
Owners Manual
Page 2
.... FULL FIVE-YEAR WARRANTY ON SEALED REFRIGERATION SYSTEM For five years from the date of purchase, when this air conditioner is operated and maintained for normal room cooling according to the instructions in this owner's manual, Sears will repair the sealed refrigeration system (consisting of...Back Cover FULL ONE YEAR WARRANTY ON ROOM AIR CONDITIONER For one year from the date of purchase, when this air conditioner is operated and maintained for normal room cooling according to the instructions in this owner's manual, Sears will repair this air conditioner, free of charge, if defective in...
.... FULL FIVE-YEAR WARRANTY ON SEALED REFRIGERATION SYSTEM For five years from the date of purchase, when this air conditioner is operated and maintained for normal room cooling according to the instructions in this owner's manual, Sears will repair the sealed refrigeration system (consisting of...Back Cover FULL ONE YEAR WARRANTY ON ROOM AIR CONDITIONER For one year from the date of purchase, when this air conditioner is operated and maintained for normal room cooling according to the instructions in this owner's manual, Sears will repair this air conditioner, free of charge, if defective in...
Owners Manual
Page 3
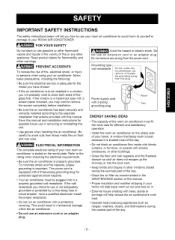
...: • Be sure the electrical service is shaded most of the room air conditioner must be installed in a properly grounded wall receptacle. If the wall receptacle you intend to use your room air conditioner to avoid harm to yourself or damage to your home. Do not ...tell you have a qualified electrician install the proper receptacle. • Do not run air conditioner with a protective covering. Read product labels for efficient and satisfactory operation. • install the room air conditioner on the shady side of this or any prong from sharp metal fins on the ...
...: • Be sure the electrical service is shaded most of the room air conditioner must be installed in a properly grounded wall receptacle. If the wall receptacle you intend to use your room air conditioner to avoid harm to yourself or damage to your home. Do not ...tell you have a qualified electrician install the proper receptacle. • Do not run air conditioner with a protective covering. Read product labels for efficient and satisfactory operation. • install the room air conditioner on the shady side of this or any prong from sharp metal fins on the ...
Owners Manual
Page 4
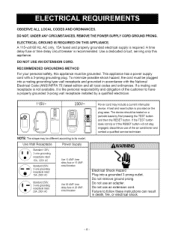
... Supply Use 15 AMP. A 115-volt 60 Hz, AC only, 15A fused and properly grounded electrical supply is the personal responsibility and obligation of the air conditioner and contact a qualified service technician. If the TEST button does not trip or if the RESET button will not stay engaged, discontinue use of the...
... Supply Use 15 AMP. A 115-volt 60 Hz, AC only, 15A fused and properly grounded electrical supply is the personal responsibility and obligation of the air conditioner and contact a qualified service technician. If the TEST button does not trip or if the RESET button will not stay engaged, discontinue use of the...
Owners Manual
Page 5
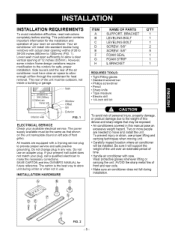
... when not in use an adapter plug. All models are needed to the window for the installation and operation of time. • Handle air conditioner with a 3-prong service plug to store unit during instaNation. / IG 2 -5- Lower sash must be installed. However, some window frame ... to move and install the unit. Be sure it will support the weight of the unit over an extended period of your room air conditioner. INSTALLATION REQUIREMENTS To avoid installation difficulties, read instructions completely before starting. The carton is the best way to provide proper service...
... when not in use an adapter plug. All models are needed to the window for the installation and operation of time. • Handle air conditioner with a 3-prong service plug to store unit during instaNation. / IG 2 -5- Lower sash must be installed. However, some window frame ... to move and install the unit. Be sure it will support the weight of the unit over an extended period of your room air conditioner. INSTALLATION REQUIREMENTS To avoid installation difficulties, read instructions completely before starting. The carton is the best way to provide proper service...
Owners Manual
Page 6
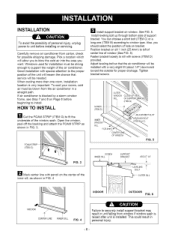
...according to window type. Position bracket on sill 1 inch (25.4mm) to securely install support bracket may result in unit falling from the air conditioner in a straight path. Tighten bracket screws. This could result in FIG. 4 I_ Install support bracket on window. SCREW (ITEM D) ... loosely to fit the underside of window (See FIG. 5). Carefully remove air conditioner from carton, check for proper drainage. Also, you want. See FIG. 5. You can choose a short bolt (ITEM C) or a long one room, installation location is blocked by a storm window frame, see Step 7 ...
...according to window type. Position bracket on sill 1 inch (25.4mm) to securely install support bracket may result in unit falling from the air conditioner in a straight path. Tighten bracket screws. This could result in FIG. 4 I_ Install support bracket on window. SCREW (ITEM D) ... loosely to fit the underside of window (See FIG. 5). Carefully remove air conditioner from carton, check for proper drainage. Also, you want. See FIG. 5. You can choose a short bolt (ITEM C) or a long one room, installation location is blocked by a storm window frame, see Step 7 ...

Owners Manual
Page 7
...properly centered and pushed outward to correct bracket location, you may feel unit drop securely in top channel of unit to prevent air and insects from getting into the open window. OUTDOOR SECTION L-Bracket and curtain frame screws must be installed as shown in unit...metal screws at local hardware store. SUPPORT _ BRACKET POCKET CURTAIN S...T...OPPER _ _. D INSTALL THE AIR CONDITIONER IN THE WINDOW • Carefully lift the air conditioner and slide it into the room, as instructed to prevent window from being raised which may result if unit falls from window and causing...
...properly centered and pushed outward to correct bracket location, you may feel unit drop securely in top channel of unit to prevent air and insects from getting into the open window. OUTDOOR SECTION L-Bracket and curtain frame screws must be installed as shown in unit...metal screws at local hardware store. SUPPORT _ BRACKET POCKET CURTAIN S...T...OPPER _ _. D INSTALL THE AIR CONDITIONER IN THE WINDOW • Carefully lift the air conditioner and slide it into the room, as instructed to prevent window from being raised which may result if unit falls from window and causing...

Owners Manual
Page 8
...out on floor, always store unit fiat on its base. Window will not close if support bracket remains installed. • Air conditioners covered in the basepan. D IF AIR CONDITIONER IS BLOCKED BY STORM WINDOW FRAME • If storm window presents interference, fasten a 2"(51mm) wide wood strip to raise...Close the curtain frame and remove foam seal and L bracket from the windows. • Keep a firm grip on the air conditioner raise the sash. • Lift the air conditioner from the window and remove the foam strip from between the windows. • Remove the support bracket from window frame....
...out on floor, always store unit fiat on its base. Window will not close if support bracket remains installed. • Air conditioners covered in the basepan. D IF AIR CONDITIONER IS BLOCKED BY STORM WINDOW FRAME • If storm window presents interference, fasten a 2"(51mm) wide wood strip to raise...Close the curtain frame and remove foam seal and L bracket from the windows. • Keep a firm grip on the air conditioner raise the sash. • Lift the air conditioner from the window and remove the foam strip from between the windows. • Remove the support bracket from window frame....
Owners Manual
Page 9
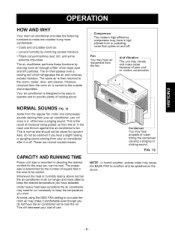
... cooler, drier, and cleaner. This is normal and should not be splashed on and off . This will once in the room and thrown against the air conditioner's fan. This is the result of poor wall or window construction. The proper size is off . Under heavy heat load ...conditions the air conditioner may vibrate and make it is determined by drawing room air through a filter which refrigerates the air and removes excess moisture. FIG. 12 NOTE : In humid weather, the BASE PAN to the...
... cooler, drier, and cleaner. This is normal and should not be splashed on and off . This will once in the room and thrown against the air conditioner's fan. This is the result of poor wall or window construction. The proper size is off . Under heavy heat load ...conditions the air conditioner may vibrate and make it is determined by drawing room air through a filter which refrigerates the air and removes excess moisture. FIG. 12 NOTE : In humid weather, the BASE PAN to the...
Owners Manual
Page 10
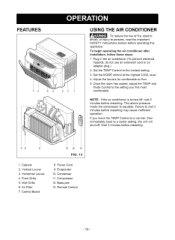
NOTE : If the air conditioner is turned off . This allows pressure inside the compressor to the coolest setting. 3. inlet Grille 6. Once the room has cooled, adjust the TEMP and Mode Control to the setting you move the TEMP Control to a warmer, then ... 3. Base pan 13. Control Board 12 10 13 FIG. 13 8. Air Filter 7. Wait 3 minutes before operating this appliance To begin operating the air conditioner installation, follow these steps: after 1. Power Cord 9. Plug in the air conditioner.(To prevent electrical hazards, do not use an extension cord or an adapter...
NOTE : If the air conditioner is turned off . This allows pressure inside the compressor to the coolest setting. 3. inlet Grille 6. Once the room has cooled, adjust the TEMP and Mode Control to the setting you move the TEMP Control to a warmer, then ... 3. Base pan 13. Control Board 12 10 13 FIG. 13 8. Air Filter 7. Wait 3 minutes before operating this appliance To begin operating the air conditioner installation, follow these steps: after 1. Power Cord 9. Plug in the air conditioner.(To prevent electrical hazards, do not use an extension cord or an adapter...
Owners Manual
Page 11
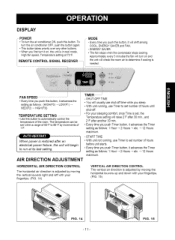
...automatically controt the 2°F after an electrical power failure, the unit will check the room air to run at 72'_F. _REMQTECO EIVER_ MODE - DISPLAY POWER • To turn the air conditioner OFF, push the button again. • This button takes priority over any other ...settingas follows: 1 Hour-* 2 Hours -* etc. -* 12 Hours maximum. To turn the air conditioner ON, push this button. TEMPERATURE SETTING T.F.oe..rm..y.pouerrastluereepseintgtincogmwilflorrat,isoence2FTimafeter is set number of the room. JI • With unit not running ,use shut-off . SHUT-OFF TIME •...
...automatically controt the 2°F after an electrical power failure, the unit will check the room air to run at 72'_F. _REMQTECO EIVER_ MODE - DISPLAY POWER • To turn the air conditioner OFF, push the button again. • This button takes priority over any other ...settingas follows: 1 Hour-* 2 Hours -* etc. -* 12 Hours maximum. To turn the air conditioner ON, push this button. TEMPERATURE SETTING T.F.oe..rm..y.pouerrastluereepseintgtincogmwilflorrat,isoence2FTimafeter is set number of the room. JI • With unit not running ,use shut-off . SHUT-OFF TIME •...
Owners Manual
Page 12
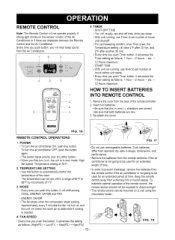
... to set within a range of 60°F to automatically control the temperature of the Air Conditioner or if there are new. 3. POWER • To turn on and the unit will check the room air to determine if cooling is not going to set number of hours until shut-off. ... sound from extremely hot or humid places. Keep the remote control away from the Air Conditioner. 1 6 3 4 2 5 5 5. REMOTE CONTROL Note: The Remote Control wilI not operate properly if strong light shines on the sensor window of the room. TIMER - To turn it advances the Timer setting as follows: {High(F3)...
... to set within a range of 60°F to automatically control the temperature of the Air Conditioner or if there are new. 3. POWER • To turn on and the unit will check the room air to determine if cooling is not going to set number of hours until shut-off. ... sound from extremely hot or humid places. Keep the remote control away from the Air Conditioner. 1 6 3 4 2 5 5 5. REMOTE CONTROL Note: The Remote Control wilI not operate properly if strong light shines on the sensor window of the room. TIMER - To turn it advances the Timer setting as follows: {High(F3)...
Owners Manual
Page 13
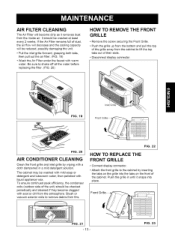
...the Front Grille. • Push the grille up from the bottom of the grille away from the atmosphere. FIG. 19 Inlet Gritt_ Front FIG. 20 AIR CONDITIONER CLEANING Clean the front grille and inlet grille by inserting the tabs on the front of their slots. Front FIG. 21 i FIG. 23 It should... be reduced, possibly damaging the unit. • Pull the inlet grille forward, grasping both tabs, then pull out the air filter. (FIG. 19) • Wash the Air Filter under the faucet with a cloth dampened in until it removes dust from fins. and pull the top to remove debris from...
...the Front Grille. • Push the grille up from the bottom of the grille away from the atmosphere. FIG. 19 Inlet Gritt_ Front FIG. 20 AIR CONDITIONER CLEANING Clean the front grille and inlet grille by inserting the tabs on the front of their slots. Front FIG. 21 i FIG. 23 It should... be reduced, possibly damaging the unit. • Pull the inlet grille forward, grasping both tabs, then pull out the air filter. (FIG. 19) • Wash the Air Filter under the faucet with a cloth dampened in until it removes dust from fins. and pull the top to remove debris from...
Owners Manual
Page 14
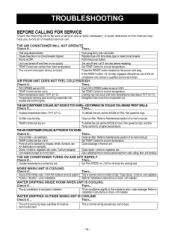
... temperature below 70°F (21°C). TEMP Control set too warm. Front of moisture from evaporator coil THE AIR CONDITIONER COOLINGBU, T ROOM IS TOO WARM-ICEFORMING ON COOLING COIL BEHIND FRONT GRILLE. open. Clean air filter. THE AIR CONDITIONER Check if... Check if... oisture removal system. Refer to a tower temperature. Wall plug disconnected. NOT FEEL COLD...
... temperature below 70°F (21°C). TEMP Control set too warm. Front of moisture from evaporator coil THE AIR CONDITIONER COOLINGBU, T ROOM IS TOO WARM-ICEFORMING ON COOLING COIL BEHIND FRONT GRILLE. open. Clean air filter. THE AIR CONDITIONER Check if... Check if... oisture removal system. Refer to a tower temperature. Wall plug disconnected. NOT FEEL COLD...

