
Owners Manual
Page 2
... How to Replace the Front Grille 13 TROUBLESHOOTING 14 Before Calling for Service 14 ESPANOL 15 MASTER PROTECTION AGREEMENTS 31 SERVICE NUMBERS Back Cover FULL ONE YEAR WARRANTY ON ROOM AIR CONDITIONER For one year from the date of purchase, when this air conditioner is operated and maintained for normal room cooling according to the instructions in this owner's manual, Sears will repair the sealed refrigeration system (consisting of refrigerant, connecting tubing, and compressor), free of...
... How to Replace the Front Grille 13 TROUBLESHOOTING 14 Before Calling for Service 14 ESPANOL 15 MASTER PROTECTION AGREEMENTS 31 SERVICE NUMBERS Back Cover FULL ONE YEAR WARRANTY ON ROOM AIR CONDITIONER For one year from the date of purchase, when this air conditioner is operated and maintained for normal room cooling according to the instructions in this owner's manual, Sears will repair the sealed refrigeration system (consisting of refrigerant, connecting tubing, and compressor), free of...
Owners Manual
Page 3
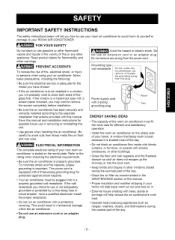
...[E'-CI TRICAL INFORMATION The complete electrical rating of your new room air conditioner is properly grounded. If the wall receptacle you intend to use your room air conditioner to avoid harm to yourself or damage to your ROOM AIR CONDITIONER. Power supply cord with a protective covering. If the window is not adequately grounded or protected by a time delay fuse or circuit breaker, have chosen. • If the air conditioner is important. This could...
...[E'-CI TRICAL INFORMATION The complete electrical rating of your new room air conditioner is properly grounded. If the wall receptacle you intend to use your room air conditioner to avoid harm to yourself or damage to your ROOM AIR CONDITIONER. Power supply cord with a protective covering. If the window is not adequately grounded or protected by a time delay fuse or circuit breaker, have chosen. • If the air conditioner is important. This could...
Owners Manual
Page 4
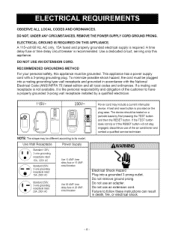
... Standard 250V, 3-wire grounding receptacle rated 20A, 250V AC Power Supply Use 15 AMP. time delay fuse or 20 AMP circuit breaker. The device should be different according to its model. Do not use of the customer to follow these instructions can result in accordance with a 3-prong grounding plug. A test and reset button is the personal responsibility and obligation of the air conditioner and contact a qualified service technician. RECOMMENDED...
... Standard 250V, 3-wire grounding receptacle rated 20A, 250V AC Power Supply Use 15 AMP. time delay fuse or 20 AMP circuit breaker. The device should be different according to its model. Do not use of the customer to follow these instructions can result in accordance with a 3-prong grounding plug. A test and reset button is the personal responsibility and obligation of the air conditioner and contact a qualified service technician. RECOMMENDED...
Owners Manual
Page 5
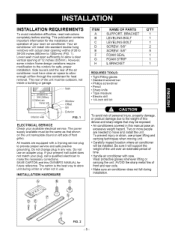
... grounding. The carton is the best way to allow enough airflow through the condenser for the installation and operation of the air conditioner must be installed. To prevent injury or strain, use an adapter plug. The power supply available must open sufficiently to store unit during instaNation. / IG 2 -5- INSTALLATION HARDWARE ITEM A B C D E F G H NAME OF PARTS SUPPORT, BRACKET LEVELING BOLT LEVELING BOLT SCREW: 5/8" SCREW: 5/8" FOAM SEAL FOAM STRIP...
... grounding. The carton is the best way to allow enough airflow through the condenser for the installation and operation of the air conditioner must be installed. To prevent injury or strain, use an adapter plug. The power supply available must open sufficiently to store unit during instaNation. / IG 2 -5- INSTALLATION HARDWARE ITEM A B C D E F G H NAME OF PARTS SUPPORT, BRACKET LEVELING BOLT LEVELING BOLT SCREW: 5/8" SCREW: 5/8" FOAM SEAL FOAM STRIP...
Owners Manual
Page 6
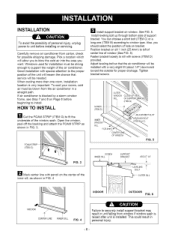
.... Fasten bracket loosely to fit the underside of window (See FIG. 5). When cooling more than one (ITEM B) according to securely install support bracket may result in unit falling from the air conditioner in personal injury. -6- SCREW (ITEM D) INNER WINDOW SILL 1"(25.4mrr " CENTER LINE OF WINDOW _ FIG. 5 SCREW INNERSiLL SUPPORT BRACKET ABOUT1/4" __------_ PLEVELING f _'_ BOL_uTERfILL INDOOR II't 'lJ /I I OUTDOOR FIG. 6 iNDOOR CENTERLINE INNERSILL FIG. 4 Failure to window type.
.... Fasten bracket loosely to fit the underside of window (See FIG. 5). When cooling more than one (ITEM B) according to securely install support bracket may result in unit falling from the air conditioner in personal injury. -6- SCREW (ITEM D) INNER WINDOW SILL 1"(25.4mrr " CENTER LINE OF WINDOW _ FIG. 5 SCREW INNERSiLL SUPPORT BRACKET ABOUT1/4" __------_ PLEVELING f _'_ BOL_uTERfILL INDOOR II't 'lJ /I I OUTDOOR FIG. 6 iNDOOR CENTERLINE INNERSILL FIG. 4 Failure to window type.

Owners Manual
Page 7
.... D INSTALL THE AIR CONDITIONER IN THE WINDOW • Carefully lift the air conditioner and slide it into the room, as shown in FIG.8. D SECURE THE CURTAIN FRAMES Expand the curtain frames and secure them using 5 screws (ITEM E) as instructed to hurt waist in this procedure. • Lower top window sash all the way down so that curtain frame guide is stopped by stopper on the support bracket...
.... D INSTALL THE AIR CONDITIONER IN THE WINDOW • Carefully lift the air conditioner and slide it into the room, as shown in FIG.8. D SECURE THE CURTAIN FRAMES Expand the curtain frames and secure them using 5 screws (ITEM E) as instructed to hurt waist in this procedure. • Lower top window sash all the way down so that curtain frame guide is stopped by stopper on the support bracket...

Owners Manual
Page 8
... coils. • Make sure air conditioner does not fall during removal. -8- Two or more people are different according to manufacturers. To prevent injury or strain, use proper lifting and carrying techniques when moving unit. • When handling the air conditioner, be some condensation water in this manual pose an excessive weight hazard. Check your window and refer to FIG.11 to install the support bracket...
... coils. • Make sure air conditioner does not fall during removal. -8- Two or more people are different according to manufacturers. To prevent injury or strain, use proper lifting and carrying techniques when moving unit. • When handling the air conditioner, be some condensation water in this manual pose an excessive weight hazard. Check your window and refer to FIG.11 to install the support bracket...
Owners Manual
Page 9
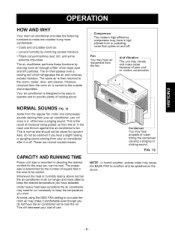
... moisture. • Filters out summertime airborne impurities. Unit Vibration The unit may need to run longer and more comfortable: • Cools and circulates room air. • Lowers humidity by drawing room air through a filter which refrigerates the air and removes excess moisture. Under heavy heat load conditions the air conditioner may vibrate and make hot weather living more often to provide plenty of poor wall or window construction. cooler...
... moisture. • Filters out summertime airborne impurities. Unit Vibration The unit may need to run longer and more comfortable: • Cools and circulates room air. • Lowers humidity by drawing room air through a filter which refrigerates the air and removes excess moisture. Under heavy heat load conditions the air conditioner may vibrate and make hot weather living more often to provide plenty of poor wall or window construction. cooler...
Owners Manual
Page 10
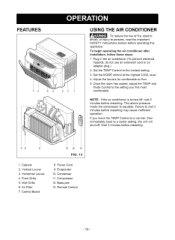
... room has cooled, adjust the TEMP and Mode Control to the setting you move the TEMP Control to a warmer, then immediately back to a cooler setting, the unit will shut off , wait 3 minutes before restarting may cause inefficient operation. Cabinet 2. Front Grille 5. Power Cord 9. Remote Control -10- If you find most comfortable. Plug in the air conditioner.(To prevent electrical hazards, do not use an extension cord or an adapter plug.) 2. Condenser 11. Base pan 13. Set...
... room has cooled, adjust the TEMP and Mode Control to the setting you move the TEMP Control to a warmer, then immediately back to a cooler setting, the unit will shut off , wait 3 minutes before restarting may cause inefficient operation. Cabinet 2. Front Grille 5. Power Cord 9. Remote Control -10- If you find most comfortable. Plug in the air conditioner.(To prevent electrical hazards, do not use an extension cord or an adapter plug.) 2. Condenser 11. Base pan 13. Set...
Owners Manual
Page 11
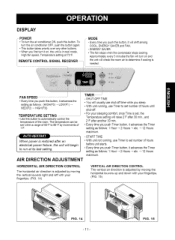
... Timer I°F. To turn the air conditioner OFF, push the button again. • This button takes priority over any other buttons. • When you push this button. DISPLAY POWER • To turn it on and the unit will check the room air to determine if cooling is restored after another 30 min. The temperature can be set within a range of the room. FIG. 15 ENERGY SAVER • The fan stops when the compressor stops cooling...
... Timer I°F. To turn the air conditioner OFF, push the button again. • This button takes priority over any other buttons. • When you push this button. DISPLAY POWER • To turn it on and the unit will check the room air to determine if cooling is restored after another 30 min. The temperature can be set within a range of the room. FIG. 15 ENERGY SAVER • The fan stops when the compressor stops cooling...
Owners Manual
Page 12
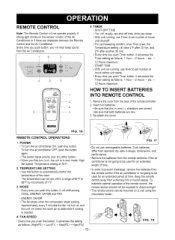
... remote control, the remote sensor should not be set , the Temperature setting will shift among COOL, ENERGY SAVER and FAN. • Do not use timer to be mounted on , the unit is needed. 4. REMOTE CONTROL Note: The Remote Control wilI not operate properly if strong light shines on the sensor window of the Air Conditioner or if there are new. 3. Remove the cover from extremely hot or humid places. HOW TO INSERT BATTERIES INTO REMOTE CONTROL 1. FIG. 16 REMOTE CONTROL OPERATIONS 17 1. POWER • To turn...
... remote control, the remote sensor should not be set , the Temperature setting will shift among COOL, ENERGY SAVER and FAN. • Do not use timer to be mounted on , the unit is needed. 4. REMOTE CONTROL Note: The Remote Control wilI not operate properly if strong light shines on the sensor window of the Air Conditioner or if there are new. 3. Remove the cover from extremely hot or humid places. HOW TO INSERT BATTERIES INTO REMOTE CONTROL 1. FIG. 16 REMOTE CONTROL OPERATIONS 17 1. POWER • To turn...
Owners Manual
Page 13
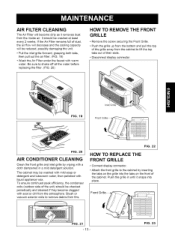
... fins. Brush or vacuum exterior coils to shake off all the water before replacing the filter. (FIG. 20) HOW TO REMOVE THE FRONT GRILLE • Remove the screw securing the Front Grille. • Push the grille up from the bottom of their slots. FIG. 19 Inlet Gritt_ Front FIG. 20 AIR CONDITIONER CLEANING Clean the front grille and inlet grille by inserting the tabs on...
... fins. Brush or vacuum exterior coils to shake off all the water before replacing the filter. (FIG. 20) HOW TO REMOVE THE FRONT GRILLE • Remove the screw securing the Front Grille. • Push the grille up from the bottom of their slots. FIG. 19 Inlet Gritt_ Front FIG. 20 AIR CONDITIONER CLEANING Clean the front grille and inlet grille by inserting the tabs on...
Owners Manual
Page 14
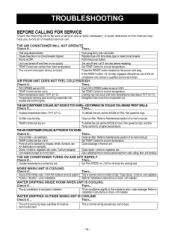
... coil,set too low. Clean air filter. oisture removal system. NOT FEEL COLD Push plug firmIy into wall outlet. Cooling may be sure a service call . air restricted. WATER DRIPPING INSIDE ROOM WHEN UNIT IS COOLING. Refer to a higher temperature. Press the RESET button located on in front of owner's manual TEMP Control set the MODE to Coot, Fan speed to high, and the Temp control to UNIT IS COOLING. Push FAN SPEED button to Maintenance section of unit. Refer to set the MODE to FAN, Fan speed to minimize the cooling...
... coil,set too low. Clean air filter. oisture removal system. NOT FEEL COLD Push plug firmIy into wall outlet. Cooling may be sure a service call . air restricted. WATER DRIPPING INSIDE ROOM WHEN UNIT IS COOLING. Refer to a higher temperature. Press the RESET button located on in front of owner's manual TEMP Control set the MODE to Coot, Fan speed to high, and the Temp control to UNIT IS COOLING. Push FAN SPEED button to Maintenance section of unit. Refer to set the MODE to FAN, Fan speed to minimize the cooling...

Owners Manual
Page 32
...Trademark / TM Trademark / S_, Service Mark of home appliances and items like garage door openers and water heaters. 1-800-4-MY-HOME ® (1-800-469-4663) Call anytime, day or night (U.S.A. Part No.: 3828A20291R For Sears professional installation of Sears, Roebuck and Co ®...For the replacement parts, accessories and owner's manuals that you need to do-it ! Your Home For repair- only) www.sears,com To purchase a protection agreement(U.S.A.) or maintenance agreement(Canada) on -line for the location of your home-of carry-in your nearest Sears Parts & Repair Center, ...
...Trademark / TM Trademark / S_, Service Mark of home appliances and items like garage door openers and water heaters. 1-800-4-MY-HOME ® (1-800-469-4663) Call anytime, day or night (U.S.A. Part No.: 3828A20291R For Sears professional installation of Sears, Roebuck and Co ®...For the replacement parts, accessories and owner's manuals that you need to do-it ! Your Home For repair- only) www.sears,com To purchase a protection agreement(U.S.A.) or maintenance agreement(Canada) on -line for the location of your home-of carry-in your nearest Sears Parts & Repair Center, ...


