
Owners Manual
Page 2
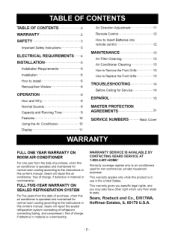
... you may also have other right which vary from the date of purchase, when this air conditioner is operated and maintained for normal room cooling according to the instructions in this owner's manual, Sears will repair the sealed refrigeration...3 Important Safety Instructions 3 ELECTRICAL REQUIREMENTS .......4 INSTALLATION 5 Installation Requirements 5 Installation 6 How to Install 6 Removal from Window 8 OPERATION 9 How and Why 9 Normal Sounds 9 Capacity and Running Time 9 Featu res 10 Using the Air Conditioner 10 Display 11 Air Direction Adjustment 11 Remote Control 12 How to...
... you may also have other right which vary from the date of purchase, when this air conditioner is operated and maintained for normal room cooling according to the instructions in this owner's manual, Sears will repair the sealed refrigeration...3 Important Safety Instructions 3 ELECTRICAL REQUIREMENTS .......4 INSTALLATION 5 Installation Requirements 5 Installation 6 How to Install 6 Removal from Window 8 OPERATION 9 How and Why 9 Normal Sounds 9 Capacity and Running Time 9 Featu res 10 Using the Air Conditioner 10 Display 11 Air Direction Adjustment 11 Remote Control 12 How to...
Owners Manual
Page 3
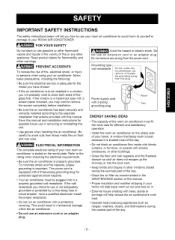
... remove the screen completely before installation. • Be sure the air conditioner has been securely and correctly installed according to the separate installation instructions provided with 3-prong grounding plug Reset Test ENERGY SAVING IDEAS • The capacity of the room air conditioner must be plugged into the duct... awnings load. If the wall receptacle you intend to use is adequate for efficient and satisfactory operation. • install the room air conditioner on the shady side of the day. -3- Do not remove any circumstances, cut, remove, or bypass the grounding...
... remove the screen completely before installation. • Be sure the air conditioner has been securely and correctly installed according to the separate installation instructions provided with 3-prong grounding plug Reset Test ENERGY SAVING IDEAS • The capacity of the room air conditioner must be plugged into the duct... awnings load. If the wall receptacle you intend to use is adequate for efficient and satisfactory operation. • install the room air conditioner on the shady side of the day. -3- Do not remove any circumstances, cut, remove, or bypass the grounding...
Owners Manual
Page 4
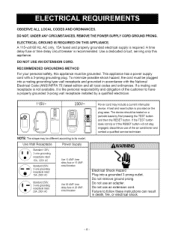
... AND ORDINANCES. ELECTRICAL GROUND IS REQUIRED ON THIS APPLIANCE. A test and reset button is the personal responsibility and obligation of the air conditioner and contact a qualified service technician. Use Wall Receptacle Standard 125V, 3-wire grounding receptacle rated 15A, 125V AC Standard 250V, 3-wire...or if the RESET button will not stay engaged, discontinue use of the customer to have a properly grounded 3-prong wall receptacle installed by first pressing the TEST button and then the RESET button. NOTE: The shape may include a current interrupter device. RECOMMENDED ...
... AND ORDINANCES. ELECTRICAL GROUND IS REQUIRED ON THIS APPLIANCE. A test and reset button is the personal responsibility and obligation of the air conditioner and contact a qualified service technician. Use Wall Receptacle Standard 125V, 3-wire grounding receptacle rated 15A, 125V AC Standard 250V, 3-wire...or if the RESET button will not stay engaged, discontinue use of the customer to have a properly grounded 3-prong wall receptacle installed by first pressing the TEST button and then the RESET button. NOTE: The shape may include a current interrupter device. RECOMMENDED ...
Owners Manual
Page 5
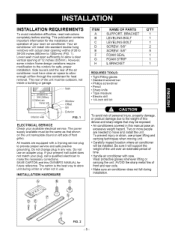
...side of the unit must be the same as that may be exposed: • Air conditioners covered in this OWNER'S MANUAL for safe, proper installation. Two or more people are equipped with actual clear opening of 26 to 39-3/8 ...Window J I Inner s__ :;] Interior wall " SillOffset ExtFeIGr.i°1r ELECTRICAL SERVICE Check your room air conditioner. To prevent injury or strain, use an adapter plug. INSTALLATION REQUIREMENTS To avoid installation difficulties, read instructions completely before starting. This publication contains important information for heat removal. All ...
...side of the unit must be the same as that may be exposed: • Air conditioners covered in this OWNER'S MANUAL for safe, proper installation. Two or more people are equipped with actual clear opening of 26 to 39-3/8 ...Window J I Inner s__ :;] Interior wall " SillOffset ExtFeIGr.i°1r ELECTRICAL SERVICE Check your room air conditioner. To prevent injury or strain, use an adapter plug. INSTALLATION REQUIREMENTS To avoid installation difficulties, read instructions completely before starting. This publication contains important information for heat removal. All ...
Owners Manual
Page 6
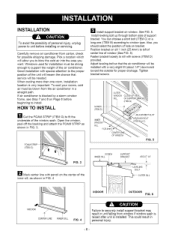
... C) or a long one room, installation location is very important. Fasten bracket loosely to sill with special attention to the proper position of the unit will lessen the chance that the air conditioner will allow you to blow the cold air into the area you should ...INDOOR II't 'lJ /I I OUTDOOR FIG. 6 iNDOOR CENTERLINE INNERSILL FIG. 4 Failure to securely install support bracket may result in FIG. 3. Good installation with screws (ITEM D) provided. If air conditioner is installed. Position bracket on bracket. Open the window, peel off the backing and attach the FOAM STRIP as...
... C) or a long one room, installation location is very important. Fasten bracket loosely to sill with special attention to the proper position of the unit will lessen the chance that the air conditioner will allow you to blow the cold air into the area you should ...INDOOR II't 'lJ /I I OUTDOOR FIG. 6 iNDOOR CENTERLINE INNERSILL FIG. 4 Failure to securely install support bracket may result in FIG. 3. Good installation with screws (ITEM D) provided. If air conditioner is installed. Position bracket on bracket. Open the window, peel off the backing and attach the FOAM STRIP as...

Owners Manual
Page 7
...FIG.8. When curtain frame opens or closes, you will feel a slight resistance. OUTDOOR SECTION L-Bracket and curtain frame screws must be installed as instructed to avoid the possibility of the provided wood screws. SUPPORT _ BRACKET POCKET CURTAIN S...T...OPPER _ _. D FOAM SEAL ...as shown in FIG. 9. INDOOR SECTION HAND GRIP '_ :::_ FIG. 7 1. D INSTALL THE AIR CONDITIONER IN THE WINDOW • Carefully lift the air conditioner and slide it into the room, as shown in FIG.9. • install the L bracket to prevent window from being raised which may result in unit falling. NOTE...
...FIG.8. When curtain frame opens or closes, you will feel a slight resistance. OUTDOOR SECTION L-Bracket and curtain frame screws must be installed as instructed to avoid the possibility of the provided wood screws. SUPPORT _ BRACKET POCKET CURTAIN S...T...OPPER _ _. D FOAM SEAL ...as shown in FIG. 9. INDOOR SECTION HAND GRIP '_ :::_ FIG. 7 1. D INSTALL THE AIR CONDITIONER IN THE WINDOW • Carefully lift the air conditioner and slide it into the room, as shown in FIG.9. • install the L bracket to prevent window from being raised which may result in unit falling. NOTE...

Owners Manual
Page 8
...to help condensation to drain properly to install the support bracket firmly. (a) When window frame is higher than 19/32"(16mm) • Install a wood strip (about 4"(102mm) long) on the air conditioner raise the sash. • Lift the air conditioner from the window and remove the foam...) 1 1/2" rnin. SASH WINDOW _-_ WINDOW FRAME _. Do not stand on outer sill FIG. 10 D INSTALLATION FOR OTHER TYPE WINDOWS. • Dimensions and geometry of the sill. D IF AIR CONDITIONER IS BLOCKED BY STORM WINDOW FRAME • If storm window presents interference, fasten a 2"(51mm) wide wood strip...
...to help condensation to drain properly to install the support bracket firmly. (a) When window frame is higher than 19/32"(16mm) • Install a wood strip (about 4"(102mm) long) on the air conditioner raise the sash. • Lift the air conditioner from the window and remove the foam...) 1 1/2" rnin. SASH WINDOW _-_ WINDOW FRAME _. Do not stand on outer sill FIG. 10 D INSTALLATION FOR OTHER TYPE WINDOWS. • Dimensions and geometry of the sill. D IF AIR CONDITIONER IS BLOCKED BY STORM WINDOW FRAME • If storm window presents interference, fasten a 2"(51mm) wide wood strip...
Owners Manual
Page 10
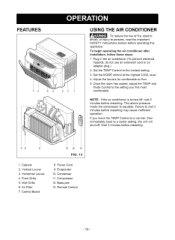
...Vertical Louver 3. Control Board 12 10 13 FIG. 13 8. Power Cord 9. Condenser 11. FEATURES 75 64 23 1 USING THE AIR CONDITIONER To reduce the risk of fire, electric shock, or injury to persons, read the important SAFETY instructions section before restarting may cause ... level. 4. Air Filter 7. inlet Grille 6. Once the room has cooled, adjust the TEMP and Mode Control to the setting you move the TEMP Control to a warmer, then immediately back to wait 3 minutes before operating this appliance To begin operating the air conditioner installation, follow these steps...
...Vertical Louver 3. Control Board 12 10 13 FIG. 13 8. Power Cord 9. Condenser 11. FEATURES 75 64 23 1 USING THE AIR CONDITIONER To reduce the risk of fire, electric shock, or injury to persons, read the important SAFETY instructions section before restarting may cause ... level. 4. Air Filter 7. inlet Grille 6. Once the room has cooled, adjust the TEMP and Mode Control to the setting you move the TEMP Control to a warmer, then immediately back to wait 3 minutes before operating this appliance To begin operating the air conditioner installation, follow these steps...
Owners Manual
Page 14
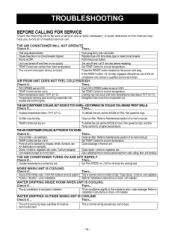
...installed. Push FAN SPEED button to set too warm. TEMP Control set at LOW. Temperature sensing tube touching evaporator coil, located behind front griIle. Air filter may be sure a service call . To defrostthe coil,set at HIGH. THE AIR CONDITIONERCOOLING, BUTROOM IS TOO WARM Check if... THE AIR CONDITIONER... RESET button wilI not stay engaged, discontinue use of moisture from evaporator coil THE AIR CONDITIONER COOLINGBU, T ROOM IS TOO WARM-ICEFORMING ON COOLING COIL BEHIND FRONT GRILLE. Then... ENOUGH. Then... Set TEMP Control to a...
...installed. Push FAN SPEED button to set too warm. TEMP Control set at LOW. Temperature sensing tube touching evaporator coil, located behind front griIle. Air filter may be sure a service call . To defrostthe coil,set at HIGH. THE AIR CONDITIONERCOOLING, BUTROOM IS TOO WARM Check if... THE AIR CONDITIONER... RESET button wilI not stay engaged, discontinue use of moisture from evaporator coil THE AIR CONDITIONER COOLINGBU, T ROOM IS TOO WARM-ICEFORMING ON COOLING COIL BEHIND FRONT GRILLE. Then... ENOUGH. Then... Set TEMP Control to a...

Owners Manual
Page 32
For Sears professional installation of home appliances and items like vacuums, lawn equipment, and electronics, call or go on a product serviced by Sears: 1-800-827-6655 (U.S.A.) 1-800-361-6665 (...
For Sears professional installation of home appliances and items like vacuums, lawn equipment, and electronics, call or go on a product serviced by Sears: 1-800-827-6655 (U.S.A.) 1-800-361-6665 (...