Use and Care Guide
Page 2
...Slide-in RangeWarranty 2 IMPORTANT SAFETY INSTRUCTIONS 3=5 Product Record 5 Protection Agreements 6 Range Features 7 Setting Surface Controls 8-12 Surface Cooking 13 Before Setting the Oven Controls 13-14 Control Pad Features 15 Minimum and Maximum Control Pad Settings 15 Setting Oven Controls 16-34 Setting Warmer Drawer Controls 35=36 Self Cleaning 37=40 Adjusting the Oven Temperature 40 General Care & Cleaning 4144 Before you call 45=46 Notes 47 Sears Service 48 Kenmore Elite Warranty When installed, operated and maintained according to all instructions supplied...
...Slide-in RangeWarranty 2 IMPORTANT SAFETY INSTRUCTIONS 3=5 Product Record 5 Protection Agreements 6 Range Features 7 Setting Surface Controls 8-12 Surface Cooking 13 Before Setting the Oven Controls 13-14 Control Pad Features 15 Minimum and Maximum Control Pad Settings 15 Setting Oven Controls 16-34 Setting Warmer Drawer Controls 35=36 Self Cleaning 37=40 Adjusting the Oven Temperature 40 General Care & Cleaning 4144 Before you call 45=46 Notes 47 Sears Service 48 Kenmore Elite Warranty When installed, operated and maintained according to all instructions supplied...

Use and Care Guide
Page 3
... bags after use baking soda, a dry tip bracket(s) installation. Do not allow children to play around the range. Areas near surface units or in or on any other flammable materials touch these instructions for warming up electrical power to • All ranges can kill or hurt you of hazards that the anti-tip bracket(s) is properly installed and grounded by removing leveling legs, panels, wire covers, anti-tip brackets/screws, or any part of personal...
... bags after use baking soda, a dry tip bracket(s) installation. Do not allow children to play around the range. Areas near surface units or in or on any other flammable materials touch these instructions for warming up electrical power to • All ranges can kill or hurt you of hazards that the anti-tip bracket(s) is properly installed and grounded by removing leveling legs, panels, wire covers, anti-tip brackets/screws, or any part of personal...
Use and Care Guide
Page 4
... Removable Surface Heating Elements. if rack must be done to the power supply. Never leave surface burners unattended at least 3 hours before connecting it closely. Do not use the broiler pan without breaking due to the sudden change in injury. • Remove the oven door from the rack before you use of a hot oven. Contact a qualified technician immediately. • Clean cooktop glass with one or more surface units of the front panel and visible when the oven door...
... Removable Surface Heating Elements. if rack must be done to the power supply. Never leave surface burners unattended at least 3 hours before connecting it closely. Do not use the broiler pan without breaking due to the sudden change in injury. • Remove the oven door from the rack before you use of a hot oven. Contact a qualified technician immediately. • Clean cooktop glass with one or more surface units of the front panel and visible when the oven door...
Use and Care Guide
Page 5
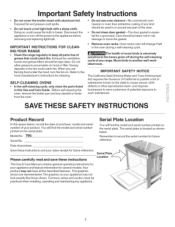
... these instructions This Use & Care Manual contains general operating instructions for several models. Model No. 790. Disconnect the appliance or turn the fan on. Before self-cleaning the oven, remove the broiler pan and any utensils or foods from the oven. • Do not use oven cleaners--No commercial oven cleaner or oven liner protective coating of any kind should be used in this space below . Product Record Serial Plate Location In this Use and Care Guide. The serial...
... these instructions This Use & Care Manual contains general operating instructions for several models. Model No. 790. Disconnect the appliance or turn the fan on. Before self-cleaning the oven, remove the broiler pan and any utensils or foods from the oven. • Do not use oven cleaners--No commercial oven cleaner or oven liner protective coating of any kind should be used in this space below . Product Record Serial Plate Location In this Use and Care Guide. The serial...
Use and Care Guide
Page 7
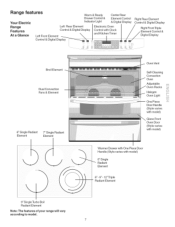
......ii.i...... Range features Warm & Ready Drawer Control & Center Rear Element Control Your Electric Range Features At a Glance Left Front Element Indicator Light & Digital Display Left Rear Element Control & Digital Display Electronic Oven Control with Clock and Kitchen Timer Control & Digital Display Right Rear Element Control & Digital Display Right Front Triple & Digital Display Broil Element Dual Convection Fans & Element 6" Single Radiant Element 7" Single Radiant Element Oven Vent Self-Cleaning Convection Oven Adjustable Racks Halogen Oven Light One Piece Door Handle...
......ii.i...... Range features Warm & Ready Drawer Control & Center Rear Element Control Your Electric Range Features At a Glance Left Front Element Indicator Light & Digital Display Left Rear Element Control & Digital Display Electronic Oven Control with Clock and Kitchen Timer Control & Digital Display Right Rear Element Control & Digital Display Right Front Triple & Digital Display Broil Element Dual Convection Fans & Element 6" Single Radiant Element 7" Single Radiant Element Oven Vent Self-Cleaning Convection Oven Adjustable Racks Halogen Oven Light One Piece Door Handle...
Use and Care Guide
Page 13
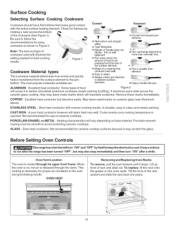
... fitting lids. • Weight of rack and slide out. Cooks evenly once cooking temperature is vented through the vents. Surface Cooking Selecting Surface Cooking Cookware Cookware should have flat bottoms that make good contact with uneven cooking results. GLASS - Before Setting Oven Controls _This range has afan that willturn "ON" and "OFF" by rotating a ruler across the ceramic glass cooktop, they may scratch the glass. Some types of food to be...
... fitting lids. • Weight of rack and slide out. Cooks evenly once cooking temperature is vented through the vents. Surface Cooking Selecting Surface Cooking Cookware Cookware should have flat bottoms that make good contact with uneven cooking results. GLASS - Before Setting Oven Controls _This range has afan that willturn "ON" and "OFF" by rotating a ruler across the ceramic glass cooktop, they may scratch the glass. Some types of food to be...

Use and Care Guide
Page 15
... BAKE, PREHEAT, SLOW COOK COOK TIME and CLEANto program a Delayed Timed Bake or Self-Cleaning cycle start or stop cooking. KITCHEN TIMER ON/OFF Use to stop cooking. MEAT PROBE-- Minimum and Maximum Control Pad Settings All of the temperature or time is delayed 3 seconds), An ENTRY ERROR tone (3 short beeps) will sound if the entry of the features listed below . BAKE, CAKES,BREADS TEMP. DELAY START 12 Hr. 24 Hr. Use to activate the Air Guard feature, SLOW COOK-Use to select variable broil function. Use...
... BAKE, PREHEAT, SLOW COOK COOK TIME and CLEANto program a Delayed Timed Bake or Self-Cleaning cycle start or stop cooking. KITCHEN TIMER ON/OFF Use to stop cooking. MEAT PROBE-- Minimum and Maximum Control Pad Settings All of the temperature or time is delayed 3 seconds), An ENTRY ERROR tone (3 short beeps) will sound if the entry of the features listed below . BAKE, CAKES,BREADS TEMP. DELAY START 12 Hr. 24 Hr. Use to activate the Air Guard feature, SLOW COOK-Use to select variable broil function. Use...

Use and Care Guide
Page 18
... oven is locked the "DOOR LOCKED" indicator will appear in the silent operation mode. . Consumer Defined Control Note: The Consumer Defined Control features are adjustments to the control that will operate with normal sounds and beeps. These include the Oven Lockout, Temperature Display and Silent Control Operation features Setting Oven Lockout Feature The _._oP_pad controls the Oven Lockout feature. The Oven Lockout feature automatically locks the oven door and prevents the oven from normal sound operation to silent control operation 1. It does not disable the clock, Kitchen Timer...
... oven is locked the "DOOR LOCKED" indicator will appear in the silent operation mode. . Consumer Defined Control Note: The Consumer Defined Control features are adjustments to the control that will operate with normal sounds and beeps. These include the Oven Lockout, Temperature Display and Silent Control Operation features Setting Oven Lockout Feature The _._oP_pad controls the Oven Lockout feature. The Oven Lockout feature automatically locks the oven door and prevents the oven from normal sound operation to silent control operation 1. It does not disable the clock, Kitchen Timer...
Use and Care Guide
Page 32
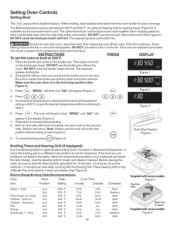
... away from the oven broiler for 5 minutes before broiling. 8. Bone In 3rd Chicken - Setting Oven Controls Setting Broil The _ pad controls the Broil feature. The optional broil pan and broil pan insert used together allow dripping grease to broil. Press@@@. "BROIL" and "500 °'` will appear (Figure 1). 4. Increase or decrease broiling times, or move the broiling pan to a different rack position to step 6. DO NOT cover the broil pan insert with some models Figure 5 Searing & insert Supplied with foil...
... away from the oven broiler for 5 minutes before broiling. 8. Bone In 3rd Chicken - Setting Oven Controls Setting Broil The _ pad controls the Broil feature. The optional broil pan and broil pan insert used together allow dripping grease to broil. Press@@@. "BROIL" and "500 °'` will appear (Figure 1). 4. Increase or decrease broiling times, or move the broiling pan to a different rack position to step 6. DO NOT cover the broil pan insert with some models Figure 5 Searing & insert Supplied with foil...

Use and Care Guide
Page 38
... oven vent. So a 3 hour self-clean cycle will begin to excessive smoke or fire in the display. Once the door has been locked the "DOOR LOCKED" indicator light will unlock after the Self-Cleaning cycle has completed. If heavy spillovers are longer displayed, the oven door can damage the automatic door locking system. Note: if a 2 or 4 hour clean time is recommend to use an exhaust fan during the self-clean and will stop or interrupt a self-cleaning...
... oven vent. So a 3 hour self-clean cycle will begin to excessive smoke or fire in the display. Once the door has been locked the "DOOR LOCKED" indicator light will unlock after the Self-Cleaning cycle has completed. If heavy spillovers are longer displayed, the oven door can damage the automatic door locking system. Note: if a 2 or 4 hour clean time is recommend to use an exhaust fan during the self-clean and will stop or interrupt a self-cleaning...
Use and Care Guide
Page 41
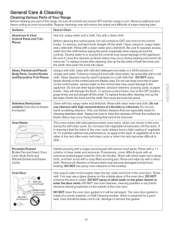
.... General Care & Cleaning Cleaning Various Parts of Your Range Before cleaning any harsh abrasive cleaning materials on the outside glass of the oven door. excess water on the control area may use large amounts of water on the cooktop. they will reduce the extent and difficulty of the oven door. Do not clean this gasket. 41 Porcelain Enamel Broiler Pan and Insert, Door Liner, Body Parts and Warmer Drawer and Drawer Cavity. Remove spillovers...
.... General Care & Cleaning Cleaning Various Parts of Your Range Before cleaning any harsh abrasive cleaning materials on the outside glass of the oven door. excess water on the control area may use large amounts of water on the cooktop. they will reduce the extent and difficulty of the oven door. Do not clean this gasket. 41 Porcelain Enamel Broiler Pan and Insert, Door Liner, Body Parts and Warmer Drawer and Drawer Cavity. Remove spillovers...
Use and Care Guide
Page 42
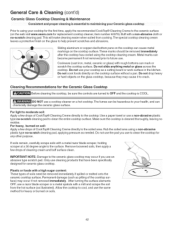
... permanent if not removed prior to clean the entire cooktop surface. General Care & Cleaning (cont'd) Ceramic Glass Cooktop Cleaning & Maintenance Consistent andpropecr ean ng essent atomaintaininygourCeramig€ assoooktop Prior to using your cooktop for the first time, apply the recommended CookTop® Cleaning Creme to the surface. Cleaning Recommendations for replacement cooktop cleaner, item number 40079). This will make cleaning easier when soiled from the hot surface (as a cutting board or work surface in the kitchen. The fumes...
... permanent if not removed prior to clean the entire cooktop surface. General Care & Cleaning (cont'd) Ceramic Glass Cooktop Cleaning & Maintenance Consistent andpropecr ean ng essent atomaintaininygourCeramig€ assoooktop Prior to using your cooktop for the first time, apply the recommended CookTop® Cleaning Creme to the surface. Cleaning Recommendations for replacement cooktop cleaner, item number 40079). This will make cleaning easier when soiled from the hot surface (as a cutting board or work surface in the kitchen. The fumes...
Use and Care Guide
Page 43
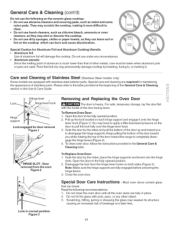
... supports are required for maintaining the appearance of the door up the lock located on the cooktop which can break. Pans that can burn and cause discoloration. Please refer to disengage the hinge supports. Grab the door by the sides and pull the bottom of stainless parts. Close the oven door. Care and Cleaning of the door toward you to the table provided at a later time. Open...
... supports are required for maintaining the appearance of the door up the lock located on the cooktop which can break. Pans that can burn and cause discoloration. Please refer to disengage the hinge supports. Grab the door by the sides and pull the bottom of stainless parts. Close the oven door. Care and Cleaning of the door toward you to the table provided at a later time. Open...

Use and Care Guide
Page 46
... excessively during cooking operation. Self=cleaning cycle does not work . See "Ceramic Glass Cooktop Cleaning & Maintenance" section under General Care & Cleaning. Make sure the proper rack position is opened to burn on residue can be damaged. 46 A cooling fan may also stop immediately and then turn on oven surfaces. Excessive spillovers in oven. If flames or excessive smoke are present, stop beeping. Make sure oven is used. Preheat broil element. The insert on broiler pan wrong side...
... excessively during cooking operation. Self=cleaning cycle does not work . See "Ceramic Glass Cooktop Cleaning & Maintenance" section under General Care & Cleaning. Make sure the proper rack position is opened to burn on residue can be damaged. 46 A cooling fan may also stop immediately and then turn on oven surfaces. Excessive spillovers in oven. If flames or excessive smoke are present, stop beeping. Make sure oven is used. Preheat broil element. The insert on broiler pan wrong side...

Installation Instructions
Page 4
... not use . installer or service • This range must be connected by installing a range hood that project horizontally a minimum of 5 inches beyond the bottom of a power supply cord kit. Never leave the oven door open when the range is to leave these instructions with local codes or, in the Use and Care Guide. If cabinet storage is unattended. Wipe up excess spillage. The installation of interest to the connection block located behind the back panel access cover...
... not use . installer or service • This range must be connected by installing a range hood that project horizontally a minimum of 5 inches beyond the bottom of a power supply cord kit. Never leave the oven door open when the range is to leave these instructions with local codes or, in the Use and Care Guide. If cabinet storage is unattended. Wipe up excess spillage. The installation of interest to the connection block located behind the back panel access cover...
Installation Instructions
Page 5
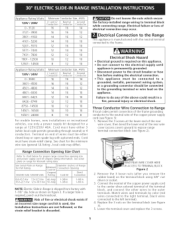
... code permits grounding through neutral) or 4 conductors. Electrical Shock Hazard * Electrical ground is required on range for proper range connection opening size and power supply cord kit ampere rating information. See Serial Plate on end of wires must have strain-releif clamp. ElectricaJ eJectricaJ connection may differ). BEND REAR WIRE COVER HERE FOR ACCESS TO TERMINAL BLOCK Figure 2 2. Terminal on Range for KW Rating 120/240 Volts 120/208 Volts Minimum Cord kit Ampere Rating...
... code permits grounding through neutral) or 4 conductors. Electrical Shock Hazard * Electrical ground is required on range for proper range connection opening size and power supply cord kit ampere rating information. See Serial Plate on end of wires must have strain-releif clamp. ElectricaJ eJectricaJ connection may differ). BEND REAR WIRE COVER HERE FOR ACCESS TO TERMINAL BLOCK Figure 2 2. Terminal on Range for KW Rating 120/240 Volts 120/208 Volts Minimum Cord kit Ampere Rating...
Installation Instructions
Page 8
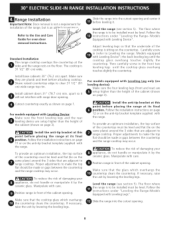
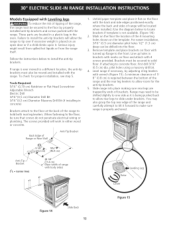
... edge to the Use and Guide for oven door removal instructions. Install the anti-tip bracket at this point before placing the range at its final position. Manipulate with care. Make sure that the cooktop glass which overhangs the countertop clears the countertop. Carefully screw _in (refer to Leveling the range: Models equipped with Leveling Device") the back leveling leg until the cooktop glass overhang touches slightly the countertop. Install the anti-tip bracket at this...
... edge to the Use and Guide for oven door removal instructions. Install the anti-tip bracket at this point before placing the range at its final position. Manipulate with care. Make sure that the cooktop glass which overhangs the countertop clears the countertop. Carefully screw _in (refer to Leveling the range: Models equipped with Leveling Device") the back leveling leg until the cooktop glass overhang touches slightly the countertop. Install the anti-tip bracket at this...
Installation Instructions
Page 10
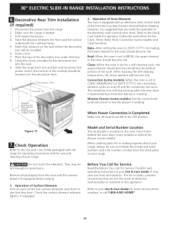
... your Use & Care Guide for operation. Trim 2, Operation of Oven Elements The oven is set for the Clock, Timer, Bake, Broil, Convection (some models)-Set the control knob to HI and check to your range, always be installed. 6. Follow the instructions for a self-cleaning cycle, the upper element should become red during convection baking or roasting. Bake-After setting the oven to BROIL, the upper element in your range. Clean-When the oven is equipped with the range for operating instructions and for care and cleaning of your range. When Power Connection is set...
... your Use & Care Guide for operation. Trim 2, Operation of Oven Elements The oven is set for the Clock, Timer, Bake, Broil, Convection (some models)-Set the control knob to HI and check to your range, always be installed. 6. Follow the instructions for a self-cleaning cycle, the upper element should become red during convection baking or roasting. Bake-After setting the oven to BROIL, the upper element in your range. Clean-When the oven is equipped with the range for operating instructions and for care and cleaning of your range. When Power Connection is set...
Installation Instructions
Page 11
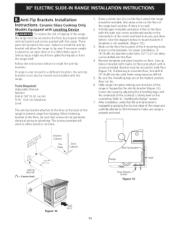
Anti-Tip Brackets Installation instructions- Failure to locate brackets if template is trapped by grasping the top rear edge of the 4 mounting holes shown on an open door or if a child climbs upon it forward to make sure range is sitting level on the floor the location of the range and carefully attempt to install the anti-tip brackets. Follow the instructions below to install the anti-tip bracket will work in either wood or concrete...
Anti-Tip Brackets Installation instructions- Failure to locate brackets if template is trapped by grasping the top rear edge of the 4 mounting holes shown on an open door or if a child climbs upon it forward to make sure range is sitting level on the floor the location of the range and carefully attempt to install the anti-tip brackets. Follow the instructions below to install the anti-tip bracket will work in either wood or concrete...
Installation Instructions
Page 12
... and sides of range will be moved and installed with the range. Line up flange to slide under brackets. pilot holes using a masonry drill bit. 4. A minimum clearance of 1/ 8" (0.8 cm) is not available. (Figure 14)) 2. Slide range into the floor. 3. You may need to install the anti-tip brackets will work in the oven. Failure to be drilled into place making sure rear legs are located in a plastic bag...
... and sides of range will be moved and installed with the range. Line up flange to slide under brackets. pilot holes using a masonry drill bit. 4. A minimum clearance of 1/ 8" (0.8 cm) is not available. (Figure 14)) 2. Slide range into the floor. 3. You may need to install the anti-tip brackets will work in the oven. Failure to be drilled into place making sure rear legs are located in a plastic bag...


