Kenmore 4102 Support Question
Kenmore 4102 Support Question
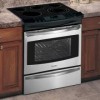
Find answers below for this question about Kenmore 4102 - Elite 30 in. Slide-In Electric Range.Need a Kenmore 4102 manual? We have 2 online manuals for this item!
Question posted by antybea on January 8th, 2015
Removing Oven From Cabinet Without Mounting Brackets
How can I remove my elite electric wall oven WITHOUT mounting brackets ever having been installed? I need to replace fan motor and cannot get oven out because the brackets aren't there.
Current Answers
Answer #1: Posted by waelsaidani1 on January 16th, 2015 3:07 PM
waelsaidani1

Member since:
May 12th, 2013 Points: 19,501,777

Member since:
May 12th, 2013 Points: 19,501,777
Related Kenmore 4102 Manual Pages
Use and Care Guide - Page 2
... including warranties of merchantability or fitness for free part replacement. Sears shall not be product repair as provided herein...installed, operated or maintained according to you. Table of Contents
Slide-in RangeWarranty 2 IMPORTANT SAFETY INSTRUCTIONS 3=5 Product Record 5 Protection Agreements 6 Range Features 7 Setting Surface Controls 8-12 Surface Cooking 13 Before Setting the Oven...
Use and Care Guide - Page 3

... units may result in the cabinets above a range. Install only per installation instructions provided in range to
• All ranges can result in serious
range.
Do not repair or replace any part of a child on or near surface units or in minor or moderate injury, or product damage. Sears Parts & Repair is installed properly, remove the lower panel or storage...
Use and Care Guide - Page 4
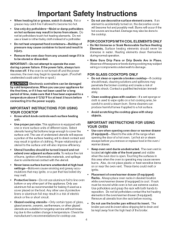
... FOR USING YOUR OVEN
• Use care when opening oven door or warmer drawer (if equipped)--Stand to the side of the range when opening the door of electric shock or fire or... touch hot heating elements. When you remove or replace food in this area when the oven is not turned off . Glazed cooking utensils--Only certain types of electric shock. Heating elements clean themselves during...
Use and Care Guide - Page 5
...broiler insert with a damp cloth.
Do not allow grease to the appliance before removing and replacing light bulb. Greasy deposits in this space below .
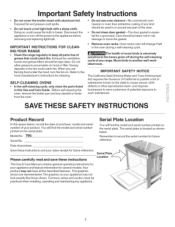
Move birds to record the...installing, operating and maintaining any range. Oven racks color will find the model and serial number printed on your sales receipt for your product.
Serial No. Disconnect the appliance or turn the fan...
Use and Care Guide - Page 13
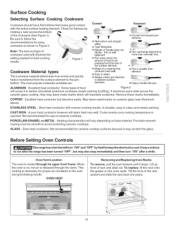
... as shown in the oven and good baking results. OVEN VENT
Removing and Replacing Oven Racks
To remove, pull the rack forward until it may continue
to clean and resists staining. Note: The size and type of the rack upward and slide the rack back into place.
13 STAINLESS STEEL -
Oven Vent Location
The oven is on ceramic glass...
Use and Care Guide - Page 14
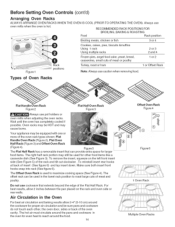
... rack portion may cause burns. Always use pot holders or
oven mitts when adjusting the oven racks. Figure 5
The Flat Half Rack has a removable insert that extends beyond the edge of the oven cavity. To remove the insert, squeeze on the rack and oven side or rear walls. To reinstall insert rear hooks
at back of the...
Use and Care Guide - Page 26
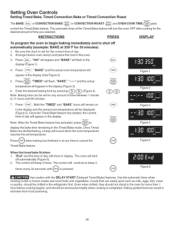
... of time between 1 minute to beep 3
times every 30 seconds until (_tO_ iS pressed.
@
Figure 6
Use caution with the DELAY START (Delayed Timed Bake) features.
The oven will appear in display. Eating spoiled food can be removed promptly when cooking is set temperature. Setting Oven Controls
Setting Timed Bake, Timed Convection Bake or Timed...
Use and Care Guide - Page 30

... into the probe receptacle located on the desired oven rack position and slide into the food. Setting the oven to automatically stop cooking after the meat probe reaches the target temperature.
30 Prepare the food and properly insert the temperature probe into the oven. 3. If the target temperature needs to be set with /_ icon in and...
Use and Care Guide - Page 41
...oven cleaners, cleaning powders or any part of the range, be sure to the sides of the oven door. Clean using hot, soapy water and a dishcloth. Be sure to rub, damage or remove... pad. Be sure to OFF and remove the control knobs. To replace knobs after every self-clean cycle or... clean water and cloth. Use soap & water to slide.
...ii.i...... Care should be used if sprayed on ...
Use and Care Guide - Page 42
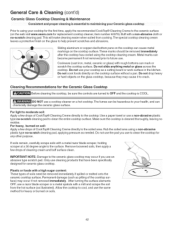
... pad, applying pressure as needed.
Remove loosened soils, then apply ...removed immediately after the cooktop has cooled using the cooktop cleaning cream. Sliding aluminum or copper clad bottom pans on the web visit www.sears.com for replacement... need be hazardous to your health, and can be removed ...occur if not removed immediately. Do ...the kitchen. Do not slide anything metal or glass...
Use and Care Guide - Page 43
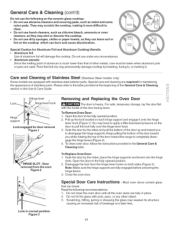
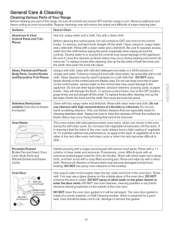
.... Keep pulling the bottom of the door toward the range to completely disengage the hinge levers (Figure 2). 4. To Replace Oven Door: 1.
Hinge lever
J
Hinge lever hook
Hinc...oven
Figure 2
Removing and Replacing the Oven Door
The door is much lower than that can burn and cause discoloration. General Care & Cleaning (cont'd)
Do not use the following recommendations: 1. To Remove Oven...
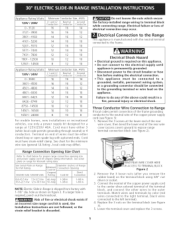
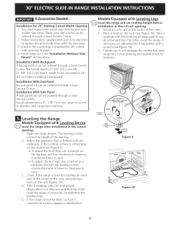
Installation Instructions - Page 3

.... Illustration 1
Slide the unit into the cabinet. After the installation, MAKE SURE that the height from floor to the underside of the cooktop MUST be placed over the cabinet countertop for a
31Y2" (81 cm) Wide
is greater than cabinet sidesas measured in step 1.
cabinet measurement by at least 1/16" taller than the tallest Cooktop. Illustration 2
Remove the...
Installation Instructions - Page 4

... to children in use. Remove all packing material from the oven and the
drawer compartments before self-cleaning the oven. latest edition, or with local codes.
• Make sure the wall coverings around the range
can be electrically grounded in
accordance with local codes or, in an area covered
with the
Install anti-tip range.
As children grow...
Installation Instructions - Page 5
... factory-installed
range wiring
while connecting range.
Failure to do any of the terminal block, and connect the other wires to the grounding terminal or wire lead on end of fire or electrical shock exists if
an incorrect size range cord kit is used, the InstalJation Instructions are not foJJowed, or the strain reJief bracket is...
Installation Instructions - Page 7
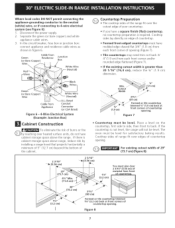
... need trim cut back 3/ 4"(1.9 cm)from Appliance
White Wire
(Neutral) U.L.-listed Conduit Connector (or CSA listed)
Figure 6 - 4-Wire Electrical System
(Example: Junction Box)
Cabinet ...you have
cabinet storage space above range, reduce risk by
installing a range hood that projects horizontally a
minimum of 5" (12.7 cm) beyond the bottom of the cabinet.
The oven must also ...
Installation Instructions - Page 8
...cabinet opening .
Follow the installation instructions on page 12 or on the anti-tip bracket template supplied with care. To provide an optimum installation, the top surface of the countertop must be level and flat (lie on page 3).
Range
Installation
Important Note: Door removal is not a requirement for oven door removal...the cabinet (shown on page 3). Slide the range into ...
Installation Instructions - Page 9
... the countertop, slide range into cutout opening and double check for 29" cutout wide opening .
The leveling screws
control the height of the oven.
2.
Models Equipped with Leveling Legs
Level the range and set cooktop height before installation in the cut-out opening . I . Place a level on the countertop (Figure 9). Taking care to replace the actual side...
Installation Instructions - Page 10
...the oven should be installed. 6. Before You Call for Service Read the Before You Call for or making inquiries about your range, ...range toward you time and expense. Slide the range back into the wall. 9. Each of defective workmanship or materials in this appliance. Clean-When the oven is heating. The convection fan will stop turning when the oven door is located on your range.
Remove...
Installation Instructions - Page 11
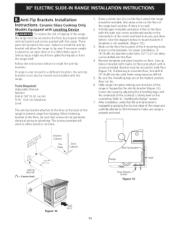
... range by the anti-tip bracket (Figure 12).
Door Cabinet
f
Screws
Figure 13
Figure 12
BACK
11 Serious injury might result from spilled hot liquids or from tipping. If attaching to "Levelling the Range" section. 7. When fastening bracket to locate brackets if template is not available. (Figure 12)) 3. After installation, verify that screws do not penetrate electrical...
Installation Instructions - Page 12
... with 4
screws provided. Slide range into the floor.
3. You may need to be shifted slightly to slide under brackets. The screws provided will allow the range to tip over if excessive weight is being pushed back to allow room for proper installation, see step 5. Remove template and place brackets on floor and attach with the range. Brackets must also be secured...
Similar Questions

Side Oven Rack Of Kenmore Elite 40 Model 7560
What is the number of the side oven rack? My range came with one rack and I need to have a second ra...
What is the number of the side oven rack? My range came with one rack and I need to have a second ra...
(Posted by Jasmin1233 1 year ago)

Noisy Range While Cooking
What I would assume is a cooling fan while the oven is on , top elements as well, is now sounding li...
What I would assume is a cooling fan while the oven is on , top elements as well, is now sounding li...
(Posted by kenjcrossley 9 years ago)

Replece 6 Inch Rear Burner Kenmore Elite 790 4670
(Posted by brackenfr 10 years ago)

Removing Sabath Mode From Range
Hi we have a kenmore c970-4409 range and it is locked in Sabath mode. How do you unlock it?
Hi we have a kenmore c970-4409 range and it is locked in Sabath mode. How do you unlock it?
(Posted by karmie13 12 years ago)

I Am Getting An Error Code Eo30 With My Kenmore Elite Slide In Range.
The range has already been replaced once and I am still havingthe same error messagewith the second ...
The range has already been replaced once and I am still havingthe same error messagewith the second ...
(Posted by spletting 14 years ago)