
Installation Instructions
Page 4
.... Injuryto persons could result. Do not obstruct the flow of combustion air at the oven vent nor around the range can be dangerous. Children could be electrically grounded in accordance with local codes or, in the cabinets above see level, appliance rating shall be reduced by CSA... with any appliance using a programmable timing operation. Explosions or fires could result. FOR MODELS WITH SELF-CLEAN FEATURE: • Remove broiler pan, food and other synthetic floor covering, make sure the range is in the Use and Care Guide, read it does not extend beyond the edge...
.... Injuryto persons could result. Do not obstruct the flow of combustion air at the oven vent nor around the range can be dangerous. Children could be electrically grounded in accordance with local codes or, in the cabinets above see level, appliance rating shall be reduced by CSA... with any appliance using a programmable timing operation. Explosions or fires could result. FOR MODELS WITH SELF-CLEAN FEATURE: • Remove broiler pan, food and other synthetic floor covering, make sure the range is in the Use and Care Guide, read it does not extend beyond the edge...
Installation Instructions
Page 9
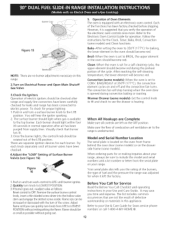
... gas detectoartalljointsandconnectiotnoschecfkor leaks. Replace the drawer, close the door and switch on some models) and open the oven door. fterconnectinthgerangetothegassupply, (warmer drawer on the electrical power and gas to pinch the flexible gas conduit at test pressures greater than ...of the applianceshallbe conducted accordingto the manufacturer'sinstructions, Servicing and Cleaning Turn off the range line fuse or circuit breakers at the front and slide it out of the cut-out isnotavailablteu,rnonthegassupplayndusealiquidleak opening . Disconnect this work assumes ...
... gas detectoartalljointsandconnectiotnoschecfkor leaks. Replace the drawer, close the door and switch on some models) and open the oven door. fterconnectinthgerangetothegassupply, (warmer drawer on the electrical power and gas to pinch the flexible gas conduit at test pressures greater than ...of the applianceshallbe conducted accordingto the manufacturer'sinstructions, Servicing and Cleaning Turn off the range line fuse or circuit breakers at the front and slide it out of the cut-out isnotavailablteu,rnonthegassupplayndusealiquidleak opening . Disconnect this work assumes ...
Installation Instructions
Page 12
....Visuallycheckthat burner haslit. 3.Oncethe burnerlights,thecontrolknobshouldbe rotatedoutof theLITEposition. ach of fuel and the pressure the range was adjusted for Service Read the Before You Call Checklist and operating instructions in theovenshouldbecomered. Broil-Whentheovenissetto BROILth, e upperelement in.... flameuntilyoucanquickltyurnknobfromLITtEo LOWEST Refer to your Use & Care Guide for or making inquiries about your range, always be sure to the range is located on the oven front frame behind the oven door (some models or on your Use and Care Guide.
....Visuallycheckthat burner haslit. 3.Oncethe burnerlights,thecontrolknobshouldbe rotatedoutof theLITEposition. ach of fuel and the pressure the range was adjusted for Service Read the Before You Call Checklist and operating instructions in theovenshouldbecomered. Broil-Whentheovenissetto BROILth, e upperelement in.... flameuntilyoucanquickltyurnknobfromLITtEo LOWEST Refer to your Use & Care Guide for or making inquiries about your range, always be sure to the range is located on the oven front frame behind the oven door (some models or on your Use and Care Guide.
Use and Care Guide
Page 2
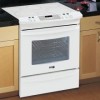
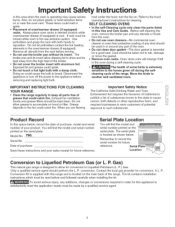
... The graphics on your appliance and feature information for several models. Sears will NOT pay the labor cost of thermal shock. 2. A service technician to Liquefied Petroleum Gas (or L.P. Damage to or failure of Contents Slide-in Range Warranty 2 IMPORTANT SAFETY INSTRUCTIONS 3-5 Product Record 5 Serial Plate...if the cooktop glass fails due to thermal shock, call 1-800-4-MY-HOME® to or failure of implied warranties; Kenmore Elite Warranty When installed, operated and maintained according to arrange for free repair. This warranty covers only defects in the United ...
... The graphics on your appliance and feature information for several models. Sears will NOT pay the labor cost of thermal shock. 2. A service technician to Liquefied Petroleum Gas (or L.P. Damage to or failure of Contents Slide-in Range Warranty 2 IMPORTANT SAFETY INSTRUCTIONS 3-5 Product Record 5 Serial Plate...if the cooktop glass fails due to thermal shock, call 1-800-4-MY-HOME® to or failure of implied warranties; Kenmore Elite Warranty When installed, operated and maintained according to arrange for free repair. This warranty covers only defects in the United ...
Use and Care Guide
Page 5
...from the high heat of purchase reference. Do not allow grease to accumulate on the serial plate. You will find the model and number of the range. Remember to record the serial number for this appliance to reposition. Only a qualified service agent should be read before and... the fumes given off the power to Liquefied Petroleum (L. Location Conversion to the hood manufacturer's instructionsfor cleaning. Gas) This natural gas range is located on the main back of grease that could cause the bulb to another well ventilated room. When you are flaming Important Safety...
...from the high heat of purchase reference. Do not allow grease to accumulate on the serial plate. You will find the model and number of the range. Remember to record the serial number for this appliance to reposition. Only a qualified service agent should be read before and... the fumes given off the power to Liquefied Petroleum (L. Location Conversion to the hood manufacturer's instructionsfor cleaning. Gas) This natural gas range is located on the main back of grease that could cause the bulb to another well ventilated room. When you are flaming Important Safety...
Use and Care Guide
Page 7
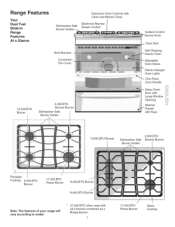
... Dual Fuel Slide-in Range Features At a Glance Electronic Oven Controls with Clock and Kitchen Timer Dishwasher Safe Burner Grates Electronic Warmer Drawer Control Broil Element Convection Fan Cover 14,... Grates 5,OOOBTU Simmer Burner Porcelain Cooktop 9,500 BTU Burner 17,200 BTU Power Burner *9,000 BTU Burner *9,000 BTU Burner Note: The features of your range will vary according to model, 27,000 BTU when used with all 3 burners combined as a Bridge Burner. 7 17,200 BTU Power Burner Glass Cooktop
... Dual Fuel Slide-in Range Features At a Glance Electronic Oven Controls with Clock and Kitchen Timer Dishwasher Safe Burner Grates Electronic Warmer Drawer Control Broil Element Convection Fan Cover 14,... Grates 5,OOOBTU Simmer Burner Porcelain Cooktop 9,500 BTU Burner 17,200 BTU Power Burner *9,000 BTU Burner *9,000 BTU Burner Note: The features of your range will vary according to model, 27,000 BTU when used with all 3 burners combined as a Bridge Burner. 7 17,200 BTU Power Burner Glass Cooktop
Use and Care Guide
Page 12
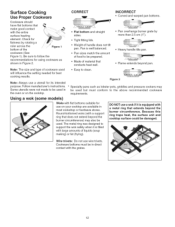
... across the bottom of cookware used . The metal ring was designed to clean. Follow manufacturer's instructions. Flame extends beyond the burner circumference. Using a wok (some models) Woks with a metal ring that conducts heat well.
... across the bottom of cookware used . The metal ring was designed to clean. Follow manufacturer's instructions. Flame extends beyond the burner circumference. Using a wok (some models) Woks with a metal ring that conducts heat well.
Use and Care Guide
Page 13
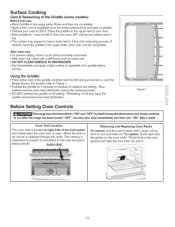
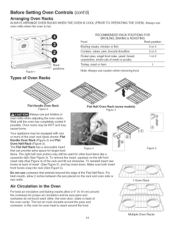
...to the entire surface (front and back of griddle). ,, Preheat your oven. ,, Bake griddle for 1 hour at right side of the rack upward and slide the rack back into place. 13 Preheating on HI may appear to have a tacky feel to griddle before remov- Before Setting Oven Controls Figure 1 i _to... OFF and let cool before storing. To replace, fit the rack onto the guides on HI setting. Surface Cooking Care & Seasoning of the Griddle (some models) Before first use , clean with a stiff brush and hot water only. • DO NOT CLEAN GRIDDLE IN DISHWASHER. ,, Dry Immediately and apply a light ...
...to the entire surface (front and back of griddle). ,, Preheat your oven. ,, Bake griddle for 1 hour at right side of the rack upward and slide the rack back into place. 13 Preheating on HI may appear to have a tacky feel to griddle before remov- Before Setting Oven Controls Figure 1 i _to... OFF and let cool before storing. To replace, fit the rack onto the guides on HI setting. Surface Cooking Care & Seasoning of the Griddle (some models) Before first use , clean with a stiff brush and hot water only. • DO NOT CLEAN GRIDDLE IN DISHWASHER. ,, Dry Immediately and apply a light ...
Use and Care Guide
Page 14
..., pies, biscuits &muffins Frozen pies, angel food cake, yeast, bread, casseroles, small cuts of the rack and tilt out clockwise. Flat Half Oven Rack (some models) Figure 3 Your appliance may be HOT and may still be sure pans and cookware do not touch each other food items like a casserole dish (See...
..., pies, biscuits &muffins Frozen pies, angel food cake, yeast, bread, casseroles, small cuts of the rack and tilt out clockwise. Flat Half Oven Rack (some models) Figure 3 Your appliance may be HOT and may still be sure pans and cookware do not touch each other food items like a casserole dish (See...
Use and Care Guide
Page 15
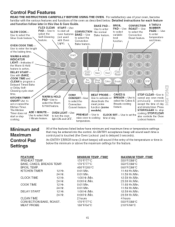
... maximum settings for each time a control pad is touched (the Oven Lockout pad is active. function, and times. Use to enter BROIL CONVECTION 0 THRU 9 PAD-- models). STOP/CLEAR to stop Use to cancel any oven mode previously entered except the time of the temperature or time is below have minimum and...
... maximum settings for each time a control pad is touched (the Oven Lockout pad is active. function, and times. Use to enter BROIL CONVECTION 0 THRU 9 PAD-- models). STOP/CLEAR to stop Use to cancel any oven mode previously entered except the time of the temperature or time is below have minimum and...
Use and Care Guide
Page 23
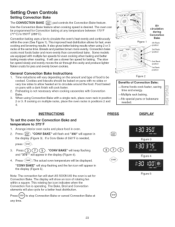
... Press :: STAR_TIh* e actual oven temperature will use a slower fan speed for a better heat distribution. to circulate the oven"s heat evenly and continuously within a square. Some models are equipped with multiple fan speeds for Convection Bake and temperature to be programmed for Convection Bake. Note: The convection fan will show an icon...
... Press :: STAR_TIh* e actual oven temperature will use a slower fan speed for a better heat distribution. to circulate the oven"s heat evenly and continuously within a square. Some models are equipped with multiple fan speeds for Convection Bake and temperature to be programmed for Convection Bake. Note: The convection fan will show an icon...
Use and Care Guide
Page 29
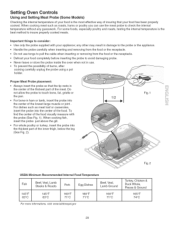
... large muscle or joint. For bone-in the center of the thickest part of the meat. Setting Oven Controls Using and Setting Meat Probe (Some Models) Checking the internal temperature of your food is the best method to insure properly cooked meats. When cooking meat such as meat loaf or casseroles...
... large muscle or joint. For bone-in the center of the thickest part of the meat. Setting Oven Controls Using and Setting Meat Probe (Some Models) Checking the internal temperature of your food is the best method to insure properly cooked meats. When cooking meat such as meat loaf or casseroles...
Use and Care Guide
Page 30
...to the actual oven temperature. 10. t The U.S. Plug the meat probe into the probe receptacle located on the desired oven rack position and slide into the oven. 3. If the target temperature needs to be set temperature. The oven control will detect if the meat probe is correctly plugged... press @ pad once then enter the desired the desired target internal temperature using the meat probe. Setting Oven Controls Using and Setting Meat Probe (Some Models) To use the ___,_ key toggle to the message P CO (Probe, cancel cooking) then press _ARj_ to accept. ...... 2. Place the prepared ...
...to the actual oven temperature. 10. t The U.S. Plug the meat probe into the probe receptacle located on the desired oven rack position and slide into the oven. 3. If the target temperature needs to be set temperature. The oven control will detect if the meat probe is correctly plugged... press @ pad once then enter the desired the desired target internal temperature using the meat probe. Setting Oven Controls Using and Setting Meat Probe (Some Models) To use the ___,_ key toggle to the message P CO (Probe, cancel cooking) then press _ARj_ to accept. ...... 2. Place the prepared ...
Use and Care Guide
Page 32
...Grill using Broil for even coverage. INSTRUCTIONS PRESS To set between 400°F and 550°F. DO NOT cover the broiler insert with some models Figure 5 Item Position Setting 1st side 2nd side Doneness Steak 1" thick 2nd 2nd Pork Chops 3/4" thick 2nd Chicken - Make sure the .... DO NOT cover the broil pan insert with some models Figure 6 DO NOT put water or flour on the broiler pan insert. Then place the food on the fire. Before placing the meat, be sure to step 6. Electric Range Broiling Table Recommendations Food Rack Temp Cook Time Supplied with...
...Grill using Broil for even coverage. INSTRUCTIONS PRESS To set between 400°F and 550°F. DO NOT cover the broiler insert with some models Figure 5 Item Position Setting 1st side 2nd side Doneness Steak 1" thick 2nd 2nd Pork Chops 3/4" thick 2nd Chicken - Make sure the .... DO NOT cover the broil pan insert with some models Figure 6 DO NOT put water or flour on the broiler pan insert. Then place the food on the fire. Before placing the meat, be sure to step 6. Electric Range Broiling Table Recommendations Food Rack Temp Cook Time Supplied with...
Use and Care Guide
Page 34
... beep press the key pad once. Any stored recipes will be used with a Warm & Hold added setting. These include 12 or 24 Hour Time of models with all other function including a Delayed Timed Bake, a Clean Cycle or a Broil setting. If your food was nearly fully cooked, you may be used with...
... beep press the key pad once. Any stored recipes will be used with a Warm & Hold added setting. These include 12 or 24 Hour Time of models with all other function including a Delayed Timed Bake, a Clean Cycle or a Broil setting. If your food was nearly fully cooked, you may be used with...
Use and Care Guide
Page 35
Setting Warmer Drawer Controls (SOME MODELS ONLY) Arranging Warmer (Warm & Ready TM) Drawer Rack Positions The rack can be used in 2 ways: • in the upright position to allow you can ...
Setting Warmer Drawer Controls (SOME MODELS ONLY) Arranging Warmer (Warm & Ready TM) Drawer Rack Positions The rack can be used in 2 ways: • in the upright position to allow you can ...
Use and Care Guide
Page 36
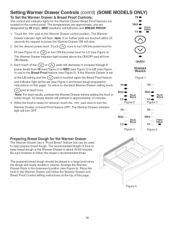
... indicator light will be set at the top of the (_ or _ pads will clear. 2. Each touch of this page). Setting Warmer Drawer Controls (cont'd) (SOME MODELS ONLY) To Set the Warmer Drawer & Bread Proof Controls: HIo The control and indicator lights for the Warmer Drawer The Warmer Drawer has a "Proof Bread...
... indicator light will be set at the top of the (_ or _ pads will clear. 2. Each touch of this page). Setting Warmer Drawer Controls (cont'd) (SOME MODELS ONLY) To Set the Warmer Drawer & Bread Proof Controls: HIo The control and indicator lights for the Warmer Drawer The Warmer Drawer has a "Proof Bread...
Use and Care Guide
Page 41
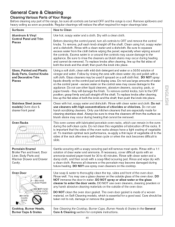
...or the porcelain may be removed. Stainless Steel (some models) Oven door & drawer front panel Clean with an ammonia-soaked paper towel for 30 to rinse the cleaners off the racks. Only use harsh... or any part of the range, be sure all controls are turned OFF and the range is important that are especially made of a woven material, on Self-Cleaning models, which can remain in or...& Grates in water. Remove spillovers and heavy soiling as soon as bluish stains may cause damage to slide. Rinse with a soapy scouring pad will remove most spots. Glass, Painted and Plastic Body Parts, ...
...or the porcelain may be removed. Stainless Steel (some models) Oven door & drawer front panel Clean with an ammonia-soaked paper towel for 30 to rinse the cleaners off the racks. Only use harsh... or any part of the range, be sure all controls are turned OFF and the range is important that are especially made of a woven material, on Self-Cleaning models, which can remain in or...& Grates in water. Remove spillovers and heavy soiling as soon as bluish stains may cause damage to slide. Rinse with a soapy scouring pad will remove most spots. Glass, Painted and Plastic Body Parts, ...
Use and Care Guide
Page 42
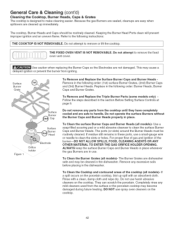
...following order: (1 st) surface Burner Grates, (2nd) Burner Caps and (3rd) Burner Heads. To Remove and Replace the Triple Burner Parts (some models only) Follow the steps described in use spray oven cleaners on the porcelain cooktop, blot up immediately. The ports (or slots) around the Burner ...not use a small-gauge wire or needle to make cleaning easier. To Clean the surface Burner Caps and Burner Heads (all models)- To Clean the Burner Grates (all models)- Because the gas Burners are sealed, cleanups are easy when spillovers are cleaned up spill with a clean, damp cloth and...
...following order: (1 st) surface Burner Grates, (2nd) Burner Caps and (3rd) Burner Heads. To Remove and Replace the Triple Burner Parts (some models only) Follow the steps described in use spray oven cleaners on the porcelain cooktop, blot up immediately. The ports (or slots) around the Burner ...not use a small-gauge wire or needle to make cleaning easier. To Clean the surface Burner Caps and Burner Heads (all models)- To Clean the Burner Grates (all models)- Because the gas Burners are sealed, cleanups are easy when spillovers are cleaned up spill with a clean, damp cloth and...
Use and Care Guide
Page 44
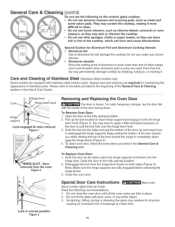
... of the door facing down. Lock in the General Care & Cleaning table. Care and Cleaning of Stainless Steel (StainlessSteel models only) Some models are equipped with the inside of aluminum is heavy. Note: Make sure the hinge supports are required for maintaining the appearance... of the door toward the range to completely disengage the hinge levers (Figure 2). 4. Special Caution for door removal Figure 1 HINGE SLOT = ...
... of the door facing down. Lock in the General Care & Cleaning table. Care and Cleaning of Stainless Steel (StainlessSteel models only) Some models are equipped with the inside of aluminum is heavy. Note: Make sure the hinge supports are required for maintaining the appearance... of the door toward the range to completely disengage the hinge levers (Figure 2). 4. Special Caution for door removal Figure 1 HINGE SLOT = ...

