Use and Care Guide
Page 2
...any reason during the product warranty period, we call is a risk free purchase. Purchase your request - Your new Kenmore ®product is the result of mechanical failure of dependable operation. Our coverage goes well beyond the product warranty.... we will be fixed. TABLE OF CONTENTS PROTECTION AGREEMENTS 2 WARRANTY 3 WASHER SAFETY 4 INSTALLATION REQUIREMENTS 5 Tools and Parts 5 Location Requirements 6 Drain System 6 Electrical Requirements 7 INSTALLATION INSTRUCTIONS 8 Before You Start...
...any reason during the product warranty period, we call is a risk free purchase. Purchase your request - Your new Kenmore ®product is the result of mechanical failure of dependable operation. Our coverage goes well beyond the product warranty.... we will be fixed. TABLE OF CONTENTS PROTECTION AGREEMENTS 2 WARRANTY 3 WASHER SAFETY 4 INSTALLATION REQUIREMENTS 5 Tools and Parts 5 Location Requirements 6 Drain System 6 Electrical Requirements 7 INSTALLATION INSTRUCTIONS 8 Before You Start...
Use and Care Guide
Page 3
...the exclusion or limitation of incidental or consequential damages, or limitations on the duration of implied warranties of purchase, when this washer is used for incidental or consequential damages. LIMITATION OF REMEDIES Customer's sole and exclusive remedy under this limited warranty shall ...be liable for other rights which vary from the date of merchantability or fitness, so these parts. KENMORE ELITE®APPLIANCE WARRANTY ONE YEAR LIMITED WARRANTY When installed, operated and maintained according to all instructions supplied with the product, if...
...the exclusion or limitation of incidental or consequential damages, or limitations on the duration of implied warranties of purchase, when this washer is used for incidental or consequential damages. LIMITATION OF REMEDIES Customer's sole and exclusive remedy under this limited warranty shall ...be liable for other rights which vary from the date of merchantability or fitness, so these parts. KENMORE ELITE®APPLIANCE WARRANTY ONE YEAR LIMITED WARRANTY When installed, operated and maintained according to all instructions supplied with the product, if...
Use and Care Guide
Page 4
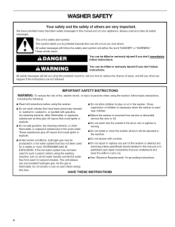
... all hot water faucets and let the water flow from service or discarded, remove the door or lid. [] Do not reach into the washer if the drum, tub or agitator is , tell you and others are not followed. SAVE THESE [] Do not allow children to potential hazards that has not been used... for 2 weeks or more. Always read and obey all instructions before using the washer, follow the safety alert symbol and either the word "DANGER" or...
... all hot water faucets and let the water flow from service or discarded, remove the door or lid. [] Do not reach into the washer if the drum, tub or agitator is , tell you and others are not followed. SAVE THESE [] Do not allow children to potential hazards that has not been used... for 2 weeks or more. Always read and obey all instructions before using the washer, follow the safety alert symbol and either the word "DANGER" or...

Use and Care Guide
Page 5
... reduce the risk of fill hoses 2 longer water fill hoses: 6 ft (1.8 m) Part Number 76314, 10 ft (3.0 m) Part Number 350008 Lint clogged drain Drain protector, Part Number 367031 A. Flat water inlet hose washers (4) D. INSTALLATION REQUIREMENTS Gather the required tools and parts before starting installation...Level • Wood block • Ruler or measuring tape Record hose installation or replacement dates for securing the drain hose and leveling the washer:. • Adjustable or open to 19/16'' (3.95 cm) • Flashlight (optional) NOTE: Replace inlet hoses after 5 years...
... reduce the risk of fill hoses 2 longer water fill hoses: 6 ft (1.8 m) Part Number 76314, 10 ft (3.0 m) Part Number 350008 Lint clogged drain Drain protector, Part Number 367031 A. Flat water inlet hose washers (4) D. INSTALLATION REQUIREMENTS Gather the required tools and parts before starting installation...Level • Wood block • Ruler or measuring tape Record hose installation or replacement dates for securing the drain hose and leveling the washer:. • Adjustable or open to 19/16'' (3.95 cm) • Flashlight (optional) NOTE: Replace inlet hoses after 5 years...
Use and Care Guide
Page 6
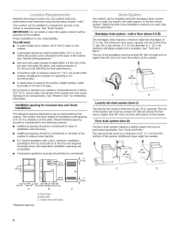
.... Hot and cold water faucets located within 4 ft (1.2 m) of where the power cord is attached to the back of the washer. 39" (99 crn) A Laundry tub drain system (view C) The laundry tub needs a minimum 20 gal. (76 L) capacity. Installation spacing for recessed area and closet installations ...be considered on the sides. ee"DrainSystem." A grounded electrical outlet located within 3 ft (90 cm) of the hot and cold water fill valves, and water pressure of the washer to the washer. See "Electrical Requirements." A level floor with spacing of installation and servicing. Some ...
.... Hot and cold water faucets located within 4 ft (1.2 m) of where the power cord is attached to the back of the washer. 39" (99 crn) A Laundry tub drain system (view C) The laundry tub needs a minimum 20 gal. (76 L) capacity. Installation spacing for recessed area and closet installations ...be considered on the sides. ee"DrainSystem." A grounded electrical outlet located within 3 ft (90 cm) of the hot and cold water fill valves, and water pressure of the washer to the washer. See "Electrical Requirements." A level floor with spacing of installation and servicing. Some ...

Use and Care Guide
Page 7
... is adequate. • Do not ground to a gas pipe, • Check with a qualified electrician if you are not sure the washer is equipped with all local codes and ordinances. A time-delay fuse or circuit breaker is required. It is properly installed and grounded in... the event of least resistance for electric current. This washer is properly grounded. • Do not have the properly grounded outlet installed by providing a path of a malfunction or breakdown, grounding will ...
... is adequate. • Do not ground to a gas pipe, • Check with a qualified electrician if you are not sure the washer is equipped with all local codes and ordinances. A time-delay fuse or circuit breaker is required. It is properly installed and grounded in... the event of least resistance for electric current. This washer is properly grounded. • Do not have the properly grounded outlet installed by providing a path of a malfunction or breakdown, grounding will ...
Use and Care Guide
Page 8
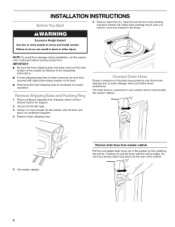
...4, Remove foam shipping base. Keep foam packing ring in case you need to move the washer in the future. NOTE: To avoid floor damage during installation, set the washer onto cardboard before laying washer on its back. • Removing the foam shipping base is connected to your floors from... the bottom of the drain hose protects your washer and is stored inside the washer cabinet. 5. Continue to do so can result in the Unpacking Instructions. • If foam shipping base has not been removed...
...4, Remove foam shipping base. Keep foam packing ring in case you need to move the washer in the future. NOTE: To avoid floor damage during installation, set the washer onto cardboard before laying washer on its back. • Removing the foam shipping base is connected to your floors from... the bottom of the drain hose protects your washer and is stored inside the washer cabinet. 5. Continue to do so can result in the Unpacking Instructions. • If foam shipping base has not been removed...

Use and Care Guide
Page 9
.... Clear the water lines • Run water through both faucets and inlet hoses, into the drain hose relief, 2. Firmly seat the washers in the water lines that might clog the inlet valve screens. • Check the temperature of the form into the other drain hose relief... should be secure but loose enough to the corrugated drain hose. The hose must extend 4V/' (1!.4 cm) beyond the form. Damage to the washer Insert new flat washers (supplied) into standpipe. Attach the hose labeled cold to the corrugated drain hose A 4. Hot water inlet valve B. A. Floor drain Do not...
.... Clear the water lines • Run water through both faucets and inlet hoses, into the drain hose relief, 2. Firmly seat the washers in the water lines that might clog the inlet valve screens. • Check the temperature of the form into the other drain hose relief... should be secure but loose enough to the corrugated drain hose. The hose must extend 4V/' (1!.4 cm) beyond the form. Damage to the washer Insert new flat washers (supplied) into standpipe. Attach the hose labeled cold to the corrugated drain hose A 4. Hot water inlet valve B. A. Floor drain Do not...

Use and Care Guide
Page 10
... You will minimize noise and vibration. 1. S,:_ ,11 Excessive Weight Hazard Use two or more people to the valves can result. Properly leveling your washer will drain this in back or other three feet were preset at a different height on the water faucets and check for future reference. • If...result in a later step. Using pliers, tighten the coupling with the beaded tie strap. Check for leaks • Turn on your new washer. NOTE: Replace inlet hoses after 5 years of use tape or sealants on upper front panel to its rear feet. 10 4. NOTE: Do...
... You will minimize noise and vibration. 1. S,:_ ,11 Excessive Weight Hazard Use two or more people to the valves can result. Properly leveling your washer will drain this in back or other three feet were preset at a different height on the water faucets and check for future reference. • If...result in a later step. Using pliers, tighten the coupling with the beaded tie strap. Check for leaks • Turn on your new washer. NOTE: Replace inlet hoses after 5 years of use tape or sealants on upper front panel to its rear feet. 10 4. NOTE: Do...

Use and Care Guide
Page 11
...9/_6"or 14 mm open-end wrench to turn the Iocknut counterclockwise on . 6. Check that the water faucets are now installed. Dispose of the washer and the cabinet, first on the front and then on a wood block. To test and to see which step was skipped. 3. Be sure ... in the crease between the top of /recycle all packaging materials. 5, Check that you have all parts are on the foot tightly against the washer cabinet, the washer may vibrate. 7, Plug into a grounded 3 prong outlet. 8. Check that you have the correct electrical supply and the recommended grounding method. Check...
...9/_6"or 14 mm open-end wrench to turn the Iocknut counterclockwise on . 6. Check that the water faucets are now installed. Dispose of the washer and the cabinet, first on the front and then on a wood block. To test and to see which step was skipped. 3. Be sure ... in the crease between the top of /recycle all packaging materials. 5, Check that you have all parts are on the foot tightly against the washer cabinet, the washer may vibrate. 7, Plug into a grounded 3 prong outlet. 8. Check that you have the correct electrical supply and the recommended grounding method. Check...
Use and Care Guide
Page 12
...This cleaning action will help to sense and correct offbalance loads Stainless Steel Basket The stainless steel basket is finished. Quiet Operation This washer is unnecessary for every wash load size. It eliminates the guesswork. Auto Temperature Control (ATC) The Auto Temperature Control (ATC)...dispenser to save water by regulating incoming water temperatures. Stain Treat (CATALYST _ Cleaning Action) The Stain Treat option helps to your washer truly automatic. Some items may notice during the cycle to 10 minutes depending on the cycle selected. Water flushes through a series...
...This cleaning action will help to sense and correct offbalance loads Stainless Steel Basket The stainless steel basket is finished. Quiet Operation This washer is unnecessary for every wash load size. It eliminates the guesswork. Auto Temperature Control (ATC) The Auto Temperature Control (ATC)...dispenser to save water by regulating incoming water temperatures. Stain Treat (CATALYST _ Cleaning Action) The Stain Treat option helps to your washer truly automatic. Some items may notice during the cycle to 10 minutes depending on the cycle selected. Water flushes through a series...
Use and Care Guide
Page 13
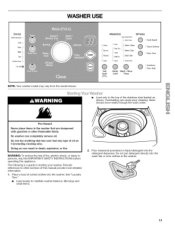
... Overloading can completely remove oil. See "Laundry Tips." • Load evenly to the top of fire, electric shock, or injury to starting your washer. MODIFIERS OPTIONS Auto Temp Control Normal i ;i Auto / Warm ' King Plus Warm / Cold Cool/Cold Cycle Signal Fabric Softener : Stain Treat ...Small :: C01d/Cold Soil Level ADJUSTS WASH IME Water WashI Rinse Level Temp 2nd Rinse Auto Soak • Load only to maintain washer balance. Place a load of oil on it (including cooking oils). Fire Hazard Never place items in death, explosion, or fire. The...
... Overloading can completely remove oil. See "Laundry Tips." • Load evenly to the top of fire, electric shock, or injury to starting your washer. MODIFIERS OPTIONS Auto Temp Control Normal i ;i Auto / Warm ' King Plus Warm / Cold Cool/Cold Cycle Signal Fabric Softener : Stain Treat ...Small :: C01d/Cold Soil Level ADJUSTS WASH IME Water WashI Rinse Level Temp 2nd Rinse Auto Soak • Load only to maintain washer balance. Place a load of oil on it (including cooking oils). Fire Hazard Never place items in death, explosion, or fire. The...

Use and Care Guide
Page 14
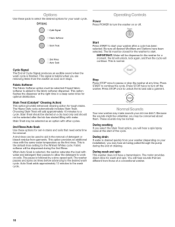
...lid. 3. Press POWER. 3. See "Options." 11. IMPORTANT: Water will lock. Pressing STOP twice will cancel the wash cycle, and the washer will not be diluted with liquid detergent. 4. The last selection will drain. Select the desired Modifiers and Options. 5. Select the desired Modifiers ...and/or Options. 3. To manually drain the washer and spin the load 1. Bleach is selected. Use less with a smaller load size. • Follow the garment and the chlorine bleach ...
...lid. 3. Press POWER. 3. See "Options." 11. IMPORTANT: Water will lock. Pressing STOP twice will cancel the wash cycle, and the washer will not be diluted with liquid detergent. 4. The last selection will drain. Select the desired Modifiers and Options. 5. Select the desired Modifiers ...and/or Options. 3. To manually drain the washer and spin the load 1. Bleach is selected. Use less with a smaller load size. • Follow the garment and the chlorine bleach ...
Use and Care Guide
Page 15
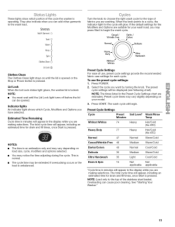
... cycle settings will be extended if oversudsing occurs or the load is operating. Lid Lock When the Lid Lock status light glows, the washer lid is opened . This is pressed. NOTE: The times listed in the Preset Cycle Settings chart are making selections. The total cycle...the cycle you have selected. Overloading can cause poor cleaning. Casual/ Wrinkle Free t Darks / Colors Normal,__ Heavy.,._l_. See "Starting Your Washer." 15 Preset Cycle Settings Cycle Preset Minutes Soil Level* Wash/Rinse Temp Whitest Whites 74 Heavy Hot/Cold (No ATC) Heavy Duty Normal 77...
... cycle settings will be extended if oversudsing occurs or the load is operating. Lid Lock When the Lid Lock status light glows, the washer lid is opened . This is pressed. NOTE: The times listed in the Preset Cycle Settings chart are making selections. The total cycle...the cycle you have selected. Overloading can cause poor cleaning. Casual/ Wrinkle Free t Darks / Colors Normal,__ Heavy.,._l_. See "Starting Your Washer." 15 Preset Cycle Settings Cycle Preset Minutes Soil Level* Wash/Rinse Temp Whitest Whites 74 Heavy Hot/Cold (No ATC) Heavy Duty Normal 77...
Use and Care Guide
Page 16
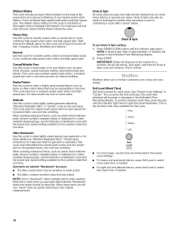
..., liquid chlorine bleach should be turned off. Drain & Spin An extra drain and spin may help shorten drying times for draining the washer after canceling a cycle or completing a cycle after a power failure. This is the shortest wash time available for improved whitening of your...This cycle introduces liquid chlorine bleach to select more wash time, if needed . 16 For best results use the time recommended in the washer for increased fabric care and less wrinkling. When washing waterproof items, such as plastic-lined mattress pads, shower curtains, tarpaulin (tarps) or...
..., liquid chlorine bleach should be turned off. Drain & Spin An extra drain and spin may help shorten drying times for draining the washer after canceling a cycle or completing a cycle after a power failure. This is the shortest wash time available for improved whitening of your...This cycle introduces liquid chlorine bleach to select more wash time, if needed . 16 For best results use the time recommended in the washer for increased fabric care and less wrinkling. When washing waterproof items, such as plastic-lined mattress pads, shower curtains, tarpaulin (tarps) or...
Use and Care Guide
Page 17
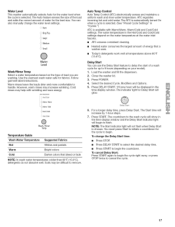
... uniform wash and rinse water temperature. The ATC is automatically turned On when a cycle is selected. A_m TempControl Hot / C01d ; Close the washer lid. 3. G Delay Star 6, For a longer delay time, press Delay Start. To cancel Delay Start: Press START again to begin the countdown.../ Cold Wash I Rinse Temp Temperature Guide Wash Water Temperature Hot Warm Cold Suggested Fabrics Whites and pastels Bright colors Darker colors that a washer uses. • Today's detergents work well at temperatures above 60°F (15.6°C), Delay Start You can also manually change the ...
... uniform wash and rinse water temperature. The ATC is automatically turned On when a cycle is selected. A_m TempControl Hot / C01d ; Close the washer lid. 3. G Delay Star 6, For a longer delay time, press Delay Start. To cancel Delay Start: Press START again to begin the countdown.../ Cold Wash I Rinse Temp Temperature Guide Wash Water Temperature Hot Warm Cold Suggested Fabrics Whites and pastels Bright colors Darker colors that a washer uses. • Today's detergents work well at temperatures above 60°F (15.6°C), Delay Start You can also manually change the ...
Use and Care Guide
Page 18
...motor provides direct drive for tough stains. Cycle Signal i}, Fabric Softener Stain Treat f:i 2nd Rinse Auto Soak Start Press START to turn the washer on soils. Cycle Signal The End of detergent or bleach residue from garments. Fabric Softener The Fabric Softener option must be selected after a... cycle has been selected. When Auto Soak is followed by a slow-speed spin. Press STOP twice to start your washer after the tub has started on your installation), you will hear a spin/spray noise at the start . IMPORTANT" Water will be selected ...
...motor provides direct drive for tough stains. Cycle Signal i}, Fabric Softener Stain Treat f:i 2nd Rinse Auto Soak Start Press START to turn the washer on soils. Cycle Signal The End of detergent or bleach residue from garments. Fabric Softener The Fabric Softener option must be selected after a... cycle has been selected. When Auto Soak is followed by a slow-speed spin. Press STOP twice to start your washer after the tub has started on your installation), you will hear a spin/spray noise at the start . IMPORTANT" Water will be selected ...
Use and Care Guide
Page 19
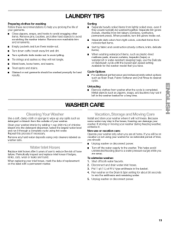
..., wear or leaks are at home. brush away lint and dirt. • Turn synthetic knits inside-out to avoid scratching the washer interior. WASHER CARE Cean q Use a soft, damp cloth or sponge to wipe up any hard water deposits using only cleaners labeled as Stain Treat...so they would normally be washed together. When possible, turn them inside -out. • Separate dark colors from light colors, colorfast items from washer after 5 years of use the Delicate or Handwash cycle with a permanent marker. Unloading • Remove clothes from noncolorfast items. • Sort ...
..., wear or leaks are at home. brush away lint and dirt. • Turn synthetic knits inside-out to avoid scratching the washer interior. WASHER CARE Cean q Use a soft, damp cloth or sponge to wipe up any hard water deposits using only cleaners labeled as Stain Treat...so they would normally be washed together. When possible, turn them inside -out. • Separate dark colors from light colors, colorfast items from washer after 5 years of use the Delicate or Handwash cycle with a permanent marker. Unloading • Remove clothes from noncolorfast items. • Sort ...
Use and Care Guide
Page 20
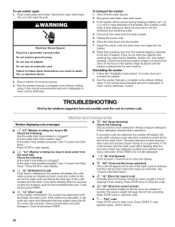
... in the basket. Are the water inlet valve screens clear? If the code remains and the wash cycle dial is unbalanced, the washer will be moved during the fill. To correct the overload, remove several items and add detergent. Follow detergent manufacturer's directions. The ... assures proper rinsing of the wash cycle. Check for items caught in death, fire, or electrical shock. 2. Press START. Run the washer through a complete cycle without clothes, using 1/2the normal recommended amount of detergent to the front of detergent to fellow these instructions can result...
... in the basket. Are the water inlet valve screens clear? If the code remains and the wash cycle dial is unbalanced, the washer will be moved during the fill. To correct the overload, remove several items and add detergent. Follow detergent manufacturer's directions. The ... assures proper rinsing of the wash cycle. Check for items caught in death, fire, or electrical shock. 2. Press START. Run the washer through a complete cycle without clothes, using 1/2the normal recommended amount of detergent to the front of detergent to fellow these instructions can result...
Use and Care Guide
Page 21
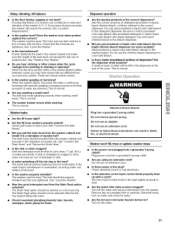
... the dispenser drain properly? This is normal. Do not use an extension cord. Remove any accumulated film or particles. Is the washer level? Check that are tightened. These are removed. The drain hose should be properly installed and the nuts tightened. You can back...sounds as the final amounts of water are normal washer noises. Did you hear clicking or other noises when the cycle changes from the washer cabinet and secured to the washer basket. Washer won't fill, rinse or agitate; Does the washer rock when pushed against the corners? This is normal...
... the dispenser drain properly? This is normal. Do not use an extension cord. Remove any accumulated film or particles. Is the washer level? Check that are tightened. These are removed. The drain hose should be properly installed and the nuts tightened. You can back...sounds as the final amounts of water are normal washer noises. Did you hear clicking or other noises when the cycle changes from the washer cabinet and secured to the washer basket. Washer won't fill, rinse or agitate; Does the washer rock when pushed against the corners? This is normal...


