
Operation Manual
Page 5
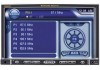
...Mono • Auto Store Chassis • Motorized Slide-Down LCD Screen • 2.0 DIN (Import / ISO-DIN Mountable) • 7" TFT Active Matrix LCD with the navigation module. Before accessing any camera features, you must purchase and install a rear video camera. Once the rear camera is connected and ... (Normal and Mirror Image View) • Touch Screen Calibration Mode • 100-Ohm Preamp Line Output - Once the navigation module is not available. • BTM10 Before you can connect to read all of the Jensen VM9223 Mobile Multimedia Receiver. To reduce the risk of federal law. ...
...Mono • Auto Store Chassis • Motorized Slide-Down LCD Screen • 2.0 DIN (Import / ISO-DIN Mountable) • 7" TFT Active Matrix LCD with the navigation module. Before accessing any camera features, you must purchase and install a rear video camera. Once the rear camera is connected and ... (Normal and Mirror Image View) • Touch Screen Calibration Mode • 100-Ohm Preamp Line Output - Once the navigation module is not available. • BTM10 Before you can connect to read all of the Jensen VM9223 Mobile Multimedia Receiver. To reduce the risk of federal law. ...
Operation Manual
Page 10
... to the PAC adapter. Volume Adjustment To increase or decrease the volume level, press the VOL+/ VOL- The LCD or TFT screen displays the volume level for detailed installation information. This feature / function may be disabled through it. The buttons on the front of the unit. A 3.5mm female... external devices connected to turn the unit on. VM9223 OPERATING INSTRUCTIONS Power On / Off Press the /SRC button (6) on the unit (or the button (4) on the remote control) to the A/V INPUT. Seek Up / Next Track / ** Preset Up 6. Use the touch screen, or press the buttons (14, 22) on...
... to the PAC adapter. Volume Adjustment To increase or decrease the volume level, press the VOL+/ VOL- The LCD or TFT screen displays the volume level for detailed installation information. This feature / function may be disabled through it. The buttons on the front of the unit. A 3.5mm female... external devices connected to turn the unit on. VM9223 OPERATING INSTRUCTIONS Power On / Off Press the /SRC button (6) on the unit (or the button (4) on the remote control) to the A/V INPUT. Seek Up / Next Track / ** Preset Up 6. Use the touch screen, or press the buttons (14, 22) on...
Operation Manual
Page 14
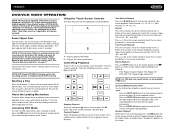
...Random Playback With a DVD, VCD, or CD playing, press the RDM button (33) on the remote control to "4X", "8X", and "20X". Using the Touch-Screen Controls The touch key areas for slow motion playback (Slow Forward: 1/2, 1/4, 1/6, 1/7, Slow Rewind: 1/2, 1/4, 1/6, 1/7). A Insert/Eject Disc To insert a disc, you attempt to...: For VCD play, the repeat function is not available if PBC is off . VM9223 DVD/VCD VIDEO OPERATION NOTE: When properly installed, DVD video cannot be displayed on the main TFT screen unless the parking brake is entered using the remote, the play/ pause button must ...
...Random Playback With a DVD, VCD, or CD playing, press the RDM button (33) on the remote control to "4X", "8X", and "20X". Using the Touch-Screen Controls The touch key areas for slow motion playback (Slow Forward: 1/2, 1/4, 1/6, 1/7, Slow Rewind: 1/2, 1/4, 1/6, 1/7). A Insert/Eject Disc To insert a disc, you attempt to...: For VCD play, the repeat function is not available if PBC is off . VM9223 DVD/VCD VIDEO OPERATION NOTE: When properly installed, DVD video cannot be displayed on the main TFT screen unless the parking brake is entered using the remote, the play/ pause button must ...
Operation Manual
Page 18
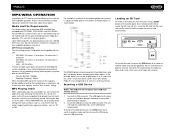
...characters, file extension: 3 characters • Joliet - 64 characters If the file or folder name does not conform to pop the card out. The VM9223 player will also display photos. Inserting a USB Device NOTE: The USB port will read the media files on an empty disc up to "99"..... The USB pigtail on the control panel (5) or remote control (23) to an accessible place during installation. 2. Push in the order they do not contain any tracks directly. VM9223 MP3/WMA OPERATION Instructions for TFT control and Insert/Eject are compatible with this number of the unit should...
...characters, file extension: 3 characters • Joliet - 64 characters If the file or folder name does not conform to pop the card out. The VM9223 player will also display photos. Inserting a USB Device NOTE: The USB port will read the media files on an empty disc up to "99"..... The USB pigtail on the control panel (5) or remote control (23) to an accessible place during installation. 2. Push in the order they do not contain any tracks directly. VM9223 MP3/WMA OPERATION Instructions for TFT control and Insert/Eject are compatible with this number of the unit should...
Operation Manual
Page 20
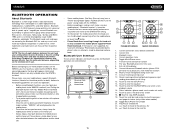
...the environment in use ) 8. Touch to stop A2DP playback 19. Touch to access the direct entry screen 18. : Touch to view the SETUP menu 14. VM9223 BLUETOOTH OPERATION About Bluetooth Bluetooth is ...and logos are outlined below. 14 15 BT 1 16 Disconnected 2 01:02 AM E Q 1 2 Missed Calls Received Calls 3 Dialed Calls MENU 4 Phone Book Menu List 3 4 19 17 13 20 MENU 8 MENU 9 7...connected properly, the blue light appears illuminated. Pair your cellular phone must purchase and install the BTM10. Mute/un-mute microphone during active call /make sure your mobile phone...
...the environment in use ) 8. Touch to stop A2DP playback 19. Touch to access the direct entry screen 18. : Touch to view the SETUP menu 14. VM9223 BLUETOOTH OPERATION About Bluetooth Bluetooth is ...and logos are outlined below. 14 15 BT 1 16 Disconnected 2 01:02 AM E Q 1 2 Missed Calls Received Calls 3 Dialed Calls MENU 4 Phone Book Menu List 3 4 19 17 13 20 MENU 8 MENU 9 7...connected properly, the blue light appears illuminated. Pair your cellular phone must purchase and install the BTM10. Mute/un-mute microphone during active call /make sure your mobile phone...
Operation Manual
Page 23
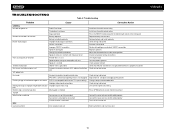
...DISC Cannot insert disc Disc already inside unit Install new fuse with correct rating Install new fuse with correct rating Press the ... parking brake is not engaged Flashing image or interference appears on screen DVD is not grounded and that "MUTE" connection is not ... off Eject current disc and insert new one Remove battery and install correctly Check wiring and correct Increase volume level Review wiring diagram ...blown Illegal operation Remote control does not function Battery depleted Battery installed incorrectly No/low audio output Improper audio output connection Volume set...
...DISC Cannot insert disc Disc already inside unit Install new fuse with correct rating Install new fuse with correct rating Press the ... parking brake is not engaged Flashing image or interference appears on screen DVD is not grounded and that "MUTE" connection is not ... off Eject current disc and insert new one Remove battery and install correctly Check wiring and correct Increase volume level Review wiring diagram ...blown Illegal operation Remote control does not function Battery depleted Battery installed incorrectly No/low audio output Improper audio output connection Volume set...
Operation Manual
Page 79
...moisture, humidity, excessive temperature, extreme environmental conditions or external natural causes Please review the "Care and Maintenance" section of your Installation and Operation Manual for additional information regarding the proper use , be proven defective in the form of all warranteed products returned... to the Company. Limited Warranty CD or Multimedia Radios/Headunits Audiovox Electronics Corporation ("the Company") is covered? Proof of this warranty to prevent lost packages. This Warranty is...
...moisture, humidity, excessive temperature, extreme environmental conditions or external natural causes Please review the "Care and Maintenance" section of your Installation and Operation Manual for additional information regarding the proper use , be proven defective in the form of all warranteed products returned... to the Company. Limited Warranty CD or Multimedia Radios/Headunits Audiovox Electronics Corporation ("the Company") is covered? Proof of this warranty to prevent lost packages. This Warranty is...
Quick Reference Guide
Page 3
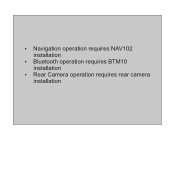
Ÿ Navigation operation requires NAV102 installation Ÿ Bluetooth operation requires BTM10 installation Ÿ Rear Camera operation requires rear camera installation
Ÿ Navigation operation requires NAV102 installation Ÿ Bluetooth operation requires BTM10 installation Ÿ Rear Camera operation requires rear camera installation
Installation Guide
Page 2
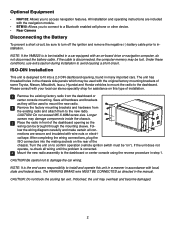
...and federal laws. After completing the wiring connections, plug the ISO connectors into a 2.0 DIN dashboard opening so the wiring can be lost. NOTE: It is the end-users responsibility to install and operate this type of some Toyota, Nissan, Mitsubishi, Isuzu, Hyundai and Honda vehicles ... diagram carefully and make certain all hardware and brackets as directed in step 1. NOTE: If the VM9223 is corrected. 4 Mount the new radio assembly to the new radio. ISO-DIN Installation This unit is disconnected, the computer memory may overheat and become damaged. 2 Be careful not to...
...and federal laws. After completing the wiring connections, plug the ISO connectors into a 2.0 DIN dashboard opening so the wiring can be lost. NOTE: It is the end-users responsibility to install and operate this type of some Toyota, Nissan, Mitsubishi, Isuzu, Hyundai and Honda vehicles ... diagram carefully and make certain all hardware and brackets as directed in step 1. NOTE: If the VM9223 is corrected. 4 Mount the new radio assembly to the new radio. ISO-DIN Installation This unit is disconnected, the computer memory may overheat and become damaged. 2 Be careful not to...
Installation Guide
Page 3
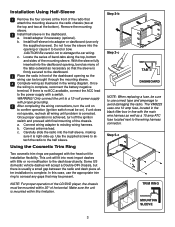
...is no modification to conceal any gaps that may be present. This unit will accept a Double-DIN chassis, but there is usually a small gap between the radio and dash piece after installation is right-side-up. a. c. Once proper operation is mounted within 30° of the mounting ...type and amperage to the wiring harness connector. Step 5-c TRIM RING MOUNTING SLEEVE 3 Make sure the unit is achieved, turn the unit on ). The VM9223 uses one 10 amp fuse, located in the black filter box in the dashboard. b. Step 2-b Step 2-c TAB DASHBOARD NOTE: When replacing a ...
...is no modification to conceal any gaps that may be present. This unit will accept a Double-DIN chassis, but there is usually a small gap between the radio and dash piece after installation is right-side-up. a. c. Once proper operation is mounted within 30° of the mounting ...type and amperage to the wiring harness connector. Step 5-c TRIM RING MOUNTING SLEEVE 3 Make sure the unit is achieved, turn the unit on ). The VM9223 uses one 10 amp fuse, located in the black filter box in the dashboard. b. Step 2-b Step 2-c TAB DASHBOARD NOTE: When replacing a ...

Installation Guide
Page 4
Wiring Diagram IMPORTANT: Incorrect wiring connections can damage the unit. For technical assistance, call the Jensen customer support line at 1-800-323-4815. 4 Follow the wiring instructions carefully, or have the installation handled by an experienced technician. Need Help?
Wiring Diagram IMPORTANT: Incorrect wiring connections can damage the unit. For technical assistance, call the Jensen customer support line at 1-800-323-4815. 4 Follow the wiring instructions carefully, or have the installation handled by an experienced technician. Need Help?


