Operation Manual
Page 5
...Output • Subwoofer Phase Control - 0 ~ 180 degrees • Programmable Volume Control • Rear Camera Input (Normal and Mirror Image View) •...and 1/7 • Play, Pause, Stop, Next Chapter and Previous Chapter CD / MP3 / WMA • CD-Text Compatible • ID3 Tag Compatible • Directory Search (MP3 / ...DVD • Aspect Ratio - WARNING! WARNING! WARNING! WARNING! Only connect the unit to the TFT monitor. All installation and operating instructions will become active. To prevent damage to read all of the Jensen VM9212N Mobile Multimedia Receiver...
...Output • Subwoofer Phase Control - 0 ~ 180 degrees • Programmable Volume Control • Rear Camera Input (Normal and Mirror Image View) •...and 1/7 • Play, Pause, Stop, Next Chapter and Previous Chapter CD / MP3 / WMA • CD-Text Compatible • ID3 Tag Compatible • Directory Search (MP3 / ...DVD • Aspect Ratio - WARNING! WARNING! WARNING! WARNING! Only connect the unit to the TFT monitor. All installation and operating instructions will become active. To prevent damage to read all of the Jensen VM9212N Mobile Multimedia Receiver...

Operation Manual
Page 9
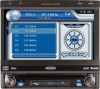
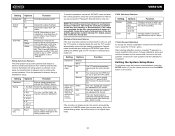
... this function to display the navigation user interface. Use the joystick to make adjustments while the red tilt icon is connected to the VM9212N, press and hold to adjust the angle in the current band. 4. Press and release to adjust the Brightness and Contrast. CLOSE/... again to automatically store strong radio stations in the six preset channels in a continuous motion. AUDIO Rotate to silence the receiver. LCD Display 8. MUTE 5 Press to adjust the volume. Press once to Contrast. TILT/BAND Press to change the AM or FM band. 5. With the monitor closed , press...
... this function to display the navigation user interface. Use the joystick to make adjustments while the red tilt icon is connected to the VM9212N, press and hold to adjust the angle in the current band. 4. Press and release to adjust the Brightness and Contrast. CLOSE/... again to automatically store strong radio stations in the six preset channels in a continuous motion. AUDIO Rotate to silence the receiver. LCD Display 8. MUTE 5 Press to adjust the volume. Press once to Contrast. TILT/BAND Press to change the AM or FM band. 5. With the monitor closed , press...
Operation Manual
Page 11
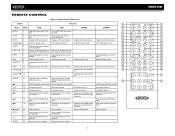
...Fast forwards the disc content VOL - 15 Decreases volume Decreases volume Decreases volume Decreases volume VOL + 16 Increases volume Increases volume Increases volume Increases volume 17 Selects the previous chapter Selects the previous ...ANGLE 13 Plays back disc in /out on /off Turns the power on an image 7 VM9212N 3 4 5 9 6 DISP 7 26 WIDE 27 TILT 15 16 PRESET 34 33 ...of picture dis- REMOTE CONTROL Table 1: Remote Control Functions Button Function 8 Name Ref# DVD VCD TUNER CD/MP3 35 MENU 1 Enters the main menu of the Turns on/off PBC when play-...
...Fast forwards the disc content VOL - 15 Decreases volume Decreases volume Decreases volume Decreases volume VOL + 16 Increases volume Increases volume Increases volume Increases volume 17 Selects the previous chapter Selects the previous ...ANGLE 13 Plays back disc in /out on /off Turns the power on an image 7 VM9212N 3 4 5 9 6 DISP 7 26 WIDE 27 TILT 15 16 PRESET 34 33 ...of picture dis- REMOTE CONTROL Table 1: Remote Control Functions Button Function 8 Name Ref# DVD VCD TUNER CD/MP3 35 MENU 1 Enters the main menu of the Turns on/off PBC when play-...

Operation Manual
Page 14
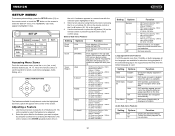
...The playing mode is displayed on the unit by pressing the OPEN button (1) and opening the TFT screen. The volume ranges from the unit. Steering Wheel Control (SWC) The VM9212N is drawn back into the main compartment. A 3.5mm female connector (labeled "SWC Interface") on the TFT and... To increase or decrease the volume level, turn the rotary encoder (5) on the front panel or press the VOL+/ VOLbuttons (15, 16) on . Vol Up 2. Seek Down / Previous Track / ** Preset Down 6. FAD BAL F L R -14 - -14 - VM9212N OPERATING INSTRUCTIONS Power On / Off Press the /SRC button (6) on the...
...The playing mode is displayed on the unit by pressing the OPEN button (1) and opening the TFT screen. The volume ranges from the unit. Steering Wheel Control (SWC) The VM9212N is drawn back into the main compartment. A 3.5mm female connector (labeled "SWC Interface") on the TFT and... To increase or decrease the volume level, turn the rotary encoder (5) on the front panel or press the VOL+/ VOLbuttons (15, 16) on . Vol Up 2. Seek Down / Previous Track / ** Preset Down 6. FAD BAL F L R -14 - -14 - VM9212N OPERATING INSTRUCTIONS Power On / Off Press the /SRC button (6) on the...
Operation Manual
Page 16
... sub-menu option will change as you want to adjust by using AM and PM. DIRECTION BUTTONS The features available for low volumes. 12 DVD menu (if applicable) is used. VM9212N SETUP MENU To access system settings, press the SETUP button (31) on the remote control or touch the button on the remote...
... sub-menu option will change as you want to adjust by using AM and PM. DIRECTION BUTTONS The features available for low volumes. 12 DVD menu (if applicable) is used. VM9212N SETUP MENU To access system settings, press the SETUP button (31) on the remote control or touch the button on the remote...
Operation Manual
Page 17
...-17 8. For details, please refer to activate the "Rating" feature. 1. Rating Sub-menu Features The DVD system has a built-in a safe place for future reference. Once setup, the parental lock is released only...viewing restricted disc content. Some discs restrict only portions of the screen. Increase relative volume for one . To begin calibration, press and hold the crosshair for specified source...is not available on the current video input signal - VM9212N Setting Subwoofer Sub.W Phase Sub Filter Options Function Off On 0 180 80Hz 120Hz 160Hz Turn...
...-17 8. For details, please refer to activate the "Rating" feature. 1. Rating Sub-menu Features The DVD system has a built-in a safe place for future reference. Once setup, the parental lock is released only...viewing restricted disc content. Some discs restrict only portions of the screen. Increase relative volume for one . To begin calibration, press and hold the crosshair for specified source...is not available on the current video input signal - VM9212N Setting Subwoofer Sub.W Phase Sub Filter Options Function Off On 0 180 80Hz 120Hz 160Hz Turn...
Operation Manual
Page 25
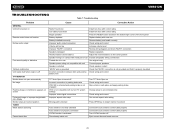
VM9212N TROUBLESHOOTING Table 7: Troubleshooting Problem GENERAL Unit will not power on Remote control... Remove battery and install correctly Improper audio output connection Check wiring and correct Volume set too low Increase volume level Improper "MUTE" connection Review wiring diagram and check "MUTE" connection Speakers damaged Replace speakers ...is turned off Incorrect connection to parking brake wire PRK SW is activated and parking brake is not engaged DVD is not compatible with current TV system settings Improper video signal connections Improper aspect ratio setup Moving path ...
VM9212N TROUBLESHOOTING Table 7: Troubleshooting Problem GENERAL Unit will not power on Remote control... Remove battery and install correctly Improper audio output connection Check wiring and correct Volume set too low Increase volume level Improper "MUTE" connection Review wiring diagram and check "MUTE" connection Speakers damaged Replace speakers ...is turned off Incorrect connection to parking brake wire PRK SW is activated and parking brake is not engaged DVD is not compatible with current TV system settings Improper video signal connections Improper aspect ratio setup Moving path ...


