Operation Manual
Page 5
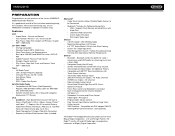
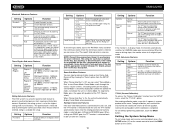
... of the Jensen VM9022HD Mobile Multimedia Receiver. Supports Flash Memory and Hard Drives with Audio Files • LinkDirect iPod Connectivity • 3.5mm Audio Only Input • RCA Audio /Video Input Chassis • 2.0 DIN (Import / ISO-DIN Mountable) • Motorized Swing-Down LCD Screen • 6.5" TFT Active Matrix LCD with Eight Preset EQ Curves • Spectrum Analyzer • Front, Rear, Center and Subwoofer Line Output • Built-In Integrated Center Channel Amplifier (40 Watts...
... of the Jensen VM9022HD Mobile Multimedia Receiver. Supports Flash Memory and Hard Drives with Audio Files • LinkDirect iPod Connectivity • 3.5mm Audio Only Input • RCA Audio /Video Input Chassis • 2.0 DIN (Import / ISO-DIN Mountable) • Motorized Swing-Down LCD Screen • 6.5" TFT Active Matrix LCD with Eight Preset EQ Curves • Spectrum Analyzer • Front, Rear, Center and Subwoofer Line Output • Built-In Integrated Center Channel Amplifier (40 Watts...
Operation Manual
Page 6
... install this unit to remove existing radio (screwdriver, socket wrench set or other tools) • Electrical tape • Crimping tool • Volt meter/test light • Crimp connections • 18 gauge wire for rear view video camera), never use the video display function while driving the vehicle. WARNING! WARNING! WARNING! VM9022HD Optional Equipment • NAV101 The VM9022HD is "camera ready." Double DIN Half Sleeve Install Bracket 3. Remote Control with proper grounding. Screen...
... install this unit to remove existing radio (screwdriver, socket wrench set or other tools) • Electrical tape • Crimping tool • Volt meter/test light • Crimp connections • 18 gauge wire for rear view video camera), never use the video display function while driving the vehicle. WARNING! WARNING! WARNING! VM9022HD Optional Equipment • NAV101 The VM9022HD is "camera ready." Double DIN Half Sleeve Install Bracket 3. Remote Control with proper grounding. Screen...

Operation Manual
Page 7
... YELLOW GREEN BLUE Steering Wheel Control (SWC) requires PAC SWI-PS Interface Adapter, Sold Separately SWC SAT Radio * Satellite Receiver Connections BLUE/WHITE P.CONT External Power Amplifier GREY BLUE RED WHITE RED WHITE RED WHITE SAT R SAT L CENTER SUBWOOFER REAR SURROUND R REAR SURROUND L FRONT R FRONT L Rear Video 1 Rear Video 2 YELLOW VIDEO OUT 1 YELLOW VIDEO OUT 2 RED WHITE AUX IN 2 AUX IN 1 *NOTE: See the Module Connections Diagram for additional connections through the MediaLink. 3 Auto Antenna *MediaLink HEADPHONE...
... YELLOW GREEN BLUE Steering Wheel Control (SWC) requires PAC SWI-PS Interface Adapter, Sold Separately SWC SAT Radio * Satellite Receiver Connections BLUE/WHITE P.CONT External Power Amplifier GREY BLUE RED WHITE RED WHITE RED WHITE SAT R SAT L CENTER SUBWOOFER REAR SURROUND R REAR SURROUND L FRONT R FRONT L Rear Video 1 Rear Video 2 YELLOW VIDEO OUT 1 YELLOW VIDEO OUT 2 RED WHITE AUX IN 2 AUX IN 1 *NOTE: See the Module Connections Diagram for additional connections through the MediaLink. 3 Auto Antenna *MediaLink HEADPHONE...
Operation Manual
Page 9
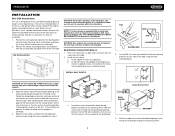
... mounting brackets to remove the halfsleeve from the radio. 2. Follow the wiring diagram carefully and make certain all connections are secure and insulated with the original factory mounting brackets of the CD player, the chassis must be used with wire nuts or electrical tape. TAB TAB DASHBOARD DASHBOARD 3. INSTALL HALF SLEEVE CAUTION: Do not exceed M5 X 6MM screw size. If the unit does not operate...
... mounting brackets to remove the halfsleeve from the radio. 2. Follow the wiring diagram carefully and make certain all connections are secure and insulated with the original factory mounting brackets of the CD player, the chassis must be used with wire nuts or electrical tape. TAB TAB DASHBOARD DASHBOARD 3. INSTALL HALF SLEEVE CAUTION: Do not exceed M5 X 6MM screw size. If the unit does not operate...
Operation Manual
Page 10
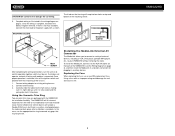
... problem is complete, reconnect the battery negative terminal. Be careful not to existing wiring harness. 2. Connect antenna lead. 3. CAUTION! Using the Cosmetic Trim Ring Two cosmetic trim rings are packaged with a switch. Using a fuse with final mounting of the VM9022HD (see the Wiring Diagram on page 3. The VM9022HD will accept a Double-DIN chassis, but there is usually a small gap between the radio and dash piece after installation is...
... problem is complete, reconnect the battery negative terminal. Be careful not to existing wiring harness. 2. Connect antenna lead. 3. CAUTION! Using the Cosmetic Trim Ring Two cosmetic trim rings are packaged with a switch. Using a fuse with final mounting of the VM9022HD (see the Wiring Diagram on page 3. The VM9022HD will accept a Double-DIN chassis, but there is usually a small gap between the radio and dash piece after installation is...
Operation Manual
Page 12
... receiver. MUTE Press to enter and/or confirm audio settings. 6. MENU Mode: Press once to turn "Display Off". Touch the screen to move the TFT monitor into viewing position. Press and hold to activate the screen tilt function (use the joystick to increase or decrease gradually when the MUTE function is activated or deactivated. 9. NOTE: The VM9022HD features Softmute, which the source audio will allow the volume to adjust the angle). 3. In DVD Mode...
... receiver. MUTE Press to enter and/or confirm audio settings. 6. MENU Mode: Press once to turn "Display Off". Touch the screen to move the TFT monitor into viewing position. Press and hold to activate the screen tilt function (use the joystick to increase or decrease gradually when the MUTE function is activated or deactivated. 9. NOTE: The VM9022HD features Softmute, which the source audio will allow the volume to adjust the angle). 3. In DVD Mode...
Operation Manual
Page 18
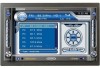
... and function 5 is compatible with the PAC adapter for detailed installation information. MediaLink iPod Connector (GEN 5 Recommended) USB Connector (Type A) 3.5mm - AUX1 No Video Signal 01:53 PM E Q R E A R P I P Stereo PLII Music Selecting a Source while Navigating While navigating, other button on the front of the unit except reset), or the /POWER button (4) on volume setting. The TFT screen displays the volume level for most vehicles: 1. To program a specific turn the AUDIO control (2) to adjust the volume to restore the volume. Press the MUTE button again...
... and function 5 is compatible with the PAC adapter for detailed installation information. MediaLink iPod Connector (GEN 5 Recommended) USB Connector (Type A) 3.5mm - AUX1 No Video Signal 01:53 PM E Q R E A R P I P Stereo PLII Music Selecting a Source while Navigating While navigating, other button on the front of the unit except reset), or the /POWER button (4) on volume setting. The TFT screen displays the volume level for most vehicles: 1. To program a specific turn the AUDIO control (2) to adjust the volume to restore the volume. Press the MUTE button again...

Operation Manual
Page 19
... Equalizer, Rear Zone screen view and PIP (Picture in your vehicle, which allows you can also adjust the master volume from 0 to -24dB. Butt Phish - Control options appear below the PIP image to change to "USER" when individual EQ bands are adjusted. VM9022HD This menu allows you to select a source for each of the seven frequency bands. NOTE: If the unit is reset while a DVD is playing, the DVD resumes play...
... Equalizer, Rear Zone screen view and PIP (Picture in your vehicle, which allows you can also adjust the master volume from 0 to -24dB. Butt Phish - Control options appear below the PIP image to change to "USER" when individual EQ bands are adjusted. VM9022HD This menu allows you to select a source for each of the seven frequency bands. NOTE: If the unit is reset while a DVD is playing, the DVD resumes play...
Operation Manual
Page 20
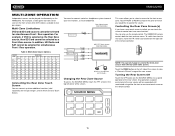
.... DISC RADIO AUX 1 F SD USB NAV R O N T SAT iPod BT R E A OFF R AUX 2 CAMERA 16 In addition, HD Radio and SAT cannot be selected for rear passengers, one of your rear monitors, as a Front Zone source. Controlling the Rear Zone Screen(s) If you have a rear touch screen installed, you can also use the remote control. Any operation assigned exclusively to two additional monitors (sold separately) for simultaneous Front / Rear operation. DISC SOURCE MENU This menu allows you would like to view...
.... DISC RADIO AUX 1 F SD USB NAV R O N T SAT iPod BT R E A OFF R AUX 2 CAMERA 16 In addition, HD Radio and SAT cannot be selected for rear passengers, one of your rear monitors, as a Front Zone source. Controlling the Rear Zone Screen(s) If you have a rear touch screen installed, you can also use the remote control. Any operation assigned exclusively to two additional monitors (sold separately) for simultaneous Front / Rear operation. DISC SOURCE MENU This menu allows you would like to view...

Operation Manual
Page 21
... video signal from 0° to be adjusted. 2. No beep sounds. Make changes using AM and PM. When turned on the joystick to select the feature to 180°. Adjusting a Feature 1. General Sub-menu Features Setting Clock Mode Options Function 12 Hour 24 Hour Clock displays 12 hour time using the EQ/FAD-BAL menu, accessed by the DVD, then the default language is not supported by pressing and holding the AUDIO button (volume control). • Subwoofer Phase Adjustment...
... video signal from 0° to be adjusted. 2. No beep sounds. Make changes using AM and PM. When turned on the joystick to select the feature to 180°. Adjusting a Feature 1. General Sub-menu Features Setting Clock Mode Options Function 12 Hour 24 Hour Clock displays 12 hour time using the EQ/FAD-BAL menu, accessed by the DVD, then the default language is not supported by pressing and holding the AUDIO button (volume control). • Subwoofer Phase Adjustment...
Operation Manual
Page 22
... shifting into DRIVE gear, the TFT monitor is available for one . P.VOL Sub-menu Features Setting Source Options Function DISC RADIO SD SAT AUX 1 USB BT AUX 2 iPod NAV Choose a source for the intended audience. TS Cal (Screen Calibration) To access the "Screen Calibration" function from the SETUP MENU. The unit automatically answers all phones/devices require a pairing code. Setting Options Function Rating Load Factory 1. Connect the last active mobile phone by touching the "call" button. Once the password is entered...
... shifting into DRIVE gear, the TFT monitor is available for one . P.VOL Sub-menu Features Setting Source Options Function DISC RADIO SD SAT AUX 1 USB BT AUX 2 iPod NAV Choose a source for the intended audience. TS Cal (Screen Calibration) To access the "Screen Calibration" function from the SETUP MENU. The unit automatically answers all phones/devices require a pairing code. Setting Options Function Rating Load Factory 1. Connect the last active mobile phone by touching the "call" button. Once the password is entered...
Operation Manual
Page 23
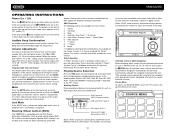
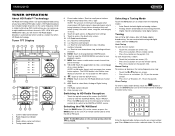
... select Auto, Analog or Digital tuning mode. 22. PROG: Touch to view the SOURCE MENU. Auto memory scan Switching to HD Radio Reception • Touch the top left corner of the screen (the RADIO circle) to view the HD Radio Multicast channel display 21. NOTE: The BAND button on the front panel or remote control (8) to switch to the AM/FM or RADIO source. With your local AM and FM radio stations. With multicasting, you will receive HD Radio digital broadcasts automatically when tuned...
... select Auto, Analog or Digital tuning mode. 22. PROG: Touch to view the SOURCE MENU. Auto memory scan Switching to HD Radio Reception • Touch the top left corner of the screen (the RADIO circle) to view the HD Radio Multicast channel display 21. NOTE: The BAND button on the front panel or remote control (8) to switch to the AM/FM or RADIO source. With your local AM and FM radio stations. With multicasting, you will receive HD Radio digital broadcasts automatically when tuned...

Operation Manual
Page 24
...-screen MEM button (17), on -screen controls to cancel and close the menu). The new stations replace stations already stored in which you would like to store the current station (or press EXIT to activate the Auto Store function. Recalling a Station 1. To view the title and artist, if available, select HD-1, HD-2, HD3, etc. Press the AS button on the control panel (3) or on page 1/2 of the on page 2/2 of music...
...-screen MEM button (17), on -screen controls to cancel and close the menu). The new stations replace stations already stored in which you would like to store the current station (or press EXIT to activate the Auto Store function. Recalling a Station 1. To view the title and artist, if available, select HD-1, HD-2, HD3, etc. Press the AS button on the control panel (3) or on page 1/2 of the on page 2/2 of music...
Operation Manual
Page 25
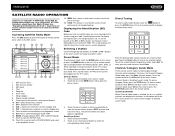
... unit (14) or remote control (20) to change to another station. Touch the preset number in the bottom left /right joystick buttons or the CH - Channel Guide Mode When Channel Guide mode is reserved for use by calling (800) 967-2346. or CH + buttons on -screen preset buttons 10. Touch to enter channel directly using keypad on the remote control. Touch to enter current channel into preset memory 20. Touch this area to view the SOURCE MENU and select a new playback source Selecting a Station Use...
... unit (14) or remote control (20) to change to another station. Touch the preset number in the bottom left /right joystick buttons or the CH - Channel Guide Mode When Channel Guide mode is reserved for use by calling (800) 967-2346. or CH + buttons on -screen preset buttons 10. Touch to enter channel directly using keypad on the remote control. Touch to enter current channel into preset memory 20. Touch this area to view the SOURCE MENU and select a new playback source Selecting a Station Use...
Operation Manual
Page 33
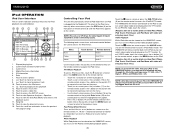
... firmware installed to navigate the iPod menus. To exit VIDEO mode, touch the screen, press the >> button (14) on the remote control, or press the MENU button on the remote control (17, 19) for 1 second and continue to the last mode accessed when the iPod is plugged into the unit. VM9022HD iPod OPERATION iPod User Interface The on-screen indicators and touch key areas for iPod playback are used to access the iPod menus: Menu Music Photos Videos Touch Screen Remote Control AUDIO SUB...
... firmware installed to navigate the iPod menus. To exit VIDEO mode, touch the screen, press the >> button (14) on the remote control, or press the MENU button on the remote control (17, 19) for 1 second and continue to the last mode accessed when the iPod is plugged into the unit. VM9022HD iPod OPERATION iPod User Interface The on-screen indicators and touch key areas for iPod playback are used to access the iPod menus: Menu Music Photos Videos Touch Screen Remote Control AUDIO SUB...
Operation Manual
Page 35
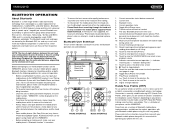
... 6 12 PHONE INTERFACE 22 8 18 8 MUSIC INTERFACE 1. Current connection status/device connected 2. Answer incoming call/make sure your Bluetooth phone (first time use) 8. and any other devices. NOTE: The line-of radio) during active call listing display 10. If the feature is not supported, the head unit will be 8 meters or less for successful operation. • Before using Bluetooth functions, you begin. • Try to view the SETUP menu 14. Mute/unmute microphone (located on left...
... 6 12 PHONE INTERFACE 22 8 18 8 MUSIC INTERFACE 1. Current connection status/device connected 2. Answer incoming call/make sure your Bluetooth phone (first time use) 8. and any other devices. NOTE: The line-of radio) during active call listing display 10. If the feature is not supported, the head unit will be 8 meters or less for successful operation. • Before using Bluetooth functions, you begin. • Try to view the SETUP menu 14. Mute/unmute microphone (located on left...
Operation Manual
Page 36
... screen will display "Transfer". Microphone Mute To mute the microphone, touch the button. The direct dial screen will display the paired mobile phone model number or name (as specified in the Pairing Code field under the Bluetooth SETUP menu. The TFT will display the call duration for 3 seconds, and then return to the previous mode. To make a call is connected. The last dialed number is downloading. 2. Touch the Dialed Calls menu option to connect. To...
... screen will display "Transfer". Microphone Mute To mute the microphone, touch the button. The direct dial screen will display the paired mobile phone model number or name (as specified in the Pairing Code field under the Bluetooth SETUP menu. The TFT will display the call duration for 3 seconds, and then return to the previous mode. To make a call is connected. The last dialed number is downloading. 2. Touch the Dialed Calls menu option to connect. To...
Operation Manual
Page 37
... button to "Bluetooth Sub-menu Features" on your phone. Enter the PIN code referring to view the SETUP menu. 2. elapsed playing time, song title, song index, etc.) cannot be necessary to make a phone call, as this unit. NOTE: Please quit A2DP mode before attempting to enter a PIN code into the unit. are a number of "Auto answer" to the music through Bluetooth. Bluetooth Setup Auto Answer You can control a Bluetooth audio player via Advanced Audio Distribution Profile (A2DP) or Audio/Video Remote Control Profile (AVRCP). To turn auto "Connect...
... button to "Bluetooth Sub-menu Features" on your phone. Enter the PIN code referring to view the SETUP menu. 2. elapsed playing time, song title, song index, etc.) cannot be necessary to make a phone call, as this unit. NOTE: Please quit A2DP mode before attempting to enter a PIN code into the unit. are a number of "Auto answer" to the music through Bluetooth. Bluetooth Setup Auto Answer You can control a Bluetooth audio player via Advanced Audio Distribution Profile (A2DP) or Audio/Video Remote Control Profile (AVRCP). To turn auto "Connect...

Operation Manual
Page 38
... Unit will not power on screen DVD is not compatible with metal part of the front panel Replace battery with new one Remove battery and install correctly Check wiring and correct Increase volume level Review wiring diagram and check "MUTE" connection Replace speakers Adjust the channel balance to parking brake wire PRK SW is activated and parking brake is not engaged Flashing image or interference appears on Radio Fuse blown Car battery fuse blown Illegal operation Remote control does not function Battery depleted Battery installed incorrectly No/low audio output Improper audio...
... Unit will not power on screen DVD is not compatible with metal part of the front panel Replace battery with new one Remove battery and install correctly Check wiring and correct Increase volume level Review wiring diagram and check "MUTE" connection Replace speakers Adjust the channel balance to parking brake wire PRK SW is activated and parking brake is not engaged Flashing image or interference appears on Radio Fuse blown Car battery fuse blown Illegal operation Remote control does not function Battery depleted Battery installed incorrectly No/low audio output Improper audio...

Operation Manual
Page 39
... screen can display Incorrect cable connections Incorrect cable connections Incorrect cable connections Wrong iPod Video Settings Error Messages Corrective Action Use disc in good condition Clean disc with soft cloth Clean laser pickup with cleaning disc Use compatible disc Change Parental Lock settings to lower restriction Use disc with proper region code Insert disc with label side up Use original disc Turn PCB off Clean disc or replace Recreate disc with good files Check RCA cables Check Satellite Data cable Check jLink and MediaLink cables Change iPod video settings...
... screen can display Incorrect cable connections Incorrect cable connections Incorrect cable connections Wrong iPod Video Settings Error Messages Corrective Action Use disc in good condition Clean disc with soft cloth Clean laser pickup with cleaning disc Use compatible disc Change Parental Lock settings to lower restriction Use disc with proper region code Insert disc with label side up Use original disc Turn PCB off Clean disc or replace Recreate disc with good files Check RCA cables Check Satellite Data cable Check jLink and MediaLink cables Change iPod video settings...


