
SR-TS1U VCR Instruction Manual (1812KB)
Page 3
... against voltage surges and built-up static charges. Do not defeat the safety purpose of antenna discharge unit, connection to be fatal. Power Sources Operate your product and its installation, use can fall into the power outlet only one blade wider than the other sources, refer to replace your obsolete outlet. Power Cord Protection Power supply cords should be taken to insert the...
... against voltage surges and built-up static charges. Do not defeat the safety purpose of antenna discharge unit, connection to be fatal. Power Sources Operate your product and its installation, use can fall into the power outlet only one blade wider than the other sources, refer to replace your obsolete outlet. Power Cord Protection Power supply cords should be taken to insert the...

SR-TS1U VCR Instruction Manual (1812KB)
Page 5
... Another VCR 53 Edit From A Camcorder 54 SPECIAL FEATURES 56 TV Multi-Brand Remote Control 56 Cable Box Multi-Brand Remote Control 57 DBS Receiver Multi-Brand Remote Control 58 Child Lock 59 Control Two JVC VCRs 59 T ROUBLESHOOTING 60 Power 60 Tape Transport 60 Playback 60 Recording 60 Timer Recording 61 Other Problems 62 Q UESTIONS AND ANSWERS 63 Playback 63 Recording 63 Timer Recording 63 I NDEX 64 List Of Terms 64 Front View 65 Rear View 66 Front Display Panel 66 Remote Control 67 SPECIFICATIONS 68 FOR SERVICING (Only...
... Another VCR 53 Edit From A Camcorder 54 SPECIAL FEATURES 56 TV Multi-Brand Remote Control 56 Cable Box Multi-Brand Remote Control 57 DBS Receiver Multi-Brand Remote Control 58 Child Lock 59 Control Two JVC VCRs 59 T ROUBLESHOOTING 60 Power 60 Tape Transport 60 Playback 60 Recording 60 Timer Recording 61 Other Problems 62 Q UESTIONS AND ANSWERS 63 Playback 63 Recording 63 Timer Recording 63 I NDEX 64 List Of Terms 64 Front View 65 Rear View 66 Front Display Panel 66 Remote Control 67 SPECIFICATIONS 68 FOR SERVICING (Only...
SR-TS1U VCR Instruction Manual (1812KB)
Page 7
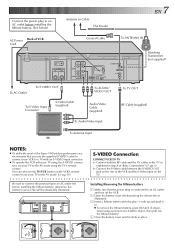
... the Super VHS picture performance we recommend that you use the TV/VCR button on the TV. Connect the S-Video cable between the S-VIDEO OUT jack on the rear of the VCR and the S-Video Input on the VCR's remote control to set your TV to an AC outlet first before installing the lithium battery. (See below) Antenna or Cable Flat Feeder EN 7 AC Power Back of VCR Cord Coaxial Cable To ANTENNA IN CABLE BOX S VIDEO...
... the Super VHS picture performance we recommend that you use the TV/VCR button on the TV. Connect the S-Video cable between the S-VIDEO OUT jack on the rear of the VCR and the S-Video Input on the VCR's remote control to set your TV to an AC outlet first before installing the lithium battery. (See below) Antenna or Cable Flat Feeder EN 7 AC Power Back of VCR Cord Coaxial Cable To ANTENNA IN CABLE BOX S VIDEO...
SR-TS1U VCR Instruction Manual (1812KB)
Page 15
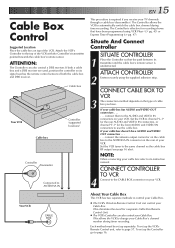
... its instruction manual. Each method must be set up separately. Situate And Connect Controller SITUATE CONTROLLER 1 Place the Controller so that have been programmed using the supplied adhesive strip. 3 CONNECT CABLE BOX TO VCR The connection method depends on the type of cable box you receive your Cable Box's channel number during timer-recording. NOTE: When connecting your VCR. This eliminates the need for a separate Cable Box Remote Control Unit. ● The VCR's Controller can also control your VCR. To set up the VCR's Remote Control unit, refer to control...
... its instruction manual. Each method must be set up separately. Situate And Connect Controller SITUATE CONTROLLER 1 Place the Controller so that have been programmed using the supplied adhesive strip. 3 CONNECT CABLE BOX TO VCR The connection method depends on the type of cable box you receive your Cable Box's channel number during timer-recording. NOTE: When connecting your VCR. This eliminates the need for a separate Cable Box Remote Control Unit. ● The VCR's Controller can also control your VCR. To set up the VCR's Remote Control unit, refer to control...

SR-TS1U VCR Instruction Manual (1812KB)
Page 16
...POWER 1 2 3 2 4 5 6 7 8 9 0 4 1 MENU 3 OK SHUTTLE PLUS INITIAL SETTINGS (cont.) Set Cable Box Output Channel & Cable Box Brand TURN ON CABLE BOX 1 Select a channel other than channel 9 on the screen. ACCESS MAIN MENU SCREEN 3 Press MENU. CH9) appears on the TV and select the VCR channel 3 or 4 (or AV mode). press CH 5∞ or SHUTTLE PLUS %fi until the channel number representing the cable box's output (CH2 - If your cable box is connected to your VCR's REAR AUDIO/VIDEO IN connectors . . . . . . If your cable box is connected to your cable box...
...POWER 1 2 3 2 4 5 6 7 8 9 0 4 1 MENU 3 OK SHUTTLE PLUS INITIAL SETTINGS (cont.) Set Cable Box Output Channel & Cable Box Brand TURN ON CABLE BOX 1 Select a channel other than channel 9 on the screen. ACCESS MAIN MENU SCREEN 3 Press MENU. CH9) appears on the TV and select the VCR channel 3 or 4 (or AV mode). press CH 5∞ or SHUTTLE PLUS %fi until the channel number representing the cable box's output (CH2 - If your cable box is connected to your VCR's REAR AUDIO/VIDEO IN connectors . . . . . . If your cable box is connected to your cable box...

SR-TS1U VCR Instruction Manual (1812KB)
Page 17
... 7, "CABLE BOX USERS SET CLOCK MANUALLY" will appear; Please contact your cable company about the possibility of timer recording. Make sure to leave the cable box turned on the screen for about 5 seconds, then it has no remote sensor), you can't use the Controller to change cable box channels. ACCESS CABLE BOX BRAND SET SCREEN 7 Press OK. 8 ENTER CABLE BOX BRAND Press the appropriate NUMBER keys to enter the CABLE BOX BRAND SET Cable Box Code from the 1 CABLE BOX BRAND LIST shown below, then press OK. PRESS NUMBER KEY (0-9) ● If the cable box's channel changes to...
... 7, "CABLE BOX USERS SET CLOCK MANUALLY" will appear; Please contact your cable company about the possibility of timer recording. Make sure to leave the cable box turned on the screen for about 5 seconds, then it has no remote sensor), you can't use the Controller to change cable box channels. ACCESS CABLE BOX BRAND SET SCREEN 7 Press OK. 8 ENTER CABLE BOX BRAND Press the appropriate NUMBER keys to enter the CABLE BOX BRAND SET Cable Box Code from the 1 CABLE BOX BRAND LIST shown below, then press OK. PRESS NUMBER KEY (0-9) ● If the cable box's channel changes to...
SR-TS1U VCR Instruction Manual (1812KB)
Page 18
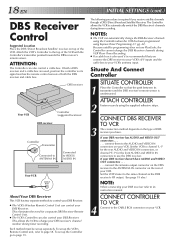
... Receiver channels using the Controller when the VCR has been programmed using the supplied adhesive strips. 3 CONNECT DBS RECEIVER TO VCR The connection method depends on the type of DBS receiver you have AUDIO and VIDEO OUT connectors connect the antenna output connector on the DBS receiver to use PlusCode; The Controller allows the VCR to its instruction manual. the Controller cannot change your DBS receiver's channel number during timer recording. Set the VCR to the CABLE BOX...
... Receiver channels using the Controller when the VCR has been programmed using the supplied adhesive strips. 3 CONNECT DBS RECEIVER TO VCR The connection method depends on the type of DBS receiver you have AUDIO and VIDEO OUT connectors connect the antenna output connector on the DBS receiver to use PlusCode; The Controller allows the VCR to its instruction manual. the Controller cannot change your DBS receiver's channel number during timer recording. Set the VCR to the CABLE BOX...

SR-TS1U VCR Instruction Manual (1812KB)
Page 21
... remote control again for more than 5 seconds. JOG SHATTLE PLAY STOP/EJECT SHUTTLE 1 2 3 2 4 5 6 7 8 9 0 4 PLAY 1 REW (Rewind) FF (Fast-Forward) 3 OK EN 21 1 LOAD A CASSETTE Make sure the window side is up on the screen (when VIDEO CALIBRATION is advanced past the start point, press REW or turn the SHUTTLE ring to remove the cassette. FIND PROGRAM START POINT 2 If the tape is set to "ON", playback begins automatically. "VIDEO...
... remote control again for more than 5 seconds. JOG SHATTLE PLAY STOP/EJECT SHUTTLE 1 2 3 2 4 5 6 7 8 9 0 4 PLAY 1 REW (Rewind) FF (Fast-Forward) 3 OK EN 21 1 LOAD A CASSETTE Make sure the window side is up on the screen (when VIDEO CALIBRATION is advanced past the start point, press REW or turn the SHUTTLE ring to remove the cassette. FIND PROGRAM START POINT 2 If the tape is set to "ON", playback begins automatically. "VIDEO...

SR-TS1U VCR Instruction Manual (1812KB)
Page 22
..., then press ENTER. (The channel changes after inserting the cassette (when Video Calibration is intact. STOP RECORDING 6 Press STOP or STOP/EJECT. SET TAPE SPEED 3 Press SP/EP to set to "ON", ੬ pg. 36). Press PLAY to resume recording. ● During record pause, you use the RF connection, by using the CH5∞ (+/-) buttons or NUMBER keys. Video Calibration will not be recorded. The Mode Lock indicator lights up on it completes.
..., then press ENTER. (The channel changes after inserting the cassette (when Video Calibration is intact. STOP RECORDING 6 Press STOP or STOP/EJECT. SET TAPE SPEED 3 Press SP/EP to set to "ON", ੬ pg. 36). Press PLAY to resume recording. ● During record pause, you use the RF connection, by using the CH5∞ (+/-) buttons or NUMBER keys. Video Calibration will not be recorded. The Mode Lock indicator lights up on it completes.

SR-TS1U VCR Instruction Manual (1812KB)
Page 30
... channel is displayed on the screen for 5 seconds. IN PLAY MODE: Default setting is pressed. Select "OFF" if you do not want the superimposed operational indications on the screen. IN RECORD MODE: Default setting is "ON".The RECORD/PAUSE indication will appear and be set to "IN PLAY MODE" or "IN RECORD MODE" by pressing CH5∞ or SHUTTLE PLUS %fi, then press OK or SHUTTLE PLUS #. Clock time Stereo program indication Second Audio Program...
... channel is displayed on the screen for 5 seconds. IN PLAY MODE: Default setting is pressed. Select "OFF" if you do not want the superimposed operational indications on the screen. IN RECORD MODE: Default setting is "ON".The RECORD/PAUSE indication will appear and be set to "IN PLAY MODE" or "IN RECORD MODE" by pressing CH5∞ or SHUTTLE PLUS %fi, then press OK or SHUTTLE PLUS #. Clock time Stereo program indication Second Audio Program...
SR-TS1U VCR Instruction Manual (1812KB)
Page 33
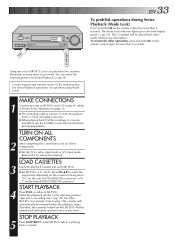
... to mono 3.5 mm mini-plug connector. ● When playing back S-VHS recordings, it is recommended to use the S-VIDEO connection to select the input mode depending on the SR-TS1U which is playing back a cassette. CH STOP/EJECT Using two sets of SR-TS1U, you can select the returning position for Series Playback (੬ pg. 28) Use the buttons and controls on the VCR's front panel for the Series Playback operations (except when using AV cables as...
... to mono 3.5 mm mini-plug connector. ● When playing back S-VHS recordings, it is recommended to use the S-VIDEO connection to select the input mode depending on the SR-TS1U which is playing back a cassette. CH STOP/EJECT Using two sets of SR-TS1U, you can select the returning position for Series Playback (੬ pg. 28) Use the buttons and controls on the VCR's front panel for the Series Playback operations (except when using AV cables as...

SR-TS1U VCR Instruction Manual (1812KB)
Page 35
... completing the connections, turn on all the components. ● Set the TV to "AUX". Refer to select the input mode depending on the connector being used - "L-1" for the rear AUDIO/VIDEO IN connector, or "F-1" for more than 5 seconds. NOTES: ● Series Recording is recording. STOP PLAYBACK 6 Press STOP/EJECT on the SR-TS1U which is also possible using Mode Lock). 1 MAKE CONNECTIONS Connect two sets of SR-TS1U. Use the buttons and controls on the VCR's front display panel...
... completing the connections, turn on all the components. ● Set the TV to "AUX". Refer to select the input mode depending on the connector being used - "L-1" for the rear AUDIO/VIDEO IN connector, or "F-1" for more than 5 seconds. NOTES: ● Series Recording is recording. STOP PLAYBACK 6 Press STOP/EJECT on the SR-TS1U which is also possible using Mode Lock). 1 MAKE CONNECTIONS Connect two sets of SR-TS1U. Use the buttons and controls on the VCR's front display panel...

SR-TS1U VCR Instruction Manual (1812KB)
Page 40
... 400 lines. NOTE: Tapes recorded in S-VHS mode. This compares with this VCR. For details, refer to record and play back with SVHS picture quality on the display panel regardless of normal VHS recordings. FUNCTION 1 = VIDEO CALIBRATION ON PICTURE CONTROL AUTO AUTO TIMER OFF AUTO SP=EP TIMER OFF VIDEO STABILIZER OFF 2ND AUDIO RECORD OFF NEXT PAGE SELECT WITH (5,∞) AND (OK) PRESS (MENU) TO END PREVIOUS PAGE AUDIO MONITOR = S-VHS MODE FRONT AUX INPUT REAR AUX INPUT HI-FI ON VIDEO VIDEO SELECT...
... 400 lines. NOTE: Tapes recorded in S-VHS mode. This compares with this VCR. For details, refer to record and play back with SVHS picture quality on the display panel regardless of normal VHS recordings. FUNCTION 1 = VIDEO CALIBRATION ON PICTURE CONTROL AUTO AUTO TIMER OFF AUTO SP=EP TIMER OFF VIDEO STABILIZER OFF 2ND AUDIO RECORD OFF NEXT PAGE SELECT WITH (5,∞) AND (OK) PRESS (MENU) TO END PREVIOUS PAGE AUDIO MONITOR = S-VHS MODE FRONT AUX INPUT REAR AUX INPUT HI-FI ON VIDEO VIDEO SELECT...

SR-TS1U VCR Instruction Manual (1812KB)
Page 42
42 EN OK CH 1 4 7 1 MENU MENU PLAYBACK AND RECORDING FEATURES (cont.) JOG SHATTLE 2 3 2 5 6 8 9 0 4 3 OK SHUTTLE PLUS Stereo And SAP (Second Audio Program) Your VCR's built-in MTS decoder enables reception of Multi- To Record SAP Programs . . . channel TV Sound broadcasts. ACCESS FUNCTION SET 1 SCREEN 2 Move the highlight bar (arrow) to "FUNCTION SET 1" by pressing CH5∞ or SHUTTLE PLUS %fi, then press OK or SHUTTLE PLUS #. 3 SELECT 2ND AUDIO RECORD SET MODE Move the highlight bar...
42 EN OK CH 1 4 7 1 MENU MENU PLAYBACK AND RECORDING FEATURES (cont.) JOG SHATTLE 2 3 2 5 6 8 9 0 4 3 OK SHUTTLE PLUS Stereo And SAP (Second Audio Program) Your VCR's built-in MTS decoder enables reception of Multi- To Record SAP Programs . . . channel TV Sound broadcasts. ACCESS FUNCTION SET 1 SCREEN 2 Move the highlight bar (arrow) to "FUNCTION SET 1" by pressing CH5∞ or SHUTTLE PLUS %fi, then press OK or SHUTTLE PLUS #. 3 SELECT 2ND AUDIO RECORD SET MODE Move the highlight bar...

SR-TS1U VCR Instruction Manual (1812KB)
Page 52
the VCR starts recording when the signals input from your cable system in the same way if the system has a timer and is connected to the VCR's rear AUDIO/VIDEO IN or S VIDEO IN (L-1) connectors. ● When you press the VCR's REC LINK button to engage the Auto Satellite Prog Rec mode, if the REC LINK button does not light but instead blinks quickly even though your...
the VCR starts recording when the signals input from your cable system in the same way if the system has a timer and is connected to the VCR's rear AUDIO/VIDEO IN or S VIDEO IN (L-1) connectors. ● When you press the VCR's REC LINK button to engage the Auto Satellite Prog Rec mode, if the REC LINK button does not light but instead blinks quickly even though your...

SR-TS1U VCR Instruction Manual (1812KB)
Page 57
... same time. OPERATE CABLE BOX 3 First, while holding down CABLE/DBS on the VCR's remote control, press MBR SET and use the NUMBER keys to repeat this step until you must press ENTER after having pressed the NUMBER keys. ● To change the VCR's channel only.) NOTES: ● Depending on the brands of cable box, you replace the remote control's batteries. button can control functions on the type of cable box, there may be operated using the cable box's remote control. 2 ENTER CABLE BOX BRAND While...
... same time. OPERATE CABLE BOX 3 First, while holding down CABLE/DBS on the VCR's remote control, press MBR SET and use the NUMBER keys to repeat this step until you must press ENTER after having pressed the NUMBER keys. ● To change the VCR's channel only.) NOTES: ● Depending on the brands of cable box, you replace the remote control's batteries. button can control functions on the type of cable box, there may be operated using the cable box's remote control. 2 ENTER CABLE BOX BRAND While...

SR-TS1U VCR Instruction Manual (1812KB)
Page 59
... the recording is capable of programs that were previously set can control two VCRs with the same remote control by switching the remote's code between A and B (੬ step 2), pressing "1" for A-code commands and "2" for B-code commands. (Ex.) To set the VCR back to respond to A code signals, repeat the same procedure as shown above except pressing NUMBER key "1" instead of the VCR. NUMBER "1" POWER 1 2 3 NUMBER "2" 2 4 5 6 7 8 9 0 TIMER 4 1 STOP 3 A/B EN 59 Control Two JVC VCRs The remote control...
... the recording is capable of programs that were previously set can control two VCRs with the same remote control by switching the remote's code between A and B (੬ step 2), pressing "1" for A-code commands and "2" for B-code commands. (Ex.) To set the VCR back to respond to A code signals, repeat the same procedure as shown above except pressing NUMBER key "1" instead of the VCR. NUMBER "1" POWER 1 2 3 NUMBER "2" 2 4 5 6 7 8 9 0 TIMER 4 1 STOP 3 A/B EN 59 Control Two JVC VCRs The remote control...
SR-TS1U VCR Instruction Manual (1812KB)
Page 60
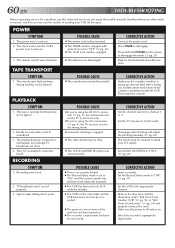
.... 39) Set the VCR to channel 3 or 4. The remote control won 't work. POSSIBLE CAUSE ● The power cord is disconnected. ● The TIMER mode is engaged with new ones. RECORDING SYMPTOM 1. POSSIBLE CAUSE ● There's no cassette loaded. ● The Record Safety mode is engaged. ● The batteries are clear. 4. Press and hold POWER on . 2. Disengage Auto Tracking and adjust the tracking manually (੬ pg. 24). The heads must be heard. The playback picture is...
.... 39) Set the VCR to channel 3 or 4. The remote control won 't work. POSSIBLE CAUSE ● The power cord is disconnected. ● The TIMER mode is engaged with new ones. RECORDING SYMPTOM 1. POSSIBLE CAUSE ● There's no cassette loaded. ● The Record Safety mode is engaged. ● The batteries are clear. 4. Press and hold POWER on . 2. Disengage Auto Tracking and adjust the tracking manually (੬ pg. 24). The heads must be heard. The playback picture is...

SR-TS1U VCR Instruction Manual (1812KB)
Page 64
... 23 Specifications 68 Still Picture Playback 23 Superimpose 30 S-VHS (Super VHS 40 S-VHS ET 41 S-Video Connection 7 T Tape Position Indicator 28 Tape Speed Setting 22 Time Zone Selection 12 Tuner Setting 13 V Variable-Speed Search 24 VCR Plus+ Timer Programming 43 VCR Plus+ Timer Recording 43 Video Stabilizer 27 A A/B Code 59 Active Video Calibration 36 Add Channel 14 Audio Monitor 26 Auto Channel Setting 13 Auto Daylight Saving Time 11 Auto SP→EP Timer 50 Auto Timer 50 Automatic Tracking 24 Aux Input 53 AV Connection 6 B Band 13 C Cable Box 15 Cable Box Brand...
... 23 Specifications 68 Still Picture Playback 23 Superimpose 30 S-VHS (Super VHS 40 S-VHS ET 41 S-Video Connection 7 T Tape Position Indicator 28 Tape Speed Setting 22 Time Zone Selection 12 Tuner Setting 13 V Variable-Speed Search 24 VCR Plus+ Timer Programming 43 VCR Plus+ Timer Recording 43 Video Stabilizer 27 A A/B Code 59 Active Video Calibration 36 Add Channel 14 Audio Monitor 26 Auto Channel Setting 13 Auto Daylight Saving Time 11 Auto SP→EP Timer 50 Auto Timer 50 Automatic Tracking 24 Aux Input 53 AV Connection 6 B Band 13 C Cable Box 15 Cable Box Brand...
SR-TS1U VCR Instruction Manual (1812KB)
Page 68
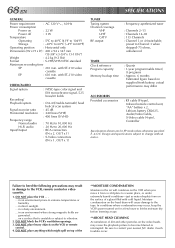
... range Normal audio Hi-Fi audio Input/Output : NTSC-type color signal and EIA monochrome signal, 525 lines/60 fields : DA-4 (Double Azimuth) head helical scan system : 45 dB : 240 lines (VHS) : 400 lines (S-VHS) : 70 Hz to 10,000 Hz : 20 Hz to contact your nearest JVC dealer if such troubles occur. ACCESSORIES Provided accessories : RF cable (F-type), Infrared remote control unit, "AA" battery x 2, Lithium battery CR2025, Audio/Video Cable, S-Video cable (4-pin), Controller Specifications shown are...
... range Normal audio Hi-Fi audio Input/Output : NTSC-type color signal and EIA monochrome signal, 525 lines/60 fields : DA-4 (Double Azimuth) head helical scan system : 45 dB : 240 lines (VHS) : 400 lines (S-VHS) : 70 Hz to 10,000 Hz : 20 Hz to contact your nearest JVC dealer if such troubles occur. ACCESSORIES Provided accessories : RF cable (F-type), Infrared remote control unit, "AA" battery x 2, Lithium battery CR2025, Audio/Video Cable, S-Video cable (4-pin), Controller Specifications shown are...


