
Instruction Manual
Page 2
... the receiving antenna. - These limits are designed to provide reasonable protection against harmful interference in a particular installation. If this equipment does cause harmful interference to radio or television reception, which the receiver is no guarantee that to which can radiate radio frequency energy and, if not installed and used in accordance with the limits for a Class B digital device, pursuant to Part 15...
... the receiving antenna. - These limits are designed to provide reasonable protection against harmful interference in a particular installation. If this equipment does cause harmful interference to radio or television reception, which the receiver is no guarantee that to which can radiate radio frequency energy and, if not installed and used in accordance with the limits for a Class B digital device, pursuant to Part 15...

Instruction Manual
Page 3
... Tone Options 24 JVC PnP's Controls and Features 12 4 FM Transmitter Options 24 Activating your SIRIUS Subscription 14 5 Add or Skip 24 Basic Operation 15 6 Lock Options 25 Selecting Music 16 7 Audio Level Options 26 Direct Tuning 17 8 Antenna Aiming Options 27 Presetting the Desired Streams 17 9 Memory Options 27 Enlarging the Indications-Display Button ...... 19 0 Time Based Features 28 S-Seek Function-Memory Button 20 - Use this and other JVC PnP products...
... Tone Options 24 JVC PnP's Controls and Features 12 4 FM Transmitter Options 24 Activating your SIRIUS Subscription 14 5 Add or Skip 24 Basic Operation 15 6 Lock Options 25 Selecting Music 16 7 Audio Level Options 26 Direct Tuning 17 8 Antenna Aiming Options 27 Presetting the Desired Streams 17 9 Memory Options 27 Enlarging the Indications-Display Button ...... 19 0 Time Based Features 28 S-Seek Function-Memory Button 20 - Use this and other JVC PnP products...

Instruction Manual
Page 5
... replacing a fuse, first unplug the cigarette lighter adapter from the cigarette lighter. • When drilling holes to mount the unit, make sure everything here is included: SIRIUS® Radio Remote Controller Battery If anything is missing or damaged, or if your JVC PnP fails to high levels of humidity, moisture, or dust. • When replacing a fuse, use only a new one with a negative ground connection. • Do not install...
... replacing a fuse, first unplug the cigarette lighter adapter from the cigarette lighter. • When drilling holes to mount the unit, make sure everything here is included: SIRIUS® Radio Remote Controller Battery If anything is missing or damaged, or if your JVC PnP fails to high levels of humidity, moisture, or dust. • When replacing a fuse, use only a new one with a negative ground connection. • Do not install...
Instruction Manual
Page 6
... transmitter. • Suction Cup Mount • Cigarette Lighter Adapter • Magnetic Roof-mount SIRIUS Antenna KS-K6003 includes... • Installation • Home Docking Cradle • SIRIUS Antenna • Power Supply • AC Power Cord • Audio cord KS-K6001 includes... • Installation • Car Docking Cradle • Suction Cup Mount • Cigarette Lighter Adapter • Magnetic Roof-mount SIRIUS Antenna • Audio cord • Cassette Adapter Note: KS-K6002 does not include any connecting cord;
... transmitter. • Suction Cup Mount • Cigarette Lighter Adapter • Magnetic Roof-mount SIRIUS Antenna KS-K6003 includes... • Installation • Home Docking Cradle • SIRIUS Antenna • Power Supply • AC Power Cord • Audio cord KS-K6001 includes... • Installation • Car Docking Cradle • Suction Cup Mount • Cigarette Lighter Adapter • Magnetic Roof-mount SIRIUS Antenna • Audio cord • Cassette Adapter Note: KS-K6002 does not include any connecting cord;

Instruction Manual
Page 7
... to JVC PnP's front panel. 2 Assemble the supplied suction cup mount to the car's controls. • Do not install JVC PnP where it will hinder your Car Docking Kit. 1 Determine where you have completed the installation. Doing so may hinder the function of the cradle-DC 12 V. Installation in Your Car with KS-K6002/KS-K6001 CAUTION: Do not plug the cigarette lighter adapter...
... to JVC PnP's front panel. 2 Assemble the supplied suction cup mount to the car's controls. • Do not install JVC PnP where it will hinder your Car Docking Kit. 1 Determine where you have completed the installation. Doing so may hinder the function of the cradle-DC 12 V. Installation in Your Car with KS-K6002/KS-K6001 CAUTION: Do not plug the cigarette lighter adapter...

Instruction Manual
Page 8
... frequency selected by the FM frequency output selector into your car stereo. Finding the Best Antenna Mounting Location 1 Temporarily plug the antenna into the back of the following frequencies-88.1 MHz, 88.3 MHz, 88.5 MHz, and 88.7 MHz. • It is achieved with KS-K6002/KS-K6001 (continued) 4 For KS-K6001: A If your car stereo does not have a line input (LINE IN or AUX)... Plug the supplied audio cable...
... frequency selected by the FM frequency output selector into your car stereo. Finding the Best Antenna Mounting Location 1 Temporarily plug the antenna into the back of the following frequencies-88.1 MHz, 88.3 MHz, 88.5 MHz, and 88.7 MHz. • It is achieved with KS-K6002/KS-K6001 (continued) 4 For KS-K6001: A If your car stereo does not have a line input (LINE IN or AUX)... Plug the supplied audio cable...

Instruction Manual
Page 9
... properly connected, "Antenna Error" will appear on your JVC PnP. Make sure your car is receiving the SIRIUS signal, you hear audio (see "8 Antenna Aiming Options" on page 27). 2 Unplug the cigarette lighter adapter from the somewhere the satellite signal could be cradle. 4 .Slide JVC PnP all the way into the cradle so that the antenna is mounted in a good location. 1 Turn off your JVC PnP then remove it...
... properly connected, "Antenna Error" will appear on your JVC PnP. Make sure your car is receiving the SIRIUS signal, you hear audio (see "8 Antenna Aiming Options" on page 27). 2 Unplug the cigarette lighter adapter from the somewhere the satellite signal could be cradle. 4 .Slide JVC PnP all the way into the cradle so that the antenna is mounted in a good location. 1 Turn off your JVC PnP then remove it...

Instruction Manual
Page 10
... is firmly secured. 6 Plug the cigarette lighter adapter into the cigarette lighter. 7 Attach the SIRIUS antenna to the metal surface of the car, such as roof of your car. • You can use the supplied double-side adhesive tape to attach the antenna cord firmly. Installation in driver's and passenger's feet. Take advantage of any existing cable channels or wiring conduits. • For SUVs...
... is firmly secured. 6 Plug the cigarette lighter adapter into the cigarette lighter. 7 Attach the SIRIUS antenna to the metal surface of the car, such as roof of your car. • You can use the supplied double-side adhesive tape to attach the antenna cord firmly. Installation in driver's and passenger's feet. Take advantage of any existing cable channels or wiring conduits. • For SUVs...

Instruction Manual
Page 11
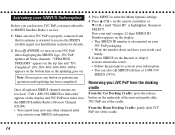
... be needed to the Installations supplied for your Home Docking Kit. 1 Plug the audio cable's mini connector into the back of the cradle-AUDIO OUT. 2 Plug the audio cable's white (L ch) and red (R ch) connectors into your home depends on the next column as a general placement guideline. or EAST- Due to the paths of SIRIUS satellites over the US, the best location for the antenna...
... be needed to the Installations supplied for your Home Docking Kit. 1 Plug the audio cable's mini connector into the back of the cradle-AUDIO OUT. 2 Plug the audio cable's white (L ch) and red (R ch) connectors into your home depends on the next column as a general placement guideline. or EAST- Due to the paths of SIRIUS satellites over the US, the best location for the antenna...

Instruction Manual
Page 13
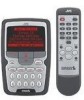
... . 9 Number (0 - 9) keys Enters the stream numbers or preset numbers directly. Replace the battery cover. 13 Also alternates the Normal Operation screen and the Stream List if pressed and held . Installing Batteries in the Remote 1. 1 Main display 7 MENU 2 (POWER) Turns on and off the power. 3 BAND (P.TUNE) Selects the 3 bands of the remote control. 2. Install two AAA batteries. 3. enters and exits from the Preset Tuning Mode. 4 MEMO (memory) (S-SEEK) Stores and recalls the Artist/Song Title information. 5 CHANNEL 5 / ∞...
... . 9 Number (0 - 9) keys Enters the stream numbers or preset numbers directly. Replace the battery cover. 13 Also alternates the Normal Operation screen and the Stream List if pressed and held . Installing Batteries in the Remote 1. 1 Main display 7 MENU 2 (POWER) Turns on and off the power. 3 BAND (P.TUNE) Selects the 3 bands of the remote control. 2. Install two AAA batteries. 3. enters and exits from the Preset Tuning Mode. 4 MEMO (memory) (S-SEEK) Stores and recalls the Artist/Song Title information. 5 CHANNEL 5 / ∞...
Instruction Manual
Page 14
... display and JVC PnP now tunes in to the SIRIUS Satellite Radio's Preview Channel (Ch184). • You cannot tune in to any operation until you must subscribe to SIRIUS Satellite Radio's service. 1. Activating your SIRIUS Subscription Before you can also call SIRIUS toll-free at 1-888-539- After displaying the SIRIUS logo, JVC PnP updates all updated SIRIUS channel streams are received, "Call 1-888-539-SIRIUS to enter the Menu Options settings. 4. Press MENU to Subscribe" appears on your JVC...
... display and JVC PnP now tunes in to the SIRIUS Satellite Radio's Preview Channel (Ch184). • You cannot tune in to any operation until you must subscribe to SIRIUS Satellite Radio's service. 1. Activating your SIRIUS Subscription Before you can also call SIRIUS toll-free at 1-888-539- After displaying the SIRIUS logo, JVC PnP updates all updated SIRIUS channel streams are received, "Call 1-888-539-SIRIUS to enter the Menu Options settings. 4. Press MENU to Subscribe" appears on your JVC...
Instruction Manual
Page 20
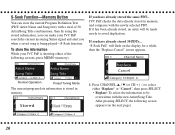
... already stored the same PDT... Normal Operation Preset Tuning Mode The current program data information is being played-S-Seek function. To store the information While your JVC PnP search the current incoming Sirius signal and alert you when a saved song is stored in memory, and compares with a total of the following screen appears (on the display for a while, then the "Replace-Cancel" screen appears.
... already stored the same PDT... Normal Operation Preset Tuning Mode The current program data information is being played-S-Seek function. To store the information While your JVC PnP search the current incoming Sirius signal and alert you when a saved song is stored in memory, and compares with a total of the following screen appears (on the display for a while, then the "Replace-Cancel" screen appears.
Instruction Manual
Page 23
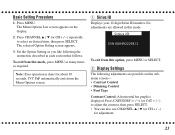
... following the instruction described in this option, press MENU or SELECT. 2 Display Settings Note: If no operation is displayed. To exit from the Menu Options screen. Set the Option Setting as required. Press CATEGORY # / @ (or CAT + / -) to select an desired item, then press SELECT. Displays your 12 digit Sirius ID number. The Menu Options List screen appears on this mode, press MENU as many times as you like following adjustments are allowed...
... following the instruction described in this option, press MENU or SELECT. 2 Display Settings Note: If no operation is displayed. To exit from the Menu Options screen. Set the Option Setting as required. Press CATEGORY # / @ (or CAT + / -) to select an desired item, then press SELECT. Displays your 12 digit Sirius ID number. The Menu Options List screen appears on this mode, press MENU as many times as you like following adjustments are allowed...
Instruction Manual
Page 24
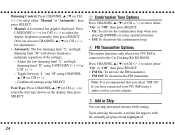
... + / -) to adjust the display brightness manually, then press SELECT. (You can skip unwanted streams while tuning. Confirm all settings using a audio cord or cassette adapter. 5 Add or Skip You can also use CHANNEL 5 / ∞ (or CH + / -) for adjustment.) • Automatic: The low dimming limit "L" and high dimming limit "H" will always maintain a minimum separation of the settings. - Dimming Control: Press CHANNEL 5 / ∞ (or CH + / -) to select either "On...
... + / -) to adjust the display brightness manually, then press SELECT. (You can skip unwanted streams while tuning. Confirm all settings using a audio cord or cassette adapter. 5 Add or Skip You can also use CHANNEL 5 / ∞ (or CH + / -) for adjustment.) • Automatic: The low dimming limit "L" and high dimming limit "H" will always maintain a minimum separation of the settings. - Dimming Control: Press CHANNEL 5 / ∞ (or CH + / -) to select either "On...

Instruction Manual
Page 27
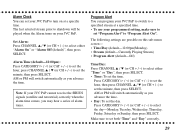
... reception when locating the SIRIUS antenna. Clear All Memory: Press CHANNEL 5 / ∞ (or CH + / -) to select either "On" or "Off", then press SELECT. • On: To activate the S-Seek Function. • Off: To deactivate the S-Seek Function. Automatic Memory Search: Press CHANNEL 5 / ∞ (or CH + / -) to be available in your JVC PnP at a time. In addition, you use your residential area. The following adjustments are shown...
... reception when locating the SIRIUS antenna. Clear All Memory: Press CHANNEL 5 / ∞ (or CH + / -) to select either "On" or "Off", then press SELECT. • On: To activate the S-Seek Function. • Off: To deactivate the S-Seek Function. Automatic Memory Search: Press CHANNEL 5 / ∞ (or CH + / -) to be available in your JVC PnP at a time. In addition, you use your residential area. The following adjustments are shown...

Instruction Manual
Page 28
... Savings Time (DST) Observance: Activate this menu option, you can set up the clock shown on the display. The clock data is subject to DST. Time Zone: Press CHANNEL 5 / ∞ (or CH + / -) to select your residential area from one of the following adjustments are possible on this submenu screen- • Clock • Alarm Clock • Program Alert • Auto Shutdown • Sleep Mode Clock When entering this function if...
... Savings Time (DST) Observance: Activate this menu option, you can set up the clock shown on the display. The clock data is subject to DST. Time Zone: Press CHANNEL 5 / ∞ (or CH + / -) to select your residential area from one of the following adjustments are possible on this submenu screen- • Clock • Alarm Clock • Program Alert • Auto Shutdown • Sleep Mode Clock When entering this function if...
Instruction Manual
Page 29
... be played when the Alarm turns on this sub-menu screen- • Time/Day (default-12:00pm/Monday) • Stream (default-Currently Playing Stream) • Program Alert (default-Off) Alarm Time (default-12:00pm): Press CATEGORY # / @ (or CAT + / -) to set the hour, press CHANNEL 5 / ∞ (or CH + / -) to set the minute, then press SELECT. Program Alert You can set your JVC PnP cannot receive the SIRIUS signals (satellite and...
... be played when the Alarm turns on this sub-menu screen- • Time/Day (default-12:00pm/Monday) • Stream (default-Currently Playing Stream) • Program Alert (default-Off) Alarm Time (default-12:00pm): Press CATEGORY # / @ (or CAT + / -) to set the hour, press CHANNEL 5 / ∞ (or CH + / -) to set the minute, then press SELECT. Program Alert You can set your JVC PnP cannot receive the SIRIUS signals (satellite and...

Instruction Manual
Page 30
... selected, Sleep Mode is canceled. Press CHANNEL 5 / ∞ (or CH + / -) to cancel the reset), then press SELECT. Press CHANNEL 5 / ∞ (or CH + / -) to select "Yes" (to reset) or "No" (to select the time, then press SELECT. Auto Shutdown You can reset the following items to select "Enabled" (or "Disabled"), then press SELECT. - Factory Default You can make your JVC PnP shuts off, and the "Cancel Auto Shutdown" screen will now turn...
... selected, Sleep Mode is canceled. Press CHANNEL 5 / ∞ (or CH + / -) to cancel the reset), then press SELECT. Press CHANNEL 5 / ∞ (or CH + / -) to select "Yes" (to reset) or "No" (to select the time, then press SELECT. Auto Shutdown You can reset the following items to select "Enabled" (or "Disabled"), then press SELECT. - Factory Default You can make your JVC PnP shuts off, and the "Cancel Auto Shutdown" screen will now turn...
Instruction Manual
Page 31
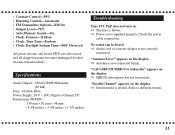
... becomes unskipped (locked streams remain locked). Troubleshooting Your JVC PnP does not turn on the display. ] Stream tuned is not supplied properly. "Antenna Error" appears on the display. ] SIRIUS subscription has not been made. Select a different stream. 31 Check the power cable connection. Specifications "Call 1-888-539-SIRIUS to Subscribe" appears on the display. ] Antenna is not correctly connected. No sound can be heard. ] Audio cord or cassette adapter is not connected firmly.
... becomes unskipped (locked streams remain locked). Troubleshooting Your JVC PnP does not turn on the display. ] Stream tuned is not supplied properly. "Antenna Error" appears on the display. ] SIRIUS subscription has not been made. Select a different stream. 31 Check the power cable connection. Specifications "Call 1-888-539-SIRIUS to Subscribe" appears on the display. ] Antenna is not correctly connected. No sound can be heard. ] Audio cord or cassette adapter is not connected firmly.

Instruction Manual
Page 32
KT-SR1000 SIRIUS® Radio h t t p : / / w w w . jvc m o b i le .c o m Visit us on-line for Technical Support & Customer Satisfaction Survey. EN VICTOR COMPANY OF JAPAN, LIMITED © 2003 VICTOR COMPANY OF JAPAN, LIMITED 1203MNMMDWKRI USA ONLY Call 1-800-252-5722 http://www.jvc.com We can help you! US RESIDENTS ONLY Having TROUBLE with operation?
KT-SR1000 SIRIUS® Radio h t t p : / / w w w . jvc m o b i le .c o m Visit us on-line for Technical Support & Customer Satisfaction Survey. EN VICTOR COMPANY OF JAPAN, LIMITED © 2003 VICTOR COMPANY OF JAPAN, LIMITED 1203MNMMDWKRI USA ONLY Call 1-800-252-5722 http://www.jvc.com We can help you! US RESIDENTS ONLY Having TROUBLE with operation?


