
Instructions
Page 3
...the display brightness 14 Turning off the power with the Sleep Timer 14 FM/AM tuner operations 15 Tuning in to FM/AM stations manually 15 Using preset tuning 15 Selecting the FM reception mode 16 XM Satellite Radio operations 17 Preparation 17 Listening to XM Satellite Radio ...30 Introducing the Surround modes 30 Introducing the DSP modes 32 Using the Surround/DSP modes 33 Activating the Surround/DSP modes 34 AV COMPU LINK remote control system .......... 35 Operating other JVC products 37 Operating other manufacturers' products ........ 39 Troubleshooting 42 Specifications 43 1
...the display brightness 14 Turning off the power with the Sleep Timer 14 FM/AM tuner operations 15 Tuning in to FM/AM stations manually 15 Using preset tuning 15 Selecting the FM reception mode 16 XM Satellite Radio operations 17 Preparation 17 Listening to XM Satellite Radio ...30 Introducing the Surround modes 30 Introducing the DSP modes 32 Using the Surround/DSP modes 33 Activating the Surround/DSP modes 34 AV COMPU LINK remote control system .......... 35 Operating other JVC products 37 Operating other manufacturers' products ........ 39 Troubleshooting 42 Specifications 43 1
Instructions
Page 4
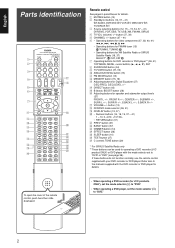
..., push here then slide downward • When operating a DVD recorder (for operating a DVD recorder (JVC product ONLY) or DVD player with the mode selector set the mode selector (i) to the manuals supplied with your DVD recorder or DVD player. button (37, 39) 5 CHANNEL +/- u VOLUME +/-... parentheses for Digital Equalizer (27) D.EQ FREQ, D.EQ LEVEL +/- BOOST button (28) y Adjusting buttons for details. English Parts identification A/V CONTROL RECEIVER REMOTE CONTROL RM-SRXD211J MUTING AUDIO 1 DBS/ DVR/DVD VCR CATV TV/SIRIUS 2 DVR/DVD VCR DBS TV 3 USB XM FM/AM SIRIUS TV...
..., push here then slide downward • When operating a DVD recorder (for operating a DVD recorder (JVC product ONLY) or DVD player with the mode selector set the mode selector (i) to the manuals supplied with your DVD recorder or DVD player. button (37, 39) 5 CHANNEL +/- u VOLUME +/-... parentheses for Digital Equalizer (27) D.EQ FREQ, D.EQ LEVEL +/- BOOST button (28) y Adjusting buttons for details. English Parts identification A/V CONTROL RECEIVER REMOTE CONTROL RM-SRXD211J MUTING AUDIO 1 DBS/ DVR/DVD VCR CATV TV/SIRIUS 2 DVR/DVD VCR DBS TV 3 USB XM FM/AM SIRIUS TV...
Instructions
Page 6
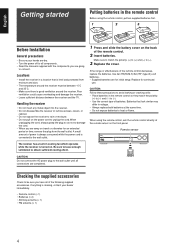
...; Leave sufficient distance between -5˚C and 35˚C. • Make sure there is good ventilation around the receiver must be sure you have all components. • Read the manuals supplied with the components you are away on the power cord to rain or moisture. • Do not pull on travel or otherwise...
...; Leave sufficient distance between -5˚C and 35˚C. • Make sure there is good ventilation around the receiver must be sure you have all components. • Read the manuals supplied with the components you are away on the power cord to rain or moisture. • Do not pull on travel or otherwise...

Instructions
Page 8
... the rear panel to the (+) and (-) terminals marked on the rear panel, using a cord with RCA pin plugs (not supplied). • Refer also to the manual supplied with the SPEAKER IMPEDANCE indicated by one surround back speaker. Normally place it to obtain the best possible surround effect. Connecting the speakers Turn...
... the rear panel to the (+) and (-) terminals marked on the rear panel, using a cord with RCA pin plugs (not supplied). • Refer also to the manual supplied with the SPEAKER IMPEDANCE indicated by one surround back speaker. Normally place it to obtain the best possible surround effect. Connecting the speakers Turn...
Instructions
Page 9
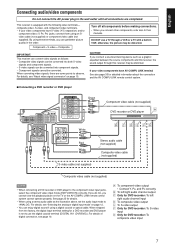
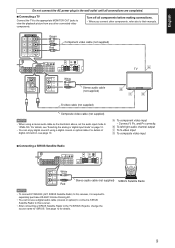
... all components before making connections. • When you connect other components, refer also to their manuals. See page 25 for detailed information about the connection and the AV COMPU LINK remote control system. 7 Connecting a DVD recorder or DVD player DVR DVR/DVD OUT...connect them using a digital coaxial or optical cable. By using a stereo audio cable as a graphic equalizer between the source components and this receiver, the sound output through a VCR or a TV with the following video terminals- otherwise, the picture may be converted. When converting video ...
... all components before making connections. • When you connect other components, refer also to their manuals. See page 25 for detailed information about the connection and the AV COMPU LINK remote control system. 7 Connecting a DVD recorder or DVD player DVR DVR/DVD OUT...connect them using a digital coaxial or optical cable. By using a stereo audio cable as a graphic equalizer between the source components and this receiver, the sound output through a VCR or a TV with the following video terminals- otherwise, the picture may be converted. When converting video ...
Instructions
Page 10
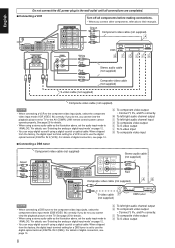
... cable (not supplied) White Composite video cable (not supplied) S-video cable (not supplied) Composite video cable (not supplied) NOTES • When connecting a VCR to their manuals. See page 25 for a DBS tuner is set the audio input mode to "ANALOG." For details of digital connection, see page 10. Å To component..., select the component video input mode (DBS VIDEO IN) correctly. For details, see "Selecting the analog or digital input mode" on the TV or the AV COMPU LINK remote control system cannot operate properly.
... cable (not supplied) White Composite video cable (not supplied) S-video cable (not supplied) Composite video cable (not supplied) NOTES • When connecting a VCR to their manuals. See page 25 for a DBS tuner is set the audio input mode to "ANALOG." For details of digital connection, see page 10. Å To component..., select the component video input mode (DBS VIDEO IN) correctly. For details, see "Selecting the analog or digital input mode" on the TV or the AV COMPU LINK remote control system cannot operate properly.
Instructions
Page 11
...IN IN White 5 2 3 ∞ Stereo audio cable (not supplied) SIRIUS Satellite Radio R Red NOTES • To connect KT-SR2000 (JVC SIRIUS Satellite Radio) to this receiver, it is required to separately purchase KS-K6013 Home Docking Kit. • You cannot use a digital audio cable (coaxial or optical) to... a TV Connect the TV to the appropriate MONITOR OUT jacks to view the playback picture from any other components, refer also to their manuals. English Do not connect the AC power plug to the wall outlet until all components before making connections. • When you connect other...
...IN IN White 5 2 3 ∞ Stereo audio cable (not supplied) SIRIUS Satellite Radio R Red NOTES • To connect KT-SR2000 (JVC SIRIUS Satellite Radio) to this receiver, it is required to separately purchase KS-K6013 Home Docking Kit. • You cannot use a digital audio cable (coaxial or optical) to... a TV Connect the TV to the appropriate MONITOR OUT jacks to view the playback picture from any other components, refer also to their manuals. English Do not connect the AC power plug to the wall outlet until all components before making connections. • When you connect other...

Instructions
Page 12
...to operate the connected component (except DBS tuner) using the AV COMPU LINK remote control system (see page 25). • ...DVR/DVD) 2(DBS) 3(VCR) When the component has a digital optical output terminal, connect it to their manuals. Digital coaxial cable (not supplied) Digital optical cable (not supplied) Turn off all the audio/video connections have...and sound adjustment may be distorted if the signals are inserted firmly. English About video signal conversion This receiver can be erased in a few days in red. Video Input Converted Video Output Component Component S-video ...
...to operate the connected component (except DBS tuner) using the AV COMPU LINK remote control system (see page 25). • ...DVR/DVD) 2(DBS) 3(VCR) When the component has a digital optical output terminal, connect it to their manuals. Digital coaxial cable (not supplied) Digital optical cable (not supplied) Turn off all the audio/video connections have...and sound adjustment may be distorted if the signals are inserted firmly. English About video signal conversion This receiver can be erased in a few days in red. Video Input Converted Video Output Component Component S-video ...
Instructions
Page 13
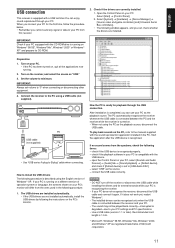
...Remember you can be played back correctly-interrupted or degraded-due to [USB Audio DAC]. - To play back sounds on the PC, refer to the manuals supplied with the CD-ROM drive is 1.5 m. * Microsoft®, Windows® 98 SE, Windows® Me, Windows® 2000, and ... your PC from the speakers, check the following procedure is equipped with the USB device. - check if the USB device is recognized. Turn on the receiver, and select the source as the source. - Select [System] = [Hardware] = [Device Manager] = [Sound, video and game controllers] and [Universal Serial ...
...Remember you can be played back correctly-interrupted or degraded-due to [USB Audio DAC]. - To play back sounds on the PC, refer to the manuals supplied with the CD-ROM drive is 1.5 m. * Microsoft®, Windows® 98 SE, Windows® Me, Windows® 2000, and ... your PC from the speakers, check the following procedure is equipped with the USB device. - check if the USB device is recognized. Turn on the receiver, and select the source as the source. - Select [System] = [Hardware] = [Device Manager] = [Sound, video and game controllers] and [Universal Serial ...
Instructions
Page 17
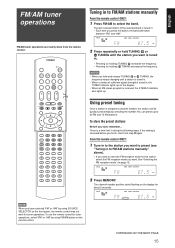
... tuner operations. From the remote control ONLY: 1 Tune in to the station you want to preset (see "Tuning in . • Each time you want is received, the STEREO indicator also lights up to select the band. You can be quickly tuned simply by selecting the number. There is canceled before you... between "FM" and "AM." See "Selecting the FM reception mode" on the remote control. If the setting is a time limit in to FM/AM stations manually From the remote control ONLY: 1 Press FM/AM to 30 FM and 15 AM stations. English FM/AM tuner operations FM/AM tuner operations are...
... tuner operations. From the remote control ONLY: 1 Tune in to the station you want to preset (see "Tuning in . • Each time you want is received, the STEREO indicator also lights up to select the band. You can be quickly tuned simply by selecting the number. There is canceled before you... between "FM" and "AM." See "Selecting the FM reception mode" on the remote control. If the setting is a time limit in to FM/AM stations manually From the remote control ONLY: 1 Press FM/AM to 30 FM and 15 AM stations. English FM/AM tuner operations FM/AM tuner operations are...
Instructions
Page 19
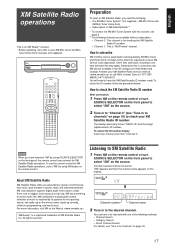
.... DIGITAL AUTO L R LINEAR PCM S.WFR DIGITAL AUTO L R LINEAR PCM S.WFR Channel number Channel name 2 Tune in to channels with this receiver, see page 5. ** The following : - Channel 0: This channel is for live sporting events, talk radio, up comedy, children's programming, and... for every music fan. Channel Search - XM service available in . NOTE When you need to the desired channel. Category Search - Tuner Home Dock manuals (not supplied). 1 2 3 4 5 6 7 8 9 10 0 10 Preparation To listen to XM Satellite Radio, you have the XM Satellite...
.... DIGITAL AUTO L R LINEAR PCM S.WFR DIGITAL AUTO L R LINEAR PCM S.WFR Channel number Channel name 2 Tune in to channels with this receiver, see page 5. ** The following : - Channel 0: This channel is for live sporting events, talk radio, up comedy, children's programming, and... for every music fan. Channel Search - XM service available in . NOTE When you need to the desired channel. Category Search - Tuner Home Dock manuals (not supplied). 1 2 3 4 5 6 7 8 9 10 0 10 Preparation To listen to XM Satellite Radio, you have the XM Satellite...

Instructions
Page 22
... On the front panel ONLY: 1 Press SETTING and turn the jog, the room size changes as follows. • For the details of the receiver are explained. Quick Speaker Setup is the initial setting. 6 Press SET. NOTES • This procedure will not be completed if you to easily ... you want to set to appropriate values automatically (common to all the connections are also set the speaker output levels separately for each speaker's information manually. ANALOG L R S.WFR 2.0ch 2.1ch 3.0ch 4.0ch 4.1ch 5.0ch 6.0ch 6.1ch 7.0ch* (Back to the beginning) * "7.0ch" is performed, the speaker...
... On the front panel ONLY: 1 Press SETTING and turn the jog, the room size changes as follows. • For the details of the receiver are explained. Quick Speaker Setup is the initial setting. 6 Press SET. NOTES • This procedure will not be completed if you to easily ... you want to set to appropriate values automatically (common to all the connections are also set the speaker output levels separately for each speaker's information manually. ANALOG L R S.WFR 2.0ch 2.1ch 3.0ch 4.0ch 4.1ch 5.0ch 6.0ch 6.1ch 7.0ch* (Back to the beginning) * "7.0ch" is performed, the speaker...
Instructions
Page 37
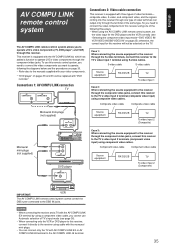
... mini-plugs (not supplied) AV COMPU LINK-III Source equipment RX-D212B TV To video input 2 (Composite) Monaural mini-plugs (not supplied) AV COMPU LINK DVD player AV COMPU LINK Case 3: When connecting the source equipment to the receiver through the composite video jacks, connect this receiver to the TV's video input...on page 36. • Refer also to the manuals supplied with your video components. * "DVD player" on pages 35 and 36 can connect only the TV with the AV COMPU LINK-III, which has added a function to operate JVC's video components through the terminal of TV's input mode...
... mini-plugs (not supplied) AV COMPU LINK-III Source equipment RX-D212B TV To video input 2 (Composite) Monaural mini-plugs (not supplied) AV COMPU LINK DVD player AV COMPU LINK Case 3: When connecting the source equipment to the receiver through the composite video jacks, connect this receiver to the TV's video input...on page 36. • Refer also to the manuals supplied with your video components. * "DVD player" on pages 35 and 36 can connect only the TV with the AV COMPU LINK-III, which has added a function to operate JVC's video components through the terminal of TV's input mode...

Instructions
Page 38
...changes the input mode to the appropriate position so that you can view the playback picture. The AV COMPU LINK remote control system allows you to use the remote control supplied with the AV COMPU LINK EX terminal using the TV volume control on the TV. 7 Turn on other connected... mode to the appropriate position (either video input 1 or video input 2) so that you can enjoy the video playback without setting other switches manually. The receiver automatically turns on and changes the source to Case 1 or Case 2 on page 35. The TV automatically turns on and changes the source ...
...changes the input mode to the appropriate position so that you can view the playback picture. The AV COMPU LINK remote control system allows you to use the remote control supplied with the AV COMPU LINK EX terminal using the TV volume control on the TV. 7 Turn on other connected... mode to the appropriate position (either video input 1 or video input 2) so that you can enjoy the video playback without setting other switches manually. The receiver automatically turns on and changes the source to Case 1 or Case 2 on page 35. The TV automatically turns on and changes the source ...
Instructions
Page 39
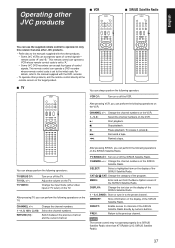
...of the SIRIUS Satellite Radio. DIRECT: Enable access to channels of the SIRIUS Satellite Radio. For details, refer to the manual supplied with the other products. - RETURN (10): Switch between the previous channel and the current channel. SELECT: Select ... 7 SIRIUS Satellite Radio You can use the supplied remote control to operate not only this receiver but also other JVC products. • Refer also to the manuals supplied with the DVD recorder. • To operate other products, aim the remote control directly at the remote sensor on the target product. 1 2 3 4 5 6 7 8 9...
...of the SIRIUS Satellite Radio. DIRECT: Enable access to channels of the SIRIUS Satellite Radio. For details, refer to the manual supplied with the other products. - RETURN (10): Switch between the previous channel and the current channel. SELECT: Select ... 7 SIRIUS Satellite Radio You can use the supplied remote control to operate not only this receiver but also other JVC products. • Refer also to the manuals supplied with the DVD recorder. • To operate other products, aim the remote control directly at the remote sensor on the target product. 1 2 3 4 5 6 7 8 9...

Instructions
Page 40
... playback. Only for operating your DVD recorder or DVD player. You can assign one of the four codes to the remote control supplied with this receiver for DVD player operations: 1 - 10, 0, h10: Select a chapter/title number, track number, menu item, etc. Initial setting: 03 1 Set... To operate the DVD recorder, set the mode selector to the beginning of the next chapter. Return to the manual supplied with the DVD recorder or DVD player for DVD recorder Some JVC DVD recorders can always perform the following operations on the DVD recorder and DVD player. 3: 7: 8: ¢:...
... playback. Only for operating your DVD recorder or DVD player. You can assign one of the four codes to the remote control supplied with this receiver for DVD player operations: 1 - 10, 0, h10: Select a chapter/title number, track number, menu item, etc. Initial setting: 03 1 Set... To operate the DVD recorder, set the mode selector to the beginning of the next chapter. Return to the manual supplied with the DVD recorder or DVD player for DVD recorder Some JVC DVD recorders can always perform the following operations on the DVD recorder and DVD player. 3: 7: 8: ¢:...

Instructions
Page 41
...products By changing the transmittable signals, you can use the supplied remote control to operate other manufacturers' products. • Refer also to the manuals supplied with the other products. • To operate those components with the TV for details. 5 Try to operate your TV by pressing ...+/-: TV/VIDEO: Turn on or off , you can perform the following operations on the TV. Manufacturers' codes for TV Manufacturer Codes JVC Akai Bell+Howell Centurion Coronad Daewoo Emerson Fisher GE•Pana GE•RCA Gold Star Hitachi KTV Magnavox Marantz Mitsubishi Panasonic Philips Pioneer ...
...products By changing the transmittable signals, you can use the supplied remote control to operate other manufacturers' products. • Refer also to the manuals supplied with the other products. • To operate those components with the TV for details. 5 Try to operate your TV by pressing ...+/-: TV/VIDEO: Turn on or off , you can perform the following operations on the TV. Manufacturers' codes for TV Manufacturer Codes JVC Akai Bell+Howell Centurion Coronad Daewoo Emerson Fisher GE•Pana GE•RCA Gold Star Hitachi KTV Magnavox Marantz Mitsubishi Panasonic Philips Pioneer ...


