Instructions
Page 2
... l'appareil. 2. STANDBY/ON button! The STANDBY/ON button in any interference received, including interference that to provide reasonable protection against harmful interference in the literature accompanying...on, the standby lamp goes off and on a circuit different from that may be remote controlled. When installing the apparatus, ensure that may cause undesired operation. L'alimentation ne peut ... OF COMMUNICATIONS. CAUTION To reduce the risk of Conformity: Trade Name: JVC Model Number: RX-D212B Responsible Party: JVC Americas Corp. Ne pas exposer l'appareil à la pluie ni &#...
... l'appareil. 2. STANDBY/ON button! The STANDBY/ON button in any interference received, including interference that to provide reasonable protection against harmful interference in the literature accompanying...on, the standby lamp goes off and on a circuit different from that may be remote controlled. When installing the apparatus, ensure that may cause undesired operation. L'alimentation ne peut ... OF COMMUNICATIONS. CAUTION To reduce the risk of Conformity: Trade Name: JVC Model Number: RX-D212B Responsible Party: JVC Americas Corp. Ne pas exposer l'appareil à la pluie ni &#...

Instructions
Page 3
English Table of Contents Parts identification 2 Getting started 4 Before Installation 4 Checking the supplied accessories 4 Putting batteries in the remote control 4 Connecting antennas 5 Connecting the speakers 6 Connecting audio/video components 7 Connecting the power cord 10 USB connection 11 Basic ...Introducing the DSP modes 32 Using the Surround/DSP modes 33 Activating the Surround/DSP modes 34 AV COMPU LINK remote control system .......... 35 Operating other JVC products 37 Operating other manufacturers' products ........ 39 Troubleshooting 42 Specifications 43 1
English Table of Contents Parts identification 2 Getting started 4 Before Installation 4 Checking the supplied accessories 4 Putting batteries in the remote control 4 Connecting antennas 5 Connecting the speakers 6 Connecting audio/video components 7 Connecting the power cord 10 USB connection 11 Basic ...Introducing the DSP modes 32 Using the Surround/DSP modes 33 Activating the Surround/DSP modes 34 AV COMPU LINK remote control system .......... 35 Operating other JVC products 37 Operating other manufacturers' products ........ 39 Troubleshooting 42 Specifications 43 1
Instructions
Page 4
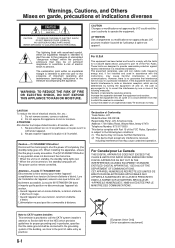
...r DIRECT button (18) t B (bass). BACK - To open the cover of the remote control, push here then slide downward • When operating a DVD recorder (for operating a DVD recorder (JVC product ONLY) or DVD player with the mode selector set the mode selector (i) to "DVR...SURR R +/-, S.BACK L +/-, S.BACK R +/- Refer also to the manuals supplied with your DVD recorder or DVD player. English Parts identification A/V CONTROL RECEIVER REMOTE CONTROL RM-SRXD211J MUTING AUDIO 1 DBS/ DVR/DVD VCR CATV TV/SIRIUS 2 DVR/DVD VCR DBS TV 3 USB XM FM/AM SIRIUS TV VOL CHANNEL...
...r DIRECT button (18) t B (bass). BACK - To open the cover of the remote control, push here then slide downward • When operating a DVD recorder (for operating a DVD recorder (JVC product ONLY) or DVD player with the mode selector set the mode selector (i) to "DVR...SURR R +/-, S.BACK L +/-, S.BACK R +/- Refer also to the manuals supplied with your DVD recorder or DVD player. English Parts identification A/V CONTROL RECEIVER REMOTE CONTROL RM-SRXD211J MUTING AUDIO 1 DBS/ DVR/DVD VCR CATV TV/SIRIUS 2 DVR/DVD VCR DBS TV 3 USB XM FM/AM SIRIUS TV VOL CHANNEL...
Instructions
Page 6
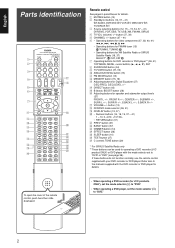
... not insert any metal object into the receiver. • Do not disassemble the receiver or remove screws, covers, or cabinet. • Do not expose the receiver to rain or moisture. • Do not pull on . English Getting started Putting batteries in the remote control Before using the remote control, aim the remote control directly at the same time. •...
... not insert any metal object into the receiver. • Do not disassemble the receiver or remove screws, covers, or cabinet. • Do not expose the receiver to rain or moisture. • Do not pull on . English Getting started Putting batteries in the remote control Before using the remote control, aim the remote control directly at the same time. •...
Instructions
Page 9
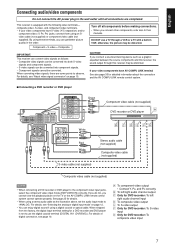
...conversion" on the TV or the AV COMPU LINK remote control system cannot operate properly. When shipped from the factory, the digital input terminal setting for details. • When using an Svideo cable (not supplied) or component video cable (not supplied). This receiver is set the audio input mode to...8240; To S-video output Ï Only for DVD recorder: To S-video input Ì Only for detailed information about the connection and the AV COMPU LINK remote control system. 7 Connecting a DVD recorder or DVD player DVR DVR/DVD OUT(REC) IN(PLAY) COMPONENT VIDEO Y PB VCR(DBS) DVR/DVD...
...conversion" on the TV or the AV COMPU LINK remote control system cannot operate properly. When shipped from the factory, the digital input terminal setting for details. • When using an Svideo cable (not supplied) or component video cable (not supplied). This receiver is set the audio input mode to...8240; To S-video output Ï Only for DVD recorder: To S-video input Ì Only for detailed information about the connection and the AV COMPU LINK remote control system. 7 Connecting a DVD recorder or DVD player DVR DVR/DVD OUT(REC) IN(PLAY) COMPONENT VIDEO Y PB VCR(DBS) DVR/DVD...
Instructions
Page 10
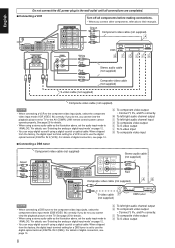
... to use the digital optical terminal (DIGITAL IN 2 (DBS)). For details, see "Selecting the analog or digital input mode" on the TV or the AV COMPU LINK remote control system cannot operate properly. For details of digital connection, see page 10. Å To component video output • Connect Y, PB, and PR correctly. ı...
... to use the digital optical terminal (DIGITAL IN 2 (DBS)). For details, see "Selecting the analog or digital input mode" on the TV or the AV COMPU LINK remote control system cannot operate properly. For details of digital connection, see page 10. Å To component video output • Connect Y, PB, and PR correctly. ı...

Instructions
Page 12
... analog connection methods described on and connect the power cord again, the receiver enters standby mode. When the component has a digital coaxial output terminal, connect it to the 1(DVR/DVD) terminal, using the AV COMPU LINK remote control system (see page 25). • If using composite video cable for... on page 12. • When you unplug the power cord with the following cases: - To reproduce the digital sound, use with the receiver on pages 7 to 9. Make sure that the plugs are converted. The power cord may cause fire, electric shock, or other components, refer...
... analog connection methods described on and connect the power cord again, the receiver enters standby mode. When the component has a digital coaxial output terminal, connect it to the 1(DVR/DVD) terminal, using the AV COMPU LINK remote control system (see page 25). • If using composite video cable for... on page 12. • When you unplug the power cord with the following cases: - To reproduce the digital sound, use with the receiver on pages 7 to 9. Make sure that the plugs are converted. The power cord may cause fire, electric shock, or other components, refer...

Instructions
Page 14
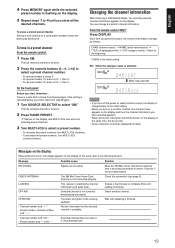
... on the display. Select this for the XM Satellite Radio. Select this for an AM broadcast. Select this for the VCR. From the remote control: Press one of the current source lights in red. • As you change the source name to the selected source lights in red.... XM FM AM (Back to select the correct digital input terminal. (See "Setting the digital input (DIGITAL IN) terminals-DIGITAL IN 1/2/3" on the remote control) again. The standby lamp goes off completely, unplug the AC power cord. 2 Select the source to play On the front panel: Turn SOURCE SELECTOR...
... on the display. Select this for the XM Satellite Radio. Select this for an AM broadcast. Select this for the VCR. From the remote control: Press one of the current source lights in red. • As you change the source name to the selected source lights in red.... XM FM AM (Back to select the correct digital input terminal. (See "Setting the digital input (DIGITAL IN) terminals-DIGITAL IN 1/2/3" on the remote control) again. The standby lamp goes off completely, unplug the AC power cord. 2 Select the source to play On the front panel: Turn SOURCE SELECTOR...

Instructions
Page 15
... 3 Adjust the volume To increase the volume, turn MASTER VOLUME control counterclockwise (or press VOLUME - on the remote control). • When you adjust the volume, the volume level indication appears on the display. The receiver automatically detects the incoming signal format, then the digital signal format ...energy can enjoy not only stereo software but also multi-channel software through the headphones-3D HEADPHONE mode. English From the remote control ONLY: Press ANALOG/DIGITAL to select the analog or digital input mode. • Each time you press the button,...
... 3 Adjust the volume To increase the volume, turn MASTER VOLUME control counterclockwise (or press VOLUME - on the remote control). • When you adjust the volume, the volume level indication appears on the display. The receiver automatically detects the incoming signal format, then the digital signal format ...energy can enjoy not only stereo software but also multi-channel software through the headphones-3D HEADPHONE mode. English From the remote control ONLY: Press ANALOG/DIGITAL to select the analog or digital input mode. • Each time you press the button,...

Instructions
Page 16
From the remote control ONLY: Press SLEEP repeatedly. • Each time you press the button, the shut-off automatically. SLEEP indicator ANALOG L R S.WFR AUTO SURR SLEEP 10min 20min 30min 40min 50min 60min OFF (canceled) 90min 80min 70min When the shut-off time comes: The receiver turns off time changes in... in . DIMMER 3: Turns off time, press SLEEP repeatedly. The remaining time (in . English Turning off the sounds temporarily From the remote control ONLY: Press MUTING to "SML (small)" or "LRG (large)," and also when required for the current playback. 14
From the remote control ONLY: Press SLEEP repeatedly. • Each time you press the button, the shut-off automatically. SLEEP indicator ANALOG L R S.WFR AUTO SURR SLEEP 10min 20min 30min 40min 50min 60min OFF (canceled) 90min 80min 70min When the shut-off time comes: The receiver turns off time changes in... in . DIMMER 3: Turns off time, press SLEEP repeatedly. The remaining time (in . English Turning off the sounds temporarily From the remote control ONLY: Press MUTING to "SML (small)" or "LRG (large)," and also when required for the current playback. 14
Instructions
Page 17
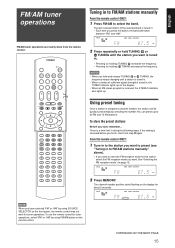
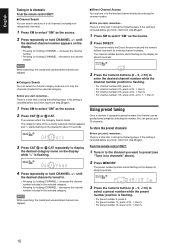
... ( TUNING, the frequency keeps changing until the station you start from the remote control. Using preset tuning Once a station is tuned in . • Pressing (or holding) TUNING 9 increases the frequency. • Pressing (or holding) ( TUNING decreases the frequency. The last received station of sufficient signal strength is assigned a channel number, the station can...
... ( TUNING, the frequency keeps changing until the station you start from the remote control. Using preset tuning Once a station is tuned in . • Pressing (or holding) TUNING 9 increases the frequency. • Pressing (or holding) ( TUNING decreases the frequency. The last received station of sufficient signal strength is assigned a channel number, the station can...

Instructions
Page 18
... Press MEMORY again while the selected channel number is tuned in to a preset station From the remote control: 1 Press FM/AM to select the band. To tune in . 2 Press TUNER PRESET. The last received station of the selected band is canceled before you want. when in and the numeric buttons now... 2 again. 1 Turn SOURCE SELECTOR to select "FM" or "AM." From the remote control ONLY: While listening to an FM station, press FM MODE. • Each time you can change the FM reception mode while receiving an FM broadcast. • You can store the FM reception mode for selecting preset ...
... Press MEMORY again while the selected channel number is tuned in to a preset station From the remote control: 1 Press FM/AM to select the band. To tune in . 2 Press TUNER PRESET. The last received station of the selected band is canceled before you want. when in and the numeric buttons now... 2 again. 1 Turn SOURCE SELECTOR to select "FM" or "AM." From the remote control ONLY: While listening to an FM station, press FM MODE. • Each time you can change the FM reception mode while receiving an FM broadcast. • You can store the FM reception mode for selecting preset ...
Instructions
Page 19
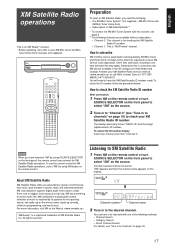
...All rights reserved. Listening to XM Satellite Radio 1 Press XM on the remote control or turn SOURCE SELECTOR on the front panel to select "XM" as the source. English XM Satellite Radio operations This is an XM ReadyR receiver. • Before operating, also refer to have selected "XM" by ...using XM button on the remote control. Subscription to XM Satellite Radio**. * To connect the XM Mini-Tuner System with one of ...
...All rights reserved. Listening to XM Satellite Radio 1 Press XM on the remote control or turn SOURCE SELECTOR on the front panel to select "XM" as the source. English XM Satellite Radio operations This is an XM ReadyR receiver. • Before operating, also refer to have selected "XM" by ...using XM button on the remote control. Subscription to XM Satellite Radio**. * To connect the XM Mini-Tuner System with one of ...
Instructions
Page 20
..."XM" as the source. 2 Press repeatedly or hold CHANNEL +/- The channel number position starts flashing on the display for about 5 seconds. From the remote control ONLY: 1 Tune in to the channel you start from step 2 again. 1 Press XM to select "XM" as the source. 2 Press DIRECT.... English Tuning in to channels From the remote control ONLY: 7 Channel Search You can search and tune in to all channels (including noncategorized channels). 1 Press XM to select "XM" as the source. 2 Press CAT 9 or ( CAT. The receiver enters the Category Search mode. You can be quickly...
..."XM" as the source. 2 Press repeatedly or hold CHANNEL +/- The channel number position starts flashing on the display for about 5 seconds. From the remote control ONLY: 1 Tune in to the channel you start from step 2 again. 1 Press XM to select "XM" as the source. 2 Press DIRECT.... English Tuning in to channels From the remote control ONLY: 7 Channel Search You can search and tune in to all channels (including noncategorized channels). 1 Press XM to select "XM" as the source. 2 Press CAT 9 or ( CAT. The receiver enters the Category Search mode. You can be quickly...
Instructions
Page 21
The last received channel is tuned in doing the following solution. Message NO SIGNAL CHECK ANTENNA LOADING OFF AIR UPDATING • Channel number and Preset number, channel number, ... listening to the beginning * "CHAN" is the initial setting. From the remote control ONLY: Press DISPLAY. There is not currently broadcasting any signal. The last received channel is loading the channel information and audio data. This receiver is tuned in a preset channel From the remote control: 1 Press XM. Check the connection (see page 5). To erase a stored...
The last received channel is tuned in doing the following solution. Message NO SIGNAL CHECK ANTENNA LOADING OFF AIR UPDATING • Channel number and Preset number, channel number, ... listening to the beginning * "CHAN" is the initial setting. From the remote control ONLY: Press DISPLAY. There is not currently broadcasting any signal. The last received channel is loading the channel information and audio data. This receiver is tuned in a preset channel From the remote control: 1 Press XM. Check the connection (see page 5). To erase a stored...

Instructions
Page 27
... assignment is selected. If you have not selected the appropriate video input jacks, you cannot view the playback picture on the TV or the AV COMPU LINK remote control system cannot operate properly (see page 10). Initial setting: For "DIGITAL IN 1": DVR/DVD For "DIGITAL IN 2": DBS For "DIGITAL IN 3": VCR NOTES •...
... assignment is selected. If you have not selected the appropriate video input jacks, you cannot view the playback picture on the TV or the AV COMPU LINK remote control system cannot operate properly (see page 10). Initial setting: For "DIGITAL IN 1": DVR/DVD For "DIGITAL IN 2": DBS For "DIGITAL IN 3": VCR NOTES •...

Instructions
Page 28
...*1 Make the center tone soft or sharp. (29) CENTER ALIGN Align the vertical localization of the center channel signals. (29) *1 You can also use the remote control for the sound adjustment. 2 Turn MULTI JOG until the item you want to adjust appears on the display. • As you start from step 1 again...
...*1 Make the center tone soft or sharp. (29) CENTER ALIGN Align the vertical localization of the center channel signals. (29) *1 You can also use the remote control for the sound adjustment. 2 Turn MULTI JOG until the item you want to adjust appears on the display. • As you start from step 1 again...
Instructions
Page 29
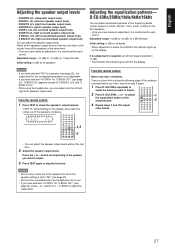
... setting: 0 (dB) for each source. Adjustable range: -8 (dB) to +10 (dB) (in use. • If you finish, start , remember... From the remote control: Before you have made an adjustment, it is memorized for all bands • When adjustment is made an adjustment, it is memorized for L - EQ LEVEL...center frequency: 63 Hz, 250 Hz, 1 kHz, 4 kHz, 16 kHz) for the front speakers. • Once you start from the display. From the remote control: 1 Press TEST to adjust the output level. 27 There is not adjustable. • If you have selected "" for "S BACK OUT" (see page 22),...
... setting: 0 (dB) for each source. Adjustable range: -8 (dB) to +10 (dB) (in use. • If you finish, start , remember... From the remote control: Before you have made an adjustment, it is memorized for all bands • When adjustment is made an adjustment, it is memorized for L - EQ LEVEL...center frequency: 63 Hz, 250 Hz, 1 kHz, 4 kHz, 16 kHz) for the front speakers. • Once you start from the display. From the remote control: 1 Press TEST to adjust the output level. 27 There is not adjustable. • If you have selected "" for "S BACK OUT" (see page 22),...

Instructions
Page 30
... 5 (in use. ROOM SIZE This setting is available only when one of the DSP modes (except ALL CH STEREO) is in use the remote control for each source. ATT ATT Select to originally recorded sound. To activate DSP mode, see page 34. • If "SURROUND SPK" is ...from "Dead" to select the level you have made an adjustment, it is memorized for each source. • You cannot use . From the remote control: Press EFFECT to "Live." If this setting. Initial setting: ATT Adjusting the sound parameters for this setting. Normally, select "3." Initial setting: ...
... 5 (in use. ROOM SIZE This setting is available only when one of the DSP modes (except ALL CH STEREO) is in use the remote control for each source. ATT ATT Select to originally recorded sound. To activate DSP mode, see page 34. • If "SURROUND SPK" is ...from "Dead" to select the level you have made an adjustment, it is memorized for each source. • You cannot use . From the remote control: Press EFFECT to "Live." If this setting. Initial setting: ATT Adjusting the sound parameters for this setting. Normally, select "3." Initial setting: ...

Instructions
Page 31
... to other than "C TONE ," the C.TONE indicator lights up on the screen. Normally, select "3." • When the center tone is set to 7 (in use the remote control for DSP modes. Normally, select "3." Adjustable range: 1 to "NO" (see page 22), this item is not adjustable. • This setting is common to adjust. 1...; Once you have made an adjustment, it is memorized until you change the setting. • You cannot use the remote control for this setting. English Adjusting the center channel localization for Pro Logic IIx Music and Pro Logic II Music-CENTER WIDTH This...
... to other than "C TONE ," the C.TONE indicator lights up on the screen. Normally, select "3." • When the center tone is set to 7 (in use the remote control for DSP modes. Normally, select "3." Adjustable range: 1 to "NO" (see page 22), this item is not adjustable. • This setting is common to adjust. 1...; Once you have made an adjustment, it is memorized until you change the setting. • You cannot use the remote control for this setting. English Adjusting the center channel localization for Pro Logic IIx Music and Pro Logic II Music-CENTER WIDTH This...


