Instructions
Page 4
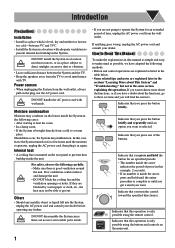
...dealer. Indicates that you get out. Internal heat • A cooling fan is selected. Indicates that this manual as simple and easyto-understand as possible, we have a doubt about This System" and "Troubleshooting," but not in the same section explaining the operations. Indicates that you press and hold ...carefully: • Make sure there is brought directly from the wall outlet. DO NOT install the System in a location near heat sources, or in a place subject to Read This Manual To make the explanations in this operation is complete or until an option you have adapted the ...
...dealer. Indicates that you get out. Internal heat • A cooling fan is selected. Indicates that this manual as simple and easyto-understand as possible, we have a doubt about This System" and "Troubleshooting," but not in the same section explaining the operations. Indicates that you press and hold ...carefully: • Make sure there is brought directly from the wall outlet. DO NOT install the System in a location near heat sources, or in a place subject to Read This Manual To make the explanations in this operation is complete or until an option you have adapted the ...

Instructions
Page 5
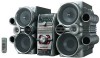
Contents Introduction 1 Precautions 1 How to Read This Manual 1 Getting Started 3 Step 1: Unpack 3 Step 2: Prepare the Remote Control 3 Step 3: Hook Up 4 Before Operating the System 6 Parts Index 6 Daily Operations-Playback 8 Listening to the Radio 9 Playing Back a Disc 10 Playing Back from the PC 12 Daily Operations-Sound and Other Adjustments ... Ejection-Tray Lock 17 Timer Operations 18 Turning Off the Power Automatically 18 Setting the Daily Timer 18 Additional Information 20 Learning More about This System 20 Maintenance 21 Troubleshooting 21 Specifications 22 2
Contents Introduction 1 Precautions 1 How to Read This Manual 1 Getting Started 3 Step 1: Unpack 3 Step 2: Prepare the Remote Control 3 Step 3: Hook Up 4 Before Operating the System 6 Parts Index 6 Daily Operations-Playback 8 Listening to the Radio 9 Playing Back a Disc 10 Playing Back from the PC 12 Daily Operations-Sound and Other Adjustments ... Ejection-Tray Lock 17 Timer Operations 18 Turning Off the Power Automatically 18 Setting the Daily Timer 18 Additional Information 20 Learning More about This System 20 Maintenance 21 Troubleshooting 21 Specifications 22 2
Instructions
Page 7
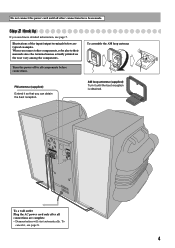
... all connections are typical examples. To a wall outlet Plug the AC power cord only after all components before connections. Turn the power off to their manuals since the terminal names actually printed on the rear vary among the components. To cancel it so that you connect other connections have been made...
... all connections are typical examples. To a wall outlet Plug the AC power cord only after all components before connections. Turn the power off to their manuals since the terminal names actually printed on the rear vary among the components. To cancel it so that you connect other connections have been made...
Instructions
Page 11
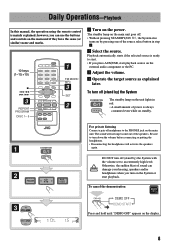
...161;/¢ 3 REPEAT PROGRAM DISC 1- 5 1 FM MODE/ MP3 3 SET 2 ¥ Turn on the main unit. DO NOT turn off (stand by ) the System with the volume set to the PHONES jack on the power. Otherwise, the sudden blast of the speakers. however, you can damage your hearing, speakers... • A small amount of headphones to an extremely high level; Daily Operations-Playback In this manual, the operation using the remote control is always consumed even while on the external audio component or the PC. π Adjust the volume. [ Operate the target source as explained later....
...161;/¢ 3 REPEAT PROGRAM DISC 1- 5 1 FM MODE/ MP3 3 SET 2 ¥ Turn on the main unit. DO NOT turn off (stand by ) the System with the volume set to the PHONES jack on the power. Otherwise, the sudden blast of the speakers. however, you can damage your hearing, speakers... • A small amount of headphones to an extremely high level; Daily Operations-Playback In this manual, the operation using the remote control is always consumed even while on the external audio component or the PC. π Adjust the volume. [ Operate the target source as explained later....
Instructions
Page 12
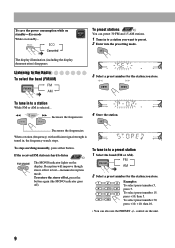
To stop searching manually, press either button. Reception will improve though stereo effect is selected... 2 sec. To tune in to a station While FM or AM is lost-monaural reception ...
To stop searching manually, press either button. Reception will improve though stereo effect is selected... 2 sec. To tune in to a station While FM or AM is lost-monaural reception ...

Instructions
Page 15
...following operations: - IMPORTANT • Always set volume to this terminal and enjoy sound reproduced through the USB connection. Playing Back from the PC This System is described using a USB cable (not supplied). (front panel) USB cable • Microsoft®, Windows® 98SE, Windows® Me, ...How to install the USB drivers The following procedure. 1 Turn on your PC. PC • Use "USB series A plug to the manuals supplied with the sound reproduction application installed in the following procedure is equipped with a USB terminal on the PC Refer to B plug" cable...
...following operations: - IMPORTANT • Always set volume to this terminal and enjoy sound reproduced through the USB connection. Playing Back from the PC This System is described using a USB cable (not supplied). (front panel) USB cable • Microsoft®, Windows® 98SE, Windows® Me, ...How to install the USB drivers The following procedure. 1 Turn on your PC. PC • Use "USB series A plug to the manuals supplied with the sound reproduction application installed in the following procedure is equipped with a USB terminal on the PC Refer to B plug" cable...
Instructions
Page 22
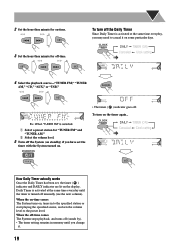
...the hour then minute for on-time. 3 Set the hour then minute for "TUNER FM" and "TUNER AM." 2 Select the volume level. 5 Turn off the System (on standby) if you have set , the timer ( ) indicator and DAILY indicator are lit on . • The timer ( ) indicator goes off -time. To... Clock setting How Daily Timer actually works Once the Daily Timer has been set the timer with the System turned on the display. When the off-time comes The System stops playback, and turns off manually (see the next column). DAILY TIMER (ON) Canceled Clock setting 4 Select the playback source-"TUNER ...
...the hour then minute for on-time. 3 Set the hour then minute for "TUNER FM" and "TUNER AM." 2 Select the volume level. 5 Turn off the System (on standby) if you have set , the timer ( ) indicator and DAILY indicator are lit on . • The timer ( ) indicator goes off -time. To... Clock setting How Daily Timer actually works Once the Daily Timer has been set the timer with the System turned on the display. When the off-time comes The System stops playback, and turns off manually (see the next column). DAILY TIMER (ON) Canceled Clock setting 4 Select the playback source-"TUNER ...


