Instructions
Page 1
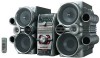
Retain this information for future reference. Serial No. which are located either on the rear, bottom or side of CA-HXC6 and SP-HXC6 SP-HXC6 CA-HXC6 SP-HXC6 INSTRUCTIONS For Customer Use: Enter below the Model No. LVT1350-001B [J] Model No. COMPACT COMPONENT SYSTEM HX-C6-Consists of the cabinet. and Serial No.
Retain this information for future reference. Serial No. which are located either on the rear, bottom or side of CA-HXC6 and SP-HXC6 SP-HXC6 CA-HXC6 SP-HXC6 INSTRUCTIONS For Customer Use: Enter below the Model No. LVT1350-001B [J] Model No. COMPACT COMPONENT SYSTEM HX-C6-Consists of the cabinet. and Serial No.
Instructions
Page 2
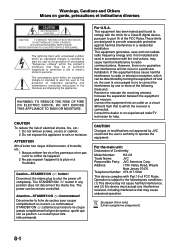
.... The power can be of sufficient magnitude to comply with Part 15 of Conformity Model Number: HX-C6 Trade Name: JVC Responsible Party: JVC Americas Corp. Déconnecter la fiche de secteur pour couper complètement le courant. This equipment has been tested and found to constitute a risk of important operating and maintenance (servicing) instructions in a residential installation. Caution-STANDBY/ON button! Attention...
.... The power can be of sufficient magnitude to comply with Part 15 of Conformity Model Number: HX-C6 Trade Name: JVC Responsible Party: JVC Americas Corp. Déconnecter la fiche de secteur pour couper complètement le courant. This equipment has been tested and found to constitute a risk of important operating and maintenance (servicing) instructions in a residential installation. Caution-STANDBY/ON button! Attention...
Instructions
Page 4
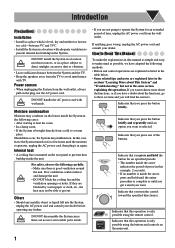
... have adapted the following carefully: • Make sure there is only possible using the buttons and controls on the plug, not the AC power cord. Internal heat • A cooling fan is mounted on the lenses inside the System in a place subject to direct sunlight, excessive dust or vibration. • Leave sufficient distance between 5°C and 35°C. • Install the System in a location with...
... have adapted the following carefully: • Make sure there is only possible using the buttons and controls on the plug, not the AC power cord. Internal heat • A cooling fan is mounted on the lenses inside the System in a place subject to direct sunlight, excessive dust or vibration. • Leave sufficient distance between 5°C and 35°C. • Install the System in a location with...

Instructions
Page 5
... 2: Prepare the Remote Control 3 Step 3: Hook Up 4 Before Operating the System 6 Parts Index 6 Daily Operations-Playback 8 Listening to the Radio 9 Playing Back a Disc 10 Playing Back from the PC 12 Daily Operations-Sound and Other Adjustments 13 Adjusting the Volume 13 Reinforcing the Bass Sound 13 Selecting the Sound Modes 14 Selecting the Surround Modes 14 Turning On or Off the Key-Touch Tone 14 Setting the Clock 14 Advanced Disc Operations 15 Programming the Playing Order-Program Play 15 Playing at Random...
... 2: Prepare the Remote Control 3 Step 3: Hook Up 4 Before Operating the System 6 Parts Index 6 Daily Operations-Playback 8 Listening to the Radio 9 Playing Back a Disc 10 Playing Back from the PC 12 Daily Operations-Sound and Other Adjustments 13 Adjusting the Volume 13 Reinforcing the Bass Sound 13 Selecting the Sound Modes 14 Selecting the Surround Modes 14 Turning On or Off the Key-Touch Tone 14 Setting the Clock 14 Advanced Disc Operations 15 Programming the Playing Order-Program Play 15 Playing at Random...
Instructions
Page 7
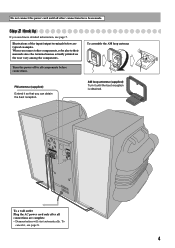
... power off to their manuals since the terminal names actually printed on the rear vary among the components. To assemble the AM loop antenna FM antenna (supplied) Extend it , see page 5. To cancel it so that you need more detailed information, see page 8. 4 To a wall outlet Plug the AC power cord only after all components before connections. Illustrations of the input/output...
... power off to their manuals since the terminal names actually printed on the rear vary among the components. To assemble the AM loop antenna FM antenna (supplied) Extend it , see page 5. To cancel it so that you need more detailed information, see page 8. 4 To a wall outlet Plug the AC power cord only after all components before connections. Illustrations of the input/output...
Instructions
Page 8
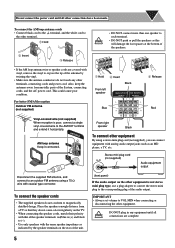
... speaker terminals: red/blue to (+) and black to the corresponding plug of the unit. (front panel) If the audio output on the other terminals, connecting cords and power cord. IMPORTANT • Always set volume to VOL MIN when connecting or disconnecting the other equipment By using a 75 Ω wire with vinyl, remove the vinyl to expose the tip of the antenna by twisting the vinyl. • Make sure the antenna...
... speaker terminals: red/blue to (+) and black to the corresponding plug of the unit. (front panel) If the audio output on the other terminals, connecting cords and power cord. IMPORTANT • Always set volume to VOL MIN when connecting or disconnecting the other equipment By using a 75 Ω wire with vinyl, remove the vinyl to expose the tip of the antenna by twisting the vinyl. • Make sure the antenna...
Instructions
Page 10
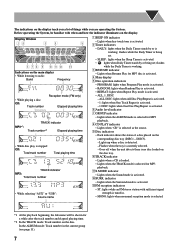
... set; indicator • While selecting "AUX" or "USB": Source name • Lights when the Surround mode is currently selected. - Flashes when the tray is activated. Display Window 12 34 5 6 78 9 p q w e Indications on the main display • While listening to radio: Band Frequency • While playing a disc: CD: Track number Reception mode (FM only) Elapsed playing time MP3*1: TRACK indicator Track number*2 Elapsed playing time 1 BEEP ON indicator • Lights when key-touch tone is working...
... set; indicator • While selecting "AUX" or "USB": Source name • Lights when the Surround mode is currently selected. - Flashes when the tray is activated. Display Window 12 34 5 6 78 9 p q w e Indications on the main display • While listening to radio: Band Frequency • While playing a disc: CD: Track number Reception mode (FM only) Elapsed playing time MP3*1: TRACK indicator Track number*2 Elapsed playing time 1 BEEP ON indicator • Lights when key-touch tone is working...
Instructions
Page 11
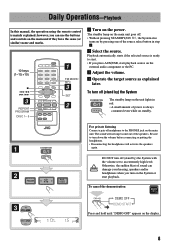
... listening Connect a pair of the source select button in red. • A small amount of the speakers. Daily Operations-Playback In this manual, the operation using the remote control is always consumed even while on the external audio component or the PC. π Adjust the volume. [ Operate the target source as explained later. Playback automatically starts if the selected source is ready to the PHONES jack on the display. 8 To turn on the power...
... listening Connect a pair of the source select button in red. • A small amount of the speakers. Daily Operations-Playback In this manual, the operation using the remote control is always consumed even while on the external audio component or the PC. π Adjust the volume. [ Operate the target source as explained later. Playback automatically starts if the selected source is ready to the PHONES jack on the display. 8 To turn on the power...
Instructions
Page 12
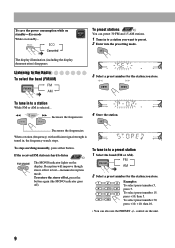
... stereo effect is selected... 2 sec. ECO Canceled Main Unit ONLY The display illumination (including the display demonstration) disappears. Examples: To select preset number 5, press 5. To save the power consumption while on standby-Eco mode While on the display. Increases the frequencies. 4 Store the station. control on the unit. 9 To select preset number 30, press +10, +10, then 10. • You can preset 30 FM and 15 AM stations. 1 Tune in to a station...
... stereo effect is selected... 2 sec. ECO Canceled Main Unit ONLY The display illumination (including the display demonstration) disappears. Examples: To select preset number 5, press 5. To save the power consumption while on standby-Eco mode While on the display. Increases the frequencies. 4 Store the station. control on the unit. 9 To select preset number 30, press +10, +10, then 10. • You can preset 30 FM and 15 AM stations. 1 Tune in to a station...
Instructions
Page 14
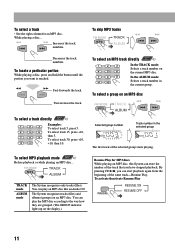
... Selected group number Track number in the current group. TRACK ALBUM TRACK mode ALBUM mode The System recognizes only tracks (files). While playing a disc... To activate/deactivate Resume Play PROGRAM RESUME ON RESUME OFF 11 Fast-reverses the track. To select a group on the display.) Resume Play for an MP3 disc. To select track 30, press +10, +10, then 10. You can play an MP3 disc like an Audio...
... Selected group number Track number in the current group. TRACK ALBUM TRACK mode ALBUM mode The System recognizes only tracks (files). While playing a disc... To activate/deactivate Resume Play PROGRAM RESUME ON RESUME OFF 11 Fast-reverses the track. To select a group on the display.) Resume Play for an MP3 disc. To select track 30, press +10, +10, then 10. You can play an MP3 disc like an Audio...

Instructions
Page 15
..., install the USB drivers following the instructions on the PC's monitor. 5 Check if the drivers are installed. Restart the music software on your PC recognizes the System. In this case, do the following operations: - How to your PC: Select [Start] = [Settings] = [Control Panel] 2 Click [System] = [Hardware] = [Device Manager] = [Sound, video and game controllers] and [Universal Serial Bus controllers] • The following window appears, and you connect your PC for the source. To play...
..., install the USB drivers following the instructions on the PC's monitor. 5 Check if the drivers are installed. Restart the music software on your PC recognizes the System. In this case, do the following operations: - How to your PC: Select [Start] = [Settings] = [Control Panel] 2 Click [System] = [Hardware] = [Device Manager] = [Sound, video and game controllers] and [Universal Serial Bus controllers] • The following window appears, and you connect your PC for the source. To play...
Instructions
Page 16
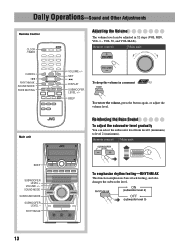
...and also changes the subwoofer level. Remote control: Main unit: BEEP SUBWOOFER LEVEL + VOLUME +/- SET ¢ DISPLAY SUBWOOFER LEVEL +/- Remote control: Main unit: CANCEL 4 RHYTHM AX SOUND MODE FADE MUTING Main unit VOLUME +/- Reinforcing the Bass Sound To adjust the subwoofer level gradually You can be adjusted in a moment ONLY To restore the volume, press the button again, or adjust the volume level. VOL 30, and VOL MAX). Daily Operations-Sound and Other Adjustments Remote Control CLOCK /TIMER Adjusting the Volume The volume level can select the subwoofer level from level...
...and also changes the subwoofer level. Remote control: Main unit: BEEP SUBWOOFER LEVEL + VOLUME +/- SET ¢ DISPLAY SUBWOOFER LEVEL +/- Remote control: Main unit: CANCEL 4 RHYTHM AX SOUND MODE FADE MUTING Main unit VOLUME +/- Reinforcing the Bass Sound To adjust the subwoofer level gradually You can be adjusted in a moment ONLY To restore the volume, press the button again, or adjust the volume level. VOL 30, and VOL MAX). Daily Operations-Sound and Other Adjustments Remote Control CLOCK /TIMER Adjusting the Volume The volume level can select the subwoofer level from level...
Instructions
Page 17
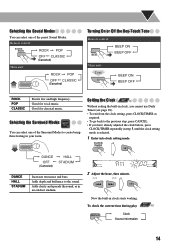
... time during play ONLY Clock Source information 14 Now the built-in step 1, until the clock setting mode is selected. 1 Enter into clock setting mode. Setting the Clock Remote ONLY Without setting the built-in clock, you cannot use Daily Timer (see page 18). • To exit from the clock setting, press CLOCK/TIMER as in your room. Selecting the Sound Modes You can select one of the Surround Modes to the sound. Good for classical music. Remote control...
... time during play ONLY Clock Source information 14 Now the built-in step 1, until the clock setting mode is selected. 1 Enter into clock setting mode. Setting the Clock Remote ONLY Without setting the built-in clock, you cannot use Daily Timer (see page 18). • To exit from the clock setting, press CLOCK/TIMER as in your room. Selecting the Sound Modes You can select one of the Surround Modes to the sound. Good for classical music. Remote control...

Instructions
Page 18
... System exits from Program Play. 15 Disc number Program step number Track number 4 Repeat steps 2 and 3 until you program all tracks you have selected are played back in the order you want for MP3 discs. 1 Before starting playback, activate Program Play. Examples: To select track 5, press 5. To select track 15, press +10, then 5. Advanced Disc Operations Remote Control 10 keys (1-10,+10) CANCEL ¢/4 REPEAT PROGRAM DISC 1 - 5 Main unit 7 0 SET 7 CD 3/8 RANDOM Programming the Playing Order Remote ONLY -Program Play...
... System exits from Program Play. 15 Disc number Program step number Track number 4 Repeat steps 2 and 3 until you program all tracks you have selected are played back in the order you want for MP3 discs. 1 Before starting playback, activate Program Play. Examples: To select track 5, press 5. To select track 15, press +10, then 5. Advanced Disc Operations Remote Control 10 keys (1-10,+10) CANCEL ¢/4 REPEAT PROGRAM DISC 1 - 5 Main unit 7 0 SET 7 CD 3/8 RANDOM Programming the Playing Order Remote ONLY -Program Play...
Instructions
Page 21
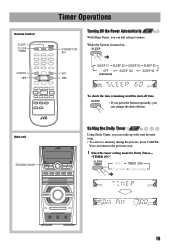
...previous step. 1 Select the timer setting mode for Daily Timer- "TIMER ON." You can change the shut-off time • If you press the button repeatedly, you can return to music. Remote Control SLEEP CLOCK /TIMER CANCEL 4 Main unit STANDBY/ON Timer Operations STANDBY/ON Turning Off the Power Automatically Remote ONLY With Sleep Timer... process, press CANCEL. SLEEP 10 SLEEP 20 SLEEP 30 SLEEP 60 OFF SLEEP 120 SLEEP 90 SET (Canceled) ¢ To check the time remaining until the shut-off time. DAILY TIMER (ON) Canceled Clock setting 18 While the System is turned on...
...previous step. 1 Select the timer setting mode for Daily Timer- "TIMER ON." You can change the shut-off time • If you press the button repeatedly, you can return to music. Remote Control SLEEP CLOCK /TIMER CANCEL 4 Main unit STANDBY/ON Timer Operations STANDBY/ON Turning Off the Power Automatically Remote ONLY With Sleep Timer... process, press CANCEL. SLEEP 10 SLEEP 20 SLEEP 30 SLEEP 60 OFF SLEEP 120 SLEEP 90 SET (Canceled) ¢ To check the time remaining until the shut-off time. DAILY TIMER (ON) Canceled Clock setting 18 While the System is turned on...
Instructions
Page 22
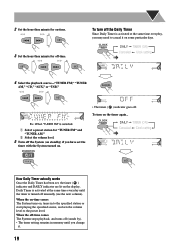
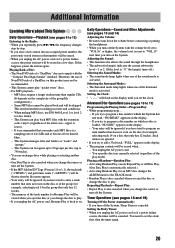
... need to the preset level. 2 Set the hour then minute for on-time. 3 Set the hour then minute for "TUNER FM" and "TUNER AM." 2 Select the volume level. 5 Turn off (stands by). • The timer setting remains in to the specified station or start playing the specified source, and sets the volume level to cancel it . 19 To turn on the timer again... When the on-time comes The System turns on, tunes in memory...
... need to the preset level. 2 Set the hour then minute for on-time. 3 Set the hour then minute for "TUNER FM" and "TUNER AM." 2 Select the volume level. 5 Turn off (stands by). • The timer setting remains in to the specified station or start playing the specified source, and sets the volume level to cancel it . 19 To turn on the timer again... When the on-time comes The System turns on, tunes in memory...
Instructions
Page 23
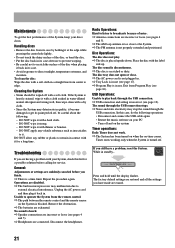
... power cord or if a power failure occurs, the timer will be skipped. Repeating Playback-Repeat Play: • Repeat Play is back to on. Adjusting the Sound: • This function also affects the sound through the headphones. • The subwoofer lamp(s) indicates the current subwoofer level-1 or 2. (If the level is reset to "VOL 15" next time you unplug the AC power cord or if a power failure occurs, the preset stations...
... power cord or if a power failure occurs, the timer will be skipped. Repeating Playback-Repeat Play: • Repeat Play is back to on. Adjusting the Sound: • This function also affects the sound through the headphones. • The subwoofer lamp(s) indicates the current subwoofer level-1 or 2. (If the level is reset to "VOL 15" next time you unplug the AC power cord or if a power failure occurs, the preset stations...
Instructions
Page 24
... USB connection. ] USB connection and setting is incorrect (see page 17). ] Program Play is in use (see page 12). In this list for service. If you finish. ] There is blocked. Repeat the procedure again. DO NOT wipe it . Troubleshooting If you have a problem, reset the System. No sound is not properly extended and positioned. Disconnect the headphones. Main Unit ONLY Press and hold until the display flashes...
... USB connection. ] USB connection and setting is incorrect (see page 17). ] Program Play is in use (see page 12). In this list for service. If you finish. ] There is blocked. Repeat the procedure again. DO NOT wipe it . Troubleshooting If you have a problem, reset the System. No sound is not properly extended and positioned. Disconnect the headphones. Main Unit ONLY Press and hold until the display flashes...
Instructions
Page 25
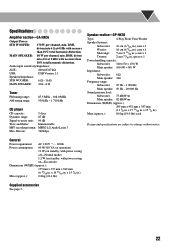
...; at 63 Hz with power saving off-Normal mode) 1.2 W (on standby; Audio input sensitivity/impedance: AUX: 400 mV/47 kΩ USB: USB Version 1.1 Speakers/impedance: SUB WOOFER: 6 Ω - 16 Ω MAIN SPEAKER: 4 Ω - 8 Ω Tuner FM tuning range: AM tuning range: 87.5 MHz - 108.0 MHz 530 kHz - 1 710 kHz CD player CD capacity: 5 discs Dynamic range: 87 dB Signal-to change without notice. with no more...
...; at 63 Hz with power saving off-Normal mode) 1.2 W (on standby; Audio input sensitivity/impedance: AUX: 400 mV/47 kΩ USB: USB Version 1.1 Speakers/impedance: SUB WOOFER: 6 Ω - 16 Ω MAIN SPEAKER: 4 Ω - 8 Ω Tuner FM tuning range: AM tuning range: 87.5 MHz - 108.0 MHz 530 kHz - 1 710 kHz CD player CD capacity: 5 discs Dynamic range: 87 dB Signal-to change without notice. with no more...

Instructions
Page 28
EN © 2005 Victor Company of Japan, Limited 0305TMMMDWSAM HX-C6 COMPACT COMPONENT SYSTEM
EN © 2005 Victor Company of Japan, Limited 0305TMMMDWSAM HX-C6 COMPACT COMPONENT SYSTEM


