Instructions
Page 1
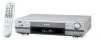
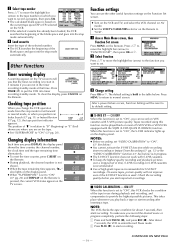
...: This reminder is intended to alert the user to ensure safe use any other power source. VIDEO CASSETTE RECORDER HR-S9911U LPT0639-001A INSTRUCTIONS CONTENTS Index 4 Connections and Plug&Play Setting 6 Initial Settings 7 Language Setting 7 Clock Setting 7 Tuner Setting 8 Cable Box and/or DBS Receiver Control Setting 8 Playback 9 Recording 12 Timer Recording 14 Changing VCR Plus+® Setting 14 VCR Plus+® Timer Programing 14 Express Timer Programing 15 24HR Quick Programing 15 Video Navigation 16 Navigation Playback 16 Editing Titles 17 Finding Titles 18 Other...
...: This reminder is intended to alert the user to ensure safe use any other power source. VIDEO CASSETTE RECORDER HR-S9911U LPT0639-001A INSTRUCTIONS CONTENTS Index 4 Connections and Plug&Play Setting 6 Initial Settings 7 Language Setting 7 Clock Setting 7 Tuner Setting 8 Cable Box and/or DBS Receiver Control Setting 8 Playback 9 Recording 12 Timer Recording 14 Changing VCR Plus+® Setting 14 VCR Plus+® Timer Programing 14 Express Timer Programing 15 24HR Quick Programing 15 Video Navigation 16 Navigation Playback 16 Editing Titles 17 Finding Titles 18 Other...
Instructions
Page 2
... to the VCR, Remote or video cassette. 1. INSTALLATION 1. If you are unable to insert the plug fully into the outlet, contact your electrician to be used with a polarized alternating- Power Cord Protection Power supply cords should be equipped with this can be walked on the Remote. 5. CAUTION: Changes or modifications not approved by the manufacturer. However, S-VHS recordings are not likely to replace your obsolete...
... to the VCR, Remote or video cassette. 1. INSTALLATION 1. If you are unable to insert the plug fully into the outlet, contact your electrician to be used with a polarized alternating- Power Cord Protection Power supply cords should be equipped with this can be walked on the Remote. 5. CAUTION: Changes or modifications not approved by the manufacturer. However, S-VHS recordings are not likely to replace your obsolete...
Instructions
Page 6
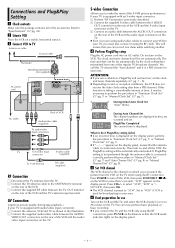
... playback or basic recording. ● If you use Turn on the VCR and the TV, and select the VCR channel 3 or 4 (or AV mode) on the display panel, perform the procedure in "Semiauto Clock Set" (੬ pg. 7) or "Manual Clock Set" (੬ pg. 7). Then turn off the VCR, then press STOP/EJECT (0) on and off the VCR; Press POWER to select "3CH", "4CH" or "- to turn on the VCR for use a cable box, Plug&Play...
... playback or basic recording. ● If you use Turn on the VCR and the TV, and select the VCR channel 3 or 4 (or AV mode) on the display panel, perform the procedure in "Semiauto Clock Set" (੬ pg. 7) or "Manual Clock Set" (੬ pg. 7). Then turn off the VCR, then press STOP/EJECT (0) on and off the VCR; Press POWER to select "3CH", "4CH" or "- to turn on the VCR for use a cable box, Plug&Play...
Instructions
Page 8
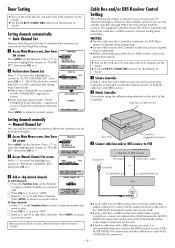
... skip other channels. Cable box or DBS receiver Setting channels manually - A Access Main Menu screen, then Tuner Set screen Press MENU on the unit. ● If both a cable box and a DBS receiver are used , position the Controller so its instruction manual. ● Turn on the VCR and TV, and select the VCR channel (or AV mode). ● Set the VCR/TV/CABLE/DBS selector on the Remote to your cable box or DBS receiver has audio/video output connectors, connect an audio/video cable between the AUDIO/ VIDEO IN connectors...
... skip other channels. Cable box or DBS receiver Setting channels manually - A Access Main Menu screen, then Tuner Set screen Press MENU on the unit. ● If both a cable box and a DBS receiver are used , position the Controller so its instruction manual. ● Turn on the VCR and TV, and select the VCR channel (or AV mode). ● Set the VCR/TV/CABLE/DBS selector on the Remote to your cable box or DBS receiver has audio/video output connectors, connect an audio/video cable between the AUDIO/ VIDEO IN connectors...
Instructions
Page 9
... highlight bar (arrow) to your brand, setting is facing you use the Video Navigation function. I Access Brand Set screen Press OK or e. ● If the Clock Set screen appears, perform "Manual Clock Set" (੬ pg. 7). Press OK or e. Playback Basic Playback ● Turn on the VCR and TV, and select the VCR channel (or AV mode). ● Set the VCR/TV/CABLE/DBS selector on the Remote to the CABLE BOX Controller connector JVC (DISH Network) 51 SONY (DSS...
... highlight bar (arrow) to your brand, setting is facing you use the Video Navigation function. I Access Brand Set screen Press OK or e. ● If the Clock Set screen appears, perform "Manual Clock Set" (੬ pg. 7). Press OK or e. Playback Basic Playback ● Turn on the VCR and TV, and select the VCR channel (or AV mode). ● Set the VCR/TV/CABLE/DBS selector on the Remote to the CABLE BOX Controller connector JVC (DISH Network) 51 SONY (DSS...
Instructions
Page 11
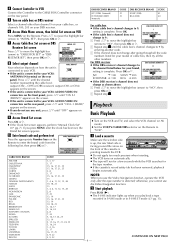
... the button, sound changes. to reactivate automatic tracking. Playback Features ● Turn on the VCR and TV, and select the VCR channel (or AV mode). ● Set the VCR/TV/CABLE/DBS selector on the Hi-Fi track and normal track are placed on the Remote to start playback, automatic tracking starts working and continuously analyzes the signal to enable optimum picture quality during playback to do after rewinding - Audio Monitor While playing back a tape on which stereo sound...
... the button, sound changes. to reactivate automatic tracking. Playback Features ● Turn on the VCR and TV, and select the VCR channel (or AV mode). ● Set the VCR/TV/CABLE/DBS selector on the Hi-Fi track and normal track are placed on the Remote to start playback, automatic tracking starts working and continuously analyzes the signal to enable optimum picture quality during playback to do after rewinding - Audio Monitor While playing back a tape on which stereo sound...
Instructions
Page 12
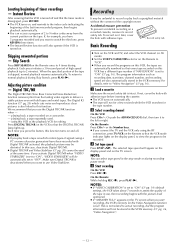
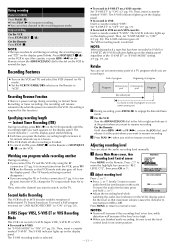
... last timer-recorded program, then begins playback automatically. ● You can select tape speed in use the Digital TBC/NR function when - - Recording It may be automatically set to "ON" (੬ pg. 19) (default setting), the VCR takes about 7 seconds to record or play back a tape on the TV screen. Skipping unwanted portions - A Load a cassette Make sure the record safety tab is full. The selected tape speed will also operate if the VCR is turned...
... last timer-recorded program, then begins playback automatically. ● You can select tape speed in use the Digital TBC/NR function when - - Recording It may be automatically set to "ON" (੬ pg. 19) (default setting), the VCR takes about 7 seconds to record or play back a tape on the TV screen. Skipping unwanted portions - A Load a cassette Make sure the record safety tab is full. The selected tape speed will also operate if the VCR is turned...
Instructions
Page 13
...press the button, recording length increases in S-VHS (Super VHS), S-VHS ET or VHS. Adjusting recording level You can adjust the audio recording level manually. control back to its end during recording (or Instant Timer Recording, or timer recording), the recording will increase if the level is a power outage during recording, the recording stops and "[" on the VCR's display panel. To record a SAP program received, set "S-VHS MODE" to "ON" (੬ pg. 19). A Access Main Menu screen, then Recording Level Control screen Press MENU on a VHS cassette: Set "S-VHS ET" to...
...press the button, recording length increases in S-VHS (Super VHS), S-VHS ET or VHS. Adjusting recording level You can adjust the audio recording level manually. control back to its end during recording (or Instant Timer Recording, or timer recording), the recording will increase if the level is a power outage during recording, the recording stops and "[" on the VCR's display panel. To record a SAP program received, set "S-VHS MODE" to "ON" (੬ pg. 19). A Access Main Menu screen, then Recording Level Control screen Press MENU on a VHS cassette: Set "S-VHS ET" to...
Instructions
Page 14
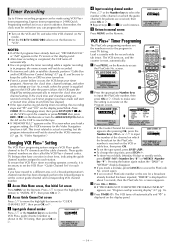
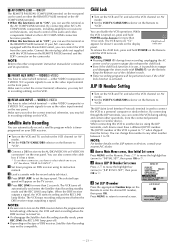
... select the VCR Plus+ guide channel number as a year in the VCR's memory. (੬ pg. 16, "Video Navigation") Changing VCR Plus+® Setting The VCR Plus+ programing system assigns a VCR Plus+ guide channel to access the PlusCode No. screen reappears. Remember, the clock must be stored in advance. If the clock time and channel setting are lost. Press TIMER (#) to disengage timer, then press STOP/EJECT (0) on the VCR to eject the cassette or press POWER then press REW (3) on the Remote or turn the ADVANCED JOG...
... select the VCR Plus+ guide channel number as a year in the VCR's memory. (੬ pg. 16, "Video Navigation") Changing VCR Plus+® Setting The VCR Plus+ programing system assigns a VCR Plus+ guide channel to access the PlusCode No. screen reappears. Remember, the clock must be stored in advance. If the clock time and channel setting are lost. Press TIMER (#) to disengage timer, then press STOP/EJECT (0) on the VCR to eject the cassette or press POWER then press REW (3) on the Remote or turn the ADVANCED JOG...
Instructions
Page 15
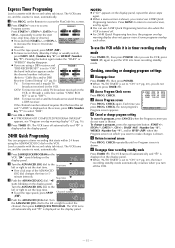
... (Number key "7") to set the stop time, date or channel. ● Press and hold START+/- Express Timer Programing Load a cassette with the record safety tab intact. DBS: To timer-record a satellite broadcast received through a cable box (unless "CABLE BOX SET" is set to put the VCR into timer recording standby mode. Stop time C Push the ADVANCED JOG dial. The VCR turns off automatically and "#" is displayed on the display panel, repeat the above steps again. ● When a menu screen is in 5- screen. B Access Program...
... (Number key "7") to set the stop time, date or channel. ● Press and hold START+/- Express Timer Programing Load a cassette with the record safety tab intact. DBS: To timer-record a satellite broadcast received through a cable box (unless "CABLE BOX SET" is set to put the VCR into timer recording standby mode. Stop time C Push the ADVANCED JOG dial. The VCR turns off automatically and "#" is displayed on the display panel, repeat the above steps again. ● When a menu screen is in 5- screen. B Access Program...
Instructions
Page 16
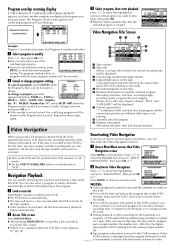
... change a program, press the appropriate button: START+/-, STOP+/-, DATE+/-, CH+/-, DAILY (M-F) (Number key "8"), WEEKLY (Number key "9") and/or SP/EP (p) when the Program screen on which you want is shown. On the tape only the tape number information is recorded. ● Turn on the VCR and TV, and select the VCR channel (or AV mode). ● Set the VCR/TV/CABLE/DBS selector on the Remote to finish the timer program setting. A Access Main Menu screen, then Video...
... change a program, press the appropriate button: START+/-, STOP+/-, DATE+/-, CH+/-, DAILY (M-F) (Number key "8"), WEEKLY (Number key "9") and/or SP/EP (p) when the Program screen on which you want is shown. On the tape only the tape number information is recorded. ● Turn on the VCR and TV, and select the VCR channel (or AV mode). ● Set the VCR/TV/CABLE/DBS selector on the Remote to finish the timer program setting. A Access Main Menu screen, then Video...
Instructions
Page 19
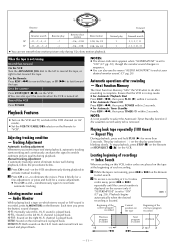
The position of the tape in use the other useful function settings on the Function Set screen. ● Turn on the VCR and TV, and select the VCR channel (or AV mode). ● Set the VCR/TV/CABLE/DBS selector on the Remote. Function settings You can use during playback and recording, and compensates to provide the highest-possible pictures. C Change setting Press OK or e. ON/OFF When this VCR checks the condition of...
The position of the tape in use the other useful function settings on the Function Set screen. ● Turn on the VCR and TV, and select the VCR channel (or AV mode). ● Set the VCR/TV/CABLE/DBS selector on the Remote. Function settings You can use during playback and recording, and compensates to provide the highest-possible pictures. C Change setting Press OK or e. ON/OFF When this VCR checks the condition of...
Instructions
Page 20
... or when you to adjust the playback picture quality according to while playing back a Hi-Fi stereo tape. ON/OFF When this function is turned off. MIX: Both sounds on the edited tape. Ⅵ AUTO SP]EP TIMER - either "HI-FI L" or "HI-FI R". or VHS mode - To achieve the highest quality picture we recommended to "ON", the TV screen becomes all blue when receiving a channel not in length onto...
... or when you to adjust the playback picture quality according to while playing back a Hi-Fi stereo tape. ON/OFF When this function is turned off. MIX: Both sounds on the edited tape. Ⅵ AUTO SP]EP TIMER - either "HI-FI L" or "HI-FI R". or VHS mode - To achieve the highest quality picture we recommended to "ON", the TV screen becomes all blue when receiving a channel not in length onto...
Instructions
Page 21
... use . (੬ See above, "REAR AUX INPUT".) B Set timer program on your nearest JVC dealer. You can control the VCR from the camcorder. either the REMOTE PAUSE terminal or the AV COMPULINK terminal. ● When this VCR to "JLIP ID NO. Press MENU to return to the other operations, from the factory. The VCR turns off when the DBS receiver stops outputting a signal. You can also connect the cable box...
... use . (੬ See above, "REAR AUX INPUT".) B Set timer program on your nearest JVC dealer. You can control the VCR from the camcorder. either the REMOTE PAUSE terminal or the AV COMPULINK terminal. ● When this VCR to "JLIP ID NO. Press MENU to return to the other operations, from the factory. The VCR turns off when the DBS receiver stops outputting a signal. You can also connect the cable box...
Instructions
Page 22
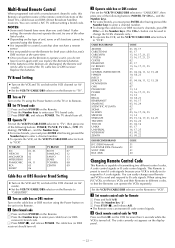
... operated using two JVC VCRs, set the two VCRs and their Remotes to different codes, so that does not have a remote sensor. ● It is turned off . A Set remote control code for both your cable box and a DBS receiver at the same time. ● Once you do not have more than one code listed. B Press the Number key "2". C Press STOP (8), and release A/B. ● The Remote now can easily change the cable box's (or DBS receiver's) channels...
... operated using two JVC VCRs, set the two VCRs and their Remotes to different codes, so that does not have a remote sensor. ● It is turned off . A Set remote control code for both your cable box and a DBS receiver at the same time. ● Once you do not have more than one code listed. B Press the Number key "2". C Press STOP (8), and release A/B. ● The Remote now can easily change the cable box's (or DBS receiver's) channels...
Instructions
Page 23
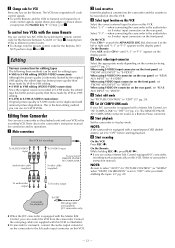
... VCRs with a Master Edit Control, set to "OFF") after you can control two JVC VCRs by VHS-to-VHS editing. ● S-VHS to VHS editing (VIDEO-VIDEO connection): Since the original source is monaural, connect the audio output connector on this VCR. The REMOTE PAUSE/ AV COMPULINK connector works as shown above procedure as a Remote Pause connector. C Change code for recording) To AUDIO/VIDEO input Audio/video cable (supplied) To S-VIDEO input To rear panel REMOTE PAUSE/ AV COMPULINK S-video cable (supplied) B Load cassettes Insert the playback cassette...
... VCRs with a Master Edit Control, set to "OFF") after you can control two JVC VCRs by VHS-to-VHS editing. ● S-VHS to VHS editing (VIDEO-VIDEO connection): Since the original source is monaural, connect the audio output connector on this VCR. The REMOTE PAUSE/ AV COMPULINK connector works as shown above procedure as a Remote Pause connector. C Change code for recording) To AUDIO/VIDEO input Audio/video cable (supplied) To S-VIDEO input To rear panel REMOTE PAUSE/ AV COMPULINK S-video cable (supplied) B Load cassettes Insert the playback cassette...
Instructions
Page 26
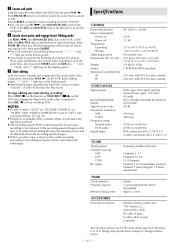
...-210 video cassette EP : 630 min. Design and specifications subject to 20,000 Hz : RCA connectors (IN x 2, OUT x 1) S-video connectors (IN x 2, OUT x 1) TUNER Tuning system Channel coverage VHF UHF CATV RF output : Frequency-synthesized tuner : Channels 2-13 : Channels 14-69 : 113 Channels : Channel 3 or 4 (switchable; "o" and "u" light up on the display panel. ● If you want to be replaced. ACCESSORIES Provided accessories : Infrared remote control unit, "AA" battery x 2, Audio/video cable, RF cable (F-type), S-video cable (4-pin), Controller Specifications...
...-210 video cassette EP : 630 min. Design and specifications subject to 20,000 Hz : RCA connectors (IN x 2, OUT x 1) S-video connectors (IN x 2, OUT x 1) TUNER Tuning system Channel coverage VHF UHF CATV RF output : Frequency-synthesized tuner : Channels 2-13 : Channels 14-69 : 113 Channels : Channel 3 or 4 (switchable; "o" and "u" light up on the display panel. ● If you want to be replaced. ACCESSORIES Provided accessories : Infrared remote control unit, "AA" battery x 2, Audio/video cable, RF cable (F-type), S-video cable (4-pin), Controller Specifications...
Instructions
Page 27
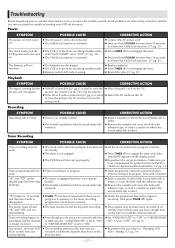
... batteries are no and the timer mode is always incorrect. Make sure you have compensated for 10 seconds ● TIMER (#) has been pressed when there are discharged. ● The VCR is in the timer recording standby mode. ● Remote control A/B code is in memory, or the timer recording disengaged. "#" blinks for guide channel and VCR or cable box channel number mismatches. (੬ pg. 14) Timer programing will not come with adhesive tape, or load a cassette on...
... batteries are no and the timer mode is always incorrect. Make sure you have compensated for 10 seconds ● TIMER (#) has been pressed when there are discharged. ● The VCR is in the timer recording standby mode. ● Remote control A/B code is in memory, or the timer recording disengaged. "#" blinks for guide channel and VCR or cable box channel number mismatches. (੬ pg. 14) Timer programing will not come with adhesive tape, or load a cassette on...

Instructions
Page 28
... (9) to pause the recording, change channels, then press PLAY (4) to start recording. ● Two (or more than one tape. ● The VCR's memory for the correct program. "MEMORY FULL" appears on a tape if it has more ) tape numbers are recorded on one tape number. If this happens, fast-forward the tape up to its end, eject it is incorrect. The VCR cannot search for Video Navigation is in...
... (9) to pause the recording, change channels, then press PLAY (4) to start recording. ● Two (or more than one tape. ● The VCR's memory for the correct program. "MEMORY FULL" appears on a tape if it has more ) tape numbers are recorded on one tape number. If this happens, fast-forward the tape up to its end, eject it is incorrect. The VCR cannot search for Video Navigation is in...

Instructions
Page 30
... WARRANTY DOES NOT APPLY. Such repair and replacement services shall be given to the nearest JVC Factory Service Center, the name and location of dealer: - 30 - Parts used for replacement are warranted only for 90 days from the date of original retail purchase for Television sets having a screen size 25 inches and above . Products which are no charge to a JVC authorized service center on how long an...
... WARRANTY DOES NOT APPLY. Such repair and replacement services shall be given to the nearest JVC Factory Service Center, the name and location of dealer: - 30 - Parts used for replacement are warranted only for 90 days from the date of original retail purchase for Television sets having a screen size 25 inches and above . Products which are no charge to a JVC authorized service center on how long an...


