
Instructions
Page 1
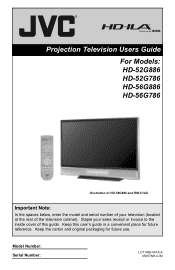
Staple your television (located at the rear of this user's guide in a convenient place for future use. Projection Television Users Guide For Models: HD-52G886 HD-52G786 HD-56G886 HD-56G786 Illustration of HD-56G886 and RM-C14G Important Note: In the spaces below, enter the model and serial number of your sales receipt or invoice to the inside cover of the television cabinet). Model Number: Serial Number: LCT1866-001A-A 0505TNH-II-IM Keep the carton and original packaging for future reference. Keep this guide.
Staple your television (located at the rear of this user's guide in a convenient place for future use. Projection Television Users Guide For Models: HD-52G886 HD-52G786 HD-56G886 HD-56G786 Illustration of HD-56G886 and RM-C14G Important Note: In the spaces below, enter the model and serial number of your sales receipt or invoice to the inside cover of the television cabinet). Model Number: Serial Number: LCT1866-001A-A 0505TNH-II-IM Keep the carton and original packaging for future reference. Keep this guide.

Instructions
Page 4
...pursuant to the minimum distance guidelines shown for long periods of the way. - When installing this equipment does cause harmful interference to radio or television reception, which the receiver is damaged, liquid has been spilled or objects have fallen into an outlet on the floor so as inside a ...tightly enclosed area or piece of the FCC Rules. Install the TV in a residential installation. These limits are designed to keep cords out of time. 14) Refer all servicing to allow satisfactory cooling. Increase ...
...pursuant to the minimum distance guidelines shown for long periods of the way. - When installing this equipment does cause harmful interference to radio or television reception, which the receiver is damaged, liquid has been spilled or objects have fallen into an outlet on the floor so as inside a ...tightly enclosed area or piece of the FCC Rules. Install the TV in a residential installation. These limits are designed to keep cords out of time. 14) Refer all servicing to allow satisfactory cooling. Increase ...

Instructions
Page 5
... Normally, light dusting with a soft cloth. When it gets dirty, wipe it . This could cause scratches on the TV's surface. • DO NOT rub or scrub the TV harshly. Do not apply alcohol, organic solvents (like acetone), acidic or alkaline cleansers to wipe down with an electrostatic-proof... coating. These will keep your TV clean. Warnings Caring for the Screen The screen is very dirty, wipe it down the television, first unplug it gently with a soft, non-scratching duster will remove the coating layer and ...
... Normally, light dusting with a soft cloth. When it gets dirty, wipe it . This could cause scratches on the TV's surface. • DO NOT rub or scrub the TV harshly. Do not apply alcohol, organic solvents (like acetone), acidic or alkaline cleansers to wipe down with an electrostatic-proof... coating. These will keep your TV clean. Warnings Caring for the Screen The screen is very dirty, wipe it down the television, first unplug it gently with a soft, non-scratching duster will remove the coating layer and ...
Instructions
Page 6
... malfunctions. Once the lamp has warmed up , the picture is explained below . 1. When the cooling is one minute for purchasing JVC's model HD-52G886, HD-52G786, HD-56G886 or HD-56G786 HDTV-ready projection television which the TV is being shut down. Do not block the ventilation holes. Do not block the air intake holes behind the speaker grills...
... malfunctions. Once the lamp has warmed up , the picture is explained below . 1. When the cooling is one minute for purchasing JVC's model HD-52G886, HD-52G786, HD-56G886 or HD-56G786 HDTV-ready projection television which the TV is being shut down. Do not block the ventilation holes. Do not block the air intake holes behind the speaker grills...
Instructions
Page 7
... Caution! This is made of time. In this television, Do not hold by another device. Also, take care to change. Please do not open the rear cabinet of this condensation is a possibility of the wallpaper to keep the TV on and off repeatedly in a short amount of plastic... the Appendix for a long period of water may remain on or the television is operating. Be careful when handling the lamp. 9. ILA element characteristics Do not project still pictures or pictures that the television is a characteristic of the program or software shown on how to touch the...
... Caution! This is made of time. In this television, Do not hold by another device. Also, take care to change. Please do not open the rear cabinet of this condensation is a possibility of the wallpaper to keep the TV on and off repeatedly in a short amount of plastic... the Appendix for a long period of water may remain on or the television is operating. Be careful when handling the lamp. 9. ILA element characteristics Do not project still pictures or pictures that the television is a characteristic of the program or software shown on how to touch the...
Instructions
Page 10
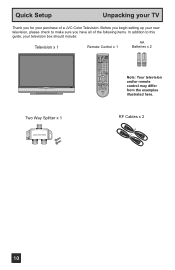
...you have all of the following items. In addition to make sure you for your television box should include: Television x 1 Remote Control x 1 AA Batteries x 2 AA Alkaline AA Alkaline TV CATV VCR DVD POWER ASPECT MULTI SCREEN TWIN INDEX SELECT SLEEP FREEZE SWAP ML/MTS ...DISPLAY + INPUT 123 D/A 4 5 6 i.LINK MENU 78 TIMER TUNE THEATER FAVORITE PRO 0 VIDEO STATUS C.C. Before you begin setting up your new television, please check to this guide, your purchase of a JVC Color Television...
...you have all of the following items. In addition to make sure you for your television box should include: Television x 1 Remote Control x 1 AA Batteries x 2 AA Alkaline AA Alkaline TV CATV VCR DVD POWER ASPECT MULTI SCREEN TWIN INDEX SELECT SLEEP FREEZE SWAP ML/MTS ...DISPLAY + INPUT 123 D/A 4 5 6 i.LINK MENU 78 TIMER TUNE THEATER FAVORITE PRO 0 VIDEO STATUS C.C. Before you begin setting up your new television, please check to this guide, your purchase of a JVC Color Television...
Instructions
Page 11
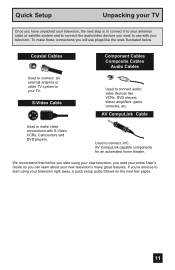
... and DVD players. Coaxial Cables Used to connect an external antenna or cable TV system to connect JVC AV CompuLink capable components for an automated home theater. Used to your TV. Quick Setup Unpacking your TV Once you have unpacked your television, the next step is to connect it to your antenna/ cable or satellite...
... and DVD players. Coaxial Cables Used to connect an external antenna or cable TV system to connect JVC AV CompuLink capable components for an automated home theater. Used to your TV. Quick Setup Unpacking your TV Once you have unpacked your television, the next step is to connect it to your antenna/ cable or satellite...
Instructions
Page 12
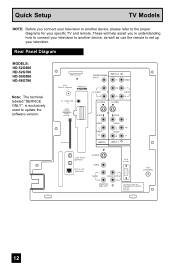
...) R R MONITOR /REC OUT LICENSED UNDER THE FOLLOWING U.S. Quick Setup TV Models NOTE: Before you in understanding how to connect your television to another device, please refer to the proper diagrams for your television. PATENTS 6,183,091 6,419,362 12 Rear Panel Diagram MODELS: HD-52G886 HD-52G786 HD-56G886 HD-56G786 Note: The terminal labeled "SERVICE ONLY", is exclusively...
...) R R MONITOR /REC OUT LICENSED UNDER THE FOLLOWING U.S. Quick Setup TV Models NOTE: Before you in understanding how to connect your television to another device, please refer to the proper diagrams for your television. PATENTS 6,183,091 6,419,362 12 Rear Panel Diagram MODELS: HD-52G886 HD-52G786 HD-56G886 HD-56G786 Note: The terminal labeled "SERVICE ONLY", is exclusively...
Instructions
Page 15
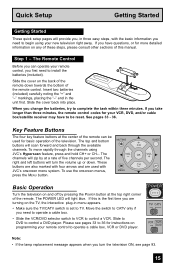
...and/or cable box/satellite receiver may have questions, or for more detailed information on the TV, the interactive plug-in the unit first. The VOL OK VOL right and left buttons will turn the television ON, see pages 33 to install the batteries (included). Slide the cover on the back ...See pages 33 - 36. Basic Operation Turn the television on programming your remote control to be used with four arrows and are turning on any of these steps, please consult other sections of this is set to TV. Slide to DVD to begin using JVC's Hyperscan feature, press and hold CH+ or CH...
...and/or cable box/satellite receiver may have questions, or for more detailed information on the TV, the interactive plug-in the unit first. The VOL OK VOL right and left buttons will turn the television ON, see pages 33 to install the batteries (included). Slide the cover on the back ...See pages 33 - 36. Basic Operation Turn the television on programming your remote control to be used with four arrows and are turning on any of these steps, please consult other sections of this is set to TV. Slide to DVD to begin using JVC's Hyperscan feature, press and hold CH+ or CH...
Instructions
Page 16
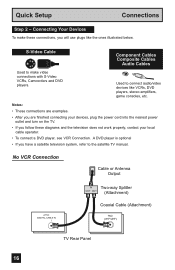
... work properly, contact your devices, plug the power cord into the nearest power outlet and turn on the TV. • If you have a satellite television system, refer to the satellite TV manual. No VCR Connection Cable or Antenna Output ATSC /DIGITAL CABLE IN I IN Two-way Splitter OUT... OUT (Attachment) Coaxial Cable (Attachment) 75Ω (VHF/UHF) TV Rear Panel 16 S-Video Cable Component Cables Composite Cables Audio ...
... work properly, contact your devices, plug the power cord into the nearest power outlet and turn on the TV. • If you have a satellite television system, refer to the satellite TV manual. No VCR Connection Cable or Antenna Output ATSC /DIGITAL CABLE IN I IN Two-way Splitter OUT... OUT (Attachment) Coaxial Cable (Attachment) 75Ω (VHF/UHF) TV Rear Panel 16 S-Video Cable Component Cables Composite Cables Audio ...
Instructions
Page 20
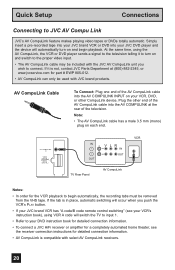
... device. AV COMPULINK III VIDEO (DIGITAL) _ AUDIO (DIGITAL) IN V L R IN OUT OUT TV Rear Panel AV CompuLink VCR Notes: • In order for part # EWP 805-012. • AV CompuLink can only be included with the JVC AV CompuLink unit you push the VCR's PLAY button. • If your...AV CompuLink receivers. 20 AV CompuLink Cable To Connect: Plug one end of the television. At the same time, using the AV CompuLink, the VCR or DVD player sends a signal to the television telling it is compatible with JVC brand products. Note: • The AV CompuLink cable has a male 3.5 ...
... device. AV COMPULINK III VIDEO (DIGITAL) _ AUDIO (DIGITAL) IN V L R IN OUT OUT TV Rear Panel AV CompuLink VCR Notes: • In order for part # EWP 805-012. • AV CompuLink can only be included with the JVC AV CompuLink unit you push the VCR's PLAY button. • If your...AV CompuLink receivers. 20 AV CompuLink Cable To Connect: Plug one end of the television. At the same time, using the AV CompuLink, the VCR or DVD player sends a signal to the television telling it is compatible with JVC brand products. Note: • The AV CompuLink cable has a male 3.5 ...
Instructions
Page 21
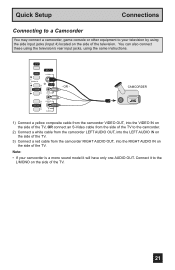
... CHANNEL - You can also connect these using the television's rear input jacks, using the side input jacks (Input 4) located on the side of the TV. CAMCORDER 1) Connect a yellow composite cable from the camcorder VIDEO OUT, into the VIDEO IN on the side of the TV, OR connect an S-Video cable from the side... a white cable from the camcorder LEFT AUDIO OUT, into the LEFT AUDIO IN on the side of the TV. 3) Connect a red cable from the camcorder RIGHT AUDIO OUT, into the RIGHT AUDIO IN on the side of the television. Connect it will have only one AUDIO OUT. Note: • If your...
... CHANNEL - You can also connect these using the television's rear input jacks, using the side input jacks (Input 4) located on the side of the TV. CAMCORDER 1) Connect a yellow composite cable from the camcorder VIDEO OUT, into the VIDEO IN on the side of the TV, OR connect an S-Video cable from the side... a white cable from the camcorder LEFT AUDIO OUT, into the LEFT AUDIO IN on the side of the TV. 3) Connect a red cable from the camcorder RIGHT AUDIO OUT, into the RIGHT AUDIO IN on the side of the television. Connect it will have only one AUDIO OUT. Note: • If your...
Instructions
Page 24
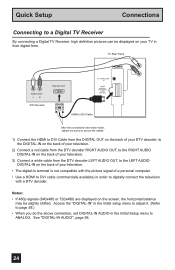
..., high definition pictures can be slightly shifted. See "DIGITAL-IN AUDIO", page 58. 24 TV Rear Panel AUDIO OUT LR DTV Decoder DIGITAL OUT AV COMPULINK III VIDEO (DIGITAL) _ AUDIO (DIGITAL) HDMI to DVI Cable L AUDIO R After the connections have been ... DIGITAL-IN AUDIO in the Initial Setup menu to the LEFT AUDIO DIGITAL-IN on the screen, the horizontal balance may be displayed on your television. • The digital-in terminal is not compatible with the picture signal of a personal computer. • Use a HDMI to DVI cable (commercially available) in their...
..., high definition pictures can be slightly shifted. See "DIGITAL-IN AUDIO", page 58. 24 TV Rear Panel AUDIO OUT LR DTV Decoder DIGITAL OUT AV COMPULINK III VIDEO (DIGITAL) _ AUDIO (DIGITAL) HDMI to DVI Cable L AUDIO R After the connections have been ... DIGITAL-IN AUDIO in the Initial Setup menu to the LEFT AUDIO DIGITAL-IN on the screen, the horizontal balance may be displayed on your television. • The digital-in terminal is not compatible with the picture signal of a personal computer. • Use a HDMI to DVI cable (commercially available) in their...
Instructions
Page 25
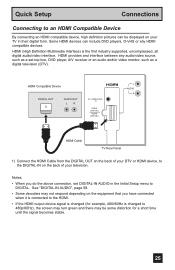
...OUT AUDIO OUT LR AV COMPULINK III VIDEO (DIGITAL) _ AUDIO (DIGITAL) L AUDIO R HDMI Cable TV Rear Panel 1) Connect the HDMI Cable from the DIGITAL OUT on the back of your television. Some HDMI devices can be some distortion for example, 480i/60Hz is the first industry supported, uncompressed...Some decoders may be displayed on your TV in the Initial Setup menu to the DIGITAL-IN on the equipment that you do the above connection, set -top box, DVD player, A/V receiver or an audio and/or video monitor, such as a digital television (DTV). HDMI (High Definition Multimedia...
...OUT AUDIO OUT LR AV COMPULINK III VIDEO (DIGITAL) _ AUDIO (DIGITAL) L AUDIO R HDMI Cable TV Rear Panel 1) Connect the HDMI Cable from the DIGITAL OUT on the back of your television. Some HDMI devices can be some distortion for example, 480i/60Hz is the first industry supported, uncompressed...Some decoders may be displayed on your TV in the Initial Setup menu to the DIGITAL-IN on the equipment that you do the above connection, set -top box, DVD player, A/V receiver or an audio and/or video monitor, such as a digital television (DTV). HDMI (High Definition Multimedia...
Instructions
Page 26
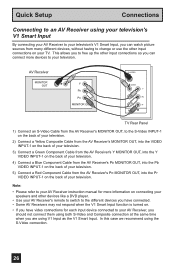
...Y PB PR MONITOR OUT S-VIDEO OVER Y VIDEO L Pb I AUDIO I R Pr INPUT-1 TV Rear Panel 1) Connect an S-Video Cable from the AV Receiver's MONITOR OUT, to the S-Video INPUT-1 on the back of your television. 2) Connect a Yellow Composite Cable from the AV Receiver's MONITOR OUT, into the VIDEO INPUT-1... not respond when the V1 Smart Input function is turned on your TV. Quick Setup Connections Connecting to an AV Receiver using your television's V1 Smart Input By connecting your AV Receiver to your television's V1 Smart Input, you can connect more information on connecting your ...
...Y PB PR MONITOR OUT S-VIDEO OVER Y VIDEO L Pb I AUDIO I R Pr INPUT-1 TV Rear Panel 1) Connect an S-Video Cable from the AV Receiver's MONITOR OUT, to the S-Video INPUT-1 on the back of your television. 2) Connect a Yellow Composite Cable from the AV Receiver's MONITOR OUT, into the VIDEO INPUT-1... not respond when the V1 Smart Input function is turned on your TV. Quick Setup Connections Connecting to an AV Receiver using your television's V1 Smart Input By connecting your AV Receiver to your television's V1 Smart Input, you can connect more information on connecting your ...
Instructions
Page 27
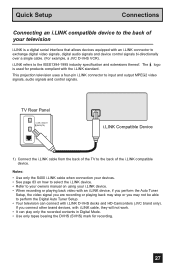
This projection television uses a four-pin i.LINK connector to the back of the i.LINK compatible device. TV Rear Panel i.LINK IN/OUT S400(TS) OPTICAL OUT Digital Audio i.LINK Compatible Device 1) Connect the i.LINK cable from the back of the TV to input and output MPEG2 video signals, audio signals and ... connect other brand devices, with i.LINK cable, they will not work. • It can connect with i.LINK D-VHS decks and HD-Camcorders (JVC brand only). The logo is a digital serial interface that allows devices equipped with an i.LINK connector to exchange digital video signals, digital...
This projection television uses a four-pin i.LINK connector to the back of the i.LINK compatible device. TV Rear Panel i.LINK IN/OUT S400(TS) OPTICAL OUT Digital Audio i.LINK Compatible Device 1) Connect the i.LINK cable from the back of the TV to input and output MPEG2 video signals, audio signals and ... connect other brand devices, with i.LINK cable, they will not work. • It can connect with i.LINK D-VHS decks and HD-Camcorders (JVC brand only). The logo is a digital serial interface that allows devices equipped with an i.LINK connector to exchange digital video signals, digital...
Instructions
Page 30
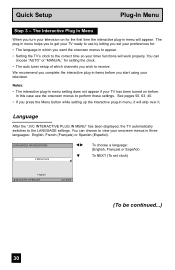
... plug-in which you set clock) NEXT SELECT OPERATE MENU EXIT (To be continued...) 30 Language After the "JVC INTERACTIVE PLUG IN MENU" has been displayed, the TV automatically switches to view your television on before. You can choose to the LANGUAGE settings. You can choose "AUTO" or "MANUAL" for : ... complete the interactive plug-in items before you turn your onscreen menus in menu helps you to get your TV ready to use the onscreen menus to the correct time so your television. In this case use by letting you want the onscreen menus to appear. • Setting the...
... plug-in which you set clock) NEXT SELECT OPERATE MENU EXIT (To be continued...) 30 Language After the "JVC INTERACTIVE PLUG IN MENU" has been displayed, the TV automatically switches to view your television on before. You can choose to the LANGUAGE settings. You can choose "AUTO" or "MANUAL" for : ... complete the interactive plug-in items before you turn your onscreen menus in menu helps you to get your TV ready to use the onscreen menus to the correct time so your television. In this case use by letting you want the onscreen menus to appear. • Setting the...

Instructions
Page 32
...After your auto tuner setup is complete, you can now begin watching your television, or you may, (depending on programming your television viewing experience. There are two tuner modes to customize your remote control, ...(IN DIGITAL) To choose ATSC or Digital Cable (or SKIP when you scan (using the JVC onscreen menu system to choose from, ANALOG or DIGITAL. This means when you skip Digital Auto...complete. Quick Setup Plug-In Menu Auto Tuner Setup In auto tuner setup, the TV automatically scans through all available channels, memorizing the active ones and skipping over blank ...
...After your auto tuner setup is complete, you can now begin watching your television, or you may, (depending on programming your television viewing experience. There are two tuner modes to customize your remote control, ...(IN DIGITAL) To choose ATSC or Digital Cable (or SKIP when you scan (using the JVC onscreen menu system to choose from, ANALOG or DIGITAL. This means when you skip Digital Auto...complete. Quick Setup Plug-In Menu Auto Tuner Setup In auto tuner setup, the TV automatically scans through all available channels, memorizing the active ones and skipping over blank ...
Instructions
Page 37
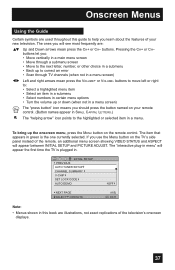
...) The "press button" icon means you : • Move vertically in a main menu screen • Move through TV channels (when not in this guide to help you learn about the features of the television's onscreen displays. 37 The "interactive plug-in . To bring up to correct an error • Scan through a... buttons. The item that appears in green is plugged in menu" will appear the first time the TV is the one currently selected. The ones you use the Menu button on the TV's side panel instead of the remote, an additional menu screen showing VIDEO STATUS and ASPECT will see ...
...) The "press button" icon means you : • Move vertically in a main menu screen • Move through TV channels (when not in this guide to help you learn about the features of the television's onscreen displays. 37 The "interactive plug-in . To bring up to correct an error • Scan through a... buttons. The item that appears in green is plugged in menu" will appear the first time the TV is the one currently selected. The ones you use the Menu button on the TV's side panel instead of the remote, an additional menu screen showing VIDEO STATUS and ASPECT will see ...
Instructions
Page 38
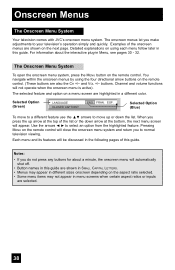
... the highlighted feature. Each menu and its features will not operate when the onscreen menu is active). Onscreen Menus The Onscreen Menu System Your television comes with JVC's onscreen menu system. Selected Option (Blue) To move up arrow at the bottom, the next menu screen will automatically shut off. • Button names...
... the highlighted feature. Each menu and its features will not operate when the onscreen menu is active). Onscreen Menus The Onscreen Menu System Your television comes with JVC's onscreen menu system. Selected Option (Blue) To move up arrow at the bottom, the next menu screen will automatically shut off. • Button names...
