User Guide
Page 8
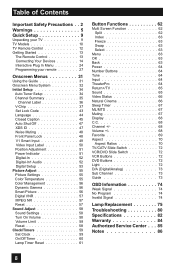
... 47 Noise Muting 48 Front Panel Lock 48 V1 Smart Input 49 Video Input Label 50 Position Adjustment 51 Power Indicator 51 Digital-In 52 Digital-In1 Audio 52 Digital Setup 53 Picture Adjust 55 Picture Settings 55 Color Temperature 55 Color Management 56 Dynamic Gamma 56 Smart Picture 56 Digital VNR... 63 Freeze 63 Swap 63 Select 63 Menu 63 OK 63 Back 63 Power 64 Number Buttons 64 Tune 64 Input 64 TheaterPro 64 Return+/TV 65 Sound 65 Video Status 66 Natural Cinema 66 Sleep Timer 67 ML/MTS 67 Muting 67 Display 68 C.C 68 Channel 68 Volume 68 Favorite 69...
... 47 Noise Muting 48 Front Panel Lock 48 V1 Smart Input 49 Video Input Label 50 Position Adjustment 51 Power Indicator 51 Digital-In 52 Digital-In1 Audio 52 Digital Setup 53 Picture Adjust 55 Picture Settings 55 Color Temperature 55 Color Management 56 Dynamic Gamma 56 Smart Picture 56 Digital VNR... 63 Freeze 63 Swap 63 Select 63 Menu 63 OK 63 Back 63 Power 64 Number Buttons 64 Tune 64 Input 64 TheaterPro 64 Return+/TV 65 Sound 65 Video Status 66 Natural Cinema 66 Sleep Timer 67 ML/MTS 67 Muting 67 Display 68 C.C 68 Channel 68 Volume 68 Favorite 69...

User Guide
Page 9
...setting up your new television, please check to make sure you have all of a JVC Color Television. NATURAL SOUND CINEMA LIGHT MUTING CH GUIDE VOL OK VOL MENU BACK CH VCR CHANNEL VCR DVD PREV NEXT POWER TV VCR REW PLAY FF REC STOP PAUSE OPEN CLOSE STILL PAUSE RM-C18G + AA... items. In addition to start using your television right away, a quick setup guide follows on the next few pages. 9 Quick Setup Unpacking your TV Thank you start using your new television, you read your entire User's Guide so you 're anxious to this guide, your television box should include...
...setting up your new television, please check to make sure you have all of a JVC Color Television. NATURAL SOUND CINEMA LIGHT MUTING CH GUIDE VOL OK VOL MENU BACK CH VCR CHANNEL VCR DVD PREV NEXT POWER TV VCR REW PLAY FF REC STOP PAUSE OPEN CLOSE STILL PAUSE RM-C18G + AA... items. In addition to start using your television right away, a quick setup guide follows on the next few pages. 9 Quick Setup Unpacking your TV Thank you start using your new television, you read your entire User's Guide so you 're anxious to this guide, your television box should include...

User Guide
Page 12
... these buttons. 12 Quick Setup Remote Control TV CATV VCR DVD POWER ASPECT MULTI SCREEN SPLIT INDEX SELECT FREEZE SWAP DISPLAY INPUT 12 3 D/A 45 6 ML/MTS 78 9 SLEEP TUNE 0 RETURN+/TV THEATER VIDEO SUB FAVORITE PRO STATUS CHANNEL C.C. NATURAL SOUND CINEMA LIGHT MUTING CH GUIDE VOL OK VOL... MENU BACK CH VCR CHANNEL VCR DVD PREV NEXT POWER TV VCR REW PLAY FF REC STOP PAUSE OPEN CLOSE STILL PAUSE RM...
... these buttons. 12 Quick Setup Remote Control TV CATV VCR DVD POWER ASPECT MULTI SCREEN SPLIT INDEX SELECT FREEZE SWAP DISPLAY INPUT 12 3 D/A 45 6 ML/MTS 78 9 SLEEP TUNE 0 RETURN+/TV THEATER VIDEO SUB FAVORITE PRO STATUS CHANNEL C.C. NATURAL SOUND CINEMA LIGHT MUTING CH GUIDE VOL OK VOL... MENU BACK CH VCR CHANNEL VCR DVD PREV NEXT POWER TV VCR REW PLAY FF REC STOP PAUSE OPEN CLOSE STILL PAUSE RM...

User Guide
Page 17
...Quick Setup Connecting to a Camcorder You may connect a camcorder, game console or other equipment to your camcorder is a mono sound model it to the RIGHT AUDIO IN on the side of the TV. L/MONO R AUDIO Camcorder 1) Connect a yellow composite cable from the camcorder VIDEO OUT to the VIDEO IN on the side... a red cable from the camcorder RIGHT AUDIO OUT to the L/MONO on the side of the TV. 17 Connect it will have only one AUDIO OUT. You can also connect these using the television's rear input jacks, using the side input jacks (Input 4) located on the side of the television. ...
...Quick Setup Connecting to a Camcorder You may connect a camcorder, game console or other equipment to your camcorder is a mono sound model it to the RIGHT AUDIO IN on the side of the TV. L/MONO R AUDIO Camcorder 1) Connect a yellow composite cable from the camcorder VIDEO OUT to the VIDEO IN on the side... a red cable from the camcorder RIGHT AUDIO OUT to the L/MONO on the side of the TV. 17 Connect it will have only one AUDIO OUT. You can also connect these using the television's rear input jacks, using the side input jacks (Input 4) located on the side of the television. ...

User Guide
Page 18
... the optical output. See page 54. • Refer to your owners manual on using the AUDIO OUTPUT under the following conditions: 1) When you have digital sound from an HDMI device connected to the HDMI 1 or HDMI 2 connection on the back of your optical output You can be PCM or Dolby Digital... a red cable from the RIGHT AUDIO OUTPUT on the back of the amplifier. OPTICAL OUT Digital Audio TV Rear Panel Amplifier 1) Connect the optical cable from the back of the TV to the back of the TV to use AUDIO OUTPUT for your amplifier. 18 Notes: • This terminal can not output audio using...
... the optical output. See page 54. • Refer to your owners manual on using the AUDIO OUTPUT under the following conditions: 1) When you have digital sound from an HDMI device connected to the HDMI 1 or HDMI 2 connection on the back of your optical output You can be PCM or Dolby Digital... a red cable from the RIGHT AUDIO OUTPUT on the back of the amplifier. OPTICAL OUT Digital Audio TV Rear Panel Amplifier 1) Connect the optical cable from the back of the TV to the back of the TV to use AUDIO OUTPUT for your amplifier. 18 Notes: • This terminal can not output audio using...

User Guide
Page 20
...any audio/video source, such as a set DIGITAL-IN1 AUDIO in their digital form. Therefore, you can include DVD players, D-VHS or any analog sound from the other device connected to the "HDMI 1" jacks, while you do the above connection, set -top box, DVD player, A/V receiver or... an audio and/or video monitor, such as a digital television (DTV). HDMI Compatible Device Digital Out TV Rear Panel R - See "DIGITAL-IN1 AUDIO", page 52. • Some decoders may not respond depending on the equipment that you have connected when it is connected to the HDMI. &#...
...any audio/video source, such as a set DIGITAL-IN1 AUDIO in their digital form. Therefore, you can include DVD players, D-VHS or any analog sound from the other device connected to the "HDMI 1" jacks, while you do the above connection, set -top box, DVD player, A/V receiver or... an audio and/or video monitor, such as a digital television (DTV). HDMI Compatible Device Digital Out TV Rear Panel R - See "DIGITAL-IN1 AUDIO", page 52. • Some decoders may not respond depending on the equipment that you have connected when it is connected to the HDMI. &#...

User Guide
Page 22
TV Rear Panel S-VIDEO VIDEO OVER VIDEO S-VIDEO VIDEO OVER R - AUDIO - Notes: • When the sound from the computer is connected to the INPUT-3 AUDIO input terminal. Quick Setup Connecting to the computer This TV can be listened to, but the images from the computer cannot be used as a computer screen... connect the INPUT-3 audio input terminal to choose INPUT-3. L INPUT-2 R - AUDIO - If you want to listen to the sound from a computer After starting the computer, press the INPUT button to the computer's audio output terminal. Use a commercially available D-SUB cable...
TV Rear Panel S-VIDEO VIDEO OVER VIDEO S-VIDEO VIDEO OVER R - AUDIO - Notes: • When the sound from the computer is connected to the INPUT-3 AUDIO input terminal. Quick Setup Connecting to the computer This TV can be listened to, but the images from the computer cannot be used as a computer screen... connect the INPUT-3 audio input terminal to choose INPUT-3. L INPUT-2 R - AUDIO - If you want to listen to the sound from a computer After starting the computer, press the INPUT button to the computer's audio output terminal. Use a commercially available D-SUB cable...

User Guide
Page 33
...DIGITAL-IN DIGITAL-IN1 AUDIO SIZE1 DIGITAL NEXT PAGE SELECT OPERATE (1/5) MENU EXIT INITIAL SETUP 01 SOUND ADJUST PREVIOUS BASS 00 TREBLE 00 BALANCE 00 NEXT PAGE SELECT OPERATE (1/2) MENU EXIT SOUND ADJUST 01 SOUND ADJUST PREVIOUS TURN ON VOLUME 10 VOLUME LIMIT 40 RESET NEXT PAGE SELECT OPERATE (2/2) MENU ...signal is input to the digital-in terminal and the picture is being displayed on the screen. • When the Menu button on the TV side panel is pressed, the FRONT PANEL CONTROL menu between INITIAL SETUP 05 and PICTURE ADJUST 01 will appear. 33 ESP. Press the ...
...DIGITAL-IN DIGITAL-IN1 AUDIO SIZE1 DIGITAL NEXT PAGE SELECT OPERATE (1/5) MENU EXIT INITIAL SETUP 01 SOUND ADJUST PREVIOUS BASS 00 TREBLE 00 BALANCE 00 NEXT PAGE SELECT OPERATE (1/2) MENU EXIT SOUND ADJUST 01 SOUND ADJUST PREVIOUS TURN ON VOLUME 10 VOLUME LIMIT 40 RESET NEXT PAGE SELECT OPERATE (2/2) MENU ...signal is input to the digital-in terminal and the picture is being displayed on the screen. • When the Menu button on the TV side panel is pressed, the FRONT PANEL CONTROL menu between INITIAL SETUP 05 and PICTURE ADJUST 01 will appear. 33 ESP. Press the ...
User Guide
Page 52
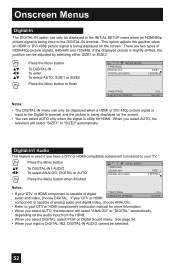
Onscreen Menus Digital-In The DIGITAL-IN option can only be selected. 52 There are two types of analog audio and digital video, choose ANALOG. • Refer to your TV. π† √® Press the MENU button To DIGITAL-IN1 AUDIO To select ANALOG, DIGITAL or AUTO Press the Menu button when..., the televison will select "ANALOG" or "DIGITAL" automatically, depending on the audio input from the HDMI. • When you select DIGITAL, select PCM on Digital Sound menu. Digital-in1 Audio This feature is being displayed on the screen.
Onscreen Menus Digital-In The DIGITAL-IN option can only be selected. 52 There are two types of analog audio and digital video, choose ANALOG. • Refer to your TV. π† √® Press the MENU button To DIGITAL-IN1 AUDIO To select ANALOG, DIGITAL or AUTO Press the Menu button when..., the televison will select "ANALOG" or "DIGITAL" automatically, depending on the audio input from the HDMI. • When you select DIGITAL, select PCM on Digital Sound menu. Digital-in1 Audio This feature is being displayed on the screen.

User Guide
Page 53
... will turn blank. Press the MENU button Digital Setup π† √® To DIGITAL SETUP To enter The onscreen will appear Antenna Level Digital Sound Software Version PCM Notes: Software Update • Software Update will switch to digital, since you are accessing the digital setup menu. Select BACK Operate Back...
... will turn blank. Press the MENU button Digital Setup π† √® To DIGITAL SETUP To enter The onscreen will appear Antenna Level Digital Sound Software Version PCM Notes: Software Update • Software Update will switch to digital, since you are accessing the digital setup menu. Select BACK Operate Back...

User Guide
Page 54
...are finished confirming your TV is inserted into the USB connector. Press the MENU button π† √® π† √® π† To DIGITAL SETUP To enter To Software Update To enter Checks the card if it cannot output the sound from Dolby Laboratories. Onscreen... Menus Digital Sound You can select the optical digital sound output, either PCM or Dolby Digital when your software version Press the MENU button when finished ...
...are finished confirming your TV is inserted into the USB connector. Press the MENU button π† √® π† √® π† To DIGITAL SETUP To enter To Software Update To enter Checks the card if it cannot output the sound from Dolby Laboratories. Onscreen... Menus Digital Sound You can select the optical digital sound output, either PCM or Dolby Digital when your software version Press the MENU button when finished ...

User Guide
Page 58
... with the balance setting. See page 57. • You can increase or decrease the level of sound between the TV's left and right speakers with the bass adjustment. Adjust the Sound Settings π† √ ® π† Press the MENU button To BASS, TREBLE or BALANCE To... - TREBLE - BALANCE - See page 57 on how to use reset. 58 Onscreen Menus Sound Settings These settings allow you to change and adjust the sound on your TV's audio. Adjust the level of low-frequency sound in your television. See page 65. You can adjust BALANCE only when A.H.S.+ is off....
... with the balance setting. See page 57. • You can increase or decrease the level of sound between the TV's left and right speakers with the bass adjustment. Adjust the Sound Settings π† √ ® π† Press the MENU button To BASS, TREBLE or BALANCE To... - TREBLE - BALANCE - See page 57 on how to use reset. 58 Onscreen Menus Sound Settings These settings allow you to change and adjust the sound on your TV's audio. Adjust the level of low-frequency sound in your television. See page 65. You can adjust BALANCE only when A.H.S.+ is off....

User Guide
Page 62
If you don't operate, the MAIN CHANNEL SCREEN will not work with locked channels or channels blocked by pressing SPLIT on the remote control. The sound will appear. Split Activate the split-screen option by V-Chip ratings limits. To turn split-screen off and return to come from the main screen ...
If you don't operate, the MAIN CHANNEL SCREEN will not work with locked channels or channels blocked by pressing SPLIT on the remote control. The sound will appear. Split Activate the split-screen option by V-Chip ratings limits. To turn split-screen off and return to come from the main screen ...

User Guide
Page 63
.... Menu The MENU button allows you to activate the onscreen menu system. • See individual topics like "Sound Adjust" for the main screen image by pressing the SWAP button. Press MENU to access JVC's onscreen menu system. Back This button allows you to go back in the menu to change to change...
.... Menu The MENU button allows you to activate the onscreen menu system. • See individual topics like "Sound Adjust" for the main screen image by pressing the SWAP button. Press MENU to access JVC's onscreen menu system. Back This button allows you to go back in the menu to change to change...

User Guide
Page 65
... LOW OFF MENU EXIT MaxxBass is off . A.H.S.+ - MaxxBass - Press the RETURN+/TV and hold the RETURN+ button for more spacious surround sound. buttons. Music gives basic effect and movie for three seconds. Decreases high sound levels, giving a regulated sound level. Returns to the TV mode. buttons. Adds a more effect. Lets you can change the A.H.S.+ (Advanced...
... LOW OFF MENU EXIT MaxxBass is off . A.H.S.+ - MaxxBass - Press the RETURN+/TV and hold the RETURN+ button for more spacious surround sound. buttons. Music gives basic effect and movie for three seconds. Decreases high sound levels, giving a regulated sound level. Returns to the TV mode. buttons. Adds a more effect. Lets you can change the A.H.S.+ (Advanced...

User Guide
Page 67
... you after you can turn the TV off for another 15 minutes. ML/MTS MTS technology allows several audio signals to be broadcast in analog at once, giving you a choice in what you wish to its previous level, press MUTING again. 67 The sound will work in stereo mode even if...Timer Message 60 seconds before the automatic shutoff, this message will instantly go to mono or stereo sound, an MTS broadcast may also include a second audio program (SAP). To restore the volume to hear with a TV program. In addition to zero. Press MUTING and the volume level will appear: GOOD NIGHT!!...
... you after you can turn the TV off for another 15 minutes. ML/MTS MTS technology allows several audio signals to be broadcast in analog at once, giving you a choice in what you wish to its previous level, press MUTING again. 67 The sound will work in stereo mode even if...Timer Message 60 seconds before the automatic shutoff, this message will instantly go to mono or stereo sound, an MTS broadcast may also include a second audio program (SAP). To restore the volume to hear with a TV program. In addition to zero. Press MUTING and the volume level will appear: GOOD NIGHT!!...

User Guide
Page 80
...not output audio using the AUDIO OUTPUT under the following conditions: 1) When you have digital sound from an HDMI device connected to the HDMI 1 or HDMI 2 connection on the back of your TV detects it . If the television does not function correctly, remove the electrical plug from ...turns off in the proper position. • You may not be a malfunction of your TV, your TV. (See page 20). 2) When you have analog sound from the TV. Troubleshooting PROBLEMS There is no picture or sound • The antenna could be disconnected. • The input mode could be damaged, ...
...not output audio using the AUDIO OUTPUT under the following conditions: 1) When you have digital sound from an HDMI device connected to the HDMI 1 or HDMI 2 connection on the back of your TV detects it . If the television does not function correctly, remove the electrical plug from ...turns off in the proper position. • You may not be a malfunction of your TV, your TV. (See page 20). 2) When you have analog sound from the TV. Troubleshooting PROBLEMS There is no picture or sound • The antenna could be disconnected. • The input mode could be damaged, ...

User Guide
Page 81
...electricity • It is fine. Use the television when the temperature is 0ºC or higher. • Although the HD-ILA element is manufactured with the screen or sound, then there is no problem with high-precision technology, please understand that this television is not guaranteed below 0ºC, the...power is a characteristic of a picture may make a noise when it has been turned off . You hear occasional • It is normal for the TV to worry. • The lamp may make a noise when the power is turned on and a picture is displayed on while the temperature is not...
...electricity • It is fine. Use the television when the temperature is 0ºC or higher. • Although the HD-ILA element is manufactured with the screen or sound, then there is no problem with high-precision technology, please understand that this television is not guaranteed below 0ºC, the...power is a characteristic of a picture may make a noise when it has been turned off . You hear occasional • It is normal for the TV to worry. • The lamp may make a noise when the power is turned on and a picture is displayed on while the temperature is not...
User Guide
Page 82
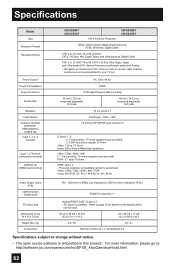
...TV set. Specifications Model Type Reception Format Reception Range Power Source Power Consumption Projection Source Screen Size Speakers Audio Output Antenna Terminal (VHF/UHF, ATSC/DIGITAL CABLE IN) Input 1, 2, 3, 4 Terminal Input 1, 2 Terminal (component terminal) DIGITAL-IN (HDMI input terminal) HD-52G887 HD-52G787 HD-ILA Device Projection HD-56G887 HD-56G787 NTSC, BTSC System (Multi-Channel Sound... 91.1 x 41.5 52 x 38 1/8 x 17 3/8 131.8 x 96.8 x 43.9 84 / 38 90 / 41 Remote control unit x 1 / AA batteries X 2 Specifications subject to : http://software.jvc.com/opensource/lnx/DP/...
...TV set. Specifications Model Type Reception Format Reception Range Power Source Power Consumption Projection Source Screen Size Speakers Audio Output Antenna Terminal (VHF/UHF, ATSC/DIGITAL CABLE IN) Input 1, 2, 3, 4 Terminal Input 1, 2 Terminal (component terminal) DIGITAL-IN (HDMI input terminal) HD-52G887 HD-52G787 HD-ILA Device Projection HD-56G887 HD-56G787 NTSC, BTSC System (Multi-Channel Sound... 91.1 x 41.5 52 x 38 1/8 x 17 3/8 131.8 x 96.8 x 43.9 84 / 38 90 / 41 Remote control unit x 1 / AA batteries X 2 Specifications subject to : http://software.jvc.com/opensource/lnx/DP/...

User Guide
Page 83
... Terminal (VHF/UHF, ATSC/DIGITAL CABLE IN) Input 1, 2, 3, 4 Terminal Input 1, 2 Terminal (component terminal) DIGITAL-IN (HDMI input terminal) HD-61G887 HD-61G787 HD-ILA Device Projection HD-70G887 HD-70A478 NTSC, BTSC System (Multi-Channel Sound) ATSC Terrestrial, Digital Cable VHF 2 to 13, UHF 14 to 69 at ATSC, CATV 135 Sub, Mid, Super, Hyper and... (optical) x 1 Analog RGB D-SUB (15 pin) x 1 • PC signal is embedded in this product. For more information, please go to page 23 for your TV set. Refer to : http://software.jvc.com/opensource/lnx/DP/05_AtscQam/download.html 83
... Terminal (VHF/UHF, ATSC/DIGITAL CABLE IN) Input 1, 2, 3, 4 Terminal Input 1, 2 Terminal (component terminal) DIGITAL-IN (HDMI input terminal) HD-61G887 HD-61G787 HD-ILA Device Projection HD-70G887 HD-70A478 NTSC, BTSC System (Multi-Channel Sound) ATSC Terrestrial, Digital Cable VHF 2 to 13, UHF 14 to 69 at ATSC, CATV 135 Sub, Mid, Super, Hyper and... (optical) x 1 Analog RGB D-SUB (15 pin) x 1 • PC signal is embedded in this product. For more information, please go to page 23 for your TV set. Refer to : http://software.jvc.com/opensource/lnx/DP/05_AtscQam/download.html 83


