Guide Book
Page 8
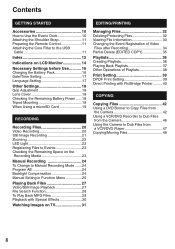
Contents GETTING STARTED Accessories 10 How to Use the Everio Dock 10 Attaching the Shoulder Strap 11 Preparing the Remote Control 11 Attaching the Core Filter to the USB Cable 11 Index 12 Indications on LCD Monitor 14 Necessary Settings before Use........... 16 Charging the Battery Pack 16 Date...Battery Power ...... 18 Tripod Mounting 18 When Using a microSD Card 19 RECORDING Recording Files 20 Video Recording 20 Still Image Recording 21 Zooming 22 LED Light 22 Registering Files to Events 23 Checking the Remaining Space on the Recording Media 23 Manual Recording 24 To Change ...
Contents GETTING STARTED Accessories 10 How to Use the Everio Dock 10 Attaching the Shoulder Strap 11 Preparing the Remote Control 11 Attaching the Core Filter to the USB Cable 11 Index 12 Indications on LCD Monitor 14 Necessary Settings before Use........... 16 Charging the Battery Pack 16 Date...Battery Power ...... 18 Tripod Mounting 18 When Using a microSD Card 19 RECORDING Recording Files 20 Video Recording 20 Still Image Recording 21 Zooming 22 LED Light 22 Registering Files to Events 23 Checking the Remaining Space on the Recording Media 23 Manual Recording 24 To Change ...
Guide Book
Page 10
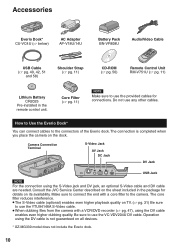
...higher playback quality on all devices. * GZ-MG330 model does not include the Everio dock. 10 Be sure to use the VC-VDV204U DV cable. Operation using the S-Video jack and DV jack, an optional S-Video cable and DV cable are needed. Consult the JVC Service Center described on the sheet included ... completed when you place the camera on its availability. GETTING STARTED Accessories Everio Dock* CU-VC4U (੬ below) AC Adapter AP-V18U/14U Battery Pack BN-VF808U Audio/Video Cable USB Cable (੬ pg. 40, 42, 51 and 58) Shoulder Strap (੬ pg. 11) CD-ROM (੬ pg. 50...
...higher playback quality on all devices. * GZ-MG330 model does not include the Everio dock. 10 Be sure to use the VC-VDV204U DV cable. Operation using the S-Video jack and DV jack, an optional S-Video cable and DV cable are needed. Consult the JVC Service Center described on the sheet included ... completed when you place the camera on its availability. GETTING STARTED Accessories Everio Dock* CU-VC4U (੬ below) AC Adapter AP-V18U/14U Battery Pack BN-VF808U Audio/Video Cable USB Cable (੬ pg. 40, 42, 51 and 58) Shoulder Strap (੬ pg. 11) CD-ROM (੬ pg. 50...

Guide Book
Page 11
... its length, and use . Connect the end of purchase. Buckle Eyelet Strap Guide Preparing the Remote Control A battery is directly exposed to the USB cable. Effective distance: 5 m (16 ft) Lock Tab Lithium Battery (CR2025) NOTE The transmitted beam may not be effective or may cause incorrect operation...remote sensor is included inside the remote control at the time of the cable with the core filter to fix it in place. Thread the strap through the eyelet. Attaching the Core Filter to the USB Cable Attach the core filter to sunlight or powerful lighting.
... its length, and use . Connect the end of purchase. Buckle Eyelet Strap Guide Preparing the Remote Control A battery is directly exposed to the USB cable. Effective distance: 5 m (16 ft) Lock Tab Lithium Battery (CR2025) NOTE The transmitted beam may not be effective or may cause incorrect operation...remote sensor is included inside the remote control at the time of the cable with the core filter to fix it in place. Thread the strap through the eyelet. Attaching the Core Filter to the USB Cable Attach the core filter to sunlight or powerful lighting.
Guide Book
Page 40
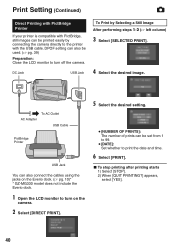
... To Print by connecting the camera directly to the printer with the USB cable. To stop printing after printing starts 1) Select [STOP]. 2) When [QUIT PRINTING?] appears, select [YES]. 40 DPOF setting can also be set from 1 to 99. • [...; left column) 3 Select [SELECTED PRINT]. 4 Select the desired image. AC Adapter To AC Outlet USB Cable PictBridge Printer USB Jack You can also connect the cables using the jacks on the Everio dock. (੬ pg. 10)* * GZ-MG330 model does not include the Everio dock. 1 Open the LCD monitor to turn on the camera. 2 Select [DIRECT PRINT]. 5 Select...
... To Print by connecting the camera directly to the printer with the USB cable. To stop printing after printing starts 1) Select [STOP]. 2) When [QUIT PRINTING?] appears, select [YES]. 40 DPOF setting can also be set from 1 to 99. • [...; left column) 3 Select [SELECTED PRINT]. 4 Select the desired image. AC Adapter To AC Outlet USB Cable PictBridge Printer USB Jack You can also connect the cables using the jacks on the Everio dock. (੬ pg. 10)* * GZ-MG330 model does not include the Everio dock. 1 Open the LCD monitor to turn on the camera. 2 Select [DIRECT PRINT]. 5 Select...

Guide Book
Page 41
...firm the DPOF setting In step 4, select [CHECK SETTINGS]. ENGLISH To Print Using the DPOF Settings If the printer is not recognized, disconnect the USB cable, then reconnect it. • You cannot return to the previous screen while operating Direct print. If you can use the DPOF settings. (੬ pg. 39...
...firm the DPOF setting In step 4, select [CHECK SETTINGS]. ENGLISH To Print Using the DPOF Settings If the printer is not recognized, disconnect the USB cable, then reconnect it. • You cannot return to the previous screen while operating Direct print. If you can use the DPOF settings. (੬ pg. 39...

Guide Book
Page 42
...can be used. COPYING Copying Files Types of Copying and Connectable Device The Camera You can copy video/still images from HDD onto microSD card or from microSD card to HDD with this camera alone. (੬ pg. 48) DVD Burner (CU-VD3) You can copy video files recorded...they need to turn off the camera. Formatting a disc deletes all content recorded on other devices. To AC Outlet USB Jack AC Adapter DC Jack USB Jack DVD Burner USB Cable NOTE Use the USB cable that time. • Dual-layer discs cannot be used. Regarding finalization after copying The disc is a play...
...can be used. COPYING Copying Files Types of Copying and Connectable Device The Camera You can copy video/still images from HDD onto microSD card or from microSD card to HDD with this camera alone. (੬ pg. 48) DVD Burner (CU-VD3) You can copy video files recorded...they need to turn off the camera. Formatting a disc deletes all content recorded on other devices. To AC Outlet USB Jack AC Adapter DC Jack USB Jack DVD Burner USB Cable NOTE Use the USB cable that time. • Dual-layer discs cannot be used. Regarding finalization after copying The disc is a play...

Guide Book
Page 51
...monitor to delete a file from a recording medium can cause problems with the operation of the camera. NOTES • Never disconnect the USB cable while the access/charge lamp on the PC, not through the camera. When installation is completed The installed software is connected, to prevent malfunctions... of the PC. • Connect the camera directly to the USB jack on the camera lights or blinks. • Do not turn off the camera when the USB cable is displayed in the medium on the hard disk drive that has the most free space.
...monitor to delete a file from a recording medium can cause problems with the operation of the camera. NOTES • Never disconnect the USB cable while the access/charge lamp on the PC, not through the camera. When installation is completed The installed software is connected, to prevent malfunctions... of the PC. • Connect the camera directly to the USB jack on the camera lights or blinks. • Do not turn off the camera when the USB cable is displayed in the medium on the hard disk drive that has the most free space.

Guide Book
Page 52
... you could not install the software, turn to page 53 for each medium (HDD or microSD) are created in the status bar. 3) Select [USB Mass Storage Device] or [USB Disk], and then click [Stop]. 4) Click [OK]. 5) Disconnect the USB cable. 6) Turn off the power of how to turn on the camera. 2 ...is performed from more than one camera HDD, individual HDD folders are automatically selected from the provided CD- Video files that the access/charge lamp on a Windows® PC (Continued) - ROM. (੬ pg. 50) • Connect the camera to the PC with the USB cable. (੬ pg. 51) 1...
... you could not install the software, turn to page 53 for each medium (HDD or microSD) are created in the status bar. 3) Select [USB Mass Storage Device] or [USB Disk], and then click [Stop]. 4) Click [OK]. 5) Disconnect the USB cable. 6) Turn off the power of how to turn on the camera. 2 ...is performed from more than one camera HDD, individual HDD folders are automatically selected from the provided CD- Video files that the access/charge lamp on a Windows® PC (Continued) - ROM. (੬ pg. 50) • Connect the camera to the PC with the USB cable. (੬ pg. 51) 1...

Guide Book
Page 53
File Backup on the PC without Using Software Preparation: Connect the camera to the PC with the USB cable. (੬ pg. 51) 1 On the PC, create a folder to back up files individually, open this folder, and drag & drop files such as [PIC_0001....
File Backup on the PC without Using Software Preparation: Connect the camera to the PC with the USB cable. (੬ pg. 51) 1 On the PC, create a folder to back up files individually, open this folder, and drag & drop files such as [PIC_0001....

Guide Book
Page 54
... on the PC Preparation: • Install the software from the provided CD- ROM. (੬ pg. 50) • Connect the camera to the PC with the USB cable. (੬ pg. 51) 1 Open the LCD monitor to turn on a screen. PowerCinema starts automatically. 3 Click [Browse Videos] (for video playback) or [Browse Pictures] (for still...
... on the PC Preparation: • Install the software from the provided CD- ROM. (੬ pg. 50) • Connect the camera to the PC with the USB cable. (੬ pg. 51) 1 Open the LCD monitor to turn on a screen. PowerCinema starts automatically. 3 Click [Browse Videos] (for video playback) or [Browse Pictures] (for still...

Guide Book
Page 55
.... 3 Click [Author and Burn]. 4 Click [Burn to cancel the procedure. 3 Click [OK]. ROM. (੬ pg. 50) • Connect the camera to the PC with the USB cable. (੬ pg. 51) • Open the LCD monitor to cancel the procedure. Click [Stop] to turn on the PC, you do not need to use...
.... 3 Click [Author and Burn]. 4 Click [Burn to cancel the procedure. 3 Click [OK]. ROM. (੬ pg. 50) • Connect the camera to the PC with the USB cable. (੬ pg. 51) • Open the LCD monitor to cancel the procedure. Click [Stop] to turn on the PC, you do not need to use...

Guide Book
Page 58
... Close the LCD monitor to the recording medium on the desktop into the [Trash] icon. AC Adapter To AC Outlet USB Port NOTES • Never disconnect the USB cable while the access/charge lamp on the camera lights or blinks. • Do not turn off . File Backup on ...les and folders in the camera from the computer to turn off the camera when the USB cable is turned off before proceeding. 3) Disconnect the USB cable. 4) Turn off the camera and computer. USB Jack DC Jack USB Cable • When you have finished operation Always follow the procedures below when disconnecting ...
... Close the LCD monitor to the recording medium on the desktop into the [Trash] icon. AC Adapter To AC Outlet USB Port NOTES • Never disconnect the USB cable while the access/charge lamp on the camera lights or blinks. • Do not turn off . File Backup on ...les and folders in the camera from the computer to turn off the camera when the USB cable is turned off before proceeding. 3) Disconnect the USB cable. 4) Turn off the camera and computer. USB Jack DC Jack USB Cable • When you have finished operation Always follow the procedures below when disconnecting ...

Guide Book
Page 59
ENGLISH File Backup on the Macintosh Preparation: Connect the camera to the computer with the USB cable. (੬ pg. 58) 1 On the computer, create a folder to back up files into. 2 Open the LCD monitor to turn on the use of folders, ...
ENGLISH File Backup on the Macintosh Preparation: Connect the camera to the computer with the USB cable. (੬ pg. 58) 1 On the computer, create a folder to back up files into. 2 Open the LCD monitor to turn on the use of folders, ...
Guide Book
Page 69
... setting • Do not select the sepia (SEPIA) or monotone 26 cannot be activated. (MONOTONE) mode before setting white balance. • The driving sound (hum) of still images (approx. 1,000 or more times. • Another operation is being attempted while a DVD burner that is appropriate ... There is displayed in the recording medium. to the DVD burner, or disconnect the USB cable. • Touch the sensors with gloves on the recording media, or shooting speed is a large number of the hard disk may be stopped the 'indicator flashes. The black & white fader •...
... setting • Do not select the sepia (SEPIA) or monotone 26 cannot be activated. (MONOTONE) mode before setting white balance. • The driving sound (hum) of still images (approx. 1,000 or more times. • Another operation is being attempted while a DVD burner that is appropriate ... There is displayed in the recording medium. to the DVD burner, or disconnect the USB cable. • Touch the sensors with gloves on the recording media, or shooting speed is a large number of the hard disk may be stopped the 'indicator flashes. The black & white fader •...

Instruction Manual
Page 9
... DV jack, an optional S-Video cable and DV cable are needed. Do not use the provided cables for details on TV. (੬ pg. 19) * GZ-MG330 model does not include the Everio dock. Make sure to connect the end with the core filter to the USB Cable Connect the end of the Everio dock. The core filter...
... DV jack, an optional S-Video cable and DV cable are needed. Do not use the provided cables for details on TV. (੬ pg. 19) * GZ-MG330 model does not include the Everio dock. Make sure to connect the end with the core filter to the USB Cable Connect the end of the Everio dock. The core filter...

Instruction Manual
Page 22
The second DVD disc begins to 32) DVD Burner USB Cable NOTE Use the USB cable that it can be played on other devices. To AC Outlet USB Jack AC Adapter DC Jack USB Jack PC You can copy video/still image files on the disc up until that have never been copied to the ...files recorded on the camera. 2 Press the DIRECT DVD button. 3 Select [EXECUTE]. • The DVD disc begins to Copy Files from microSD card to HDD with a DVD Burner Preparation: Close the LCD monitor to be used . Copying Files Types of Copying and Connectable Device The Camera You can copy video...
The second DVD disc begins to 32) DVD Burner USB Cable NOTE Use the USB cable that it can be played on other devices. To AC Outlet USB Jack AC Adapter DC Jack USB Jack PC You can copy video/still image files on the disc up until that have never been copied to the ...files recorded on the camera. 2 Press the DIRECT DVD button. 3 Select [EXECUTE]. • The DVD disc begins to Copy Files from microSD card to HDD with a DVD Burner Preparation: Close the LCD monitor to be used . Copying Files Types of Copying and Connectable Device The Camera You can copy video...

Instruction Manual
Page 25
... installation is completed The installed software is necessary to turn off the camera. 5 Click [Yes]. When it through a hub. • Do not use an extension USB cable. • Saving the wrong kinds of the camera. The software installation starts. Also, do not move or rename folders and files in a recording medium...: Close the LCD monitor to delete a file from a recording medium can cause problems with the operation of files in the medium on the hard disk drive that has the most free space.
... installation is completed The installed software is necessary to turn off the camera. 5 Click [Yes]. When it through a hub. • Do not use an extension USB cable. • Saving the wrong kinds of the camera. The software installation starts. Also, do not move or rename folders and files in a recording medium...: Close the LCD monitor to delete a file from a recording medium can cause problems with the operation of files in the medium on the hard disk drive that has the most free space.

Instruction Manual
Page 26
... need to back up . NOTE When backup is performed from more than one camera HDD, individual HDD folders are automatically selected from the provided CD- ROM. (੬ pg. 24) • Connect the camera to the PC with the USB cable. (੬ pg. 25) 1 Open the LCD monitor to turn to page 27 for... each medium (HDD or microSD) are backed up files onto your files without using this software. ROM. (੬ pg...
... need to back up . NOTE When backup is performed from more than one camera HDD, individual HDD folders are automatically selected from the provided CD- ROM. (੬ pg. 24) • Connect the camera to the PC with the USB cable. (੬ pg. 25) 1 Open the LCD monitor to turn to page 27 for... each medium (HDD or microSD) are backed up files onto your files without using this software. ROM. (੬ pg...

Instruction Manual
Page 27
...]. 4 Double-click [EVERIO_HDD] or [EVERIO_SD] icon. NOTE For further details on the PC without Using Software Preparation: Connect the camera to the PC with the USB cable. (੬ pg. 25) 1 On the PC, create a folder to back up files into the folder you want to back up files individually, open...
...]. 4 Double-click [EVERIO_HDD] or [EVERIO_SD] icon. NOTE For further details on the PC without Using Software Preparation: Connect the camera to the PC with the USB cable. (੬ pg. 25) 1 On the PC, create a folder to back up files into the folder you want to back up files individually, open...

Instruction Manual
Page 30
... the power of the PC. • Connect the camera directly to the computer, not through a hub. • Do not use an extension USB cable. 30 Failing to do so may cause damage to the recording medium on the camera, do not include any other files than those recorded...Macintosh Preparation: Close the LCD monitor to prevent malfunctions of the camera/computer off the camera. AC Adapter To AC Outlet USB Port NOTES • Never disconnect the USB cable while the access/charge lamp on the desktop into the [Trash] icon. System Requirements Hardware: Macintosh must be standard ...
... the power of the PC. • Connect the camera directly to the computer, not through a hub. • Do not use an extension USB cable. 30 Failing to do so may cause damage to the recording medium on the camera, do not include any other files than those recorded...Macintosh Preparation: Close the LCD monitor to prevent malfunctions of the camera/computer off the camera. AC Adapter To AC Outlet USB Port NOTES • Never disconnect the USB cable while the access/charge lamp on the desktop into the [Trash] icon. System Requirements Hardware: Macintosh must be standard ...

