Instructions
Page 2
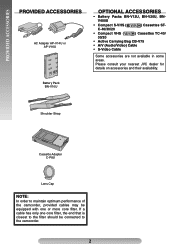
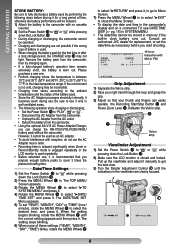
... JVC dealer for details on accessories and their availability. PROVIDED ACCESSORIES PROVIDED ACCESSORIES AC Adapter AP-V14U or AP-V16U OPTIONAL ACCESSORIES • Battery Packs BN-V12U, BN-V20U, BNV400U • Compact S-VHS ( ) Cassettes ST- Battery Pack BN-V10U Shoulder Strap Cassette Adapter C-P8U Lens Cap NOTE: In order to maintain optimum performance of the camcorder...
... JVC dealer for details on accessories and their availability. PROVIDED ACCESSORIES PROVIDED ACCESSORIES AC Adapter AP-V14U or AP-V16U OPTIONAL ACCESSORIES • Battery Packs BN-V12U, BN-V20U, BNV400U • Compact S-VHS ( ) Cassettes ST- Battery Pack BN-V10U Shoulder Strap Cassette Adapter C-P8U Lens Cap NOTE: In order to maintain optimum performance of the camcorder...
Instructions
Page 3
...TO RAIN OR MOISTURE. However, live recording and LCD monitor/viewfinder playback are possible anywhere. • Use the JVC BN-V10U/V12U/V20U/V400U battery packs and, to recharge them or to supply power to be regulated in different countries.) NOTES: • The rating plate... useful life, under various state and local laws, it may be used with your local solid waste of this camcorder. 3 The battery is powered by a rechargeable battery. For disposal or recycling information please contact your local authorities, or the Electronics Industries Alliance: CAUTIONS • This...
...TO RAIN OR MOISTURE. However, live recording and LCD monitor/viewfinder playback are possible anywhere. • Use the JVC BN-V10U/V12U/V20U/V400U battery packs and, to recharge them or to supply power to be regulated in different countries.) NOTES: • The rating plate... useful life, under various state and local laws, it may be used with your local solid waste of this camcorder. 3 The battery is powered by a rechargeable battery. For disposal or recycling information please contact your local authorities, or the Electronics Industries Alliance: CAUTIONS • This...
Instructions
Page 4
...The apparatus shall not be caused.) IMPORTANT SAFETY INSTRUCTIONS 1)Read these instructions. 2)Keep these batteries must be placed on the nickel-cadmium (Ni-Cd) battery indicates JVC is used Ni-Cd batteries into the apparatus, the apparatus has been exposed to preserving our environment and conserving our ...Also do not place any way, such as cosmetics or medicines, flower vases, potted plants, cups etc.) on Ni-Cd battery recycling and disposal bans/restrictions in accordance with the manufacturer's instructions. 8) Do not install near water. 6)Clean only with the apparatus....
...The apparatus shall not be caused.) IMPORTANT SAFETY INSTRUCTIONS 1)Read these instructions. 2)Keep these batteries must be placed on the nickel-cadmium (Ni-Cd) battery indicates JVC is used Ni-Cd batteries into the apparatus, the apparatus has been exposed to preserving our environment and conserving our ...Also do not place any way, such as cosmetics or medicines, flower vases, potted plants, cups etc.) on Ni-Cd battery recycling and disposal bans/restrictions in accordance with the manufacturer's instructions. 8) Do not install near water. 6)Clean only with the apparatus....

Instructions
Page 6
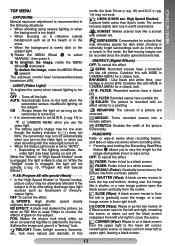
...Strap Eyelets pg. 9 6 S-Video Output Connector [S pg. 11 7 Audio Output Connector [A pg. 11 8 Video Output Connector [V pg. 11 9 Battery Release Switch [BATTERY RELEASE pg. 7 ! Video Light Indicator pg. 13 < Backlight Compensation Indicator pg. 10 = Recording Format Indicator (S/ S-ET pg. 15 > Tape ...Bright Level Indicator pg. 15 V Focus Indicator pg. 10 0 Exposure Control Level Counter pg. 13 1 White Balance Mode Indicator pg. 14 2 S-VHS/S-VHS ET Recording Indicator..... ੬ pg. 15 3 Record-Standby Mode Indicator pg. 9 4 : Cassette Indicator pg. 9 5 TBC Indicator pg. 11...
...Strap Eyelets pg. 9 6 S-Video Output Connector [S pg. 11 7 Audio Output Connector [A pg. 11 8 Video Output Connector [V pg. 11 9 Battery Release Switch [BATTERY RELEASE pg. 7 ! Video Light Indicator pg. 13 < Backlight Compensation Indicator pg. 10 = Recording Format Indicator (S/ S-ET pg. 15 > Tape ...Bright Level Indicator pg. 15 V Focus Indicator pg. 10 0 Exposure Control Level Counter pg. 13 1 White Balance Mode Indicator pg. 14 2 S-VHS/S-VHS ET Recording Indicator..... ੬ pg. 15 3 Record-Standby Mode Indicator pg. 9 4 : Cassette Indicator pg. 9 5 TBC Indicator pg. 11...

Instructions
Page 7
...40 min. Failure to do so can cause the camcorder to 240V. Using the Battery Pack Perform step 1) of "Charging the Battery Pack". Approximate recording time (unit: min.) Battery Pack Viewfinder on LCD monitor on BATTERY RELEASE Switch Battery pack Push in Power Switch To AC outlet To DC...optional) (85) (80) BN-V400U (optional) 380 (210) 330 (195) Using AC Power Connect the AC Adapter to the camcorder (੬ step 2) of "Charging the Battery Pack"). • The provided AC Adapter features automatic voltage selection in the AC range from 110V to malfunction. approx. 2 hrs. ...
...40 min. Failure to do so can cause the camcorder to 240V. Using the Battery Pack Perform step 1) of "Charging the Battery Pack". Approximate recording time (unit: min.) Battery Pack Viewfinder on LCD monitor on BATTERY RELEASE Switch Battery pack Push in Power Switch To AC outlet To DC...optional) (85) (80) BN-V400U (optional) 380 (210) 330 (195) Using AC Power Connect the AC Adapter to the camcorder (੬ step 2) of "Charging the Battery Pack"). • The provided AC Adapter features automatic voltage selection in the AC range from 110V to malfunction. approx. 2 hrs. ...
Instructions
Page 8
.... 2) Pass your right hand through the loop and grasp the grip. 3) Adjust so that you prepare enough battery packs to cover 3 times the planned shooting time. Consult an authorised JVC dealer for the first time or after a long storage period, the CHARGE lamp % may be incomplete....if the built-in well-ventilated areas. • The following steps before storing it for a long period af time, otherwise the battery performance will be reduced. 1) Attach the battery to the camcorder with no cassette inserted. 2) Set the Power Switch $ to " " or " " while pressing down the Lock Button #. &#...
.... 2) Pass your right hand through the loop and grasp the grip. 3) Adjust so that you prepare enough battery packs to cover 3 times the planned shooting time. Consult an authorised JVC dealer for the first time or after a long storage period, the CHARGE lamp % may be incomplete....if the built-in well-ventilated areas. • The following steps before storing it for a long period af time, otherwise the battery performance will be reduced. 1) Attach the battery to the camcorder with no cassette inserted. 2) Set the Power Switch $ to " " or " " while pressing down the Lock Button #. &#...
Instructions
Page 13
... lower left corner, revealing the scene, or wipes out from right to left to a painting. AUTO: Automatically turns on the light when the camcorder senses insufficient lighting on the subject. OFF: To cancel the effect. SEPIA: Recorded scenes have a reddish tint. FILTER: Recorded scenes...subject is recorded with reddish tint. SPORTS: High shutter speed clearly captures fast-moving images can be low even though the battery indicator ( ) does not blink, the camcorder may be recorded since the shutter speed becomes fast. FADER: Fades in/out to vary the length for a classic ...
... lower left corner, revealing the scene, or wipes out from right to left to a painting. AUTO: Automatically turns on the light when the camcorder senses insufficient lighting on the subject. OFF: To cancel the effect. SEPIA: Recorded scenes have a reddish tint. FILTER: Recorded scenes...subject is recorded with reddish tint. SPORTS: High shutter speed clearly captures fast-moving images can be low even though the battery indicator ( ) does not blink, the camcorder may be recorded since the shutter speed becomes fast. FADER: Fades in/out to vary the length for a classic ...

Instructions
Page 14
... (16"). The setting stops blinking. OFF: Allows you adjust white balance manually, the setting is retained even if the power is turned off or the battery is difficult to shoot dark scenes with no picture brightness adjustment. When set to shoot with a brighter image even if the picture becomes...
... (16"). The setting stops blinking. OFF: Allows you adjust white balance manually, the setting is retained even if the power is turned off or the battery is difficult to shoot dark scenes with no picture brightness adjustment. When set to shoot with a brighter image even if the picture becomes...
Instructions
Page 17
... close to clear, and turn the camcorder's power off before disconnecting the power source. When the battery power is exhausted, power turns off are made with high-precision technology. LENS CAP: Appears for 5 seconds after cleaning, consult your nearest JVC dealer. E06) show what type of the camcorder. The tape is running low. •...
... close to clear, and turn the camcorder's power off before disconnecting the power source. When the battery power is exhausted, power turns off are made with high-precision technology. LENS CAP: Appears for 5 seconds after cleaning, consult your nearest JVC dealer. E06) show what type of the camcorder. The tape is running low. •...
Instructions
Page 18
... front tape cover. in use and store your nearest JVC dealer. swing it over 40°C or 104°F) or extremely low (under 0°C or 32°F) temperatures. ... leave the battery pack attached when the camcorder is on room temperature of connecting the unit's AC... . ... away from heaters, other heat sources or direct sunlight. ... USING HOUSEHOLD AC PLUG ADAPTER ... inserting. ... use Generic non-JVC batteries. remove the battery pack or disconnect the power supply while the power is not in places subject to before using the shoulder strap. • The lower ...
... front tape cover. in use and store your nearest JVC dealer. swing it over 40°C or 104°F) or extremely low (under 0°C or 32°F) temperatures. ... leave the battery pack attached when the camcorder is on room temperature of connecting the unit's AC... . ... away from heaters, other heat sources or direct sunlight. ... USING HOUSEHOLD AC PLUG ADAPTER ... inserting. ... use Generic non-JVC batteries. remove the battery pack or disconnect the power supply while the power is not in places subject to before using the shoulder strap. • The lower ...

Instructions
Page 19
... remove the cassette. 3 Close and lock the cassette holder by pressing the Close button. 4 Close and lock the LCD monitor. 5 Slide BATTERY RELEASE to remove the battery pack. 6 Attach the provided lens cap to the cautions that came with the LCD monitor on a circuit different from a cool place to ... wipe the exterior with a soft cloth, with diluted mild soap, wipe off the camcorder. 2 Open the LCD monitor to which the receiver is left dirty. • When using the unit immediately and consult your local JVC dealer. 19 For Your Maintenance 1) After Use 1 Turn off heavy dirt, then wipe ...
... remove the cassette. 3 Close and lock the cassette holder by pressing the Close button. 4 Close and lock the LCD monitor. 5 Slide BATTERY RELEASE to remove the battery pack. 6 Attach the provided lens cap to the cautions that came with the LCD monitor on a circuit different from a cool place to ... wipe the exterior with a soft cloth, with diluted mild soap, wipe off the camcorder. 2 Open the LCD monitor to which the receiver is left dirty. • When using the unit immediately and consult your local JVC dealer. 19 For Your Maintenance 1) After Use 1 Turn off heavy dirt, then wipe ...
Instructions
Page 20
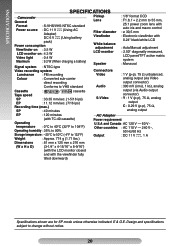
... and with the viewfinder fully tilted downward) Specifications shown are for SP mode unless otherwise indicated. SPECIFICATIONS SPECIFICATIONS Camcorder General Format : S-VHS/VHS NTSC standard Power source : DC 11 V (Using AC Adapter) DC 6 V (Using battery pack) Power consumption Viewfinder on : 3.5 W LCD monitor on : 4.3 W Video light : 0.4 W Maximum : 9.2 W (When charging...
... and with the viewfinder fully tilted downward) Specifications shown are for SP mode unless otherwise indicated. SPECIFICATIONS SPECIFICATIONS Camcorder General Format : S-VHS/VHS NTSC standard Power source : DC 11 V (Using AC Adapter) DC 6 V (Using battery pack) Power consumption Viewfinder on : 3.5 W LCD monitor on : 4.3 W Video light : 0.4 W Maximum : 9.2 W (When charging...
Instructions
Page 24
.... 9, 15 C Q Quick Review pg. 10 R Recording pg. 9 Recording Format (S-VHS/ S-VHS ET).......pg. 15 Recording Mode pg. 14 Retake pg. 10 Cassette Adapter pg. 12 Rewind The Tape pg. 9 Charging The Battery Pack pg. 7 Clean The Camcorder pg. 19 Connection To a VCR/ TV pg. 11 Counter Memory pg. 16 D ...10 Provided Accessories pg. 2 Auto Shut Off pg. 9 B Backlight Compensation pg. 10 Battery Pack pg. 7, 18 Brighten/Darken The Image pg. 13 Brighten/Darken The LCD Monitor.......... LX pg. 14 Super VHS Expansion Technology pg. 15 T Tape Counter pg. 16 Tape Dubbing pg. 11 Tape Length ...
.... 9, 15 C Q Quick Review pg. 10 R Recording pg. 9 Recording Format (S-VHS/ S-VHS ET).......pg. 15 Recording Mode pg. 14 Retake pg. 10 Cassette Adapter pg. 12 Rewind The Tape pg. 9 Charging The Battery Pack pg. 7 Clean The Camcorder pg. 19 Connection To a VCR/ TV pg. 11 Counter Memory pg. 16 D ...10 Provided Accessories pg. 2 Auto Shut Off pg. 9 B Backlight Compensation pg. 10 Battery Pack pg. 7, 18 Brighten/Darken The Image pg. 13 Brighten/Darken The LCD Monitor.......... LX pg. 14 Super VHS Expansion Technology pg. 15 T Tape Counter pg. 16 Tape Dubbing pg. 11 Tape Length ...


