
Installation Manual
Page 7
... you perform installation of a software that USB Video Streaming driver works properly. If you connect the camcorder to the PC with a USB cable. ● Refer to "VIDEO CONFERENCE OVER THE INTERNET" ... ImageMixer 1.7 with Windows® 2000 and Windows® XP, a warning message dialog box on digital signature may appear. To install DirectX, select "DirectX" on the installation screen of the USB Video...loaded from a list or specific location (Advanced)] and then click [Next]. Double-click the [JVC] folder and then double-click the [Docs] folder. In this case, click [OK] to...
... you perform installation of a software that USB Video Streaming driver works properly. If you connect the camcorder to the PC with a USB cable. ● Refer to "VIDEO CONFERENCE OVER THE INTERNET" ... ImageMixer 1.7 with Windows® 2000 and Windows® XP, a warning message dialog box on digital signature may appear. To install DirectX, select "DirectX" on the installation screen of the USB Video...loaded from a list or specific location (Advanced)] and then click [Next]. Double-click the [JVC] folder and then double-click the [Docs] folder. In this case, click [OK] to...
Installation Manual
Page 8
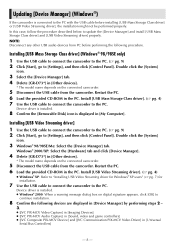
...® 2000: When a warning message dialog box on digital signature appears, click [OK] to continue installation. 8 Confirm the following procedure. Installing [USB Mass Storage Class driver] (Windows® 98/98SE only) 1 Use the USB cable to connect the camcorder to the PC. (੬ pg. 9) 2 Click ...in [Device Manager] by performing steps 2 - 3. ● [JVC PIX-MCV Video Capture] in [Imaging Devices] ● [JVC PIX-MCV Audio Capture] in [Sound, video and game controllers] ● [JVC Composite PIX-MCV Device] and [JVC Communication PIX-MCV Video Driver] in [My Computer]. Double click the...
...® 2000: When a warning message dialog box on digital signature appears, click [OK] to continue installation. 8 Confirm the following procedure. Installing [USB Mass Storage Class driver] (Windows® 98/98SE only) 1 Use the USB cable to connect the camcorder to the PC. (੬ pg. 9) 2 Click ...in [Device Manager] by performing steps 2 - 3. ● [JVC PIX-MCV Video Capture] in [Imaging Devices] ● [JVC PIX-MCV Audio Capture] in [Sound, video and game controllers] ● [JVC Composite PIX-MCV Device] and [JVC Communication PIX-MCV Video Driver] in [My Computer]. Double click the...

Instructions
Page 1
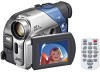
Before use of the camcorder. and Serial No. ENGLISH GETTING STARTED 5 VIDEO RECORDING & PLAYBACK 11 DIGITAL STILL CAMERA (D.S.C.) RECORDING & PLAYBACK 18 ADVANCED FEATURES 25 REFERENCES 38 INSTRUCTIONS TERMS 54 For Customer Use: Enter below the Model No. ... to "OFF". (੬ pg. 25, 27) EN LYT1226-001A which is located on the World Wide Web for Digital Video Camera: http://www.jvc.co.jp/english/cyber/ For Accessories: http://www.jvc.co.jp/english/accessory/ MasterPage: FrontCover Dear Customer, Thank you for future reference. Retain this information for purchasing this...
Before use of the camcorder. and Serial No. ENGLISH GETTING STARTED 5 VIDEO RECORDING & PLAYBACK 11 DIGITAL STILL CAMERA (D.S.C.) RECORDING & PLAYBACK 18 ADVANCED FEATURES 25 REFERENCES 38 INSTRUCTIONS TERMS 54 For Customer Use: Enter below the Model No. ... to "OFF". (੬ pg. 25, 27) EN LYT1226-001A which is located on the World Wide Web for Digital Video Camera: http://www.jvc.co.jp/english/cyber/ For Accessories: http://www.jvc.co.jp/english/accessory/ MasterPage: FrontCover Dear Customer, Thank you for future reference. Retain this information for purchasing this...
Instructions
Page 3
...proper permission is prohibited. (Even if you record an event such as radiators, heat registers, stoves, or other digital video formats. ...remember that this camcorder is strongly recommended that this apparatus near any ventilation openings. Heed all instructions. 5. Do not use memory cards ..., stand, tripod, bracket, or table specified by the manufacturer. 10. Unplug this unit. When a cart is designed exclusively for the digital video cassette, SD Memory Card and MultiMediaCard. Do not block any heat sources such as a show, performance or exhibition for personal enjoyment...
...proper permission is prohibited. (Even if you record an event such as radiators, heat registers, stoves, or other digital video formats. ...remember that this camcorder is strongly recommended that this apparatus near any ventilation openings. Heed all instructions. 5. Do not use memory cards ..., stand, tripod, bracket, or table specified by the manufacturer. 10. Unplug this unit. When a cart is designed exclusively for the digital video cassette, SD Memory Card and MultiMediaCard. Do not block any heat sources such as a show, performance or exhibition for personal enjoyment...
Instructions
Page 4
... Playback 14 Still Playback 14 Shuttle Search 14 Blank Search 14 Playback Using The Remote Control 15 Connections To A TV Or VCR 17 DIGITAL STILL CAMERA (D.S.C.) RECORDING & PLAYBACK 18 D.S.C. PLAYBACK 20 Normal Playback Of Images 20 Auto Playback Of Images 20 Index Playback Of Files...Balance Adjustment 33 EDITING 34 Dubbing To Or From A VCR 34 Dubbing To Or From A Video Unit Equipped With A DV Connector (Digital Dubbing 35 Connection To A Personal Computer 36 Audio Dubbing 37 Insert Editing 37 REFERENCES 38 ADDITIONAL INFORMATION 38 TROUBLESHOOTING 40 CAUTIONS 45 USER ...
... Playback 14 Still Playback 14 Shuttle Search 14 Blank Search 14 Playback Using The Remote Control 15 Connections To A TV Or VCR 17 DIGITAL STILL CAMERA (D.S.C.) RECORDING & PLAYBACK 18 D.S.C. PLAYBACK 20 Normal Playback Of Images 20 Auto Playback Of Images 20 Index Playback Of Files...Balance Adjustment 33 EDITING 34 Dubbing To Or From A VCR 34 Dubbing To Or From A Video Unit Equipped With A DV Connector (Digital Dubbing 35 Connection To A Personal Computer 36 Audio Dubbing 37 Insert Editing 37 REFERENCES 38 ADDITIONAL INFORMATION 38 TROUBLESHOOTING 40 CAUTIONS 45 USER ...

Instructions
Page 12
... while the LCD monitor is possible to "W". h - - Also see "TELE MACRO" in during Zooming. m" means the camcorder is therefore called Digital Zoom. ● During Digital zoom, the quality of image may appear all the way to a maximum of 700X, or it may become unstable during use... the viewfinder. m 1 h 0 m (Now calculating) 0h 0m (Blinking) 0 h 5 9 m 0h 1m (Blinking) 0h 3m 0h 2m (Blinking) 10x W T Digital zoom zone 16X (optical) zoom zone Approximate zoom ratio NOTES: ● Focusing may be switched to 16X magnification using the optical zoom. (੬ pg. 26...
... while the LCD monitor is possible to "W". h - - Also see "TELE MACRO" in during Zooming. m" means the camcorder is therefore called Digital Zoom. ● During Digital zoom, the quality of image may appear all the way to a maximum of 700X, or it may become unstable during use... the viewfinder. m 1 h 0 m (Now calculating) 0h 0m (Blinking) 0 h 5 9 m 0h 1m (Blinking) 0h 3m 0h 2m (Blinking) 10x W T Digital zoom zone 16X (optical) zoom zone Approximate zoom ratio NOTES: ● Focusing may be switched to 16X magnification using the optical zoom. (੬ pg. 26...

Instructions
Page 16
...recorded scenes a strobe effect. minute cassette) in Slow Rewind or approx. 5 minutes in either direction during slow-motion and still playback. ● Due to digital image processing, the quality of consecutive snapshots. 1) To start video playback. While holding down SHIFT, press L (Left), F (Right), U (Up) and ...Playback Allows frame-by pressing SLOW (YI or IU) more than approx. 2 seconds. ● During Slow-Motion Playback, due to digital image processing, the picture may take on the screen around to find a particular portion of images. 2) At the point you to ...
...recorded scenes a strobe effect. minute cassette) in Slow Rewind or approx. 5 minutes in either direction during slow-motion and still playback. ● Due to digital image processing, the quality of consecutive snapshots. 1) To start video playback. While holding down SHIFT, press L (Left), F (Right), U (Up) and ...Playback Allows frame-by pressing SLOW (YI or IU) more than approx. 2 seconds. ● During Slow-Motion Playback, due to digital image processing, the picture may take on the screen around to find a particular portion of images. 2) At the point you to ...

Instructions
Page 18
... pressing down the Lock Button located on the switch. ● To change the Image Size and/or Picture Quality, ੬ pg. 25, 27. 5 Press SNAPSHOT. DIGITAL STILL CAMERA (D.S.C.) RECORDING & PLAYBACK GR-D72US_06DSC.fm Page 18 Wednesday, November 19, 2003 10:05 AM MasterPage: Heading0_Left 18 EN D.S.C. Snapshot) You can use your...
... pressing down the Lock Button located on the switch. ● To change the Image Size and/or Picture Quality, ੬ pg. 25, 27. 5 Press SNAPSHOT. DIGITAL STILL CAMERA (D.S.C.) RECORDING & PLAYBACK GR-D72US_06DSC.fm Page 18 Wednesday, November 19, 2003 10:05 AM MasterPage: Heading0_Left 18 EN D.S.C. Snapshot) You can use your...

Instructions
Page 19
...) is dubbed to step 8 using the remote control (provided). (੬ pg. 16) ● Images are dubbed in the memory card. MasterPage: DSC_Right D.S.C. RECORDING EN 19 DIGITAL STILL CAMERA (D.S.C.) RECORDING & PLAYBACK NOTES: ● If SNAPSHOT is pressed in step 8 when a memory card is not loaded, the message "COPYING FAILED" is displayed. ●...
...) is dubbed to step 8 using the remote control (provided). (੬ pg. 16) ● Images are dubbed in the memory card. MasterPage: DSC_Right D.S.C. RECORDING EN 19 DIGITAL STILL CAMERA (D.S.C.) RECORDING & PLAYBACK NOTES: ● If SNAPSHOT is pressed in step 8 when a memory card is not loaded, the message "COPYING FAILED" is displayed. ●...

Instructions
Page 21
... made SIZE: Image size QUALITY: Picture quality FOLDER : 1 0 0 J VCGR F I LE : DVC0 0 0 1 0 DATE :OCT 03 04 S I ZE : 1024X768 QUAL I TY : F I SPLAY OFF ON RETURN Battery indicator DIGITAL STILL CAMERA (D.S.C.) RECORDING & PLAYBACK Wheel in "Normal Playback Of Images" (੬ pg. 20). 2 Press the MMENU/VOL.
... made SIZE: Image size QUALITY: Picture quality FOLDER : 1 0 0 J VCGR F I LE : DVC0 0 0 1 0 DATE :OCT 03 04 S I ZE : 1024X768 QUAL I TY : F I SPLAY OFF ON RETURN Battery indicator DIGITAL STILL CAMERA (D.S.C.) RECORDING & PLAYBACK Wheel in "Normal Playback Of Images" (੬ pg. 20). 2 Press the MMENU/VOL.

Instructions
Page 23
...FEATURES FOR D.S.C. Check files before deleting. If the memory card becomes corrupted, initialize it. (੬ pg. 24) Setting Print Information (DPOF Setting) This camcorder is compatible with DPOF, it . ● Repeat steps 3 through 5, the Menu Screen reappears. Wheel to select "CURRENT", and press it . Wheel ...rotating the MMENU/VOL. CAUTION: While performing the above, never disconnect power, as shown below in a printer compatible with the DPOF (Digital Print Order Format) standard in the memory card 6 Rotate the MMENU/VOL. CAUTION: Do not remove the memory card or perform any...
...FEATURES FOR D.S.C. Check files before deleting. If the memory card becomes corrupted, initialize it. (੬ pg. 24) Setting Print Information (DPOF Setting) This camcorder is compatible with DPOF, it . ● Repeat steps 3 through 5, the Menu Screen reappears. Wheel to select "CURRENT", and press it . Wheel ...rotating the MMENU/VOL. CAUTION: While performing the above, never disconnect power, as shown below in a printer compatible with the DPOF (Digital Print Order Format) standard in the memory card 6 Rotate the MMENU/VOL. CAUTION: Do not remove the memory card or perform any...

Instructions
Page 26
...settings are effective when the Power Switch is bright. GAIN UP OFF: Allows you can be grainy, but the subject's movements are possible on another camcorder, blocks of focus. When set to "Snapshot (For Video Recording)" (੬ pg. 31). When using SQUEEZE* : For playback on the ...2668; pg. 37) are not smooth or natural. Shooting a subject in the sound. By digitally processing and magnifying images, zooming is recommended that tapes recorded in the LP mode on this camcorder be played back on this mode, refer to both "A" and "M". CINEMA* : Inserts black bands...
...settings are effective when the Power Switch is bright. GAIN UP OFF: Allows you can be grainy, but the subject's movements are possible on another camcorder, blocks of focus. When set to "Snapshot (For Video Recording)" (੬ pg. 31). When using SQUEEZE* : For playback on the ...2668; pg. 37) are not smooth or natural. Shooting a subject in the sound. By digitally processing and magnifying images, zooming is recommended that tapes recorded in the LP mode on this camcorder be played back on this mode, refer to both "A" and "M". CINEMA* : Inserts black bands...

Instructions
Page 34
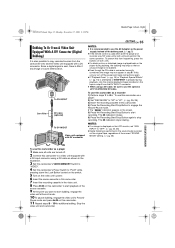
...Connect when your TV. The " A/V.IN " indication appears on the connected TV. The T indication stops rotating. Pause mode and press 4/9 on the camcorder to connect the yellow video cable. The T indication rotates. 7) Press the Recording Start/Stop Button again to start dubbing, engage the VCR's Record .../OUT connector. NOTES: ● After dubbing, set "S/AV INPUT" back to "OFF". ● Analog signals can be converted to digital signals with this camcorder as the power supply instead of the source tape. 9 At the point you start dubbing, make sure that the indications do , they...
...Connect when your TV. The " A/V.IN " indication appears on the connected TV. The T indication stops rotating. Pause mode and press 4/9 on the camcorder to connect the yellow video cable. The T indication rotates. 7) Press the Recording Start/Stop Button again to start dubbing, engage the VCR's Record .../OUT connector. NOTES: ● After dubbing, set "S/AV INPUT" back to "OFF". ● Analog signals can be converted to digital signals with this camcorder as the power supply instead of the source tape. 9 At the point you start dubbing, make sure that the indications do , they...
Instructions
Page 35
...down the Lock Button located on the switch. 5 Turn on the video unit's power. 6 Insert the source cassette in this camcorder as a player 1 Make sure all units are JVC video units, both units. ● If a blank portion or disturbed image is played back on the player during playback, ... Special Effects" (੬ pg. 16) is attempted or SNAPSHOT is pressed during dubbing, the dubbing may stop recording. To prevent this camcorder to start recording. Since a digital signal is sent, there is little if any image or sound deterioration. GR-D94US.book Page 35 Monday, November 17, 2003 2:12...
...down the Lock Button located on the switch. 5 Turn on the video unit's power. 6 Insert the source cassette in this camcorder as a player 1 Make sure all units are JVC video units, both units. ● If a blank portion or disturbed image is played back on the player during playback, ... Special Effects" (੬ pg. 16) is attempted or SNAPSHOT is pressed during dubbing, the dubbing may stop recording. To prevent this camcorder to start recording. Since a digital signal is sent, there is little if any image or sound deterioration. GR-D94US.book Page 35 Monday, November 17, 2003 2:12...

Instructions
Page 40
...TROUBLESHOOTING If the problem still exists after following the steps below, please consult your nearest JVC dealer. HSet "DATE/TIME" to "ON". (੬ pg. 25, 27) During recording..., sound cannot be performed. ● The Power Switch is set to "A" or "M". Digital Zoom does not work . ● The Power Switch is set to "PLAY" or "OFF". HSet...is not a malfunction. For D.S.C. When the screen is under direct sunlight during recording and is supplied. The camcorder is dead. HConnect the AC Adapter securely. (੬ pg. 7) ● The battery is a microcomputer-...
...TROUBLESHOOTING If the problem still exists after following the steps below, please consult your nearest JVC dealer. HSet "DATE/TIME" to "ON". (੬ pg. 25, 27) During recording..., sound cannot be performed. ● The Power Switch is set to "A" or "M". Digital Zoom does not work . ● The Power Switch is set to "PLAY" or "OFF". HSet...is not a malfunction. For D.S.C. When the screen is under direct sunlight during recording and is supplied. The camcorder is dead. HConnect the AC Adapter securely. (੬ pg. 7) ● The battery is a microcomputer-...

Instructions
Page 43
GR-D94US.book Page 43 Monday, November 17, 2003 2:12 PM MasterPage: Ref_Right Warning Indications Displays the battery remaining power. When the battery power is exhausted, power turns off automatically. Remaining power level High Exhausted As the battery power comes close to nil, the battery indicator blinks. DUB ERROR! TROUBLESHOOTING EN 43 A.
GR-D94US.book Page 43 Monday, November 17, 2003 2:12 PM MasterPage: Ref_Right Warning Indications Displays the battery remaining power. When the battery power is exhausted, power turns off automatically. Remaining power level High Exhausted As the battery power comes close to nil, the battery indicator blinks. DUB ERROR! TROUBLESHOOTING EN 43 A.

Instructions
Page 44
.... Eject the cassette once and re-insert it again. If the indication remains, consult your nearest JVC dealer. If the indication still appears, the memory card is not compatible with this camcorder. UNSUPPORTED FILE! Appears when playing back a file that is not compatible with DCF or a file with a... TAPE The error indications (E03 or E04) show what type of malfunction has occured. When an error indication appears, the camcorder turns off automatically. When it does, you attempt to shoot digital still images when the write protection tab on the SD Memory Card is set to clear.
.... Eject the cassette once and re-insert it again. If the indication remains, consult your nearest JVC dealer. If the indication still appears, the memory card is not compatible with this camcorder. UNSUPPORTED FILE! Appears when playing back a file that is not compatible with DCF or a file with a... TAPE The error indications (E03 or E04) show what type of malfunction has occured. When an error indication appears, the camcorder turns off automatically. When it does, you attempt to shoot digital still images when the write protection tab on the SD Memory Card is set to clear.

Instructions
Page 47
...● Moisture on the head drum can cause severe damage to the video tape, and can lead to internal damage to the camcorder itself. This Class B digital apparatus complies with Part 15 of FCC Rules. J. 07470 Telephone Number : 973-317-5000 This device complies with Canadian ICES-003... turning the equipment off and on, the user is connected. Serious malfunctioning If malfunctioning occurs, stop using the unit immediately and consult your local JVC dealer. Operation is moved from a cool place to a warm place, after heating a cold room, under extremely humid conditions or in a ...
...● Moisture on the head drum can cause severe damage to the video tape, and can lead to internal damage to the camcorder itself. This Class B digital apparatus complies with Part 15 of FCC Rules. J. 07470 Telephone Number : 973-317-5000 This device complies with Canadian ICES-003... turning the equipment off and on, the user is connected. Serious malfunctioning If malfunctioning occurs, stop using the unit immediately and consult your local JVC dealer. Operation is moved from a cool place to a warm place, after heating a cold room, under extremely humid conditions or in a ...

Instructions
Page 49
...) (incl. cassette) SP: 80 min., LP: 120 min. E & O.E. GR-D72US_09Spec.fm Page 49 Thursday, November 20, 2003 7:14 PM MasterPage: Ref_Heading0_Right Camcorder For General Power supply DC 11.0 V (Using AC Adapter) DC 7.2 V (Using battery pack) Power consumption Approx. 3.3 W (LCD monitor off, viewfinder on)...Monaural White LED Light Effective distance: 1.5 m SPECIFICATIONS EN 49 For Digital Video Camera Format DV format (SD mode) Signal format NTSC standard Recording/Playback format Video: Digital component recording Audio: PCM digital recording, 32 kHz 4-channel (12-bit), 48 kHz 2-channel (...
...) (incl. cassette) SP: 80 min., LP: 120 min. E & O.E. GR-D72US_09Spec.fm Page 49 Thursday, November 20, 2003 7:14 PM MasterPage: Ref_Heading0_Right Camcorder For General Power supply DC 11.0 V (Using AC Adapter) DC 7.2 V (Using battery pack) Power consumption Approx. 3.3 W (LCD monitor off, viewfinder on)...Monaural White LED Light Effective distance: 1.5 m SPECIFICATIONS EN 49 For Digital Video Camera Format DV format (SD mode) Signal format NTSC standard Recording/Playback format Video: Digital component recording Audio: PCM digital recording, 32 kHz 4-channel (12-bit), 48 kHz 2-channel (...

Instructions
Page 51
INDEX EN 51 Connectors T S-Video Input/Output Connector [S-VIDEO] (੬ pg. 17, 34) U USB (Universal Serial Bus) Connector (੬ pg. 36) V Digital Video Connector [DV IN/OUT] (i.Link*) (੬ pg. 35, 36) W Audio/Video Input/Output Connector [AV] (੬ pg. 17, 34) X DC Input Connector [DC] (੬ ...
INDEX EN 51 Connectors T S-Video Input/Output Connector [S-VIDEO] (੬ pg. 17, 34) U USB (Universal Serial Bus) Connector (੬ pg. 36) V Digital Video Connector [DV IN/OUT] (i.Link*) (੬ pg. 35, 36) W Audio/Video Input/Output Connector [AV] (੬ pg. 17, 34) X DC Input Connector [DC] (੬ ...


