Instruction Manual
Page 2
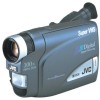
Using This Instruction Manual •All major sections and subsections are separated for easier reference. It is intended to alert the user to the presence of important operating and ... advanced features/operation are listed in other countries. They contain extremely important information regarding the safe use . You are on lithium battery (for purchasing the JVC Compact VHS camcorder. The lightning flash with Maxell, Panasonic (Matsushita Electric), Sanyo or Sony CR2025; CAUTION (applies to persons. Cet appareil numérique de la classe B est...
Using This Instruction Manual •All major sections and subsections are separated for easier reference. It is intended to alert the user to the presence of important operating and ... advanced features/operation are listed in other countries. They contain extremely important information regarding the safe use . You are on lithium battery (for purchasing the JVC Compact VHS camcorder. The lightning flash with Maxell, Panasonic (Matsushita Electric), Sanyo or Sony CR2025; CAUTION (applies to persons. Cet appareil numérique de la classe B est...
Instruction Manual
Page 4
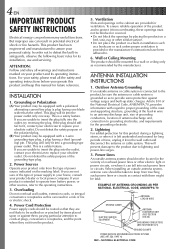
... with regard to proper grounding of the mast and supporting structure, grounding of the lead-in wire to an antenna discharge unit, size of grounding conductors, location of antenna discharge unit, connection to grounding electrodes, and requirements for ventilation. This is provided or the ... extreme care should be taken to assure your obsolete outlet. PART H) NEC - This product has been engineered and manufactured to keep this manual for long periods of fire or electric shock. 4. This plug will fit into the outlet, contact your electrician to protect it can result...
... with regard to proper grounding of the mast and supporting structure, grounding of the lead-in wire to an antenna discharge unit, size of grounding conductors, location of antenna discharge unit, connection to grounding electrodes, and requirements for ventilation. This is provided or the ... extreme care should be taken to assure your obsolete outlet. PART H) NEC - This product has been engineered and manufactured to keep this manual for long periods of fire or electric shock. 4. This plug will fit into the outlet, contact your electrician to protect it can result...
Instruction Manual
Page 9
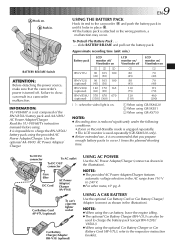
... Push in the illustration). Read the VU-V856KIT's instruction manuals before using the provided AC Power Adapter/Charger. To Detach ... BH-V3U (optional) USING AC POWER Use the AC Power Adapter/Charger (connect as shown in a camcorder malfunction. BATTERY RELEASE Switch ATTENTION: Before detaching the power source, make sure that you prepare enough battery...Car Battery Charger/ Adapter (connect as shown in . A Hook on . 1 When using GR-SXM320 2 When using GR-SX851 3 When using GR-AX750 NOTES: ● Recording time is reduced significantly under the following conditions: •Zoom...
... Push in the illustration). Read the VU-V856KIT's instruction manuals before using the provided AC Power Adapter/Charger. To Detach ... BH-V3U (optional) USING AC POWER Use the AC Power Adapter/Charger (connect as shown in a camcorder malfunction. BATTERY RELEASE Switch ATTENTION: Before detaching the power source, make sure that you prepare enough battery...Car Battery Charger/ Adapter (connect as shown in . A Hook on . 1 When using GR-SXM320 2 When using GR-SX851 3 When using GR-AX750 NOTES: ● Recording time is reduced significantly under the following conditions: •Zoom...

Instruction Manual
Page 15
...Adjustment 1 Set the Power Switch to "CAMERA" ("AUTO" or "PRO."). 2 Adjust the viewfinder manually for best viewability. 3 Turn the Diopter Adjustment Control until the indications in the illustration 4. Tripod..."PRO."). PAUSE 1 2 3 Set to the unit caused by falling over, do not use a small-sized tripod. CAUTION: When using a tripod, be sure to open and extend its legs fully to the other ... screw. Repeat the procedure to attach the other 4 end of the strap to stabilize the camcorder. Power Zoom Lever Recording Start/Stop Button Grip Adjustment EN15 1 Separate the Velcro strip. 2...
...Adjustment 1 Set the Power Switch to "CAMERA" ("AUTO" or "PRO."). 2 Adjust the viewfinder manually for best viewability. 3 Turn the Diopter Adjustment Control until the indications in the illustration 4. Tripod..."PRO."). PAUSE 1 2 3 Set to the unit caused by falling over, do not use a small-sized tripod. CAUTION: When using a tripod, be sure to open and extend its legs fully to the other ... screw. Repeat the procedure to attach the other 4 end of the strap to stabilize the camcorder. Power Zoom Lever Recording Start/Stop Button Grip Adjustment EN15 1 Separate the Velcro strip. 2...
Instruction Manual
Page 16
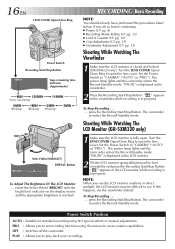
...the Recording Start/Stop Button. PLAY : Allows you to set recording functions using NO special effects or manual adjustments. If not, do so before continuing. ● Power (੬ pg. 8) ● Recording...fully open. Shooting While Watching The LCD Monitor (GR-SXM320 only) 1 Make sure the LCD monitor is closed and locked (GR-SXM320 only). "PAUSE" is in progress. 16... Ring to play back your recordings. To Stop Recording . . . .... OFF : Switches off the camcorder. rotate the Select Wheel (BRIGHT) until the bright level indicator on the display moves and the appropriate ...
...the Recording Start/Stop Button. PLAY : Allows you to set recording functions using NO special effects or manual adjustments. If not, do so before continuing. ● Power (੬ pg. 8) ● Recording...fully open. Shooting While Watching The LCD Monitor (GR-SXM320 only) 1 Make sure the LCD monitor is closed and locked (GR-SXM320 only). "PAUSE" is in progress. 16... Ring to play back your recordings. To Stop Recording . . . .... OFF : Switches off the camcorder. rotate the Select Wheel (BRIGHT) until the bright level indicator on the display moves and the appropriate ...

Instruction Manual
Page 18
... OPERATION: Press P. 18 EN Zoom in the Menu Screen (੬ pg. 24). This system is through digital processing. ● When using the manual focus (੬ pg. 29), then zoom in or out in Record-Standby, lock the focus by using Digital Zoom, the quality of image may suffer...Basic Features FEATURE: Zooming PURPOSE: To produce the zoom in/out effect, or an instantaneous change in various directions. • When shooting scenes with the camcorder on a tripod. ● The " " indicator appears blinking if the Stabilizer cannot be used. NOTES: ● Focusing may not be possible if hand...
... OPERATION: Press P. 18 EN Zoom in the Menu Screen (੬ pg. 24). This system is through digital processing. ● When using the manual focus (੬ pg. 29), then zoom in or out in Record-Standby, lock the focus by using Digital Zoom, the quality of image may suffer...Basic Features FEATURE: Zooming PURPOSE: To produce the zoom in/out effect, or an instantaneous change in various directions. • When shooting scenes with the camcorder on a tripod. ● The " " indicator appears blinking if the Stabilizer cannot be used. NOTES: ● Focusing may not be possible if hand...
Instruction Manual
Page 20
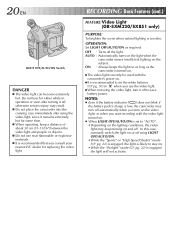
...pg. 22) is recommended that you consult your nearest JVC dealer for replacing the video light. AUTO : Automatically turns on the light when the camcorder senses insufficient lighting on and off , otherwise serious .... OPERATION: Set LIGHT OFF/AUTO/ON as the camcorder is turned on. Ⅲ The video light can become extremely hot. In this case, manually switch the light on . Ⅲ It is...; When operating, keep turning on the subject. RECORDING Basic Features (cont.) FEATURE: Video Light (GR-SXM320/SX851 only) PURPOSE: To brighten the scene when natural lighting is set the white balance ...
...pg. 22) is recommended that you consult your nearest JVC dealer for replacing the video light. AUTO : Automatically turns on the light when the camcorder senses insufficient lighting on and off , otherwise serious .... OPERATION: Set LIGHT OFF/AUTO/ON as the camcorder is turned on. Ⅲ The video light can become extremely hot. In this case, manually switch the light on . Ⅲ It is...; When operating, keep turning on the subject. RECORDING Basic Features (cont.) FEATURE: Video Light (GR-SXM320/SX851 only) PURPOSE: To brighten the scene when natural lighting is set the white balance ...

Instruction Manual
Page 22
...:FOG Makes the picture look more natural and dramatic. NEGA POSI The colors of an older movie. NOTES: ● Only one mode can also be manually changed to another mode (੬ pg. 30). •Auto Focus becomes available only in well-lit situations. ● In the "High Speed Shutter" or "Sports... on the subject. Helps to counter the effects of 10 m (32 ft.) to the lens. S1/2000 Captures faster action than 10 m (32 ft.), use manual focusing (੬ pg. 29). Softens the image and gives it a "fantasy" look of a classic Hollywood movie. NEGA POSI mode ND:ND EFFECT A black mist ...
...:FOG Makes the picture look more natural and dramatic. NEGA POSI The colors of an older movie. NOTES: ● Only one mode can also be manually changed to another mode (੬ pg. 30). •Auto Focus becomes available only in well-lit situations. ● In the "High Speed Shutter" or "Sports... on the subject. Helps to counter the effects of 10 m (32 ft.) to the lens. S1/2000 Captures faster action than 10 m (32 ft.), use manual focusing (੬ pg. 29). Softens the image and gives it a "fantasy" look of a classic Hollywood movie. NEGA POSI mode ND:ND EFFECT A black mist ...
Instruction Manual
Page 24
...TIME DISP. ZOOM ON OFF TELE MACRO OFF ON Allows you to "White Balance Adjustment" and "Manual White Balance Operation" (੬ pg. 30). Usually the distance to a subject where the lens ...(23-5/8"). •Depending on the zoom position, the lens may go out of 400X (GR-SXM320)/300X (GR-SX851/AX750) digital magnification. When set to a maximum of focus. : Factory-preset M.W.B. ... a less coarse picture although the subject becomes slightly dark. To record a subject in the camcorder or on the zoom magnification. This setting is a distance of focus at the maximum telephoto...
...TIME DISP. ZOOM ON OFF TELE MACRO OFF ON Allows you to "White Balance Adjustment" and "Manual White Balance Operation" (੬ pg. 30). Usually the distance to a subject where the lens ...(23-5/8"). •Depending on the zoom position, the lens may go out of 400X (GR-SXM320)/300X (GR-SX851/AX750) digital magnification. When set to a maximum of focus. : Factory-preset M.W.B. ... a less coarse picture although the subject becomes slightly dark. To record a subject in the camcorder or on the zoom magnification. This setting is a distance of focus at the maximum telephoto...

Instruction Manual
Page 26
... mode is selected by rotating the Select Wheel. ● In this mode, the date is replaced after 5 seconds with "AUTO DATE" but also in the camcorder or on a connected color monitor, as well as to record them over the video image. NOTES: DISPLAY ● The selected display can be displayed not... bar to the desired mode, then press it . Press the Select Wheel to display the Date/Time DISP. Instant Titles can superimpose one of them manually or automatically. Select Wheel Power Switch DEC 2 5 . 9 9 AUTO DATE DEC 25. 99 (DATE) AM 10 : 25 : 00 (TIME) DEC 25. 99 AM 10 : 25 : 00...
... mode is selected by rotating the Select Wheel. ● In this mode, the date is replaced after 5 seconds with "AUTO DATE" but also in the camcorder or on a connected color monitor, as well as to record them over the video image. NOTES: DISPLAY ● The selected display can be displayed not... bar to the desired mode, then press it . Press the Select Wheel to display the Date/Time DISP. Instant Titles can superimpose one of them manually or automatically. Select Wheel Power Switch DEC 2 5 . 9 9 AUTO DATE DEC 25. 99 (DATE) AM 10 : 25 : 00 (TIME) DEC 25. 99 AM 10 : 25 : 00...

Instruction Manual
Page 28
Power Switch 1 Set the Power Switch to "MANU", then press it and make the adjustment manually. The exposure control level counter decreases (maximum -06). 6 Press the Select Wheel. NOTES: ● To return to the factory setting, select "AUTO" in the following ... -06 +06 To darken the image 4 Rotate the Select Wheel to move the highlight bar to indicate the exposure is complete. Manual exposure adjustment is overly dark or the subject light. Manual Exposure Screen 00 Exposure control level counter 2 Press the Select Wheel to display the Menu Screen. 3 Rotate the Select Wheel...
Power Switch 1 Set the Power Switch to "MANU", then press it and make the adjustment manually. The exposure control level counter decreases (maximum -06). 6 Press the Select Wheel. NOTES: ● To return to the factory setting, select "AUTO" in the following ... -06 +06 To darken the image 4 Rotate the Select Wheel to move the highlight bar to indicate the exposure is complete. Manual exposure adjustment is overly dark or the subject light. Manual Exposure Screen 00 Exposure control level counter 2 Press the Select Wheel to display the Menu Screen. 3 Rotate the Select Wheel...

Instruction Manual
Page 29
... downward. " " appears and blinks. 6 Press the Select Wheel. Keep the lens clean, wiping with the highlight bar on the distance between the camcorder and the subject. " " appears and blinks. The Menu Screen disppears and " " reappears to infinity. If zoomed in in bright- ness and darkness... zoomed in because the depth-of water. •When shooting a scene with a high-contrast background. * The low-contrast warning " " appears MANUAL FOCUS Make the necessary viewfinder adjustments to use the viewfinder (੬ pg. 15). 1 Set the Power Switch to "PRO.". 2 Press the Select...
... downward. " " appears and blinks. 6 Press the Select Wheel. Keep the lens clean, wiping with the highlight bar on the distance between the camcorder and the subject. " " appears and blinks. The Menu Screen disppears and " " reappears to infinity. If zoomed in in bright- ness and darkness... zoomed in because the depth-of water. •When shooting a scene with a high-contrast background. * The low-contrast warning " " appears MANUAL FOCUS Make the necessary viewfinder adjustments to use the viewfinder (੬ pg. 15). 1 Set the Power Switch to "PRO.". 2 Press the Select...
Instruction Manual
Page 30
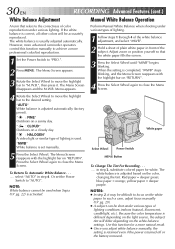
....... The white balance is correct, all other colors will differ depending on "RETURN". The Menu Screen disappears and the M.W.B. Perform Manual White Balance when shooting under various types of the subject. yellow paper = deeper purple. If the white balance is adjusted based on... the light source, the subject tint will be difficult to "PRO.". 2 Press MENU. However, more advanced camcorder operators control this function for white. Menu appears. White paper Select Wheel Power Switch MENU Button To Change The Tint For Recording ....
....... The white balance is correct, all other colors will differ depending on "RETURN". The Menu Screen disappears and the M.W.B. Perform Manual White Balance when shooting under various types of the subject. yellow paper = deeper purple. If the white balance is adjusted based on... the light source, the subject tint will be difficult to "PRO.". 2 Press MENU. However, more advanced camcorder operators control this function for white. Menu appears. White paper Select Wheel Power Switch MENU Button To Change The Tint For Recording ....

Instruction Manual
Page 32
... is working. ● TBC does not work during playback, the camcorder enters the Auto Tracking mode and "AT" is engaged. "M" appears. 3) After recording or playback, press 5, then 2. To activate Manual Tracking: 1) Press P.AE and EFFECT simultaneously. Factory-preset: TBC is displayed. ● Manual Tracking may be distorted if the TBC mode is Auto...
... is working. ● TBC does not work during playback, the camcorder enters the Auto Tracking mode and "AT" is engaged. "M" appears. 3) After recording or playback, press 5, then 2. To activate Manual Tracking: 1) Press P.AE and EFFECT simultaneously. Factory-preset: TBC is displayed. ● Manual Tracking may be distorted if the TBC mode is Auto...

Instruction Manual
Page 34
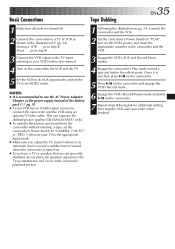
A. Connection to your VCR and TV instruction manuals. B. 34 EN PLAYBACK Connections These are some basic types of connections. When making connections, refer also to a TV or VCR equipped only with an S-VIDEO IN and A/V input connectors (GR-SXM320/SX851 only) TV To Audio Output Audio cable (optional) To AUDIO IN S-Video cable...
A. Connection to your VCR and TV instruction manuals. B. 34 EN PLAYBACK Connections These are some basic types of connections. When making connections, refer also to a TV or VCR equipped only with an S-VIDEO IN and A/V input connectors (GR-SXM320/SX851 only) TV To Audio Output Audio cable (optional) To AUDIO IN S-Video cable...
Instruction Manual
Page 35
If not . . . This can improve the dubbed picture quality (GR-SXM320/SX851 only). ● To monitor the picture and sound from the camcorder without inserting a tape, set the camcorder's Power Switch to "CAMERA" ("AUTO" or "PRO."), then set the TV to step 3. Once it is recommended to find a spot just before ...the speakers adjacent to a TV or VCR as the power supply instead of the battery pack (੬ pg. 9). ● If your VCR's instruction manual. 4 Turn on the camcorder, the VCR and the TV. 5 Set the VCR to its VIDEO mode. go to step 4. 3 Connect the VCR output to the TV input...
If not . . . This can improve the dubbed picture quality (GR-SXM320/SX851 only). ● To monitor the picture and sound from the camcorder without inserting a tape, set the camcorder's Power Switch to "CAMERA" ("AUTO" or "PRO."), then set the TV to step 3. Once it is recommended to find a spot just before ...the speakers adjacent to a TV or VCR as the power supply instead of the battery pack (੬ pg. 9). ● If your VCR's instruction manual. 4 Turn on the camcorder, the VCR and the TV. 5 Set the VCR to its VIDEO mode. go to step 4. 3 Connect the VCR output to the TV input...

Instruction Manual
Page 49
pg. 44, 45 Load A Tape pg. 10 EN49 M Manual Focus pg. 29 Menu Screen pg. 23 - 25 N ND Effect Mode pg. 22 Nega/...Attachment pg. 15 Shuttle Search pg. 31 Specifications pg. 51 Sports Mode pg. 22 Still Playback pg. 31 Super LoLux (S.LX pg. 24 Super VHS Expansion Technology pg. 13 T Tape Counter pg. 32, 38 Tape Dubbing pg. 34, 35 Tape Length Setting.... 16 C Car Battery pg. 9 Cassette Adapter pg. 33 Charge Marker pg. 8 Charging The Battery Pack pg. 8 Clean The Camcorder pg. 50 Clock (Lithium) Battery pg. 10 Connection To A VCR/TV pg. 34 Contents cover page Counter Memory pg. 32 D...
pg. 44, 45 Load A Tape pg. 10 EN49 M Manual Focus pg. 29 Menu Screen pg. 23 - 25 N ND Effect Mode pg. 22 Nega/...Attachment pg. 15 Shuttle Search pg. 31 Specifications pg. 51 Sports Mode pg. 22 Still Playback pg. 31 Super LoLux (S.LX pg. 24 Super VHS Expansion Technology pg. 13 T Tape Counter pg. 32, 38 Tape Dubbing pg. 34, 35 Tape Length Setting.... 16 C Car Battery pg. 9 Cassette Adapter pg. 33 Charge Marker pg. 8 Charging The Battery Pack pg. 8 Clean The Camcorder pg. 50 Clock (Lithium) Battery pg. 10 Connection To A VCR/TV pg. 34 Contents cover page Counter Memory pg. 32 D...
Instruction Manual
Page 51
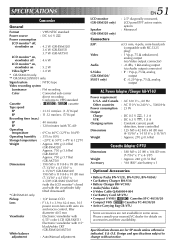
... with 0.55" color LCD (GR-SX851) Electronic viewfinder with 0.5" black/white CRT (GR-SXM320/AX750) White balance adjustment : Auto/Manual adjustment LCD monitor (GR-SXM320 only) Speaker (GR-SXM320 only) Connectors JLIP: Video Audio S-Video (GR-SXM320/ SX851 only) EN51 :...8226; Compact S-VHS ( ) Cassettes ST-C-40/30/20 • Compact VHS ( ) Cassettes TC-40/30/20 • Active Carrying Bag CB-V7U Some accessories are for details on : 5.2 W Video light** : 3.0 W * GR-SXM320 only. ** GR-SXM320/SX851 only. E & O.E. SPECIFICATIONS Camcorder General Format : VHS NTSC standard...
... with 0.55" color LCD (GR-SX851) Electronic viewfinder with 0.5" black/white CRT (GR-SXM320/AX750) White balance adjustment : Auto/Manual adjustment LCD monitor (GR-SXM320 only) Speaker (GR-SXM320 only) Connectors JLIP: Video Audio S-Video (GR-SXM320/ SX851 only) EN51 :...8226; Compact S-VHS ( ) Cassettes ST-C-40/30/20 • Compact VHS ( ) Cassettes TC-40/30/20 • Active Carrying Bag CB-V7U Some accessories are for details on : 5.2 W Video light** : 3.0 W * GR-SXM320 only. ** GR-SXM320/SX851 only. E & O.E. SPECIFICATIONS Camcorder General Format : VHS NTSC standard...
Instruction Manual
Page 55
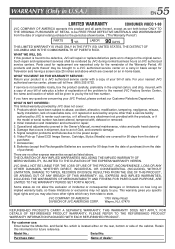
...WORKMANSHIP from the date of original retail purchase for Television sets having a screen size 25 inches and above . WHAT WE WILL DO: If this product is not available locally, box the product carefully, preferably in the Owner's Manual, normal maintenance, video and audio head cleaning; 4. WHAT YOU MUST DO ...location of which are warranted only for 90 days from the date of the cabinet. WHAT IS NOT COVERED: This limited warranty provided by JVC during normal business hours at no other than a service facility authorized by the toll-free number. Products which have been subject to line...
...WORKMANSHIP from the date of original retail purchase for Television sets having a screen size 25 inches and above . WHAT WE WILL DO: If this product is not available locally, box the product carefully, preferably in the Owner's Manual, normal maintenance, video and audio head cleaning; 4. WHAT YOU MUST DO ...location of which are warranted only for 90 days from the date of the cabinet. WHAT IS NOT COVERED: This limited warranty provided by JVC during normal business hours at no other than a service facility authorized by the toll-free number. Products which have been subject to line...


