Instruction Manual
Page 2
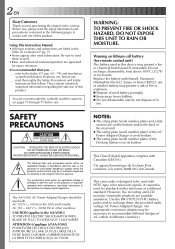
... Power Adapter/Charger is on pages 75 through 77 before use . Replace the battery with button locations, etc. Cet appareil numérique de la classe B est conforme à la norme NMB-003 du Canada. REFER SERVICING TO QUALIFIED SERVICE PERSONNEL. CAUTION (applies to accommodate different designs of in this digital video camera. This Class B digital apparatus complies with NTSC-type color television signals. However, live recording...
... Power Adapter/Charger is on pages 75 through 77 before use . Replace the battery with button locations, etc. Cet appareil numérique de la classe B est conforme à la norme NMB-003 du Canada. REFER SERVICING TO QUALIFIED SERVICE PERSONNEL. CAUTION (applies to accommodate different designs of in this digital video camera. This Class B digital apparatus complies with NTSC-type color television signals. However, live recording...

Instruction Manual
Page 3
... likely to cords at plugs, convenience receptacles, and the point where they exit from battery power, or other ). ANTENNA INSTALLATION INSTRUCTIONS 1. When installing an outside antenna system, extreme care should be sure the antenna or cable system is intended to operate from the product. 3 EN 5. PART H) NEC - IMPORTANT PRODUCT SAFETY INSTRUCTIONS Electrical energy can fall into such power lines or circuits. Power Lines An...
... likely to cords at plugs, convenience receptacles, and the point where they exit from battery power, or other ). ANTENNA INSTALLATION INSTRUCTIONS 1. When installing an outside antenna system, extreme care should be sure the antenna or cable system is intended to operate from the product. 3 EN 5. PART H) NEC - IMPORTANT PRODUCT SAFETY INSTRUCTIONS Electrical energy can fall into such power lines or circuits. Power Lines An...

Instruction Manual
Page 5
... care not to the user. The following 5 software programs: •JLIP Video Capture •JLIP Video Producer Presto! •Mr. Photo • PhotoAlbum • ImageFolio • JLIP Cable •Lithium Battery CR2025 (for the digital video cassette. Attaching the camcorder to the Docking Station with this type of an optional external microphone) •Cleaning Cloth •PC Connection Cable • CD-ROM The CD ROM contains the following notes concern...
... care not to the user. The following 5 software programs: •JLIP Video Capture •JLIP Video Producer Presto! •Mr. Photo • PhotoAlbum • ImageFolio • JLIP Cable •Lithium Battery CR2025 (for the digital video cassette. Attaching the camcorder to the Docking Station with this type of an optional external microphone) •Cleaning Cloth •PC Connection Cable • CD-ROM The CD ROM contains the following notes concern...

Instruction Manual
Page 9
...; The temperature is below 10˚C/50˚F. • Zoom or Record-Standby mode is engaged repeatedly. • The LCD monitor is a set composed of the battery pack in the AC range from 110 V to cover 3 times the planned shooting time. Use the optional AA-V80U AC Power Adapter/Charger. To battery pack mount To Detach The Battery Pack. . . .... RELEASE, detach it locks into the...
...; The temperature is below 10˚C/50˚F. • Zoom or Record-Standby mode is engaged repeatedly. • The LCD monitor is a set composed of the battery pack in the AC range from 110 V to cover 3 times the planned shooting time. Use the optional AA-V80U AC Power Adapter/Charger. To battery pack mount To Detach The Battery Pack. . . .... RELEASE, detach it locks into the...
Instruction Manual
Page 10
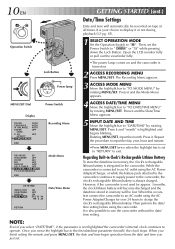
... Recording Menu appears. 3 ACCESS MODE MENU Move the highlight bar to charge the clock's rechargeable lithium battery. Then perform the date/ time setting before using the AC Power Adapter/Charger for approx. 3 months, the clock lithium battery will become discharged and the date/time stored in memory will automatically be lost. Lock Button YOFF CAME Power lamp PLA RA 5S MENU/SET Dial Power Switch Display FOCUS AUTO EXPOSURE AUTO W. AE OFF / EFFECT 4 TO MODE MENU 0 END Recording Menu REC MODE SP WIDE MODE OFF ZOOM...
... Recording Menu appears. 3 ACCESS MODE MENU Move the highlight bar to charge the clock's rechargeable lithium battery. Then perform the date/ time setting before using the AC Power Adapter/Charger for approx. 3 months, the clock lithium battery will become discharged and the date/time stored in memory will automatically be lost. Lock Button YOFF CAME Power lamp PLA RA 5S MENU/SET Dial Power Switch Display FOCUS AUTO EXPOSURE AUTO W. AE OFF / EFFECT 4 TO MODE MENU 0 END Recording Menu REC MODE SP WIDE MODE OFF ZOOM...

Instruction Manual
Page 12
... LP - - - - -6- - - - - Select "SP" or "LP" by rotating MENU/SET. Open the LCD monitor fully or pull out the viewfinder fully. •The power lamp comes on a tape recorded in the sound. 4 REC MODE SP WIDE MODE OFF ZOOM 40X DIS OFF GAIN UP AGC SELF-TIMER OFF TO DATE / TIME MENU TO SYSTEM MENU END - - - - -6- - - - - 12 EN A M Operation Switch Lock Button YOFF CAME Power lamp PLA RA 5S MENU/SET Dial Display FOCUS AUTO EXPOSURE AUTO W.
... LP - - - - -6- - - - - Select "SP" or "LP" by rotating MENU/SET. Open the LCD monitor fully or pull out the viewfinder fully. •The power lamp comes on a tape recorded in the sound. 4 REC MODE SP WIDE MODE OFF ZOOM 40X DIS OFF GAIN UP AGC SELF-TIMER OFF TO DATE / TIME MENU TO SYSTEM MENU END - - - - -6- - - - - 12 EN A M Operation Switch Lock Button YOFF CAME Power lamp PLA RA 5S MENU/SET Dial Display FOCUS AUTO EXPOSURE AUTO W.

Instruction Manual
Page 15
... Button A M YOFF CAME Power lamp PLA RA 5S Operation Switch Power Switch According to the Operation Switch position you to record using NO special effects or manual adjustments. AUTO PAUSE When set the Power Switch to play back a recording. ੬ pg. 42 - 49. Allows you to any operation mode except "OFF", then pull out the viewfinder fully or open the LCD monitor. However, Focus and Exposure are automatically reset to "5S", "MANUAL" blinks.) If the Power Switch is set to "AUTO". Operation Switch...
... Button A M YOFF CAME Power lamp PLA RA 5S Operation Switch Power Switch According to the Operation Switch position you to record using NO special effects or manual adjustments. AUTO PAUSE When set the Power Switch to play back a recording. ੬ pg. 42 - 49. Allows you to any operation mode except "OFF", then pull out the viewfinder fully or open the LCD monitor. However, Focus and Exposure are automatically reset to "5S", "MANUAL" blinks.) If the Power Switch is set to "AUTO". Operation Switch...

Instruction Manual
Page 28
... Power Switch Recording Menu 4 REC MODE SP WIDE MODE OFF ZOOM 40X DIS OFF GAIN UP AGC SELF-TIMER OFF TO DATE / TIME MENU TO SYSTEM MENU END - - - - -6- - - - - BALANCE AUTO FADER OFF / WIPE P. Go to "RETURN". 28 EN Operation Switch RECORDING Advanced Features (cont.) MENU/SET Dial Using Menu For Detailed Adjustment This camcorder is equipped with an easy-to-use, on the function you select. RA 5S Lock Button PLA YOFF CAME Display 4 FOCUS MANUAL EXPOSURE AUTO W. Normal Screen 7 CLOSE MENU SCREEN...
... Power Switch Recording Menu 4 REC MODE SP WIDE MODE OFF ZOOM 40X DIS OFF GAIN UP AGC SELF-TIMER OFF TO DATE / TIME MENU TO SYSTEM MENU END - - - - -6- - - - - BALANCE AUTO FADER OFF / WIPE P. Go to "RETURN". 28 EN Operation Switch RECORDING Advanced Features (cont.) MENU/SET Dial Using Menu For Detailed Adjustment This camcorder is equipped with an easy-to-use, on the function you select. RA 5S Lock Button PLA YOFF CAME Display 4 FOCUS MANUAL EXPOSURE AUTO W. Normal Screen 7 CLOSE MENU SCREEN...
Instruction Manual
Page 30
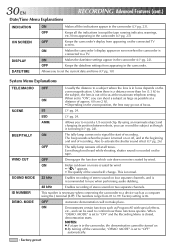
... change. Factory setting is recorded on the tape. This number is in focus depends on two separate channels. Allows you can be turned on screen when the camcorder is connected to the subject, the lens is set to confirm how these functions operate. ON The tally lamp comes on noise created by wind. Even though not heard while shooting, shutter sound is 06. 30 EN RECORDING Advanced Features (cont.) Date/Time Menu...
... change. Factory setting is recorded on the tape. This number is in focus depends on two separate channels. Allows you can be turned on screen when the camcorder is connected to the subject, the lens is set to confirm how these functions operate. ON The tally lamp comes on noise created by wind. Even though not heard while shooting, shutter sound is 06. 30 EN RECORDING Advanced Features (cont.) Date/Time Menu...

Instruction Manual
Page 37
... OPERATION MODE Set the Operation Switch to " ". Go to " ". Focus adjustment is reduced at this point. 5 ADJUST FOCUS To farther subject . . . .... " " appears and blinks. A M Operation Switch Lock Button YOFF CAME Power lamp RA 5S MENU/SET Dial Power Switch Display 4 FOCUS MANUAL EXPOSURE AUTO W. NOTES: ● After the Power Switch is set the Operation Switch to step 6. 6 END ADJUSTMENT OF FOCUS Press MENU/SET. " blinks. The Recording Menu disappears and "FOCUS" is displayed in the wide-angle position, sharply focused images cannot be obtained when zoomed...
... OPERATION MODE Set the Operation Switch to " ". Go to " ". Focus adjustment is reduced at this point. 5 ADJUST FOCUS To farther subject . . . .... " " appears and blinks. A M Operation Switch Lock Button YOFF CAME Power lamp RA 5S MENU/SET Dial Power Switch Display 4 FOCUS MANUAL EXPOSURE AUTO W. NOTES: ● After the Power Switch is set the Operation Switch to step 6. 6 END ADJUSTMENT OF FOCUS Press MENU/SET. " blinks. The Recording Menu disappears and "FOCUS" is displayed in the wide-angle position, sharply focused images cannot be obtained when zoomed...

Instruction Manual
Page 38
... fully or open the LCD monitor fully. 2 ACCESS RECORDING MENU Press MENU/SET. and the highlight bar on the exposure control indicator goes out. AE OFF / EFFECT TO MODE MENU 0 END Recording Menu EXP. 1 SELECT OPERATION MODE Set the Operation Switch to the previous level. Exposure adjustment is +6. rotate MENU/SET to display "AUTO" then press it . The exposure control indicator disappears. changes to "MANUAL" and the highlight bar on the exposure control indicator are displayed. 5 ADJUST EXPOSURE To...
... fully or open the LCD monitor fully. 2 ACCESS RECORDING MENU Press MENU/SET. and the highlight bar on the exposure control indicator goes out. AE OFF / EFFECT TO MODE MENU 0 END Recording Menu EXP. 1 SELECT OPERATION MODE Set the Operation Switch to the previous level. Exposure adjustment is +6. rotate MENU/SET to display "AUTO" then press it . The exposure control indicator disappears. changes to "MANUAL" and the highlight bar on the exposure control indicator are displayed. 5 ADJUST EXPOSURE To...
Instruction Manual
Page 47
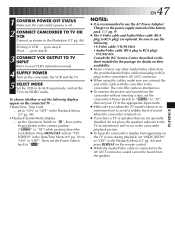
.... ● When using the cables, make sure you adjust the TV sound volume to its VIDEO mode. Press MENU/SET and set "INDICATION" to "OFF" in the Playback Menu (੬ pg. 44). •Playback Sound Mode Display .... Then, set to "ON" or "OFF" in the Playback Menu (੬ pg. 44) and press DISPLAY on the camcorder, the VCR and the TV. 5 SELECT MODE Set the VCR to its AUX input mode, and set the Power Switch to the camera position (" " or...
.... ● When using the cables, make sure you adjust the TV sound volume to its VIDEO mode. Press MENU/SET and set "INDICATION" to "OFF" in the Playback Menu (੬ pg. 44). •Playback Sound Mode Display .... Then, set to "ON" or "OFF" in the Playback Menu (੬ pg. 44) and press DISPLAY on the camcorder, the VCR and the TV. 5 SELECT MODE Set the VCR to its AUX input mode, and set the Power Switch to the camera position (" " or...
Instruction Manual
Page 49
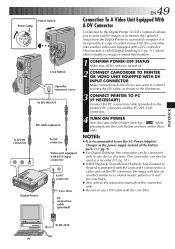
... Button Open the connector cover. NOTES: ● It is also possible to copy recorded scenes from the Digital Printer to transfer the captured image from the camcorder onto another video unit equipped with the core filter. It is recommended to use a DV cable with a DV connector. This function is attempted with a DV input connector Digital Printer To PC connector Core filter PC connection cable (provided) EN49 Connection To A Video...
... Button Open the connector cover. NOTES: ● It is also possible to copy recorded scenes from the Digital Printer to transfer the captured image from the camcorder onto another video unit equipped with the core filter. It is recommended to use a DV cable with a DV connector. This function is attempted with a DV input connector Digital Printer To PC connector Core filter PC connection cable (provided) EN49 Connection To A Video...

Instruction Manual
Page 51
..." changes to "DV IN". If the above occurs, turn off . 2 MAKE CONNECTIONS Connect the camcorder to your video unit equipped with a DV connector using the recording mode selected in the Mode Menu (੬ pg. 12). ● Digital Dubbing is performed in the illustration and load a cassette to use the AC Power Adapter/ Charger as shown in step 3. "DV IN" appears on the source tape you want to copy recorded scenes...
..." changes to "DV IN". If the above occurs, turn off . 2 MAKE CONNECTIONS Connect the camcorder to your video unit equipped with a DV connector using the recording mode selected in the Mode Menu (੬ pg. 12). ● Digital Dubbing is performed in the illustration and load a cassette to use the AC Power Adapter/ Charger as shown in step 3. "DV IN" appears on the source tape you want to copy recorded scenes...

Instruction Manual
Page 56
You are PLAY, STOP, PAUSE, FF, REW and VCR REC STBY (you release MBR SET, and the VCR's power comes on. 2 OPERATE VCR Make sure the VCR's power is installed in the remote control RM-V713U (੬ pg. 52). 3 TW SHIFT 1 6 MBR SET 2 4 5 RM-V713U (provided) 7 8 9 ` VCR CODE LIST VCR BRAND BUTTONS NAME (A) (B) GE 1 1 9 2 9 ` 9 4 HITACHI 6 6 6 3 JVC A B C MAGNAVOX 9 1 9 6 9 3 9 5 1 1 7 1 7 6 MITSUBISHI 6 7 6 8 NEC 3 7 3 8 PHILIPS 1 9 9 5 1 1 9 4 9 1 9 6 1 2 VCR BRAND BUTTONS NAME (A) (B) PHILIPS 3 3 7 2 PANASONIC 1 3 1 7 1 1 9 4 1 8 RCA 9 2 9 4 6 6 6 3 9 `...
You are PLAY, STOP, PAUSE, FF, REW and VCR REC STBY (you release MBR SET, and the VCR's power comes on. 2 OPERATE VCR Make sure the VCR's power is installed in the remote control RM-V713U (੬ pg. 52). 3 TW SHIFT 1 6 MBR SET 2 4 5 RM-V713U (provided) 7 8 9 ` VCR CODE LIST VCR BRAND BUTTONS NAME (A) (B) GE 1 1 9 2 9 ` 9 4 HITACHI 6 6 6 3 JVC A B C MAGNAVOX 9 1 9 6 9 3 9 5 1 1 7 1 7 6 MITSUBISHI 6 7 6 8 NEC 3 7 3 8 PHILIPS 1 9 9 5 1 1 9 4 9 1 9 6 1 2 VCR BRAND BUTTONS NAME (A) (B) PHILIPS 3 3 7 2 PANASONIC 1 3 1 7 1 1 9 4 1 8 RCA 9 2 9 4 6 6 6 3 9 `...
Instruction Manual
Page 63
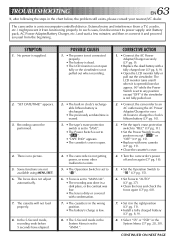
... no picture. 5. "SET DATE/TIME!" The cassette will not load properly. 8. The camcorder is supplied. 2. Recording cannot be performed. 4. Some functions are not available using the AC Power Adapter/Charger for over 24 hours to charge the clock's lithium battery (੬ pg. 10). 3. • Set the tape's erase protection switch to "REC" (੬ pg. 11). • Set the Power Switch to any position except " " or "OFF" (੬ pg. 15). • Replace with a fully charged...
... no picture. 5. "SET DATE/TIME!" The cassette will not load properly. 8. The camcorder is supplied. 2. Recording cannot be performed. 4. Some functions are not available using the AC Power Adapter/Charger for over 24 hours to charge the clock's lithium battery (੬ pg. 10). 3. • Set the tape's erase protection switch to "REC" (੬ pg. 11). • Set the Power Switch to any position except " " or "OFF" (੬ pg. 15). • Replace with a fully charged...

Instruction Manual
Page 66
..." in the Date/Time Menu (੬ pg. 23). 26. • Adjust the brightness and angle of its service life, images on the LCD monitor become dark due to " " (੬ pg. 42). Consult your nearest JVC dealer. 27. • The light used together are not recorded on the LCD monitor appear dark or whitish. 27. Images on the tape. Play, Rewind and FastForward functions do not appear...
..." in the Date/Time Menu (੬ pg. 23). 26. • Adjust the brightness and angle of its service life, images on the LCD monitor become dark due to " " (੬ pg. 42). Consult your nearest JVC dealer. 27. • The light used together are not recorded on the LCD monitor appear dark or whitish. 27. Images on the tape. Play, Rewind and FastForward functions do not appear...

Instruction Manual
Page 74
...'s Lithium Battery pg. 10 C Charge The Battery Pack pg. 8 Cinema pg. 29 Classic Film pg. 35 Clean The Camcorder pg. 68 Connections pg. 9, 46 - 51, 57 D Darken The LCD Monitor pg. 19 Date/Time Display pg. 22, 45 Date/Time Settings pg. 10 Demonstration Mode pg. 30 Digital Dubbing pg. 51 Digital Zoom pg. 20, 29 DIS (Digital Image Stabilizer pg. 29 Diopter Adjustment pg. 13 Dissolve During 5-second Recording Mode pg...
...'s Lithium Battery pg. 10 C Charge The Battery Pack pg. 8 Cinema pg. 29 Classic Film pg. 35 Clean The Camcorder pg. 68 Connections pg. 9, 46 - 51, 57 D Darken The LCD Monitor pg. 19 Date/Time Display pg. 22, 45 Date/Time Settings pg. 10 Demonstration Mode pg. 30 Digital Dubbing pg. 51 Digital Zoom pg. 20, 29 DIS (Digital Image Stabilizer pg. 29 Diopter Adjustment pg. 13 Dissolve During 5-second Recording Mode pg...

Instruction Manual
Page 75
... after charging, or after use an AC plug adapter, called a "Siemens Plug", as those generated by motors, transformers or magnets). .... make sure the cassette bears the Mini DV mark. .... This exposes the tape to run at all. USING HOUSEHOLD AC PLUG ADAPTER In case of connecting the unit's power cord to an AC wall outlet other than the USA Ⅲ The provided AC Power Adapter/Charger features...
... after charging, or after use an AC plug adapter, called a "Siemens Plug", as those generated by motors, transformers or magnets). .... make sure the cassette bears the Mini DV mark. .... This exposes the tape to run at all. USING HOUSEHOLD AC PLUG ADAPTER In case of connecting the unit's power cord to an AC wall outlet other than the USA Ⅲ The provided AC Power Adapter/Charger features...

Instruction Manual
Page 78
...1-9/16" x 3-5/8") : Approx. 320 g (0.71 lbs) Specifications shown are for SP mode unless otherwise indicated. 78 EN SPECIFICATIONS Camcorder General Power supply : DC 6.3 V (Using the AC Power Adapter/Charger) DC 7.2 V (Using battery pack) Power consumption LCD monitor off, viewfinder on : Approx. 4.5 W LCD monitor on, viewfinder off : Approx. 5.4 W Format : DV Format (SD mode) Signal format : NTSC Standard Video signal recording format : Digital Component Recording Cassette : Mini DV Cassette Tape Speed : SP: 18.8 mm/s LP: 12.5 mm/s Maximum recording time : SP: 60 min.
...1-9/16" x 3-5/8") : Approx. 320 g (0.71 lbs) Specifications shown are for SP mode unless otherwise indicated. 78 EN SPECIFICATIONS Camcorder General Power supply : DC 6.3 V (Using the AC Power Adapter/Charger) DC 7.2 V (Using battery pack) Power consumption LCD monitor off, viewfinder on : Approx. 4.5 W LCD monitor on, viewfinder off : Approx. 5.4 W Format : DV Format (SD mode) Signal format : NTSC Standard Video signal recording format : Digital Component Recording Cassette : Mini DV Cassette Tape Speed : SP: 18.8 mm/s LP: 12.5 mm/s Maximum recording time : SP: 60 min.


