Instructions
Page 2
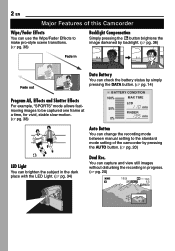
... be captured one frame at a time, for vivid, stable slow-motion. (੬ pg. 38) Data Battery You can check the battery status by simply pressing the DATA button. (੬ pg. 14) BATTERY CONDITION 100% MAX TIME LCD 50% min FINDER 0% min Auto Button You can change the recording mode between... manual setting to the standard mode setting of the camcorder by pressing the AUTO button. (੬ pg. 20) LED Light You...
... be captured one frame at a time, for vivid, stable slow-motion. (੬ pg. 38) Data Battery You can check the battery status by simply pressing the DATA button. (੬ pg. 14) BATTERY CONDITION 100% MAX TIME LCD 50% min FINDER 0% min Auto Button You can change the recording mode between... manual setting to the standard mode setting of the camcorder by pressing the AUTO button. (੬ pg. 20) LED Light You...
Instructions
Page 3
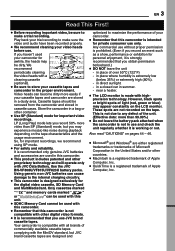
... that you may experience mosaic-like noise during playback depending on the LCD monitor. Store the camcorder in use only. Any commercial use without proper permission is made with JVC Data Battery. in summer. - near a heater. ● The LCD monitor is prohibited. (Even ...SP mode. ● For safety and reliability. Video heads can cause damage to the internal charging circuitry. ● This camcorder is recommended only genuine JVC batteries and accessories are not recorded on pages 44 - 46. ● Microsoft® and Windows® are designed and optimized...
... that you may experience mosaic-like noise during playback depending on the LCD monitor. Store the camcorder in use only. Any commercial use without proper permission is made with JVC Data Battery. in summer. - near a heater. ● The LCD monitor is prohibited. (Even ...SP mode. ● For safety and reliability. Video heads can cause damage to the internal charging circuitry. ● This camcorder is recommended only genuine JVC batteries and accessories are not recorded on pages 44 - 46. ● Microsoft® and Windows® are designed and optimized...
Instructions
Page 4
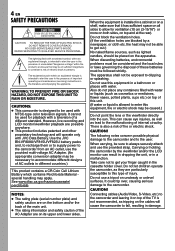
...and safety caution of injury. Also do not place any containers filled with water. Use the JVC BN-VF808U/VF815U/VF823U battery packs and, to recharge them or to supply power to the camcorder from an AC outlet, use this type of the AC Adapter are particularly susceptible to get your ... flame sources, such as lighted candles, should be placed on top of internal circuitry. the heat may be used for playback with JVC Data Battery. However, live recording and LCD monitor/viewfinder playback are blocked by the viewfinder and/or the LCD monitor can cause...
...and safety caution of injury. Also do not place any containers filled with water. Use the JVC BN-VF808U/VF815U/VF823U battery packs and, to recharge them or to supply power to the camcorder from an AC outlet, use this type of the AC Adapter are particularly susceptible to get your ... flame sources, such as lighted candles, should be placed on top of internal circuitry. the heat may be used for playback with JVC Data Battery. However, live recording and LCD monitor/viewfinder playback are blocked by the viewfinder and/or the LCD monitor can cause...
Instructions
Page 5
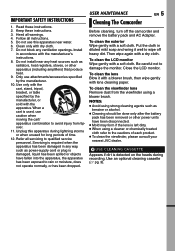
...; Mold may form if the lens is left dirty. ● When using a cleaner or chemically treated cloth refer to wipe off the camcorder and remove the battery pack and AC Adapter. Install in diluted mild soap and wring it with a blower brush, then wipe gently with a dry cloth. When...heads during lightning storms or when unused for long periods of each product. ● To clean the viewfinder, please consult your nearest JVC dealer. Clean only with the manufacturer's instructions. 8. Only use caution when moving the cart/ apparatus combination to rain or moisture, does not...
...; Mold may form if the lens is left dirty. ● When using a cleaner or chemically treated cloth refer to wipe off the camcorder and remove the battery pack and AC Adapter. Install in diluted mild soap and wring it with a blower brush, then wipe gently with a dry cloth. When...heads during lightning storms or when unused for long periods of each product. ● To clean the viewfinder, please consult your nearest JVC dealer. Clean only with the manufacturer's instructions. 8. Only use caution when moving the cart/ apparatus combination to rain or moisture, does not...
Instructions
Page 7
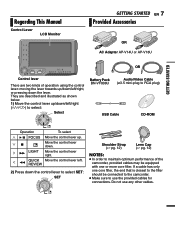
... to select SET: SET Shoulder Strap (੬ pg. 12) Lens Cap (੬ pg. 12) NOTES: ● In order to maintain optimum performance of the camcorder, provided cables may be equipped with one core filter, the end that is closest to the filter should be connected to the...or AP-V18U OR Control lever There are described and illustrated as shown below. 1) Move the control lever up/down/left/right (3/4/1/2) to select: Select Battery Pack BN-VF808U Audio/Video Cable (ø3.5 mini-plug to RCA plug) USB Cable CD-ROM GETTING STARTED Operation To select 3 6 FOCUS Move the ...
... to select SET: SET Shoulder Strap (੬ pg. 12) Lens Cap (੬ pg. 12) NOTES: ● In order to maintain optimum performance of the camcorder, provided cables may be equipped with one core filter, the end that is closest to the filter should be connected to the...or AP-V18U OR Control lever There are described and illustrated as shown below. 1) Move the control lever up/down/left/right (3/4/1/2) to select: Select Battery Pack BN-VF808U Audio/Video Cable (ø3.5 mini-plug to RCA plug) USB Cable CD-ROM GETTING STARTED Operation To select 3 6 FOCUS Move the ...

Instructions
Page 9
...Switch Position VIDEO: To record on a tape or play back a recording on the tape or in a memory card. OFF: To switch off the camcorder. MEMORY: To record in a memory card or access data stored in the memory card. The logo is used for shooting is built-in here.) ...Speaker Volume Control [VOL. +, -] (੬ pg. 21) !Recording Start/Stop Button [START/STOP] (੬ pg. 18) "Power Switch [REC, PLAY, OFF] #Lock Button $Battery Release Button [BATT.] (੬ pg. 13) %Cassette Open/Eject Switch [OPEN/EJECT] (੬ pg. 16) Connectors &USB (Universal Serial Bus) Connector (੬ pg. 41) (...
...Switch Position VIDEO: To record on a tape or play back a recording on the tape or in a memory card. OFF: To switch off the camcorder. MEMORY: To record in a memory card or access data stored in the memory card. The logo is used for shooting is built-in here.) ...Speaker Volume Control [VOL. +, -] (੬ pg. 21) !Recording Start/Stop Button [START/STOP] (੬ pg. 18) "Power Switch [REC, PLAY, OFF] #Lock Button $Battery Release Button [BATT.] (੬ pg. 13) %Cassette Open/Eject Switch [OPEN/EJECT] (੬ pg. 16) Connectors &USB (Universal Serial Bus) Connector (੬ pg. 41) (...
Instructions
Page 13
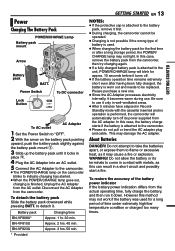
... its terminals to flame or excessive heat, as this case, the battery charge starts if the battery is finished. Unplug the AC Adapter from the camcorder. To detach the battery pack Slide the battery pack downward while pressing BATT. BN-VF823U Approx. 3 hrs. 50 min. * ... it first. ● During charging, the camcorder cannot be replaced. To restore the accuracy of the battery power indicator If the battery power indication differs from the camcorder, then try charging again. ● If a fully charged battery pack is worn out and needs to be operated. ...
... its terminals to flame or excessive heat, as this case, the battery charge starts if the battery is finished. Unplug the AC Adapter from the camcorder. To detach the battery pack Slide the battery pack downward while pressing BATT. BN-VF823U Approx. 3 hrs. 50 min. * ... it first. ● During charging, the camcorder cannot be replaced. To restore the accuracy of the battery power indicator If the battery power indication differs from the camcorder, then try charging again. ● If a fully charged battery pack is worn out and needs to be operated. ...
Instructions
Page 14
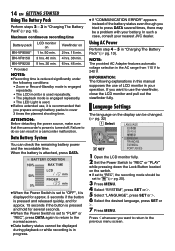
... SET or 2. 7 Press MENU. 14 EN GETTING STARTED Using The Battery Pack Perform steps 2 - 3 in "Charging The Battery Pack" (੬ pg. 13). When the battery is recommended that the camcorder's power is in your nearest JVC dealer. Using AC Power Perform step 4 - 5 in "Charging The Battery Pack" (੬ pg. 13). NOTE: The provided AC Adapter features...
... SET or 2. 7 Press MENU. 14 EN GETTING STARTED Using The Battery Pack Perform steps 2 - 3 in "Charging The Battery Pack" (੬ pg. 13). When the battery is recommended that the camcorder's power is in your nearest JVC dealer. Using AC Power Perform step 4 - 5 in "Charging The Battery Pack" (੬ pg. 13). NOTE: The provided AC Adapter features...
Instructions
Page 16
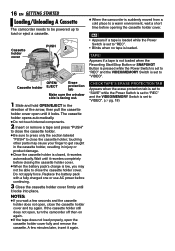
... product damage. ● Once the cassette holder is closed, it again. ● When the camcorder is suddenly moved from a cold place to a warm environment, wait a short time before closing the cassette holder cover. ● When the battery pack's charge is set to "VIDEO". TAPE! Appears if a tape is not loaded when the...
... product damage. ● Once the cassette holder is closed, it again. ● When the camcorder is suddenly moved from a cold place to a warm environment, wait a short time before closing the cassette holder cover. ● When the battery pack's charge is set to "VIDEO". TAPE! Appears if a tape is not loaded when the...
Instructions
Page 21
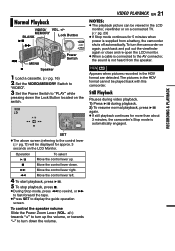
... back and pull out the viewfinder again or close and re-open the LCD monitor. ● When a cable is connected to turn the camcorder on a connected TV. (੬ pg. 23) ● If Stop mode continues for 5 minutes when power is automatically engaged. Operation To select 6... Move the control lever up the volume, or towards "-" to the AV connector, the sound is not heard from a battery, the camcorder shuts off automatically. To control the speaker volume Slide the Power Zoom Lever (VOL. +/-) towards "+" to turn up . 7 Move the control lever ...
... back and pull out the viewfinder again or close and re-open the LCD monitor. ● When a cable is connected to turn the camcorder on a connected TV. (੬ pg. 23) ● If Stop mode continues for 5 minutes when power is automatically engaged. Operation To select 6... Move the control lever up the volume, or towards "-" to the AV connector, the sound is not heard from a battery, the camcorder shuts off automatically. To control the speaker volume Slide the Power Zoom Lever (VOL. +/-) towards "+" to turn up . 7 Move the control lever ...
Instructions
Page 23
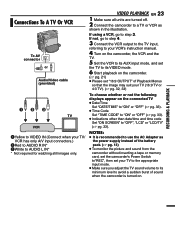
... sure all units are turned off. 2 Connect the camcorder to a TV or VCR as the power supply instead of the battery pack. (੬ pg. 13) ● To monitor the picture and sound from the camcorder without inserting a tape or memory card, set the camcorder's Power Switch to"REC", then set "16:9 OUTPUT..." of sound when the camcorder is recommended to use the AC ...
... sure all units are turned off. 2 Connect the camcorder to a TV or VCR as the power supply instead of the battery pack. (੬ pg. 13) ● To monitor the picture and sound from the camcorder without inserting a tape or memory card, set the camcorder's Power Switch to"REC", then set "16:9 OUTPUT..." of sound when the camcorder is recommended to use the AC ...
Instructions
Page 24
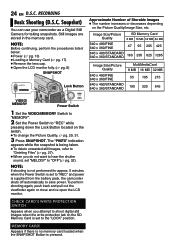
... CHECK CARD'S WRITE PROTECTION SWITCH Appears when you do not want to hear the shutter sound, set to save power. Snapshot) You can use your camcorder as a Digital Still Camera for approx. 5 minutes when the Power Switch is set to "REC" and power is set "MELODY" to "REC"... Lock Button Approximate Number of Storable Images ● The number increases or decreases depending on the SD Memory Card is supplied from the battery pack, the camcorder shuts off automatically to the "LOCK" position. The "PHOTO" indication appears while the snapshot is pressed. Appears if there is no ...
... CHECK CARD'S WRITE PROTECTION SWITCH Appears when you do not want to hear the shutter sound, set to save power. Snapshot) You can use your camcorder as a Digital Still Camera for approx. 5 minutes when the Power Switch is set to "REC" and power is set "MELODY" to "REC"... Lock Button Approximate Number of Storable Images ● The number increases or decreases depending on the SD Memory Card is supplied from the battery pack, the camcorder shuts off automatically to the "LOCK" position. The "PHOTO" indication appears while the snapshot is pressed. Appears if there is no ...

Instructions
Page 25
... Images You can run through a photo album. ON ● The operation mode indicator, folder/file number, date/time and battery remaining power indicator disappear. ● To display the indicators again, select "ON". This browsing capability makes it easy to locate a...64257;le. ON SCREEN OFF 5 Press MENU. These thumbnail images cannot be displayed as thumbnails only. The selected file is not compatible with the camcorder are no image files stored in the memory card. VIDEO/MEMORY Lock Button [PLAY] 3, 3 2 Power Switch 1 SET [STOP] 7, 4...
... Images You can run through a photo album. ON ● The operation mode indicator, folder/file number, date/time and battery remaining power indicator disappear. ● To display the indicators again, select "ON". This browsing capability makes it easy to locate a...64257;le. ON SCREEN OFF 5 Press MENU. These thumbnail images cannot be displayed as thumbnails only. The selected file is not compatible with the camcorder are no image files stored in the memory card. VIDEO/MEMORY Lock Button [PLAY] 3, 3 2 Power Switch 1 SET [STOP] 7, 4...
Instructions
Page 37
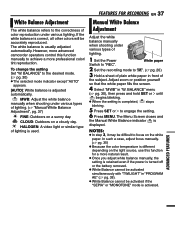
... adjust focus manually. (੬ pg. 35) ● Because the color temperature is different depending on the white paper. However, more advanced camcorder operators control this function for a more professional color/ tint reproduction. MWB: Adjust the white balance manually when shooting under various types of lighting...more natural result. ● Once you adjust white balance manually, the setting is retained even if the power is turned off or the battery removed. ● White Balance cannot be activated simultaneously with "TWILIGHT" in "PROGRAM AE" (੬ pg. 38). ● White ...
... adjust focus manually. (੬ pg. 35) ● Because the color temperature is different depending on the white paper. However, more advanced camcorder operators control this function for a more professional color/ tint reproduction. MWB: Adjust the white balance manually when shooting under various types of lighting...more natural result. ● Once you adjust white balance manually, the setting is retained even if the power is turned off or the battery removed. ● White Balance cannot be activated simultaneously with "TWILIGHT" in "PROGRAM AE" (੬ pg. 38). ● White ...
Instructions
Page 39
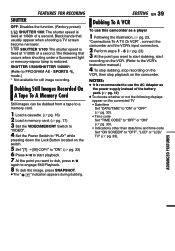
... Press 6 to start playback. 7 At the point you want to dub, press 6 again to "PLAY" while pressing down the Lock Button located on the camcorder. FEATURES FOR RECORING SHUTTER OFF: Disables the function. (Factory-preset) SHUTTER 1/60: The shutter speed is fixed at 1/100th of a second. The ... recording. Black bands that occurs when shooting under a fluorescent light or mercury-vapour lamp is recommended to use this camcorder as the power supply instead of the battery pack. (੬ pg. 13) ● To choose whether or not the following displays appear on the connected TV &#...
... Press 6 to start playback. 7 At the point you want to dub, press 6 again to "PLAY" while pressing down the Lock Button located on the camcorder. FEATURES FOR RECORING SHUTTER OFF: Disables the function. (Factory-preset) SHUTTER 1/60: The shutter speed is fixed at 1/100th of a second. The ... recording. Black bands that occurs when shooting under a fluorescent light or mercury-vapour lamp is recommended to use this camcorder as the power supply instead of the battery pack. (੬ pg. 13) ● To choose whether or not the following displays appear on the connected TV &#...
Instructions
Page 40
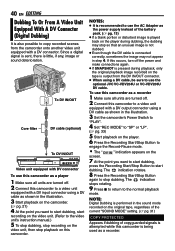
... MODE" setting. (੬ pg. 31) COPY PROTECTED Appears if dubbing of the battery pack. (੬ pg. 13) ● If a blank portion or disturbed image is played back on the tape is output from the camcorder onto another video unit equipped with a DV connector. To DV IN/OUT Core fi... unit's instruction manual.) 5 To stop dubbing, stop recording on the video unit, then stop playback on this camcorder to a video unit equipped with DV connector To use the optional JVC VC-VDV204U or VC-VDV206U DV cable. NOTE: Digital Dubbing is pressed during playback, only the original playback image...
... MODE" setting. (੬ pg. 31) COPY PROTECTED Appears if dubbing of the battery pack. (੬ pg. 13) ● If a blank portion or disturbed image is played back on the tape is output from the camcorder onto another video unit equipped with a DV connector. To DV IN/OUT Core fi... unit's instruction manual.) 5 To stop dubbing, stop recording on the video unit, then stop playback on this camcorder to a video unit equipped with DV connector To use the optional JVC VC-VDV204U or VC-VDV206U DV cable. NOTE: Digital Dubbing is pressed during playback, only the original playback image...
Instructions
Page 41
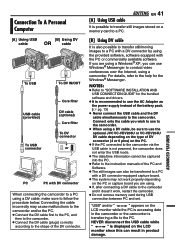
.... If you are using. ● If, after connecting a DV cable to the camcorder. Connect only the cable you can result in the camcorder or the camcorder is displayed on the LCD monitor since this can use the optional JVC VC-VDV206U or VC-VDV204U DV cable depending on the type of the DV... PC or capture board you are using a Windows® XP, you wish to use to the camcorder. ● When using a DV cable, be captured into the PC. ● Refer to the instruction manuals of the battery pack. (੬ pg. 13) ● Never connect the USB cable and the DV cable simultaneously ...
.... If you are using. ● If, after connecting a DV cable to the camcorder. Connect only the cable you can result in the camcorder or the camcorder is displayed on the LCD monitor since this can use the optional JVC VC-VDV206U or VC-VDV204U DV cable depending on the type of the DV... PC or capture board you are using a Windows® XP, you wish to use to the camcorder. ● When using a DV cable, be captured into the PC. ● Refer to the instruction manuals of the battery pack. (੬ pg. 13) ● Never connect the USB cable and the DV cable simultaneously ...
Instructions
Page 42
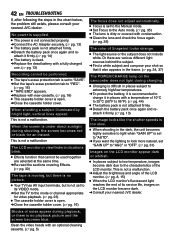
... to 35°C (50°F to low temperature, images become dark. ➜Consult your nearest JVC dealer. Clean the video heads with a temperature of noise appear during playback, or there is no ... TV has AV input terminals, but is not set to its service life, images on the camcorder does not light during shooting, the screen becomes red or black for video playback. (੬ pg.... ➜Close the cassette holder cover. This is not attached firmly. ➜Detach the battery pack once again and re- When shooting a subject illuminated by bright light, vertical lines appear. 42...
... to 35°C (50°F to low temperature, images become dark. ➜Consult your nearest JVC dealer. Clean the video heads with a temperature of noise appear during playback, or there is no ... TV has AV input terminals, but is not set to its service life, images on the camcorder does not light during shooting, the screen becomes red or black for video playback. (੬ pg.... ➜Close the cassette holder cover. This is not attached firmly. ➜Detach the battery pack once again and re- When shooting a subject illuminated by bright light, vertical lines appear. 42...
Instructions
Page 43
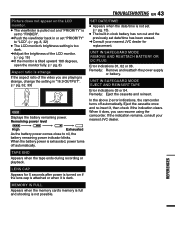
... is not set date/time has been erased. ➜Consult your nearest JVC dealer. UNIT IN SAFEGUARD MODE REMOVE AND REATTACH BATTERY OR DC PLUG Error indications 01, 02 or 06. In the above 2 error indications, the camcorder turns off automatically. MEMORY IS FULL Appears when the memory card's memory ... 8) Aspect ratio is strange If the aspect ratio of the video you can resume using the camcorder. Eject the cassette once and re-insert it does, you are playing is strange, change the setting in clock battery has run out and the previously set . (੬ pg. 15). ● The built-...
... is not set date/time has been erased. ➜Consult your nearest JVC dealer. UNIT IN SAFEGUARD MODE REMOVE AND REATTACH BATTERY OR DC PLUG Error indications 01, 02 or 06. In the above 2 error indications, the camcorder turns off automatically. MEMORY IS FULL Appears when the memory card's memory ... 8) Aspect ratio is strange If the aspect ratio of the video you can resume using the camcorder. Eject the cassette once and re-insert it does, you are playing is strange, change the setting in clock battery has run out and the previously set . (੬ pg. 15). ● The built-...
Instructions
Page 44
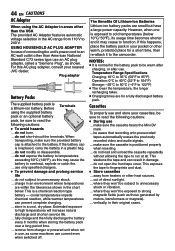
...read the following cautions: ● During use and store your nearest JVC dealer. use an AC plug adapter, called a "Siemens Plug", as those generated by motors, transformers or magnets). ... be sure to the camcorder. away from 110 V to unnecessary shock. ... Cassettes To properly ...use ... make sure the cassette is exposed to unnecessary shock or vibration. ... The Benefits Of Lithium-Ion Batteries Lithium-ion battery packs are within the tolerances shown...
...read the following cautions: ● During use and store your nearest JVC dealer. use an AC plug adapter, called a "Siemens Plug", as those generated by motors, transformers or magnets). ... be sure to the camcorder. away from 110 V to unnecessary shock. ... Cassettes To properly ...use ... make sure the cassette is exposed to unnecessary shock or vibration. ... The Benefits Of Lithium-Ion Batteries Lithium-ion battery packs are within the tolerances shown...


