Instructions
Page 2
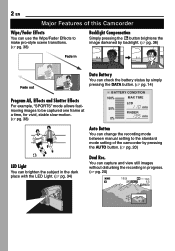
You can brighten the subject in progress. (੬ pg. 20) 16:9 --- min 640F 13 PHOTO 2 EN Major Features of this Camcorder Wipe/Fader Effects You can use the Wipe/Fader Effects to make pro-style scene transitions. (੬ pg. 38) Backlight Compensation Simply pressing .... 14) BATTERY CONDITION 100% MAX TIME LCD 50% min FINDER 0% min Auto Button You can change the recording mode between manual setting to the standard mode setting of the camcorder by pressing the AUTO button. (੬ pg. 20) LED Light You can capture and view still images without disturbing the recording...
You can brighten the subject in progress. (੬ pg. 20) 16:9 --- min 640F 13 PHOTO 2 EN Major Features of this Camcorder Wipe/Fader Effects You can use the Wipe/Fader Effects to make pro-style scene transitions. (੬ pg. 38) Backlight Compensation Simply pressing .... 14) BATTERY CONDITION 100% MAX TIME LCD 50% min FINDER 0% min Auto Button You can change the recording mode between manual setting to the standard mode setting of the camcorder by pressing the AUTO button. (੬ pg. 20) LED Light You can capture and view still images without disturbing the recording...
Instructions
Page 6
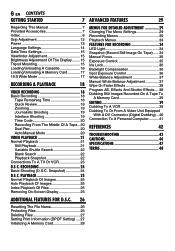
...Quick Review 18 Zooming 19 Journalistic Shooting 19 Interface Shooting 19 Time Code 20 Recording From The Middle Of A Tape...20 Dual Rec 20 Auto/Manual Mode 20 VIDEO PLAYBACK 21 Normal Playback 21 Still Playback 21 Variable Shuttle Search 22 Blank Search 22 Playback Snapshot 22 Connections To A TV Or... The Menu Settings 29 Recording Menus 30 Playback Menus 33 FEATURES FOR RECORDING 34 LED Light 34 Snapshot (Record Still Image On Tape) ..... 34 Manual Focus 35 Exposure Control 35 Iris Lock 36 Backlight Compensation 36 Spot Exposure Control 36 White Balance Adjustment 37...
...Quick Review 18 Zooming 19 Journalistic Shooting 19 Interface Shooting 19 Time Code 20 Recording From The Middle Of A Tape...20 Dual Rec 20 Auto/Manual Mode 20 VIDEO PLAYBACK 21 Normal Playback 21 Still Playback 21 Variable Shuttle Search 22 Blank Search 22 Playback Snapshot 22 Connections To A TV Or... The Menu Settings 29 Recording Menus 30 Playback Menus 33 FEATURES FOR RECORDING 34 LED Light 34 Snapshot (Record Still Image On Tape) ..... 34 Manual Focus 35 Exposure Control 35 Iris Lock 36 Backlight Compensation 36 Spot Exposure Control 36 White Balance Adjustment 37...
Instructions
Page 7
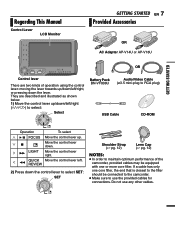
.... 12) Lens Cap (੬ pg. 12) NOTES: ● In order to maintain optimum performance of the camcorder, provided cables may be connected to the camcorder. ● Make sure to use any other cables. Regarding This Manual Control Lever LCD Monitor GETTING STARTED EN 7 Provided Accessories OR AC Adapter AP-V14U or AP-V18U...
.... 12) Lens Cap (੬ pg. 12) NOTES: ● In order to maintain optimum performance of the camcorder, provided cables may be connected to the camcorder. ● Make sure to use any other cables. Regarding This Manual Control Lever LCD Monitor GETTING STARTED EN 7 Provided Accessories OR AC Adapter AP-V14U or AP-V18U...

Instructions
Page 9
OFF: To switch off the camcorder. GETTING STARTED The logo is built-in here.) îStereo Microphone ïStud Hole (੬ pg. 15) ñTripod Mounting Socket (੬ pg. 15) ó... Review [QUICK REVIEW] (੬ pg. 18) 2 : Right/Fast-Forward (¡) (੬ pg. 21)/ LED Light [LIGHT] (੬ pg. 34) 3 : Up/Play/Pause (6) (੬ pg. 21)/ Manual Focus [FOCUS] (੬ pg. 35) 4 : Down/Stop (7) (੬ pg. 21)/ Backlight Compensation [ ] (੬ pg. 36)/ Spot Exposure (੬ pg. 36) Press down : SET 2VIDEO/MEMORY...
OFF: To switch off the camcorder. GETTING STARTED The logo is built-in here.) îStereo Microphone ïStud Hole (੬ pg. 15) ñTripod Mounting Socket (੬ pg. 15) ó... Review [QUICK REVIEW] (੬ pg. 18) 2 : Right/Fast-Forward (¡) (੬ pg. 21)/ LED Light [LIGHT] (੬ pg. 34) 3 : Up/Play/Pause (6) (੬ pg. 21)/ Manual Focus [FOCUS] (੬ pg. 35) 4 : Down/Stop (7) (੬ pg. 21)/ Backlight Compensation [ ] (੬ pg. 36)/ Spot Exposure (੬ pg. 36) Press down : SET 2VIDEO/MEMORY...
Instructions
Page 10
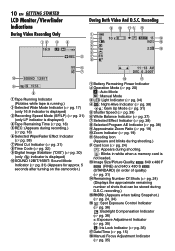
...; pg. 31) (Appears for approx. 5 seconds after turning on the camcorder.) 11 : 13 AM DEC . 6 . 2007 ~ ) 1Battery Remaining Power Indicator 2Operation Mode (੬ pg. 20) A : Auto Mode M : Manual Mode 3LED Light Indicator (੬ pg. 34) 4 : Night-Alive Indicator...Backlight Compensation Indicator (੬ pg. 36) ±: Exposure Adjustment Indicator (੬ pg. 35) : Iris Lock Indicator (੬ pg. 36) )Date/Time (੬ pg. 15) ~Manual Focus Adjustment Indicator (੬ pg. 35) Recording 9 ! "# $ During Video Recording Only 1 2 M 10 x 12 3 4 3 4 16:9 LP - - -min 5 6...
...; pg. 31) (Appears for approx. 5 seconds after turning on the camcorder.) 11 : 13 AM DEC . 6 . 2007 ~ ) 1Battery Remaining Power Indicator 2Operation Mode (੬ pg. 20) A : Auto Mode M : Manual Mode 3LED Light Indicator (੬ pg. 34) 4 : Night-Alive Indicator...Backlight Compensation Indicator (੬ pg. 36) ±: Exposure Adjustment Indicator (੬ pg. 35) : Iris Lock Indicator (੬ pg. 36) )Date/Time (੬ pg. 15) ~Manual Focus Adjustment Indicator (੬ pg. 35) Recording 9 ! "# $ During Video Recording Only 1 2 M 10 x 12 3 4 3 4 16:9 LP - - -min 5 6...
Instructions
Page 14
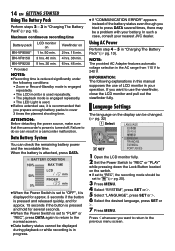
...pack LCD monitor on Viewfinder on the display can be a problem with your nearest JVC dealer. BATTERY CONDITION 100% MAX TIME LCD 50% min FINDER 0% min ● When ...viewfinder fully. 14 EN GETTING STARTED Using The Battery Pack Perform steps 2 - 3 in a camcorder malfunction. If you want to "OFF", it is turned off. When the battery is in progress. ...● If "COMMUNICATION ERROR" appears instead of LCD monitor in this manual supposes the use , it is displayed for approx. 3 seconds if the button is pressed and ...
...pack LCD monitor on Viewfinder on the display can be a problem with your nearest JVC dealer. BATTERY CONDITION 100% MAX TIME LCD 50% min FINDER 0% min ● When ...viewfinder fully. 14 EN GETTING STARTED Using The Battery Pack Perform steps 2 - 3 in a camcorder malfunction. If you want to "OFF", it is turned off. When the battery is in progress. ...● If "COMMUNICATION ERROR" appears instead of LCD monitor in this manual supposes the use , it is displayed for approx. 3 seconds if the button is pressed and ...
Instructions
Page 20
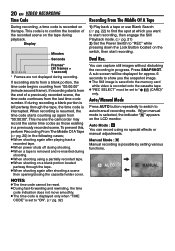
... located on a blank portion located partway through the tape, the time code is removed and re-inserted during recording. When manual mode is possible by setting various functions. M Manual Mode : Manual recording is selected, the indicator " " appears on the tape during shooting. ● When a tape is interrupted. Display...9679; When shooting again after playing back a recorded tape. ● When power shuts off during playback. This code is to M auto/manual recording mode. This means the camcorder may record the same time codes as those existing in progress. AUTO...
... located on a blank portion located partway through the tape, the time code is removed and re-inserted during recording. When manual mode is possible by setting various functions. M Manual Mode : Manual recording is selected, the indicator " " appears on the tape during shooting. ● When a tape is interrupted. Display...9679; When shooting again after playing back a recorded tape. ● When power shuts off during playback. This code is to M auto/manual recording mode. This means the camcorder may record the same time codes as those existing in progress. AUTO...
Instructions
Page 23
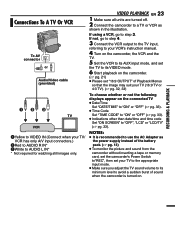
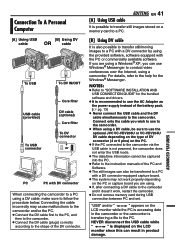
...; It is turned on. If using a VCR, go to step 4. 3 Connect the VCR output to the TV input, referring to your VCR's instruction manual. 4 Turn on the camcorder, the VCR and the TV. 5 Set the VCR to its AUX input mode, and set "16:9 OUTPUT" of the battery pack. (੬ pg. 13... set your TV to the appropriate input mode. ● Make sure you adjust the TV sound volume to its VIDEO mode. 6 Start playback on the camcorder. (੬ pg. 21) ● Please set the TV to its minimum level to a TV or VCR as shown in the illustration. If not, go to...
...; It is turned on. If using a VCR, go to step 4. 3 Connect the VCR output to the TV input, referring to your VCR's instruction manual. 4 Turn on the camcorder, the VCR and the TV. 5 Set the VCR to its AUX input mode, and set "16:9 OUTPUT" of the battery pack. (੬ pg. 13... set your TV to the appropriate input mode. ● Make sure you adjust the TV sound volume to its VIDEO mode. 6 Start playback on the camcorder. (੬ pg. 21) ● Please set the TV to its minimum level to a TV or VCR as shown in the illustration. If not, go to...
Instructions
Page 35
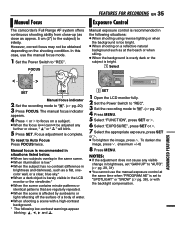
...SET or 2. 7 Select the appropriate exposure, press SET or 2. ● To brighten the image, press 3. FEATURES FOR RECORDING EN 35 Manual Focus Exposure Control The camcorder's Full Range AF system offers continuous shooting ability from close-up (as close as at the beach or when skiing. ● When the... background is overly dark or the 1 subject is complete. In this case, use the manual exposure control at , onecolor wall, ...
...SET or 2. 7 Select the appropriate exposure, press SET or 2. ● To brighten the image, press 3. FEATURES FOR RECORDING EN 35 Manual Focus Exposure Control The camcorder's Full Range AF system offers continuous shooting ability from close-up (as close as at the beach or when skiing. ● When the... background is overly dark or the 1 subject is complete. In this case, use the manual exposure control at , onecolor wall, ...
Instructions
Page 37
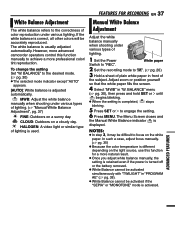
...cloudy day. To change the setting Set "W. The Menu Screen closes and the Manual White Balance indicator is correct, all other colors will be accurately reproduced. However, more advanced camcorder operators control this function for a more professional color/ tint reproduction. MWB: Adjust... the white balance manually when shooting under various lighting. NOTES: ● In step 3, it may...
...cloudy day. To change the setting Set "W. The Menu Screen closes and the Manual White Balance indicator is correct, all other colors will be accurately reproduced. However, more advanced camcorder operators control this function for a more professional color/ tint reproduction. MWB: Adjust... the white balance manually when shooting under various lighting. NOTES: ● In step 3, it may...
Instructions
Page 38
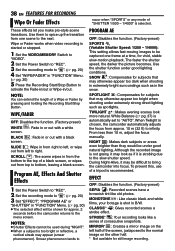
.... BLACK screen. : Fade in from right to left half of consecutive snapshots. NIGHT : Makes dark subjects or areas even brighter than 10 m, adjust the focus manually. M 2 Set the Power Switch to "REC". 3 Set the recording mode to " ". (੬ pg. 20) 4 Set "WIPE/FADER" in the ... and holding the Recording Start/Stop Button. SNOW : Compensates for still image recording. SPOTLIGHT : Compensates for approx. 2 seconds before the camcorder returns to activate the Fade-in/out or Wipe-in extremely bright surroundings such as spotlights. When Twilight is strobing due to "AUTO". ...
.... BLACK screen. : Fade in from right to left half of consecutive snapshots. NIGHT : Makes dark subjects or areas even brighter than 10 m, adjust the focus manually. M 2 Set the Power Switch to "REC". 3 Set the recording mode to " ". (੬ pg. 20) 4 Set "WIPE/FADER" in the ... and holding the Recording Start/Stop Button. SNOW : Compensates for still image recording. SPOTLIGHT : Compensates for approx. 2 seconds before the camcorder returns to activate the Fade-in/out or Wipe-in extremely bright surroundings such as spotlights. When Twilight is strobing due to "AUTO". ...
Instructions
Page 39
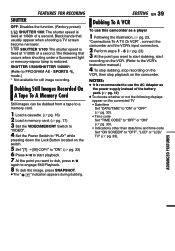
SHUTTER 1/500/SHUTTER 1/4000*: (Refer to the VCR's instruction manual.) 4 To stop dubbing, stop recording on the VCR, then stop playback on the camcorder. The flickering that usually appear when shooting a TV screen become narrower. EDITING EN 39 Dubbing To A VCR To use the AC..." " indication appears during dubbing. Black bands that occurs when shooting under a fluorescent light or mercury-vapour lamp is recommended to use this camcorder as the power supply instead of the battery pack. (੬ pg. 13) ● To choose whether or not the following displays appear on...
SHUTTER 1/500/SHUTTER 1/4000*: (Refer to the VCR's instruction manual.) 4 To stop dubbing, stop recording on the VCR, then stop playback on the camcorder. The flickering that usually appear when shooting a TV screen become narrower. EDITING EN 39 Dubbing To A VCR To use the AC..." " indication appears during dubbing. Black bands that occurs when shooting under a fluorescent light or mercury-vapour lamp is recommended to use this camcorder as the power supply instead of the battery pack. (੬ pg. 13) ● To choose whether or not the following displays appear on...
Instructions
Page 40
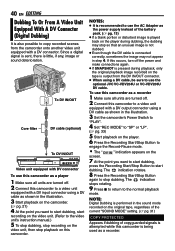
.... 9 Press 7 to return to the video unit's instruction manual.) 5 To stop dubbing, stop recording on the video unit, then stop dubbing. NOTES: ● It is recommended to use the AC Adapter as shown in the illustration. 3 Start playback on the camcorder. (੬ pg. 21) 4 At the point you want... during playback, only the original playback image recorded on the tape is output from the camcorder onto another video unit equipped with a DV input connector using a DV cable, be sure to use the optional JVC VC-VDV204U or VC-VDV206U DV cable. The indication rotates. 8 Press the Recording Start...
.... 9 Press 7 to return to the video unit's instruction manual.) 5 To stop dubbing, stop recording on the video unit, then stop dubbing. NOTES: ● It is recommended to use the AC Adapter as shown in the illustration. 3 Start playback on the camcorder. (੬ pg. 21) 4 At the point you want... during playback, only the original playback image recorded on the tape is output from the camcorder onto another video unit equipped with a DV input connector using a DV cable, be sure to use the optional JVC VC-VDV204U or VC-VDV206U DV cable. The indication rotates. 8 Press the Recording Start...
Instructions
Page 41
...still/moving images to conduct video conferences over the Internet, using a camcorder. ADVANCED FEATURES Connect only the cable you wish to use to the camcorder. ● When using a DV cable, be sure to use the optional JVC VC-VDV206U or VC-VDV204U DV cable depending on the type of ... on the LCD monitor since this can result in the camcorder or the camcorder is not powered, the camcorder does not enter the USB mode. ● The date/time information cannot be captured into the PC. ● Refer to the instruction manuals of the DV connector. Connecting the cable incorrectly may not...
...still/moving images to conduct video conferences over the Internet, using a camcorder. ADVANCED FEATURES Connect only the cable you wish to use to the camcorder. ● When using a DV cable, be sure to use the optional JVC VC-VDV206U or VC-VDV204U DV cable depending on the type of ... on the LCD monitor since this can result in the camcorder or the camcorder is not powered, the camcorder does not enter the USB mode. ● The date/time information cannot be captured into the PC. ● Refer to the instruction manuals of the DV connector. Connecting the cable incorrectly may not...
Instructions
Page 42
... is not set "GAIN UP" to "AGC" or "OFF". (੬ pg. 31) Images on the camcorder does not light during shooting, the screen becomes red or black for video playback. (੬ pg. 23) ...TROUBLESHOOTING If, after following the steps in the chart below, the problem still exists, please consult your nearest JVC dealer. attach it firmly. (੬ pg. 14) ● The battery is dead. ➜... The LCD monitor or viewfinder indications blink. ● Effects function that it is set to the Manual mode. ➜Set Focus to 95°F). (੬ pg. 44) ● The battery pack is...
... is not set "GAIN UP" to "AGC" or "OFF". (੬ pg. 31) Images on the camcorder does not light during shooting, the screen becomes red or black for video playback. (੬ pg. 23) ...TROUBLESHOOTING If, after following the steps in the chart below, the problem still exists, please consult your nearest JVC dealer. attach it firmly. (੬ pg. 14) ● The battery is dead. ➜... The LCD monitor or viewfinder indications blink. ● Effects function that it is set to the Manual mode. ➜Set Focus to 95°F). (੬ pg. 44) ● The battery pack is...
Instructions
Page 48
............19 Iris Lock 36 J Journalistic Shooting ..... 19 L Language 14, 32 LCD Monitor and Viewfinder 8, 15 LED Light 34 Loading A Cassette ....... 16 Loading A Memory Card 17 M Manual Focus 35 Melody 32 Memory Card .......... 17, 45 Motor Drive Mode .......... 34 N Narration 33 Night Alive 38 O On Screen 32, 33 P Playback Sound 33 Power... ...... 42, 43 V Video/Memory Switch .. 9, 31 W White Balance 37 Wind Cut 31 Wipe Or Fader Effects .. 38 Z Zooming 19, 30 16:9 Output 32, 33 GR-D770U © 2006 Victor Company of Japan, Limited UC Printed in Malaysia 1206ASR-NF-MP
............19 Iris Lock 36 J Journalistic Shooting ..... 19 L Language 14, 32 LCD Monitor and Viewfinder 8, 15 LED Light 34 Loading A Cassette ....... 16 Loading A Memory Card 17 M Manual Focus 35 Melody 32 Memory Card .......... 17, 45 Motor Drive Mode .......... 34 N Narration 33 Night Alive 38 O On Screen 32, 33 P Playback Sound 33 Power... ...... 42, 43 V Video/Memory Switch .. 9, 31 W White Balance 37 Wind Cut 31 Wipe Or Fader Effects .. 38 Z Zooming 19, 30 16:9 Output 32, 33 GR-D770U © 2006 Victor Company of Japan, Limited UC Printed in Malaysia 1206ASR-NF-MP


