Instructions
Page 6
... RECORDING & PLAYBACK 18 VIDEO RECORDING 18 Basic Recording 18 Tape Remaining Time 18 Quick Review 18 Zooming 19 Journalistic Shooting 19 Interface Shooting 19 Time Code 20 Recording From The Middle Of A Tape...20 Dual Rec 20 Auto/Manual Mode 20 VIDEO PLAYBACK 21 Normal Playback 21 Still Playback 21 Variable...
... RECORDING & PLAYBACK 18 VIDEO RECORDING 18 Basic Recording 18 Tape Remaining Time 18 Quick Review 18 Zooming 19 Journalistic Shooting 19 Interface Shooting 19 Time Code 20 Recording From The Middle Of A Tape...20 Dual Rec 20 Auto/Manual Mode 20 VIDEO PLAYBACK 21 Normal Playback 21 Still Playback 21 Variable...
Instructions
Page 10
... (Appears during recording.) (੬ pg. 18) 6Selected Wipe/Fader Effect Indicator (੬ pg. 38) 7Wind Cut Indicator (੬ pg. 31) 8Time Code (੬ pg. 32) 9Digital Image Stabilizer ("DIS") (੬ pg. 30) (only indicator is displayed) !SOUND 12BIT/16BIT: Sound Mode Indicator (੬...; pg. 31) (Appears for approx. 5 seconds after turning on the camcorder.) 11 : 13 AM DEC . 6 . 2007 ~ ) 1Battery Remaining Power Indicator 2Operation Mode (੬ pg. 20) A : Auto Mode M : Manual Mode 3LED ...
... (Appears during recording.) (੬ pg. 18) 6Selected Wipe/Fader Effect Indicator (੬ pg. 38) 7Wind Cut Indicator (੬ pg. 31) 8Time Code (੬ pg. 32) 9Digital Image Stabilizer ("DIS") (੬ pg. 30) (only indicator is displayed) !SOUND 12BIT/16BIT: Sound Mode Indicator (੬...; pg. 31) (Appears for approx. 5 seconds after turning on the camcorder.) 11 : 13 AM DEC . 6 . 2007 ~ ) 1Battery Remaining Power Indicator 2Operation Mode (੬ pg. 20) A : Auto Mode M : Manual Mode 3LED ...

Instructions
Page 11
.... 22) 63: Playback ¡: Fast-Forward/Shuttle Search 1: Rewind/Shuttle Search 8: Pause 7Date/Time (੬ pg. 33) 8VOLUME: Volume Level Indicator (੬ pg. 21) 9Time Code (੬ pg. 33) 1 2 100-0013 3 11:13 AM DEC. 6. 2007 4 1Battery Remaining Power Indicator 2Folder/File Number 3Operation Mode Indicator 4Date/Time During Video Playback...
.... 22) 63: Playback ¡: Fast-Forward/Shuttle Search 1: Rewind/Shuttle Search 8: Pause 7Date/Time (੬ pg. 33) 8VOLUME: Volume Level Indicator (੬ pg. 21) 9Time Code (੬ pg. 33) 1 2 100-0013 3 11:13 AM DEC. 6. 2007 4 1Battery Remaining Power Indicator 2Folder/File Number 3Operation Mode Indicator 4Date/Time During Video Playback...
Instructions
Page 18
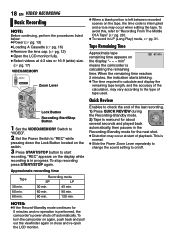
... recording time Enables to on/off automatically. NOTES: ● If the Record-Standby mode continues for 5 minutes and no operation is performed, the camcorder's power shuts off . "- - - To stop recording press START/STOP again. Tape 30 min. 60 min. 80 min. Tape Remaining Time Approximate...MEMORY Zoom Lever ● When a blank portion is left between recorded scenes on the tape, the time code is interrupted and errors may occur at start recording. To turn the camcorder on the display. Quick Review Lock Button Recording Start/Stop Button 1 Set the VIDEO/MEMORY Switch to "VIDEO...
... recording time Enables to on/off automatically. NOTES: ● If the Record-Standby mode continues for 5 minutes and no operation is performed, the camcorder's power shuts off . "- - - To stop recording press START/STOP again. Tape 30 min. 60 min. 80 min. Tape Remaining Time Approximate...MEMORY Zoom Lever ● When a blank portion is left between recorded scenes on the tape, the time code is interrupted and errors may occur at start recording. To turn the camcorder on the display. Quick Review Lock Button Recording Start/Stop Button 1 Set the VIDEO/MEMORY Switch to "VIDEO...
Instructions
Page 20
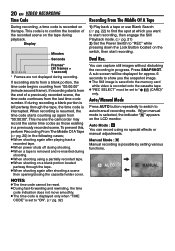
...Dual Rec. A Auto Mode : You can capture still images without disturbing the recording in a previously recorded scene. When recording is interrupted. This code is recorded onto the cassette tape. ● "REC SELECT" must be displayed for approx. 6 seconds to show you want to start recording.... This means the camcorder may record the same time codes as those existing in progress. Press SNAPSHOT. AUTO MANUAL If recording starts from a blank portion, the time code begins counting from the end of the recorded scene on the tape. ...
...Dual Rec. A Auto Mode : You can capture still images without disturbing the recording in a previously recorded scene. When recording is interrupted. This code is recorded onto the cassette tape. ● "REC SELECT" must be displayed for approx. 6 seconds to show you want to start recording.... This means the camcorder may record the same time codes as those existing in progress. Press SNAPSHOT. AUTO MANUAL If recording starts from a blank portion, the time code begins counting from the end of the recorded scene on the tape. ...
Instructions
Page 22
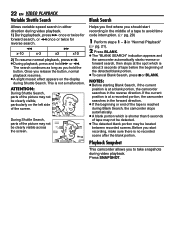
... long as you hold ¡ or 1. NOTES: ● Before starting Blank Search, if the current position is at a recorded portion, the camcorder searches in the reverse direction. ATTENTION: During Shuttle Search, parts of the detected blank portion. ● To cancel Blank Search, press 7 or ... Search Helps you find where you to avoid time code interruption. (੬ pg. 20) 1 Perform steps 1 - 3 in "Normal Playback" (੬ pg. 21). 2 Press BLANK. ● The "BLANK SEARCH" indication appears and the camcorder automatically starts reverse or forward search, then stops at the spot...
... long as you hold ¡ or 1. NOTES: ● Before starting Blank Search, if the current position is at a recorded portion, the camcorder searches in the reverse direction. ATTENTION: During Shuttle Search, parts of the detected blank portion. ● To cancel Blank Search, press 7 or ... Search Helps you find where you to avoid time code interruption. (੬ pg. 20) 1 Perform steps 1 - 3 in "Normal Playback" (੬ pg. 21). 2 Press BLANK. ● The "BLANK SEARCH" indication appears and the camcorder automatically starts reverse or forward search, then stops at the spot...
Instructions
Page 23
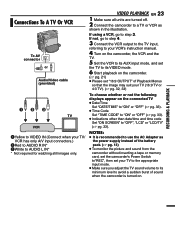
...cable (provided) TV VCR 1Yellow to VIDEO IN (Connect when your VCR's instruction manual. 4 Turn on the camcorder, the VCR and the TV. 5 Set the VCR to its AUX input mode, and set the TV to ...its VIDEO mode. 6 Start playback on the camcorder. (੬ pg. 21) ● Please set your TV to the appropriate input mode. ● Make sure... other than date/time and time code Set "ON SCREEN" to use the AC Adapter as shown in the illustration. VIDEO PLAYBACK EN 23 1 Make sure all units are turned off. 2 Connect the camcorder to a TV or VCR as ...
...cable (provided) TV VCR 1Yellow to VIDEO IN (Connect when your VCR's instruction manual. 4 Turn on the camcorder, the VCR and the TV. 5 Set the VCR to its AUX input mode, and set the TV to ...its VIDEO mode. 6 Start playback on the camcorder. (੬ pg. 21) ● Please set your TV to the appropriate input mode. ● Make sure... other than date/time and time code Set "ON SCREEN" to use the AC Adapter as shown in the illustration. VIDEO PLAYBACK EN 23 1 Make sure all units are turned off. 2 Connect the camcorder to a TV or VCR as ...
Instructions
Page 32
...the demonstration stops the demonstration temporarily. ON SCREEN LCD: Keeps the camcorder's display (except the date, time and time code) from appearing on the connected TV screen. [LCD/TV]: Makes the camcorder's display appear on the connected TV. ON: Time code is opened . DATE/TIME [OFF]: The date/time does not... appear. FINDER: The image is displayed in the viewfinder when the viewfinder is pulled out while the LCD monitor is displayed on the camcorder and on screen when the camcorder is opened . ...
...the demonstration stops the demonstration temporarily. ON SCREEN LCD: Keeps the camcorder's display (except the date, time and time code) from appearing on the connected TV screen. [LCD/TV]: Makes the camcorder's display appear on the connected TV. ON: Time code is opened . DATE/TIME [OFF]: The date/time does not... appear. FINDER: The image is displayed in the viewfinder when the viewfinder is pulled out while the LCD monitor is displayed on the camcorder and on screen when the camcorder is opened . ...
Instructions
Page 33
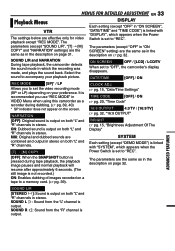
... "L" and "R" channels in "ON SCREEN", "DATE/TIME" and "TIME CODE") is linked with "SYSTEM", which appears when the Power Switch is set to "REC". SOUND L/R and NARRATION During tape playback, the camcorder detects the sound mode in stereo. Select the sound to accompany your preference.... effective only for video playback except "REC MODE". ADVANCED FEATURES SOUND L/R [STEREO ]: Sound is recommended you to set to "OFF", the camcorder's display disappears. SOUND R : Sound from the "L" channel is output. MENUS FOR DETAILED ADJUSTMENT EN 33 Playback Menus VTR The settings below ...
... "L" and "R" channels in "ON SCREEN", "DATE/TIME" and "TIME CODE") is linked with "SYSTEM", which appears when the Power Switch is set to "REC". SOUND L/R and NARRATION During tape playback, the camcorder detects the sound mode in stereo. Select the sound to accompany your preference.... effective only for video playback except "REC MODE". ADVANCED FEATURES SOUND L/R [STEREO ]: Sound is recommended you to set to "OFF", the camcorder's display disappears. SOUND R : Sound from the "L" channel is output. MENUS FOR DETAILED ADJUSTMENT EN 33 Playback Menus VTR The settings below ...
Instructions
Page 39
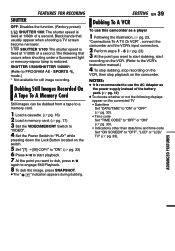
... 1/100th of a second. Black bands that occurs when shooting under a fluorescent light or mercury-vapour lamp is recommended to use this camcorder as the power supply instead of the battery pack. (੬ pg. 13) ● To choose whether or not the following displays appear on...33). • Indications other than date/time and time code Set "ON SCREEN" to PROGRAM AE - EDITING EN 39 Dubbing To A VCR To use the AC Adapter as a player 1 Following the illustration, ੬ pg. 23, "Connections To A TV Or VCR" , connect the camcorder and the VCR's input connectors. 2 Perform steps 1 ...
... 1/100th of a second. Black bands that occurs when shooting under a fluorescent light or mercury-vapour lamp is recommended to use this camcorder as the power supply instead of the battery pack. (੬ pg. 13) ● To choose whether or not the following displays appear on...33). • Indications other than date/time and time code Set "ON SCREEN" to PROGRAM AE - EDITING EN 39 Dubbing To A VCR To use the AC Adapter as a player 1 Following the illustration, ੬ pg. 23, "Connections To A TV Or VCR" , connect the camcorder and the VCR's input connectors. 2 Perform steps 1 ...
Instructions
Page 48
... 31, 33 Speaker Volume 21 EN Specifications 47 Spot Exposure Control .. 36 T Tape Speed (REC MODE) 31 33 Tele Macro 30 Telephoto Setting .......... 30 Time Code ........ 20, 32, 33 Tripod Mounting 15 Troubleshooting ...... 42, 43 V Video/Memory Switch .. 9, 31 W White Balance 37 Wind Cut 31 Wipe Or Fader Effects .. 38 Z Zooming...
... 31, 33 Speaker Volume 21 EN Specifications 47 Spot Exposure Control .. 36 T Tape Speed (REC MODE) 31 33 Tele Macro 30 Telephoto Setting .......... 30 Time Code ........ 20, 32, 33 Tripod Mounting 15 Troubleshooting ...... 42, 43 V Video/Memory Switch .. 9, 31 W White Balance 37 Wind Cut 31 Wipe Or Fader Effects .. 38 Z Zooming...


