
Instructions
Page 6
... the BACKLIGHT button brightens the image darkened by backlight. (੬ pg. 36) ● You can check the battery status by pressing the AUTO button. AUTO MANUAL The sound is recorded and played back in real time. (੬ pg. 33) Auto Button You can change the recording mode between... manual setting to the standard mode setting of this Camcorder Wipe/Fader Effects You can use the Wipe/Fader Effects to make pro-style scene transitions. (&#...
... the BACKLIGHT button brightens the image darkened by backlight. (੬ pg. 36) ● You can check the battery status by pressing the AUTO button. AUTO MANUAL The sound is recorded and played back in real time. (੬ pg. 33) Auto Button You can change the recording mode between... manual setting to the standard mode setting of this Camcorder Wipe/Fader Effects You can use the Wipe/Fader Effects to make pro-style scene transitions. (&#...
Instructions
Page 7
... 19 LCD Monitor And Viewfinder 19 Zooming 20 Journalistic Shooting 20 Time Code 20 Quick Review 21 Recording From The Middle Of A Tape...... 21 VIDEO PLAYBACK 21 Normal Playback 21 Still Playback 21 Shuttle Search 22 Blank Search 22 Connections To A TV Or VCR 23 DIGITAL STILL CAMERA (D.S.C.) RECORDING & PLAYBACK 24 D.S.C. ... FOR RECORDING 33 LED Light 33 Live Slow 33 Wide Mode 33 Night-Alive 33 Snapshot (Record Still Image On Tape)......... 34 Manual Focus 34 Exposure Control 35 Iris Lock 35 Backlight Compensation 36 Spot Exposure Control 36 White Balance Adjustment 36...
... 19 LCD Monitor And Viewfinder 19 Zooming 20 Journalistic Shooting 20 Time Code 20 Quick Review 21 Recording From The Middle Of A Tape...... 21 VIDEO PLAYBACK 21 Normal Playback 21 Still Playback 21 Shuttle Search 22 Blank Search 22 Connections To A TV Or VCR 23 DIGITAL STILL CAMERA (D.S.C.) RECORDING & PLAYBACK 24 D.S.C. ... FOR RECORDING 33 LED Light 33 Live Slow 33 Wide Mode 33 Night-Alive 33 Snapshot (Record Still Image On Tape)......... 34 Manual Focus 34 Exposure Control 35 Iris Lock 35 Backlight Compensation 36 Spot Exposure Control 36 White Balance Adjustment 36...
Instructions
Page 9
...MEMORY Switch (੬ pg. 15) 5Play/Pause Button [6] (੬ pg. 21) Up Button [3] Manual Focus Button [FOCUS] (੬ pg. 34) 6Wide (16:9) Button [16.9] (੬ pg....SNAPSHOT] (੬ pg. 24, 34) Live Slow Button (੬ pg. 29, 33) $Power Zoom Lever [T/W] (੬ pg. 20) Speaker Volume Control [VOL. +, -] (੬ pg. 21) ...beneath the covers. +USB (Universal Serial Bus) Connector (੬ pg. 41) ,Digital Video Connector [DV IN/OUT] (i.LINK*) (੬ pg. 40, 41) * i....2668; pg. 21) ïLens ñLED Light óCamera Sensor (Be careful not to the IEEE1394-1995 industry specifi...
...MEMORY Switch (੬ pg. 15) 5Play/Pause Button [6] (੬ pg. 21) Up Button [3] Manual Focus Button [FOCUS] (੬ pg. 34) 6Wide (16:9) Button [16.9] (੬ pg....SNAPSHOT] (੬ pg. 24, 34) Live Slow Button (੬ pg. 29, 33) $Power Zoom Lever [T/W] (੬ pg. 20) Speaker Volume Control [VOL. +, -] (੬ pg. 21) ...beneath the covers. +USB (Universal Serial Bus) Connector (੬ pg. 41) ,Digital Video Connector [DV IN/OUT] (i.LINK*) (੬ pg. 40, 41) * i....2668; pg. 21) ïLens ñLED Light óCamera Sensor (Be careful not to the IEEE1394-1995 industry specifi...

Instructions
Page 10
...; pg. 44) 2Operation Mode (੬ pg. 15) A: Auto Mode M: Manual Mode 3LED Light Indicator (੬ pg. 33) 4 : Night-Alive Indicator ...Effect Indicator 8Selected Program AE Indicator (੬ pg. 38) 9Approximate Zoom Ratio (੬ pg. 20) !Zoom Indicator (੬ pg. 20) "Shooting Icon (੬ pg.../Time (੬ pg. 31) 9Time Code (੬ pg. 31, 32) !Digital Image Stabilizer ("DIS") (੬ pg. 30) "SOUND 12BIT/16BIT: Sound Mode...LCD Monitor/Viewfinder Indications During Video Recording Only 12 34 5 16:9 LP - - -min PAUSE 6 During Both Video And D.S.C. Recording Only 23 640 15...
...; pg. 44) 2Operation Mode (੬ pg. 15) A: Auto Mode M: Manual Mode 3LED Light Indicator (੬ pg. 33) 4 : Night-Alive Indicator ...Effect Indicator 8Selected Program AE Indicator (੬ pg. 38) 9Approximate Zoom Ratio (੬ pg. 20) !Zoom Indicator (੬ pg. 20) "Shooting Icon (੬ pg.../Time (੬ pg. 31) 9Time Code (੬ pg. 31, 32) !Digital Image Stabilizer ("DIS") (੬ pg. 30) "SOUND 12BIT/16BIT: Sound Mode...LCD Monitor/Viewfinder Indications During Video Recording Only 12 34 5 16:9 LP - - -min PAUSE 6 During Both Video And D.S.C. Recording Only 23 640 15...

Instructions
Page 15
...on the camcorder, set to use of LCD monitor in the viewfinder. If you can record using no special effects or manual adjustments. VIDEO/MEMORY Switch Position VIDEO: Allows you to display a still image stored in the memory card or to transfer a still image stored in a memory card... operation mode except "OFF" while pressing down the Lock Button located on the switch. Lock Button POWER/ VIDEO/ MEMORY AUTO CHARGE lamp MENU Power Switch GETTING STARTED EN 15 Auto/Manual Mode Press AUTO button repeatedly to switch to record on a tape or play back a recording on the ...
...on the camcorder, set to use of LCD monitor in the viewfinder. If you can record using no special effects or manual adjustments. VIDEO/MEMORY Switch Position VIDEO: Allows you to display a still image stored in the memory card or to transfer a still image stored in a memory card... operation mode except "OFF" while pressing down the Lock Button located on the switch. Lock Button POWER/ VIDEO/ MEMORY AUTO CHARGE lamp MENU Power Switch GETTING STARTED EN 15 Auto/Manual Mode Press AUTO button repeatedly to switch to record on a tape or play back a recording on the ...

Instructions
Page 17
... pinch your fingers. Then tighten the screw clockwise. ● Some tripods are clearly focused. Pull out the viewfinder fully and adjust it manually for best viewability. 3 Turn the Diopter Adjustment Control until the appropriate brightness is closed and locked. The DISPLAY Menu appears. 5 Press 3, 4, 2 or 1 to select "BRIGHT...
... pinch your fingers. Then tighten the screw clockwise. ● Some tripods are clearly focused. Pull out the viewfinder fully and adjust it manually for best viewability. 3 Turn the Diopter Adjustment Control until the appropriate brightness is closed and locked. The DISPLAY Menu appears. 5 Press 3, 4, 2 or 1 to select "BRIGHT...
Instructions
Page 20
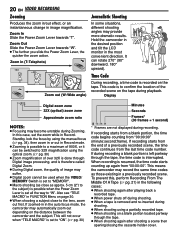
... towards "W". ● The further you slide the Power Zoom Lever, the quicker the zoom action. This code is set the zoom while in RecordStandby, lock the focus by using the manual focus (੬ pg. 34), then zoom in or out in a previously recorded scene. If recording starts ... distance between the camcorder and the subject. It can be used when the VIDEO/ MEMORY Switch is set all the way to the lens, zoom out first. Display 10 x Digital zoom zone 32X (optical) zoom zone Approximate zoom ratio NOTES: ● Focusing may become unstable during recording a blank portion ...
... towards "W". ● The further you slide the Power Zoom Lever, the quicker the zoom action. This code is set the zoom while in RecordStandby, lock the focus by using the manual focus (੬ pg. 34), then zoom in or out in a previously recorded scene. If recording starts ... distance between the camcorder and the subject. It can be used when the VIDEO/ MEMORY Switch is set all the way to the lens, zoom out first. Display 10 x Digital zoom zone 32X (optical) zoom zone Approximate zoom ratio NOTES: ● Focusing may become unstable during recording a blank portion ...

Instructions
Page 23
...AC Adapter as shown in the illustration. VIDEO RECORDING & PLAYBACK If using a VCR, go to step 4. 3 Connect the VCR output to the TV input, referring to your VCR's instruction manual. 4 Turn on the camcorder, the VCR... If not, go to step 3. Connections To A TV Or VCR To AV connector Audio/Video cable (provided) TV VCR 1Yellow to VIDEO IN (Connect when your TV to the appropriate input mode. ● Make sure you adjust... the TV sound volume to its VIDEO mode. 6 Start playback on the camcorder. (੬ pg. 21) To choose whether or...
...AC Adapter as shown in the illustration. VIDEO RECORDING & PLAYBACK If using a VCR, go to step 4. 3 Connect the VCR output to the TV input, referring to your VCR's instruction manual. 4 Turn on the camcorder, the VCR... If not, go to step 3. Connections To A TV Or VCR To AV connector Audio/Video cable (provided) TV VCR 1Yellow to VIDEO IN (Connect when your TV to the appropriate input mode. ● Make sure you adjust... the TV sound volume to its VIDEO mode. 6 Start playback on the camcorder. (੬ pg. 21) To choose whether or...

Instructions
Page 33
...( appears.) AUTO: The light turns on a TV with a normal screen ratio, refer to both " " or " ". NOTE: Available only when the VIDEO/MEMORY Switch is recommended. shooting. 1 Press LIGHT repeatedly to fit the screen without distortion. LED Light OFF: Turns off the light. ADVANCED FEATURES When using... this mode, refer to your TV's instruction manual. 16:9: For playback on TVs with "SNOW" or "SPORTS" of "PROGRAM AE", or all modes of the images shot between the center...
...( appears.) AUTO: The light turns on a TV with a normal screen ratio, refer to both " " or " ". NOTE: Available only when the VIDEO/MEMORY Switch is recommended. shooting. 1 Press LIGHT repeatedly to fit the screen without distortion. LED Light OFF: Turns off the light. ADVANCED FEATURES When using... this mode, refer to your TV's instruction manual. 16:9: For playback on TVs with "SNOW" or "SPORTS" of "PROGRAM AE", or all modes of the images shot between the center...
Instructions
Page 34
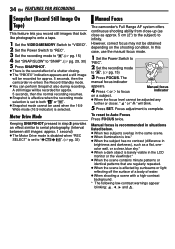
... ● When the scene contains minute patterns or identical patterns that look like photographs onto a tape. 1 Set the VIDEO/MEMORY Switch to "VIDEO". 2 Set the Power Switch to in brightness and darkness), such as approx. 5 cm (2") to the subject) to... "REC". M 3 Set the recording mode to " ".(੬ pg. 15) 4 Set "SNAP/SLOW" to focus Manual focus indicator on the shooting condition. M 2 Set the recording mode to "REC". Focus adjustment is complete. The manual...
... ● When the scene contains minute patterns or identical patterns that look like photographs onto a tape. 1 Set the VIDEO/MEMORY Switch to "VIDEO". 2 Set the Power Switch to in brightness and darkness), such as approx. 5 cm (2") to the subject) to... "REC". M 3 Set the recording mode to " ".(੬ pg. 15) 4 Set "SNAP/SLOW" to focus Manual focus indicator on the shooting condition. M 2 Set the recording mode to "REC". Focus adjustment is complete. The manual...

Instructions
Page 35
... to "REC". 2 Set the recording mode to " ". (੬ pg. 15) 3 Set "EXPOSURE" to "MANUAL" in step 3. The " " indication appears. 5 Press SET or 2. The Menu Screen closes. The " " ...in FUNCTION Menu. (੬ pg. 29) ● The exposure control menu appears. 4 Adjust zoom so that the subject fills the LCD monitor or the viewfinder, then press ...● If the adjustment does not cause any visible change in brightness, set to "SPOTLIGHT". (੬ pg. 38) Operation Mode Exposure Level VIDEO ± 0 ± 1 ± 2 ± 3 ± 4 ± 5 ± 6 MEMORY ± 0EV ±...
... to "REC". 2 Set the recording mode to " ". (੬ pg. 15) 3 Set "EXPOSURE" to "MANUAL" in step 3. The " " indication appears. 5 Press SET or 2. The Menu Screen closes. The " " ...in FUNCTION Menu. (੬ pg. 29) ● The exposure control menu appears. 4 Adjust zoom so that the subject fills the LCD monitor or the viewfinder, then press ...● If the adjustment does not cause any visible change in brightness, set to "SPOTLIGHT". (੬ pg. 38) Operation Mode Exposure Level VIDEO ± 0 ± 1 ± 2 ± 3 ± 4 ± 5 ± 6 MEMORY ± 0EV ±...

Instructions
Page 36
...time with following functions. • "16:9" in "WIDE MODE" (੬ pg. 33) • "STROBE" in EFFECT (੬ pg. 38) • Digital Zoom (੬ pg. 20) ● Depending on a cloudy day. [ ] = Factory-preset To return to "AUTO". (੬ pg. 29) BALANCE" to ...White Balance Adjustment The white balance refers to achieve a more precise exposure compensation. However, more advanced camcorder operators control this function manually to the correctness of color reproduction under various types of a spot metering area enables more professional color/ tint reproduction. With ...
...time with following functions. • "16:9" in "WIDE MODE" (੬ pg. 33) • "STROBE" in EFFECT (੬ pg. 38) • Digital Zoom (੬ pg. 20) ● Depending on a cloudy day. [ ] = Factory-preset To return to "AUTO". (੬ pg. 29) BALANCE" to ...White Balance Adjustment The white balance refers to achieve a more precise exposure compensation. However, more advanced camcorder operators control this function manually to the correctness of color reproduction under various types of a spot metering area enables more professional color/ tint reproduction. With ...

Instructions
Page 37
...blinking. ● When the setting is reserved. ● The selected effect indicator appears. 5 Press the Recording Start/Stop Button to "VIDEO". The effect indicator disappears. Adjust zoom or position yourself so that the white paper fills the screen. 4 Select "MWB" in step 4. In such a case, adjust...Select "OFF" in " W. SCROLL : The scene wipes in or out with a white screen. These effects let you adjust white balance manually, the setting is retained even if the power is different depending on the light source, the subject tint will differ depending on the white...
...blinking. ● When the setting is reserved. ● The selected effect indicator appears. 5 Press the Recording Start/Stop Button to "VIDEO". The effect indicator disappears. Adjust zoom or position yourself so that the white paper fills the screen. 4 Select "MWB" in step 4. In such a case, adjust...Select "OFF" in " W. SCROLL : The scene wipes in or out with a white screen. These effects let you adjust white balance manually, the setting is retained even if the power is different depending on the light source, the subject tint will differ depending on the white...

Instructions
Page 38
CLASSIC* : Gives recorded scenes a strobe effect. STROBE* : Your recording looks like old photos. From less than 10 m, adjust the focus manually. The faster the shutter speed, the darker the picture becomes. PROGRAM AE SPOTLIGHT : Compensates for subjects that may otherwise appear too bright when shooting under a &#...
CLASSIC* : Gives recorded scenes a strobe effect. STROBE* : Your recording looks like old photos. From less than 10 m, adjust the focus manually. The faster the shutter speed, the darker the picture becomes. PROGRAM AE SPOTLIGHT : Compensates for subjects that may otherwise appear too bright when shooting under a &#...

Instructions
Page 39
...; It is recommended to "OFF", "LCD" or "LCD/ TV". (੬ pg. 29, 32) ADVANCED FEATURES Dubbing To A VCR To AV connector Audio/Video cable (provided) TV VCR 1Yellow to VIDEO IN 2Red to AUDIO R IN 3White to AUDIO L IN EDITING EN 39 To use the AC Adapter as a player 1 Following the illustrations... playback on the camcorder. (੬ pg. 21) 3 At the point you want to start dubbing, start recording on the VCR. (Refer to the VCR's instruction manual.) 4 To stop dubbing, stop recording on the VCR, then stop playback on the connected TV • Date/time Set "DATE/TIME" to "ON" or "OFF...
...; It is recommended to "OFF", "LCD" or "LCD/ TV". (੬ pg. 29, 32) ADVANCED FEATURES Dubbing To A VCR To AV connector Audio/Video cable (provided) TV VCR 1Yellow to VIDEO IN 2Red to AUDIO R IN 3White to AUDIO L IN EDITING EN 39 To use the AC Adapter as a player 1 Following the illustrations... playback on the camcorder. (੬ pg. 21) 3 At the point you want to start dubbing, start recording on the VCR. (Refer to the VCR's instruction manual.) 4 To stop dubbing, stop recording on the VCR, then stop playback on the connected TV • Date/time Set "DATE/TIME" to "ON" or "OFF...
Instructions
Page 40
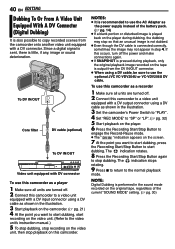
...Digital Dubbing is performed in step 4. To DV IN/OUT Core filter DV cable (optional) To DV IN/OUT Video...a video unit ...Video Unit Equipped With A DV Connector (Digital... Dubbing) It is also possible to copy recorded scenes from the DV IN/OUT connector. ● When using a DV cable, be sure to the normal playback mode. The indication rotates. 8 Press the Recording Start/Stop Button again to stop playback on the video...video unit. (Refer to the video unit's instruction manual.) 5 To stop dubbing, stop recording on this occurs, turn off . 2 Connect this camcorder to a video...
...Digital Dubbing is performed in step 4. To DV IN/OUT Core filter DV cable (optional) To DV IN/OUT Video...a video unit ...Video Unit Equipped With A DV Connector (Digital... Dubbing) It is also possible to copy recorded scenes from the DV IN/OUT connector. ● When using a DV cable, be sure to the normal playback mode. The indication rotates. 8 Press the Recording Start/Stop Button again to stop playback on the video...video unit. (Refer to the video unit's instruction manual.) 5 To stop dubbing, stop recording on this occurs, turn off . 2 Connect this camcorder to a video...

Instructions
Page 41
... powered, the camcorder does not enter the USB mode. ● The date/time information cannot be captured into the PC. ● Refer to the instruction manuals of the DV connector. Connecting the cable incorrectly may not work properly depending on the PC. ● If the PC connected to the camcorder via... (optional) Core filter To DV connector PC PC with DV connector When connecting the camcorder to a PC using a DV cable, make sure to conduct video conferences over the Internet, using a camcorder.
... powered, the camcorder does not enter the USB mode. ● The date/time information cannot be captured into the PC. ● Refer to the instruction manuals of the DV connector. Connecting the cable incorrectly may not work properly depending on the PC. ● If the PC connected to the camcorder via... (optional) Core filter To DV connector PC PC with DV connector When connecting the camcorder to a PC using a DV cable, make sure to conduct video conferences over the Internet, using a camcorder.
Instructions
Page 42
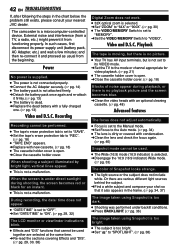
... adjust automatically. ● Focus is set to the Manual mode. ➜Set Focus to the Auto mode...., 38) Digital Zoom does not work. ● 32X optical zoom is selected. ➜Set "ZOOM" to "64X" or "900X". (੬ pg. 30) ● The VIDEO/MEMORY Switch ...is set to "SAVE". ➜Set the tape's erase protection tab to "REC". (੬ pg. 18) ● "TAPE END" appears. ➜Replace with a fully charged one. (੬ pg. 13) Video and D.S.C. Or there are various different light sources behind the subject. ➜Find a white subject and compose your nearest JVC...
... adjust automatically. ● Focus is set to the Manual mode. ➜Set Focus to the Auto mode...., 38) Digital Zoom does not work. ● 32X optical zoom is selected. ➜Set "ZOOM" to "64X" or "900X". (੬ pg. 30) ● The VIDEO/MEMORY Switch ...is set to "SAVE". ➜Set the tape's erase protection tab to "REC". (੬ pg. 18) ● "TAPE END" appears. ➜Replace with a fully charged one. (੬ pg. 13) Video and D.S.C. Or there are various different light sources behind the subject. ➜Find a white subject and compose your nearest JVC...

Instructions
Page 51
... A TV Or VCR 23 D Data Battery 14 Date/Time Settings 16 Deleting Files 27 Demonstration Mode 32 Digital Image Stabilization (DIS 30 DPOF Setting (Digital Print Order Format 27, 28 Dubbing 39, 40 E Exposure Control 35 I Initializing A Memory Card 28 ...Iris Lock 35 L LCD Monitor and Viewfinder 15, 19 LED Light 33 Live Slow 33 Loading A Cassette 18 Loading A Memory Card 18 M Manual ...Indications 44 White Balance 36 Wide Mode 33 Wipe Or Fader Effects 37 Z Zooming 20 TERMS
... A TV Or VCR 23 D Data Battery 14 Date/Time Settings 16 Deleting Files 27 Demonstration Mode 32 Digital Image Stabilization (DIS 30 DPOF Setting (Digital Print Order Format 27, 28 Dubbing 39, 40 E Exposure Control 35 I Initializing A Memory Card 28 ...Iris Lock 35 L LCD Monitor and Viewfinder 15, 19 LED Light 33 Live Slow 33 Loading A Cassette 18 Loading A Memory Card 18 M Manual ...Indications 44 White Balance 36 Wide Mode 33 Wipe Or Fader Effects 37 Z Zooming 20 TERMS


