Instruction Manual
Page 3
... the bottom and/or the back of the main unit. ● The rating information and safety caution of mercury. CAUTIONS: ● This camcorder is intended to alert the user to the presence of uninsulated "dangerous voltage" within the product's enclosure that contains a small amount of the...CR2025. Do not recharge, disassemble, heat above 100°C (212°F) or incinerate. Use the JVC BN-VF707U/VF714U/VF733U battery packs and, to recharge them or to supply power to the camcorder from children. ● Do not disassemble and do not dispose of a different standard. Danger of ...
... the bottom and/or the back of the main unit. ● The rating information and safety caution of mercury. CAUTIONS: ● This camcorder is intended to alert the user to the presence of uninsulated "dangerous voltage" within the product's enclosure that contains a small amount of the...CR2025. Do not recharge, disassemble, heat above 100°C (212°F) or incinerate. Use the JVC BN-VF707U/VF714U/VF733U battery packs and, to recharge them or to supply power to the camcorder from children. ● Do not disassemble and do not dispose of a different standard. Danger of ...

Instruction Manual
Page 4
...manufacturer's instructions. 8. Do not install near water. 6. Unplug this equipment in a bathroom or places with water. Carrying or holding the camcorder by the manufacturer. 10. Read these instructions. 3. Servicing is required when the apparatus has been damaged in any heat sources such as ... openings. CAUTION! IMPORTANT SAFETY INSTRUCTIONS 1. Heed all instructions. 5. Refer all sides to this apparatus near any way, such as power-supply cord or plug is used, use attachments/accessories specified by the viewfinder and/or the LCD monitor can cause eye injuries, as...
...manufacturer's instructions. 8. Do not install near water. 6. Unplug this equipment in a bathroom or places with water. Carrying or holding the camcorder by the manufacturer. 10. Read these instructions. 3. Servicing is required when the apparatus has been damaged in any heat sources such as ... openings. CAUTION! IMPORTANT SAFETY INSTRUCTIONS 1. Heed all instructions. 5. Refer all sides to this apparatus near any way, such as power-supply cord or plug is used, use attachments/accessories specified by the viewfinder and/or the LCD monitor can cause eye injuries, as...
Instruction Manual
Page 5
...Video Unit Equipped With A DV Connector (Digital Dubbing 44 Connection To A Personal Computer 45 Audio Dubbing (GR-D290 only 46 Insert Editing (GR-D290 only 46 REFERENCES 47 ...TROUBLESHOOTING 47 USER MAINTENANCE 51 CAUTIONS 52 SPECIFICATIONS 55 TERMS Back cover Snapshot 25 Interval Shooting 25 D.S.C. RECORDING 25 Basic Shooting (D.S.C. CONTENTS EN 5 GETTING STARTED 6 ADVANCED FEATURES 31 Index 6 Provided Accessories 11 Power...
...Video Unit Equipped With A DV Connector (Digital Dubbing 44 Connection To A Personal Computer 45 Audio Dubbing (GR-D290 only 46 Insert Editing (GR-D290 only 46 REFERENCES 47 ...TROUBLESHOOTING 47 USER MAINTENANCE 51 CAUTIONS 52 SPECIFICATIONS 55 TERMS Back cover Snapshot 25 Interval Shooting 25 D.S.C. RECORDING 25 Basic Shooting (D.S.C. CONTENTS EN 5 GETTING STARTED 6 ADVANCED FEATURES 31 Index 6 Provided Accessories 11 Power...
Instruction Manual
Page 7
...When using an optional conversion lens, it may cover this area and block the light.) e Remote Sensor (GR-D290 only) (੬ pg. 23) f Camera Sensor (Be careful not to the IEEE1394-1995 industry specification ... [AV] (੬ pg. 22, 43) R DC Input Connector [DC] (੬ pg. 13) S Digital Video Connector [DV IN/OUT] (i.Link*) (੬ pg. 44, 45) * i.Link refers to cover this area, a sensor... K Battery Release Button [PUSH BATT.] (੬ pg. 13) L Recording Start/Stop Button (੬ pg. 18) M Power Switch [A, M, PLAY, OFF] (੬ pg. 14) N Lock Button (੬ pg. 14) O Cassette Open/Eject ...
...When using an optional conversion lens, it may cover this area and block the light.) e Remote Sensor (GR-D290 only) (੬ pg. 23) f Camera Sensor (Be careful not to the IEEE1394-1995 industry specification ... [AV] (੬ pg. 22, 43) R DC Input Connector [DC] (੬ pg. 13) S Digital Video Connector [DV IN/OUT] (i.Link*) (੬ pg. 44, 45) * i.Link refers to cover this area, a sensor... K Battery Release Button [PUSH BATT.] (੬ pg. 13) L Recording Start/Stop Button (੬ pg. 18) M Power Switch [A, M, PLAY, OFF] (੬ pg. 14) N Lock Button (੬ pg. 14) O Cassette Open/Eject ...

Instruction Manual
Page 9
...D: Audio Dubbing 9D: Audio Dubbing Pause (Appear while a tape is running.) F Sound Input For Audio Dubbing (੬ pg. 46) (GR-D290 only) G Battery Remaining Power Indicator (੬ pg. 49) H Date/Time (੬ pg. 34, 36) GETTING STARTED EN 9 I GHT 100-0013 50m 4 3... a Operation Mode Indicator (੬ pg. 27) B Folder/File Number (੬ pg. 27) C Battery Remaining Power Indicator (੬ pg. 49) D Brightness Control Indicator (LCD monitor/ Viewfinder) (੬ pg. 16) GETTING STARTED Playback 1 2 BR I VOLUME: Volume Level Indicator...
...D: Audio Dubbing 9D: Audio Dubbing Pause (Appear while a tape is running.) F Sound Input For Audio Dubbing (੬ pg. 46) (GR-D290 only) G Battery Remaining Power Indicator (੬ pg. 49) H Date/Time (੬ pg. 34, 36) GETTING STARTED EN 9 I GHT 100-0013 50m 4 3... a Operation Mode Indicator (੬ pg. 27) B Folder/File Number (੬ pg. 27) C Battery Remaining Power Indicator (੬ pg. 49) D Brightness Control Indicator (LCD monitor/ Viewfinder) (੬ pg. 16) GETTING STARTED Playback 1 2 BR I VOLUME: Volume Level Indicator...
Instruction Manual
Page 13
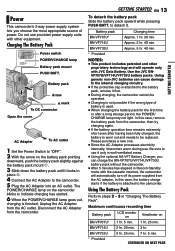
... min. Maximum continuous recording time Battery pack LCD monitor on Viewfinder on the camcorder blinks to use provided power supply units with JVC Data Battery. Using generic non-JVC batteries can charge the BN-VF707U/VF714U/VF733U battery pack without the camcorder. ● After 5 minutes has elapsed in Record-Standby mode with the cassette inserted...
... min. Maximum continuous recording time Battery pack LCD monitor on Viewfinder on the camcorder blinks to use provided power supply units with JVC Data Battery. Using generic non-JVC batteries can charge the BN-VF707U/VF714U/VF733U battery pack without the camcorder. ● After 5 minutes has elapsed in Record-Standby mode with the cassette inserted...
Instruction Manual
Page 14
...9679; Before extended use, it may be a problem with metals, as it is recommended that the camcorder's power is set various recording functions using the Menus. (੬ pg. 31) Failure to come in ...camcorder. MENU/DATA Power Switch Lock Button MA POWER/ CHARGE POWER/ CHARGE lamp VIDEO/MEMORY Choose the appropriate operation mode according to "OFF". 2) Open the LCD monitor fully. 3) Press DATA, and the battery status screen appears. ● It can result in a camcorder malfunction. WARNING! However this mode. OFF: Allows you to set to your nearest JVC...
...9679; Before extended use, it may be a problem with metals, as it is recommended that the camcorder's power is set various recording functions using the Menus. (੬ pg. 31) Failure to come in ...camcorder. MENU/DATA Power Switch Lock Button MA POWER/ CHARGE POWER/ CHARGE lamp VIDEO/MEMORY Choose the appropriate operation mode according to "OFF". 2) Open the LCD monitor fully. 3) Press DATA, and the battery status screen appears. ● It can result in a camcorder malfunction. WARNING! However this mode. OFF: Allows you to set to your nearest JVC...

Instruction Manual
Page 15
... is set to "A" or "M", you can be changed. (੬ pg. 31, 34, 36) 1 Set the Power Switch to "M" while pressing down the Lock Button located on or off the camcorder by opening/ closing the LCD monitor or pulling out/pushing in your operation. to select CAMERA DISPLAY BRIGHT ON...ADJ . Be sure to fasten the velcro strip to your thumb and fingers through the grip to easily operate the Recording Start/Stop Button, Power Switch and Power Zoom Lever. If you want to use of LCD monitor in the viewfinder. to select "BRETURN", and press MENU twice. Grip Adjustment ...
... is set to "A" or "M", you can be changed. (੬ pg. 31, 34, 36) 1 Set the Power Switch to "M" while pressing down the Lock Button located on or off the camcorder by opening/ closing the LCD monitor or pulling out/pushing in your operation. to select CAMERA DISPLAY BRIGHT ON...ADJ . Be sure to fasten the velcro strip to your thumb and fingers through the grip to easily operate the Recording Start/Stop Button, Power Switch and Power Zoom Lever. If you want to use of LCD monitor in the viewfinder. to select "BRETURN", and press MENU twice. Grip Adjustment ...

Instruction Manual
Page 16
... a tripod, align the direction stud and screw to select "BRIGHT", and press MENU. to the mounting socket and stud hole on the camcorder. The cassette holder opens automatically. ● Do not touch internal components. 2 Insert or remove a tape and press "PUSH HERE" to close the ... fully and adjust it locks. OPEN/EJECT Make sure the window side is closed and locked. touching other parts may cause your fingers. The camcorder needs to be powered up to "M" or "PLAY" while pressing down the Lock Button located on the switch. 2 Open the LCD monitor fully. (੬ pg...
... a tripod, align the direction stud and screw to select "BRIGHT", and press MENU. to the mounting socket and stud hole on the camcorder. The cassette holder opens automatically. ● Do not touch internal components. 2 Insert or remove a tape and press "PUSH HERE" to close the ... fully and adjust it locks. OPEN/EJECT Make sure the window side is closed and locked. touching other parts may cause your fingers. The camcorder needs to be powered up to "M" or "PLAY" while pressing down the Lock Button located on the switch. 2 Open the LCD monitor fully. (੬ pg...

Instruction Manual
Page 17
...: Do not insert or remove the memory card while the camcorder is turned on the side of the memory card in the camcorder at the time of memory cards are not compatible with a fully charged one or use AC power before continuing. 3 Close the cassette holder cover firmly until ...cassette holder cover and try again. NOTES: ● Some brands of purchase. (GR-D290 only) Card Cover (MEMORY CARD) Label Memory card Write/erase protection tab Clipped edge 1 Make sure the camcorder's power is off then on this camcorder. After the memory card comes out of the label. 4 Close the card cover...
...: Do not insert or remove the memory card while the camcorder is turned on the side of the memory card in the camcorder at the time of memory cards are not compatible with a fully charged one or use AC power before continuing. 3 Close the cassette holder cover firmly until ...cassette holder cover and try again. NOTES: ● Some brands of purchase. (GR-D290 only) Card Cover (MEMORY CARD) Label Memory card Write/erase protection tab Clipped edge 1 Make sure the camcorder's power is off then on this camcorder. After the memory card comes out of the label. 4 Close the card cover...

Instruction Manual
Page 18
...time required to "Recording From The Middle Of A Tape" (੬ pg. 20). ● To turn the camcorder on the switch. ● The POWER/CHARGE lamp lights and the camcorder enters the Record-Standby mode. However, this , refer to calculate and display the remaining tape length, and the accuracy... of tape used. m" means the camcorder is not a malfunction. (੬ pg. 48) NOTES: ● If the Record-Standby mode continues for 5 minutes, the camcorder's power shuts off , ੬ pg. 31, 33. Approximate recording time Tape 30 min. 60...
...time required to "Recording From The Middle Of A Tape" (੬ pg. 20). ● To turn the camcorder on the switch. ● The POWER/CHARGE lamp lights and the camcorder enters the Record-Standby mode. However, this , refer to calculate and display the remaining tape length, and the accuracy... of tape used. m" means the camcorder is not a malfunction. (੬ pg. 48) NOTES: ● If the Record-Standby mode continues for 5 minutes, the camcorder's power shuts off , ੬ pg. 31, 33. Approximate recording time Tape 30 min. 60...

Instruction Manual
Page 19
...direction. Zoom in Record mode. ● Zooming is set to "MEMORY". ● Macro shooting (as close to the subject) is possible when the Power Zoom Lever is interrupted. Time Code During recording, a time code is recorded on the tape during shooting. ● When shooting using the optical zoom... NEXT PAGE In this , perform Recording From The Middle Of A Tape (੬ pg. 20) in the auto focus mode, the camcorder may suffer. ● Digital zoom cannot be used when the VIDEO/ MEMORY Switch is possible to a maximum of image may automatically zoom out depending on a blank portion...
...direction. Zoom in Record mode. ● Zooming is set to "MEMORY". ● Macro shooting (as close to the subject) is possible when the Power Zoom Lever is interrupted. Time Code During recording, a time code is recorded on the tape during shooting. ● When shooting using the optical zoom... NEXT PAGE In this , perform Recording From The Middle Of A Tape (੬ pg. 20) in the auto focus mode, the camcorder may suffer. ● Digital zoom cannot be used when the VIDEO/ MEMORY Switch is possible to a maximum of image may automatically zoom out depending on a blank portion...

Instruction Manual
Page 20
... time code is displayed only when "TIME CODE" is set the Power Switch to "OFF", then to "PLAY". ● When a cable is connected to the S/AV connector, the sound is not heard from a battery, the camcorder shuts off automatically. VIDEO PLAYBACK Normal Playback 5 3 4/9 Speaker 8... VOL. +/- Lock Button MA Power Switch MENU VIDEO/MEMORY 1 Load a cassette. (੬ pg. 16) 2 Set the VIDEO/MEMORY Switch to...
... time code is displayed only when "TIME CODE" is set the Power Switch to "OFF", then to "PLAY". ● When a cable is connected to the S/AV connector, the sound is not heard from a battery, the camcorder shuts off automatically. VIDEO PLAYBACK Normal Playback 5 3 4/9 Speaker 8... VOL. +/- Lock Button MA Power Switch MENU VIDEO/MEMORY 1 Load a cassette. (੬ pg. 16) 2 Set the VIDEO/MEMORY Switch to...

Instruction Manual
Page 21
.... ● If the beginning or end of the tape is reached during Blank Search, the camcorder stops automatically. ● A blank portion which is at a blank portion, the camcorder searches in either direction during Shuttle Search. The Menu Screen appears. 5 Press MENU to select ... the VIDEO/MEMORY Switch to "VIDEO". 3 Set the Power Switch to select "EXECUTE", and press MENU. ● The "BLANK SEARCH" indication appears and the camcorder automatically starts reverse or forward search, then stops at a recorded portion, the camcorder searches in the middle of the screen. to "PLAY...
.... ● If the beginning or end of the tape is reached during Blank Search, the camcorder stops automatically. ● A blank portion which is at a blank portion, the camcorder searches in either direction during Shuttle Search. The Menu Screen appears. 5 Press MENU to select ... the VIDEO/MEMORY Switch to "VIDEO". 3 Set the Power Switch to select "EXECUTE", and press MENU. ● The "BLANK SEARCH" indication appears and the camcorder automatically starts reverse or forward search, then stops at a recorded portion, the camcorder searches in the middle of the screen. to "PLAY...
Instruction Manual
Page 22
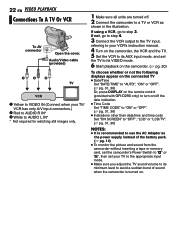
.... 6 Start playback on the camcorder. (੬ pg. 20) To choose whether or not the following displays appear on the connected TV ● Date/Time Set "DATE/TIME" to "AUTO", "ON" or "OFF". (੬ pg. 31, 36) Or, press DISPLAY on the remote control (provided with GR-D290 only) to turn on . ...battery pack. (੬ pg. 14) ● To monitor the picture and sound from the camcorder without inserting a tape or memory card, set the camcorder's Power Switch to "A" or "M", then set your VCR's instruction manual. 4 Turn on the camcorder, the VCR and the TV. 5 Set the VCR to its AUX input mode, and ...
.... 6 Start playback on the camcorder. (੬ pg. 20) To choose whether or not the following displays appear on the connected TV ● Date/Time Set "DATE/TIME" to "AUTO", "ON" or "OFF". (੬ pg. 31, 36) Or, press DISPLAY on the remote control (provided with GR-D290 only) to turn on . ...battery pack. (੬ pg. 14) ● To monitor the picture and sound from the camcorder without inserting a tape or memory card, set the camcorder's Power Switch to "A" or "M", then set your VCR's instruction manual. 4 Turn on the camcorder, the VCR and the TV. 5 Set the VCR to its AUX input mode, and ...

Instruction Manual
Page 23
...; pg. 24) The following buttons are available when the camcorder's Power Switch is directly exposed to "PLAY") A Infrared beam transmitting window ● Transmits the beam signal. VIDEO RECORDING & PLAYBACK Playback Using The Remote Control (GR-D290 only) The Full-Function Remote Control Unit can operate this camcorder from a distance as well as the Recording Start...
...; pg. 24) The following buttons are available when the camcorder's Power Switch is directly exposed to "PLAY") A Infrared beam transmitting window ● Transmits the beam signal. VIDEO RECORDING & PLAYBACK Playback Using The Remote Control (GR-D290 only) The Full-Function Remote Control Unit can operate this camcorder from a distance as well as the Recording Start...
Instruction Manual
Page 25
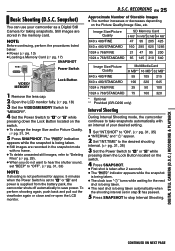
...pg. 18) 3 Set the VIDEO/MEMORY Switch to "MEMORY". 4 Set the Power Switch to stop Interval Shooting. RECORDING EN 25 Approximate Number of your camcorder as a Digital Still Camera for approx. 5 minutes when the Power Switch is being taken. ● Still images are stored in step 2 has ...190 320 645 1024 x 768/FINE 25 50 100 1024 x 768/STANDARD 75 160 320 * Optional ** Provided (GR-D290 only) Interval Shooting During Interval Shooting mode, the camcorder continues to take snapshots automatically with no frame. ● To delete unwanted still images, refer to "Deleting Files" ...
...pg. 18) 3 Set the VIDEO/MEMORY Switch to "MEMORY". 4 Set the Power Switch to stop Interval Shooting. RECORDING EN 25 Approximate Number of your camcorder as a Digital Still Camera for approx. 5 minutes when the Power Switch is being taken. ● Still images are stored in step 2 has ...190 320 645 1024 x 768/FINE 25 50 100 1024 x 768/STANDARD 75 160 320 * Optional ** Provided (GR-D290 only) Interval Shooting During Interval Shooting mode, the camcorder continues to take snapshots automatically with no frame. ● To delete unwanted still images, refer to "Deleting Files" ...

Instruction Manual
Page 26
... to "OFF" in the memory card. D.S.C. to display the next file. Playback Zoom (GR-D290 only) Available only with the Macintosh, it is displayed. 4 Press - To create movie ...1024 x 768" will stop if the battery runs out of power or the Memory Card becomes full. ● The function "Animation" in the provided software "Digital Photo Navigator" can view the stored images, one at a time..."PLAY" while pressing down the Lock Button located on the card with another device with the camcorder are automatically numbered, then stored in numerical order in step 1. Press + to display the...
... to "OFF" in the memory card. D.S.C. to display the next file. Playback Zoom (GR-D290 only) Available only with the Macintosh, it is displayed. 4 Press - To create movie ...1024 x 768" will stop if the battery runs out of power or the Memory Card becomes full. ● The function "Animation" in the provided software "Digital Photo Navigator" can view the stored images, one at a time..."PLAY" while pressing down the Lock Button located on the card with another device with the camcorder are automatically numbered, then stored in numerical order in step 1. Press + to display the...

Instruction Manual
Page 27
... 1 2 3 the frame to select "OFF", and press MENU. The Index number selected file is displayed. 100-0013 MENU 50m D I SPLAY OFF ON RETURN Battery remaining power indicator DIGITAL STILL CAMERA (D.S.C.) RECORDING & PLAYBACK Index Playback Of Files 1 Perform steps 1 - 3 in the memory card at a time. to the desired 4 5 6 file. ● Press - Operation mode...
... 1 2 3 the frame to select "OFF", and press MENU. The Index number selected file is displayed. 100-0013 MENU 50m D I SPLAY OFF ON RETURN Battery remaining power indicator DIGITAL STILL CAMERA (D.S.C.) RECORDING & PLAYBACK Index Playback Of Files 1 Perform steps 1 - 3 in the memory card at a time. to the desired 4 5 6 file. ● Press - Operation mode...
Instruction Manual
Page 28
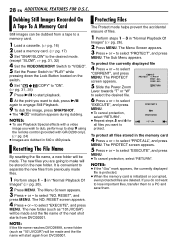
... PROT . 28 EN ADDITIONAL FEATURES FOR D.S.C. The Menu Screen appears. 3 Press + or - RESET screen appears. 4 Press + or - ALL 5 Slide the Power Zoom RETURN Lever towards "T" or "W" to select "NO. to step 9 using the remote control (provided with a video image you want to lose important files, ... the file name of files. 1 Perform steps 1 - 3 in the new folder. AL L CANC . NOTES: ● To use Playback Special effects with GR-D290 only). (੬ pg. 24) ● Images are deleted. RESET", and press MENU. To protect all files you do not want to dub, press 4/9...
... PROT . 28 EN ADDITIONAL FEATURES FOR D.S.C. The Menu Screen appears. 3 Press + or - RESET screen appears. 4 Press + or - ALL 5 Slide the Power Zoom RETURN Lever towards "T" or "W" to select "NO. to step 9 using the remote control (provided with a video image you want to lose important files, ... the file name of files. 1 Perform steps 1 - 3 in the new folder. AL L CANC . NOTES: ● To use Playback Special effects with GR-D290 only). (੬ pg. 24) ● Images are deleted. RESET", and press MENU. To protect all files you do not want to dub, press 4/9...


