Instruction Manual
Page 1
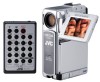
AUTOMATIC DEMONSTRATION ENGLISH 9 DIGITAL VIDEO CAMERA GR-DVP9 GETTING STARTED 10 Please visit our Homepage on the World Wide Web for Digital Video Camera: http://www.jvc-victor.co.jp/english/cyber/ VIDEO RECORDING & PLAYBACK 17 For Accessories: http://www.jvc-victor.co.jp/english/accessory/ DIGITAL STILL CAMERA (D.S.C.) RECORDING & 23 PLAYBACK INSTRUCTIONS ADVANCED FEATURES 31 REFERENCES 64 TERMS 82 EN LYT1147-001A
AUTOMATIC DEMONSTRATION ENGLISH 9 DIGITAL VIDEO CAMERA GR-DVP9 GETTING STARTED 10 Please visit our Homepage on the World Wide Web for Digital Video Camera: http://www.jvc-victor.co.jp/english/cyber/ VIDEO RECORDING & PLAYBACK 17 For Accessories: http://www.jvc-victor.co.jp/english/accessory/ DIGITAL STILL CAMERA (D.S.C.) RECORDING & 23 PLAYBACK INSTRUCTIONS ADVANCED FEATURES 31 REFERENCES 64 TERMS 82 EN LYT1147-001A
Instruction Manual
Page 24
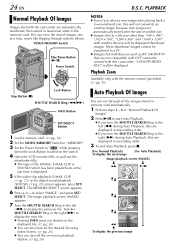
...5 If the video clip playback (E-MAIL CLIP, ੬ pg. 25) or the digital sound playback (SOUND, ੬ pg. 25) screen appears, press SET/ SELECT. Playback Zoom Available only with devices (such as JVC GR-DVX70) that are automatically numbered, then stored in numerical order in "Normal Playback Of ...file size other than "640 x 480", "1024 x 768", "1280 x 960" and "1600 x 1200" with this camcorder; PLAYBACK Normal Playback Of Images Images shot with the camcorder are not compatible with DCF cannot be viewed with another devices will be transferred to a PC. ● Images shot with ...
...5 If the video clip playback (E-MAIL CLIP, ੬ pg. 25) or the digital sound playback (SOUND, ੬ pg. 25) screen appears, press SET/ SELECT. Playback Zoom Available only with devices (such as JVC GR-DVX70) that are automatically numbered, then stored in numerical order in "Normal Playback Of ...file size other than "640 x 480", "1024 x 768", "1280 x 960" and "1600 x 1200" with this camcorder; PLAYBACK Normal Playback Of Images Images shot with the camcorder are not compatible with DCF cannot be viewed with another devices will be transferred to a PC. ● Images shot with ...

Instruction Manual
Page 84
EN GR-DVP9 ®Registered Trademark owned by VICTOR COMPANY OF JAPAN, LTD. AA/AG/AH/AC COPYRIGHT© 2003 VICTOR COMPANY OF JAPAN, LTD. Printed in Japan 0303-FO-ID-VP
EN GR-DVP9 ®Registered Trademark owned by VICTOR COMPANY OF JAPAN, LTD. AA/AG/AH/AC COPYRIGHT© 2003 VICTOR COMPANY OF JAPAN, LTD. Printed in Japan 0303-FO-ID-VP
Instruction Manual
Page 92
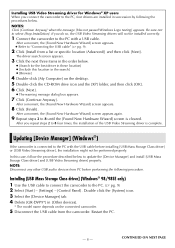
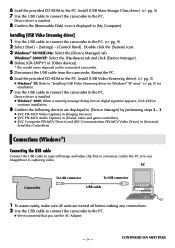
...Search for Windows® XP users When you do so, the USB Video Streaming drivers will not be installed correctly. 1 Connect the camcorder to the PC with the USB cable before performing the following procedure. After a moment, the [Found New Hardware Wizard] screen appears. ...Finish]. Updating [Device Manager] (Windows®) If the camcorder is complete. Double click the [System] icon. 3 Select the [Device Manager] tab. 4 Delete [GR-DVP9*] in the search] ● [Browse] 4 Double-click [My Computer] on the connected camcorder. 5 Disconnect the USB cable from PC before installing [USB...
...Search for Windows® XP users When you do so, the USB Video Streaming drivers will not be installed correctly. 1 Connect the camcorder to the PC with the USB cable before performing the following procedure. After a moment, the [Found New Hardware Wizard] screen appears. ...Finish]. Updating [Device Manager] (Windows®) If the camcorder is complete. Double click the [System] icon. 3 Select the [Device Manager] tab. 4 Delete [GR-DVP9*] in the search] ● [Browse] 4 Double-click [My Computer] on the connected camcorder. 5 Disconnect the USB cable from PC before installing [USB...
Instruction Manual
Page 93
... Load the provided CD-ROM in [Other devices]. * The model name depends on digital signature appears, click [OK] to continue installation. 8 Confirm the following devices are...3. ● [JVC PIX-MCV Video Capture] in [Imaging Devices] ● [JVC PIX-MCV Audio Capture] in [Sound, video and game controllers] ● [JVC Composite PIX-MCV Device] and [JVC Communication PIX-MCV...Streaming driver] 1 Use the USB cable to connect the camcorder to the PC. Windows® 2000/XP: Select the [Hardware] tab and click [Device Manager]. 4 Delete [GR-DVP9*] in the PC. Double click the [System] icon. ...
... Load the provided CD-ROM in [Other devices]. * The model name depends on digital signature appears, click [OK] to continue installation. 8 Confirm the following devices are...3. ● [JVC PIX-MCV Video Capture] in [Imaging Devices] ● [JVC PIX-MCV Audio Capture] in [Sound, video and game controllers] ● [JVC Composite PIX-MCV Device] and [JVC Communication PIX-MCV...Streaming driver] 1 Use the USB cable to connect the camcorder to the PC. Windows® 2000/XP: Select the [Hardware] tab and click [Device Manager]. 4 Delete [GR-DVP9*] in the PC. Double click the [System] icon. ...


