Instruction Manual
Page 4
... surfaces may result in fire, electric shock or other products (including amplifiers) that could result in safe operating condition. HOW TO USE THIS INSTRUCTION MANUAL • The Index on pages 7 - 11 illustrates the controls and connections on the front and rear panel, the front display panel and the...tub, in its normal operation. Never spill liquid of any mounting of other hazards. e.If the product has been dropped or damaged in the manual. • The A mark signals a reference to service it yourself as they may expose you are used or explained in any kind into the...
... surfaces may result in fire, electric shock or other products (including amplifiers) that could result in safe operating condition. HOW TO USE THIS INSTRUCTION MANUAL • The Index on pages 7 - 11 illustrates the controls and connections on the front and rear panel, the front display panel and the...tub, in its normal operation. Never spill liquid of any mounting of other hazards. e.If the product has been dropped or damaged in the manual. • The A mark signals a reference to service it yourself as they may expose you are used or explained in any kind into the...
Instruction Manual
Page 5
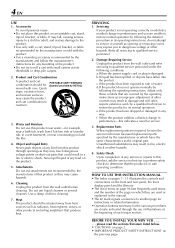
... back display. Contact your nearest JVC dealer. • During VHS playback, if there is fuzzy. (VHS playback) VHS playback Early symptom D-VHS playback Late symptom Block noise Still image Black screen Use a cleaning tape designed specifically for D-VHS video heads (JVC D-VHS video head cleaner DFC-2) to clean... tracking problem, the picture may cause picture disturbance. Do not place such appliance on the VCR or Remote. 4. Adjust the tracking manually (A page 30). DO NOT expose the apparatus to extreme temperatures or humidity. ... There is no sound. • Mosaic (block)...
... back display. Contact your nearest JVC dealer. • During VHS playback, if there is fuzzy. (VHS playback) VHS playback Early symptom D-VHS playback Late symptom Block noise Still image Black screen Use a cleaning tape designed specifically for D-VHS video heads (JVC D-VHS video head cleaner DFC-2) to clean... tracking problem, the picture may cause picture disturbance. Do not place such appliance on the VCR or Remote. 4. Adjust the tracking manually (A page 30). DO NOT expose the apparatus to extreme temperatures or humidity. ... There is no sound. • Mosaic (block)...
Instruction Manual
Page 6
... 34 Viewing slow motion picture 34 RECORDING 35 Basic Recording 35 D-VHS Recording 35 S-VHS/VHS Recording 36 Basic Recording Features 37 Changing display information 37 Specifying recording length 37 Watching one program while recording another ...... 38 Showing on-screen display 38 TIMER RECORDING 40 VCR Plus+ C3® ... Canadian V-Chip ratings 72 Unrated programs 73 Set lock code 73 Viewing a blocked channel 73 Closed Caption 75 Digital Auto Setting 75 Digital Manual Setting 76 JLIP ID Number Setting 77 i.LINK Set Up 78 EDITING 80 i.LINK/DV Connections 80 S-VIDEO...
... 34 Viewing slow motion picture 34 RECORDING 35 Basic Recording 35 D-VHS Recording 35 S-VHS/VHS Recording 36 Basic Recording Features 37 Changing display information 37 Specifying recording length 37 Watching one program while recording another ...... 38 Showing on-screen display 38 TIMER RECORDING 40 VCR Plus+ C3® ... Canadian V-Chip ratings 72 Unrated programs 73 Set lock code 73 Viewing a blocked channel 73 Closed Caption 75 Digital Auto Setting 75 Digital Manual Setting 76 JLIP ID Number Setting 77 i.LINK Set Up 78 EDITING 80 i.LINK/DV Connections 80 S-VIDEO...
Instruction Manual
Page 8
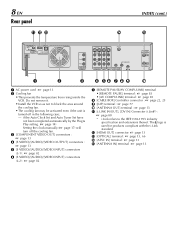
... VCR. if the Auto Clock Set and Auto Tuner Set have not been completed automatically by the Plug & Play setting. (A page 14) Setting the clock manually (A page 17) will turn off in the following case; - L [HDMI OUT] connector: A page 13 M [OPTICAL] terminal : A page 13, 66 N [ATSC IN] ...IN] terminal : A page 13 8 EN Rear panel KLM INDEX (cont.) N O i.LINK IN/OUT DV IN HDMI OUT OPTICAL S400 D-THEATER REGION 1 PCM/STREAM DIGITAL AUDIO OUT Y PB/CB PR/CR COMPONENT VIDEO OUT S-VIDEO S-VIDEO ATSC IN VIDEO VIDEO L AUDIO R OUTPUT L AUDIO R L-1 L-2 INPUT CABLE BOX REMOTE PAUSE...
... VCR. if the Auto Clock Set and Auto Tuner Set have not been completed automatically by the Plug & Play setting. (A page 14) Setting the clock manually (A page 17) will turn off in the following case; - L [HDMI OUT] connector: A page 13 M [OPTICAL] terminal : A page 13, 66 N [ATSC IN] ...IN] terminal : A page 13 8 EN Rear panel KLM INDEX (cont.) N O i.LINK IN/OUT DV IN HDMI OUT OPTICAL S400 D-THEATER REGION 1 PCM/STREAM DIGITAL AUDIO OUT Y PB/CB PR/CR COMPONENT VIDEO OUT S-VIDEO S-VIDEO ATSC IN VIDEO VIDEO L AUDIO R OUTPUT L AUDIO R L-1 L-2 INPUT CABLE BOX REMOTE PAUSE...
Instruction Manual
Page 14
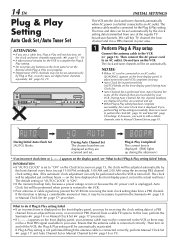
...We call this function is taking a considerable amount of time, it is a PBS channel in progress. • Digital tuner (DTV) channels may not be necessary to perform the Semiauto (A page 16) or Manual Clock Set (A page 17) procedure. A Perform Plug & Play setup Connect the antenna cable to an AC ...outlet. If this TV channel the host channel and it may be set digital tuner channels separately. (A page 20, 21) IN F-1 ...
...We call this function is taking a considerable amount of time, it is a PBS channel in progress. • Digital tuner (DTV) channels may not be necessary to perform the Semiauto (A page 16) or Manual Clock Set (A page 17) procedure. A Perform Plug & Play setup Connect the antenna cable to an AC ...outlet. If this TV channel the host channel and it may be set digital tuner channels separately. (A page 20, 21) IN F-1 ...
Instruction Manual
Page 15
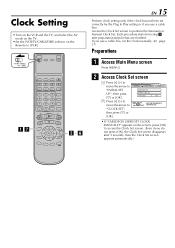
Each procedure starts from step C after 5 seconds, then the Clock Set screen appears automatically.) Access the Clock Set screen to perform the Semiauto or Manual Clock Set. B Press [D E] to move the arrow to "INITIAL SET UP", then press [G] or [OK]. FUNCTION SET UP TUNER SET UP INITIAL SET... move the arrow to "CLOCK SET", then press [G] or [OK]. F EN 15 Perform clock setting only if the clock has not been set the clock manually. (A page 17) Preparations A Access Main Menu screen Press [MENU]. If you use a cable box. VCR CABLE TV /DBS A G B - Clock Setting • Turn ...
Each procedure starts from step C after 5 seconds, then the Clock Set screen appears automatically.) Access the Clock Set screen to perform the Semiauto or Manual Clock Set. B Press [D E] to move the arrow to "INITIAL SET UP", then press [G] or [OK]. FUNCTION SET UP TUNER SET UP INITIAL SET... move the arrow to "CLOCK SET", then press [G] or [OK]. F EN 15 Perform clock setting only if the clock has not been set the clock manually. (A page 17) Preparations A Access Main Menu screen Press [MENU]. If you use a cable box. VCR CABLE TV /DBS A G B - Clock Setting • Turn ...
Instruction Manual
Page 16
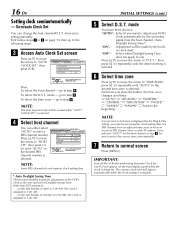
...[D E] repeatedly until the desired setting is selected. FUNCTION SET UP TUNER SET UP INITIAL SET UP CLOCK SET GUIDE CHANNEL OTHER AUTO CLOCK SET MANUAL CLOCK SET AUTO CLOCK ON MENU EXIT OK SELECT WITH ARROW KEYS SELECT THEN PRESS [OK] Then; NOTE: The time set . To select the...select "AUTO" or enter a PBS channel number. Select when Daylight Saving Time does not apply to you want to select the correct time zone manually. IMPORTANT: Turn off the VCR after performing Semiauto Clock Set. [AUTO] will appear automatically when the clock setting is being set previously will be...
...[D E] repeatedly until the desired setting is selected. FUNCTION SET UP TUNER SET UP INITIAL SET UP CLOCK SET GUIDE CHANNEL OTHER AUTO CLOCK SET MANUAL CLOCK SET AUTO CLOCK ON MENU EXIT OK SELECT WITH ARROW KEYS SELECT THEN PRESS [OK] Then; NOTE: The time set . To select the...select "AUTO" or enter a PBS channel number. Select when Daylight Saving Time does not apply to you want to select the correct time zone manually. IMPORTANT: Turn off the VCR after performing Semiauto Clock Set. [AUTO] will appear automatically when the clock setting is being set previously will be...

Instruction Manual
Page 17
... press the button, the time zone changes as the setting for EPG (A page 51). Select when Daylight Saving Time does not apply to "MANUAL CLOCK SET", then press [OK]. Manual Clock Set First follow steps A to B on page 15, then go to select "ON" or "OFF". D Set time Press [D E] ...is selected. Select time zone I Press [FG] to move the highlight bar to "D.S.T.", then press [D E] to the following steps. EN 17 Setting clock manually - Adjustment will be made by the built-in 15-day intervals. G NOTE: When you want to the beginning) Start clock Press [MENU] and normal screen...
... press the button, the time zone changes as the setting for EPG (A page 51). Select when Daylight Saving Time does not apply to "MANUAL CLOCK SET", then press [OK]. Manual Clock Set First follow steps A to B on page 15, then go to select "ON" or "OFF". D Set time Press [D E] ...is selected. Select time zone I Press [FG] to move the highlight bar to "D.S.T.", then press [D E] to the following steps. EN 17 Setting clock manually - Adjustment will be made by the built-in 15-day intervals. G NOTE: When you want to the beginning) Start clock Press [MENU] and normal screen...

Instruction Manual
Page 18
...TUNER SET UP INITIAL SET UP TUNER SET CABLE SET UP DBS SET UP BAND TV AUTO CH SET MANUAL CH SET MENU OK SELECT WITH ARROW KEYS EXIT SELECT THEN PRESS [OK] FUNCTION SET UP TUNER ...END MENU OK SELECT WITH ARROW KEYS EXIT SELECT THEN PRESS [OK] D Return to add or delete channels, use Manual Channel Set (Analog) (A page 19). 18 EN Analog Tuner Setting •Turn on the VCR and the TV,... the [VCR/TV/CABLE/DBS] selector on the Remote to start again, or select "EXIT". AUTO CH SET MANUAL CH SET B Press [D E] to MENU move the arrow to TUNER SET CABLE SET UP DBS SET UP "TUNER...
...TUNER SET UP INITIAL SET UP TUNER SET CABLE SET UP DBS SET UP BAND TV AUTO CH SET MANUAL CH SET MENU OK SELECT WITH ARROW KEYS EXIT SELECT THEN PRESS [OK] FUNCTION SET UP TUNER ...END MENU OK SELECT WITH ARROW KEYS EXIT SELECT THEN PRESS [OK] D Return to add or delete channels, use Manual Channel Set (Analog) (A page 19). 18 EN Analog Tuner Setting •Turn on the VCR and the TV,... the [VCR/TV/CABLE/DBS] selector on the Remote to start again, or select "EXIT". AUTO CH SET MANUAL CH SET B Press [D E] to MENU move the arrow to TUNER SET CABLE SET UP DBS SET UP "TUNER...
Instruction Manual
Page 19
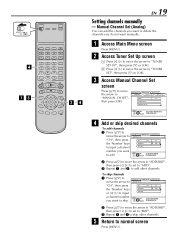
...", then press [D E] to set to add other channels. EXIT OK SELECT WITH ARROW SELECT OR NUMBER KEYS B Press [FG] to move the arrow to MANUAL CH SET INITIAL SET UP "CH", then press CH [TV] 46 the 'Number' keys ADD/SKIP SKIP RETURN or [D E] to input a channel number... and B to "ADD". B Access Tuner Set Up screen A Press [D E] to move the arrow to "TUNER SET UP", then press [G] or [OK]. D EN 19 Setting channels manually - B Press [D E] to move the arrow to "TUNER SET", then press [G] or [OK]. C Repeat A and B to normal screen Press [MENU]. E Return to skip other ...
...", then press [D E] to set to add other channels. EXIT OK SELECT WITH ARROW SELECT OR NUMBER KEYS B Press [FG] to move the arrow to MANUAL CH SET INITIAL SET UP "CH", then press CH [TV] 46 the 'Number' keys ADD/SKIP SKIP RETURN or [D E] to input a channel number... and B to "ADD". B Access Tuner Set Up screen A Press [D E] to move the arrow to "TUNER SET UP", then press [G] or [OK]. D EN 19 Setting channels manually - B Press [D E] to move the arrow to "TUNER SET", then press [G] or [OK]. C Repeat A and B to normal screen Press [MENU]. E Return to skip other ...
Instruction Manual
Page 20
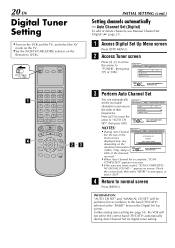
...performed in the order of the menu screen displayed may vary AUTO CHANNEL SET SCANNING... NO SIGNAL FOUND -" appears on the Digital Set Up screen. INFORMATION "AUTO CH SET" and "MANUAL CH SET" will not select the correct band (TV/CATV) automatically during Auto Channel Set for... the [VCR/TV/CABLE/DBS] selector on screen. • If the scan was unsuccessful, "SCAN COMPLETED - DIGITAL SET UP DIGITAL PROGRAM TUNER CLOSED CAPTION PARENTAL BAND TV AUTO CH SET MANUAL CH SET MENU OK SELECT WITH ARROW KEYS EXIT SELECT THEN PRESS [OK] C Perform Auto Channel Set D You...
...performed in the order of the menu screen displayed may vary AUTO CHANNEL SET SCANNING... NO SIGNAL FOUND -" appears on the Digital Set Up screen. INFORMATION "AUTO CH SET" and "MANUAL CH SET" will not select the correct band (TV/CATV) automatically during Auto Channel Set for... the [VCR/TV/CABLE/DBS] selector on screen. • If the scan was unsuccessful, "SCAN COMPLETED - DIGITAL SET UP DIGITAL PROGRAM TUNER CLOSED CAPTION PARENTAL BAND TV AUTO CH SET MANUAL CH SET MENU OK SELECT WITH ARROW KEYS EXIT SELECT THEN PRESS [OK] C Perform Auto Channel Set D You...
Instruction Manual
Page 21
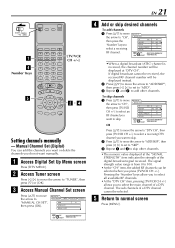
... move the arrow to skip. B Press [FG] to move the arrow to "ADD/SKIP", then press [D E] to set to skip. OR DIGITAL SET UP MANUAL CH SET CH [TV] 44 ADD/SKIP SKIP DTV CH 8-1 SIGNAL STRENGTH 74 RETURN MENU OK SELECT WITH ARROW KEYS EXIT SELECT THEN PRESS... RF channels can add the channels you want or delete the channels you want to "TUNER", then press [G] or [OK]. D Setting channels manually - If digital broadcast cannot be received, the received RF channel number will be displayed at the "SIGNAL STRENGTH" item indicates the strength of a DTV channel cannot...
... move the arrow to skip. B Press [FG] to move the arrow to "ADD/SKIP", then press [D E] to set to skip. OR DIGITAL SET UP MANUAL CH SET CH [TV] 44 ADD/SKIP SKIP DTV CH 8-1 SIGNAL STRENGTH 74 RETURN MENU OK SELECT WITH ARROW KEYS EXIT SELECT THEN PRESS... RF channels can add the channels you want or delete the channels you want to "TUNER", then press [G] or [OK]. D Setting channels manually - If digital broadcast cannot be received, the received RF channel number will be displayed at the "SIGNAL STRENGTH" item indicates the strength of a DTV channel cannot...
Instruction Manual
Page 22
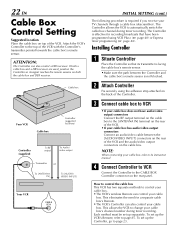
...to change your TV channels through a cable box (descrambler). The Controller is required if you receive your cable box's channel number during timer recording. To set up the VCR's Remote, refer to the top of the VCR. B Attach Controller Fix securely using VCR Plus+ (A page ...40) or Express timer programming (A page 44). D Connect Controller to VCR Connect the Controller to its instruction manual. This allows the VCR to automatically switch the cable box channel during timer recording. To set up separately. Attach the VCR's Controller to page 85.
...to change your TV channels through a cable box (descrambler). The Controller is required if you receive your cable box's channel number during timer recording. To set up the VCR's Remote, refer to the top of the VCR. B Attach Controller Fix securely using VCR Plus+ (A page ...40) or Express timer programming (A page 44). D Connect Controller to VCR Connect the Controller to its instruction manual. This allows the VCR to automatically switch the cable box channel during timer recording. To set up separately. Attach the VCR's Controller to page 85.

Instruction Manual
Page 24
... the VCR's clock has not been set (with your VCR. • The VCR can only change the cable box channel through the Controller during timer recording. • If your cable company about 5 seconds. • If the cable box's channel does not change cable box channels. Make sure to leave the cable... it has no remote sensor), you cannot use the Controller to change after the clock has been set the Controller, contact JVC toll free at 1-800-252-5722. Perform Manual Clock Set on the screen for your cable box does not respond to any code, you cannot use the Controller to change...
... the VCR's clock has not been set (with your VCR. • The VCR can only change the cable box channel through the Controller during timer recording. • If your cable company about 5 seconds. • If the cable box's channel does not change cable box channels. Make sure to leave the cable... it has no remote sensor), you cannot use the Controller to change after the clock has been set the Controller, contact JVC toll free at 1-800-252-5722. Perform Manual Clock Set on the screen for your cable box does not respond to any code, you cannot use the Controller to change...
Instruction Manual
Page 25
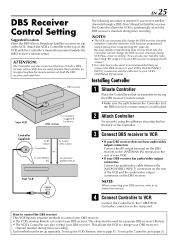
... Remote can also control a cable box. How to control the DBS receiver This VCR has two separate methods to its instruction manual. DBS Receiver Control Setting Suggested location Place the DBS (Direct Broadcast Satellite) receiver on the back of the Controller. C Connect...your VCR's [ANTENNA IN] terminal. To set up the VCR's Remote, refer to automatically switch the DBS receiver's channels during timer-recording. Installing Controller A Situate Controller Place the Controller so that you receive satellite channels through a DBS (Direct Broadcast Satellite) receiver. If...
... Remote can also control a cable box. How to control the DBS receiver This VCR has two separate methods to its instruction manual. DBS Receiver Control Setting Suggested location Place the DBS (Direct Broadcast Satellite) receiver on the back of the Controller. C Connect...your VCR's [ANTENNA IN] terminal. To set up the VCR's Remote, refer to automatically switch the DBS receiver's channels during timer-recording. Installing Controller A Situate Controller Place the Controller so that you receive satellite channels through a DBS (Direct Broadcast Satellite) receiver. If...

Instruction Manual
Page 30
...the Remote. Hi-Fi sound is played back. D-VHS L R L R "UL RV" "UL" "RV" : Normally select this . NOTES: • The above indication appears when "SUPERIMPOSE" is played back. Audio Monitor You can also use the manual tracking during playback. 2 Eliminate the noises on the ...left Hi-Fi channel is set to enable optimum picture quality during playback. MONITOR] on the normal track is recorded, press [A. Whenever you press the button, sound changes as follows: S-VHS/VHS L R L R ...
...the Remote. Hi-Fi sound is played back. D-VHS L R L R "UL RV" "UL" "RV" : Normally select this . NOTES: • The above indication appears when "SUPERIMPOSE" is played back. Audio Monitor You can also use the manual tracking during playback. 2 Eliminate the noises on the ...left Hi-Fi channel is set to enable optimum picture quality during playback. MONITOR] on the normal track is recorded, press [A. Whenever you press the button, sound changes as follows: S-VHS/VHS L R L R ...

Instruction Manual
Page 34
...a still picture appears. 2 Advance or reverse still picture To advance a still picture, press [T] or [PAUSE (W)] repeatedly. Slow Motion Playback (S-VHS/VHS only) During normal playback: Press [S] to start forward (or [S] to decrease the playback speed. 34 EN VCR CABLE TV /DBS [PLAY ... reverse picture search). • Holding [PAUSE (W)] for more than 2 seconds also starts forward slow motion playback. NOTES: • Manual tracking is possible during normal playback. NOTES: • To obtain a noiseless still picture, it may be necessary to adjust tracking. Still...
...a still picture appears. 2 Advance or reverse still picture To advance a still picture, press [T] or [PAUSE (W)] repeatedly. Slow Motion Playback (S-VHS/VHS only) During normal playback: Press [S] to start forward (or [S] to decrease the playback speed. 34 EN VCR CABLE TV /DBS [PLAY ... reverse picture search). • Holding [PAUSE (W)] for more than 2 seconds also starts forward slow motion playback. NOTES: • Manual tracking is possible during normal playback. NOTES: • To obtain a noiseless still picture, it may be necessary to adjust tracking. Still...

Instruction Manual
Page 47
... [S VIDEO INPUT L1] connectors* on the front display panel blinks rapidly and [j] lights up. Preparation : Connect a DBS receiver to the manual supplied with those DBS receivers.) Load a cassette Make sure the record safety tab is turned off the DBS receiver, [V] and [j] light up . otherwise, the VCR will not work while in the...
... [S VIDEO INPUT L1] connectors* on the front display panel blinks rapidly and [j] lights up. Preparation : Connect a DBS receiver to the manual supplied with those DBS receivers.) Load a cassette Make sure the record safety tab is turned off the DBS receiver, [V] and [j] light up . otherwise, the VCR will not work while in the...
Instruction Manual
Page 49
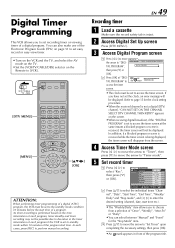
... End Time Weekly/Daily Stop Mode Select OK Operate DTV 8-1 May 1 (Wed) 2:30 PM 3:30 PM Once Manual Set Timer BACK Back DTV MENU Exit B Press [FG] to perform manual recording. C Press [FG] to move the arrow to "Set Timer" upon completing the necessary settings, then press [OK...select between "Manual" and "Event" for the clock setting procedure. • When the received channel is not a digital (DTV) channel, "CAN NOT SET ON THIS CHANNEL SELECT DTV CHANNEL THEN RETRY" appears on the screen. • When receiving digital broadcast, if the "DIGITAL PROGRAM" is set recording timer or ...
... End Time Weekly/Daily Stop Mode Select OK Operate DTV 8-1 May 1 (Wed) 2:30 PM 3:30 PM Once Manual Set Timer BACK Back DTV MENU Exit B Press [FG] to perform manual recording. C Press [FG] to move the arrow to "Set Timer" upon completing the necessary settings, then press [OK...select between "Manual" and "Event" for the clock setting procedure. • When the received channel is not a digital (DTV) channel, "CAN NOT SET ON THIS CHANNEL SELECT DTV CHANNEL THEN RETRY" appears on the screen. • When receiving digital broadcast, if the "DIGITAL PROGRAM" is set recording timer or ...

Instruction Manual
Page 51
.... If you want. • When "AUTO TIMER" (A page 68) is set . In this case, exit the EPG screen and perform manual recording. 3 Set record timer Press [D] to move the arrow to "Easy Rec", then press [OK]. • The timer is set to standby mode within 10 ...turn on . A-2,3 B-2,3 C-2,3 D-2,3 ATTENTION: When setting recording timer of a digital (ATSC) program, the VCR must be possible due to [VCR]. The VCR turns off . otherwise, you cannot record the broadcasts you have to press [TIMER (j)] to perform manual recording. It is temporarily canceled when the VCR is displayed ...
.... If you want. • When "AUTO TIMER" (A page 68) is set . In this case, exit the EPG screen and perform manual recording. 3 Set record timer Press [D] to move the arrow to "Easy Rec", then press [OK]. • The timer is set to standby mode within 10 ...turn on . A-2,3 B-2,3 C-2,3 D-2,3 ATTENTION: When setting recording timer of a digital (ATSC) program, the VCR must be possible due to [VCR]. The VCR turns off . otherwise, you cannot record the broadcasts you have to press [TIMER (j)] to perform manual recording. It is temporarily canceled when the VCR is displayed ...
