Instruction Manual
Page 4
...table recommended by the manufacturer or sold with the product. • Use a mounting accessory recommended by following the detailed procedure in the manual. • The A mark signals a reference to another page for instructions or related information. • Operation buttons necessary for the ...instructions for example, near a bath tub, wash bowl, kitchen sink or laundry tub, in safe operating condition. BEFORE YOU INSTALL YOUR NEW VCR please read the sections/literature listed below. • 'CAUTIONS' on page 2. • 'IMPORTANT PRODUCT SAFETY INSTRUCTIONS' on an unstable cart,...
...table recommended by the manufacturer or sold with the product. • Use a mounting accessory recommended by following the detailed procedure in the manual. • The A mark signals a reference to another page for instructions or related information. • Operation buttons necessary for the ...instructions for example, near a bath tub, wash bowl, kitchen sink or laundry tub, in safe operating condition. BEFORE YOU INSTALL YOUR NEW VCR please read the sections/literature listed below. • 'CAUTIONS' on page 2. • 'IMPORTANT PRODUCT SAFETY INSTRUCTIONS' on an unstable cart,...
Instruction Manual
Page 5
...containers filled with water. If this equipment in an environment prone to extreme temperatures or humidity. ... Adjust the tracking manually (A page 30). On placing the VCR: Some TVs or other appliances generates strong magnetic fields. Do not place such appliance on video tapes. • ...dirty video heads: • The picture is allowed to enter this unit. 7. In conditions where condensation may occur, keep the VCR turned on for D-VHS video heads (JVC D-VHS video head cleaner DFC-2) to clean the video heads. • In order to avoid misoperation, set "NAVIGATION" to "OFF...
...containers filled with water. If this equipment in an environment prone to extreme temperatures or humidity. ... Adjust the tracking manually (A page 30). On placing the VCR: Some TVs or other appliances generates strong magnetic fields. Do not place such appliance on video tapes. • ...dirty video heads: • The picture is allowed to enter this unit. 7. In conditions where condensation may occur, keep the VCR turned on for D-VHS video heads (JVC D-VHS video head cleaner DFC-2) to clean the video heads. • In order to avoid misoperation, set "NAVIGATION" to "OFF...
Instruction Manual
Page 6
... 34 RECORDING 35 Basic Recording 35 D-VHS Recording 35 S-VHS/VHS Recording 36 Basic Recording Features 37 Changing display information 37 Specifying recording length 37 Watching one program while recording another ...... 38 Showing on-screen display 38 TIMER RECORDING 40 VCR Plus+ C3® Timer Programming 40 Changing VCR Plus+... V-Chip ratings 72 Unrated programs 73 Set lock code 73 Viewing a blocked channel 73 Closed Caption 75 Digital Auto Setting 75 Digital Manual Setting 76 JLIP ID Number Setting 77 i.LINK Set Up 78 EDITING 80 i.LINK/DV Connections 80 S-...
... 34 RECORDING 35 Basic Recording 35 D-VHS Recording 35 S-VHS/VHS Recording 36 Basic Recording Features 37 Changing display information 37 Specifying recording length 37 Watching one program while recording another ...... 38 Showing on-screen display 38 TIMER RECORDING 40 VCR Plus+ C3® Timer Programming 40 Changing VCR Plus+... V-Chip ratings 72 Unrated programs 73 Set lock code 73 Viewing a blocked channel 73 Closed Caption 75 Digital Auto Setting 75 Digital Manual Setting 76 JLIP ID Number Setting 77 i.LINK Set Up 78 EDITING 80 i.LINK/DV Connections 80 S-...
Instruction Manual
Page 8
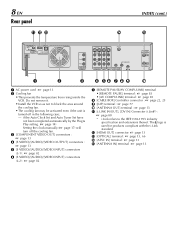
... page 22, 25 I J A AC power cord : A page 13 B Cooling fan • This prevents the temperature from rising inside the VCR. L [HDMI OUT] connector: A page 13 M [OPTICAL] terminal : A page 13, 66 N [ATSC IN] terminal : A page ...not been completed automatically by the Plug & Play setting. (A page 14) Setting the clock manually (A page 17) will turn off in the following case; - 8 EN Rear panel KLM ... (cont.) N O i.LINK IN/OUT DV IN HDMI OUT OPTICAL S400 D-THEATER REGION 1 PCM/STREAM DIGITAL AUDIO OUT Y PB/CB PR/CR COMPONENT VIDEO OUT S-VIDEO S-VIDEO ATSC IN VIDEO VIDEO L AUDIO ...
... page 22, 25 I J A AC power cord : A page 13 B Cooling fan • This prevents the temperature from rising inside the VCR. L [HDMI OUT] connector: A page 13 M [OPTICAL] terminal : A page 13, 66 N [ATSC IN] terminal : A page ...not been completed automatically by the Plug & Play setting. (A page 14) Setting the clock manually (A page 17) will turn off in the following case; - 8 EN Rear panel KLM ... (cont.) N O i.LINK IN/OUT DV IN HDMI OUT OPTICAL S400 D-THEATER REGION 1 PCM/STREAM DIGITAL AUDIO OUT Y PB/CB PR/CR COMPONENT VIDEO OUT S-VIDEO S-VIDEO ATSC IN VIDEO VIDEO L AUDIO ...
Instruction Manual
Page 14
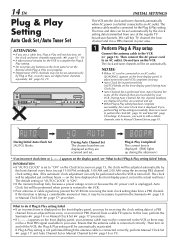
...AM and 2:00 AM) using the incoming PBS channel clock setting data. (This automatic clock adjustment can be set digital tuner channels separately. (A page 20, 21) IN F-1 INITIAL SETTINGS This VCR sets the clock and tuner channels automatically when AC power cord is performed next. During Initial Auto Clock Set [... (A page 15 - 19) • It takes several minutes for the Plug & Play setting. If this function is connected correctly, perform Manual Clock Set (A page 17) and Auto Channel Set or Manual Channel Set (A page 18 or 19). In this TV channel the host channel and it may prevent the...
...AM and 2:00 AM) using the incoming PBS channel clock setting data. (This automatic clock adjustment can be set digital tuner channels separately. (A page 20, 21) IN F-1 INITIAL SETTINGS This VCR sets the clock and tuner channels automatically when AC power cord is performed next. During Initial Auto Clock Set [... (A page 15 - 19) • It takes several minutes for the Plug & Play setting. If this function is connected correctly, perform Manual Clock Set (A page 17) and Auto Channel Set or Manual Channel Set (A page 18 or 19). In this TV channel the host channel and it may prevent the...
Instruction Manual
Page 15
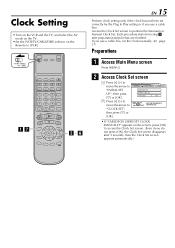
...only if the clock has not been set correctly by the Plug & Play setting or if you use a cable box. VCR CABLE TV /DBS A G B - If you use a cable box, set the clock manually. (A page 17) Preparations A Access Main Menu screen Press [MENU]. FUNCTION SET UP TUNER SET UP INITIAL SET UP CLOCK... AUTO CLOCK OFF MENU OK SELECT WITH ARROW KEYS EXIT SELECT THEN PRESS [OK] • If "CABLE BOX USERS SET CLOCK MANUALLY" appears on the Remote to perform the Semiauto or Manual Clock Set. B Access Clock Set screen A Press [D E] to move the arrow to access the Clock Set screen. (Even if ...
...only if the clock has not been set correctly by the Plug & Play setting or if you use a cable box. VCR CABLE TV /DBS A G B - If you use a cable box, set the clock manually. (A page 17) Preparations A Access Main Menu screen Press [MENU]. FUNCTION SET UP TUNER SET UP INITIAL SET UP CLOCK... AUTO CLOCK OFF MENU OK SELECT WITH ARROW KEYS EXIT SELECT THEN PRESS [OK] • If "CABLE BOX USERS SET CLOCK MANUALLY" appears on the Remote to perform the Semiauto or Manual Clock Set. B Access Clock Set screen A Press [D E] to move the arrow to access the Clock Set screen. (Even if ...
Instruction Manual
Page 16
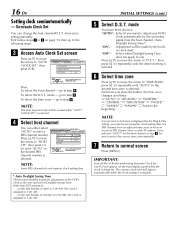
...) NOTE: If an incorrect clock time is selected. FUNCTION SET UP TUNER SET UP INITIAL SET UP CLOCK SET GUIDE CHANNEL OTHER AUTO CLOCK SET MANUAL CLOCK SET AUTO CLOCK ON MENU EXIT OK SELECT WITH ARROW KEYS SELECT THEN PRESS [OK] Then; mode - To select the time zone - "... [D E] repeatedly until "AUTO" or the desired PBS channel number is selected. F Select time zone Press [FG] to move the arrow to adjust your VCR's clock automatically by the builtin clock itself. go to normal screen Press [MENU]. G Return to the following steps. FUNCTION SET UP TUNER SET UP INITIAL...
...) NOTE: If an incorrect clock time is selected. FUNCTION SET UP TUNER SET UP INITIAL SET UP CLOCK SET GUIDE CHANNEL OTHER AUTO CLOCK SET MANUAL CLOCK SET AUTO CLOCK ON MENU EXIT OK SELECT WITH ARROW KEYS SELECT THEN PRESS [OK] Then; mode - To select the time zone - "... [D E] repeatedly until "AUTO" or the desired PBS channel number is selected. F Select time zone Press [FG] to move the arrow to adjust your VCR's clock automatically by the builtin clock itself. go to normal screen Press [MENU]. G Return to the following steps. FUNCTION SET UP TUNER SET UP INITIAL...

Instruction Manual
Page 17
VCR CABLE TV /DBS H C - G NOTE: When you want to change, then press [D E]. D Set time Press [D E] until the desired date appears, then press [G]. • Holding [D E] changes the date in 30-minute intervals. FUNCTION SET UP TUNER SET UP MANUAL CLOCK SET INITIAL SET UP TIME DATE YEAR D.S.T TIME ZONE ...ON"- mode H Press [FG] to move the arrow to you press the button, the time zone changes as the setting for EPG (A page 51). Manual Clock Set First follow steps A to B on page 15, then go to "TIME ZONE", press [D E] repeatedly until the desired year appears. Adjustment ...
VCR CABLE TV /DBS H C - G NOTE: When you want to change, then press [D E]. D Set time Press [D E] until the desired date appears, then press [G]. • Holding [D E] changes the date in 30-minute intervals. FUNCTION SET UP TUNER SET UP MANUAL CLOCK SET INITIAL SET UP TIME DATE YEAR D.S.T TIME ZONE ...ON"- mode H Press [FG] to move the arrow to you press the button, the time zone changes as the setting for EPG (A page 51). Manual Clock Set First follow steps A to B on page 15, then go to "TIME ZONE", press [D E] repeatedly until the desired year appears. Adjustment ...

Instruction Manual
Page 18
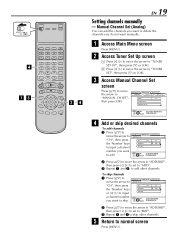
...[D E] to FUNCTION SET UP TUNER SET UP INITIAL SET UP move the arrow to [VCR]. FUNCTION SET UP TUNER SET UP INITIAL SET UP TUNER SET CABLE SET UP DBS SET UP BAND TV AUTO CH SET MANUAL CH SET MENU OK SELECT WITH ARROW KEYS EXIT SELECT THEN PRESS [OK] FUNCTION..., use Manual Channel Set (Analog) (A page 19). Auto Channel Set (Analog) Use Auto Channel Set only if channels have not been set the receivable channels in your area in the order of "BAND" on screen. • If the scan was unsuccessful, "SCAN COMPLETED - VCR CABLE TV /DBS A D B - INFORMATION The VCR selects the...
...[D E] to FUNCTION SET UP TUNER SET UP INITIAL SET UP move the arrow to [VCR]. FUNCTION SET UP TUNER SET UP INITIAL SET UP TUNER SET CABLE SET UP DBS SET UP BAND TV AUTO CH SET MANUAL CH SET MENU OK SELECT WITH ARROW KEYS EXIT SELECT THEN PRESS [OK] FUNCTION..., use Manual Channel Set (Analog) (A page 19). Auto Channel Set (Analog) Use Auto Channel Set only if channels have not been set the receivable channels in your area in the order of "BAND" on screen. • If the scan was unsuccessful, "SCAN COMPLETED - VCR CABLE TV /DBS A D B - INFORMATION The VCR selects the...
Instruction Manual
Page 19
... set to add. EXIT OK SELECT WITH ARROW SELECT OR NUMBER KEYS B Press [FG] to move the arrow to MANUAL CH SET INITIAL SET UP "CH", then press CH [TV] 46 the 'Number' keys ADD/SKIP SKIP RETURN or... MENU EXIT OK SELECT WITH ARROW SELECT OR NUMBER KEYS B Press [FG] to move the arrow to MANUAL CH SET INITIAL SET UP "CH", then press CH [TV] 45 the 'Number' keys ADD/SKIP ADD... to input a channel RETURN number you do not want to "ADD". VCR CABLE TV /DBS D A E B - FUNCTION SET UP TUNER SET UP INITIAL SET UP TUNER SET CABLE SET...
... set to add. EXIT OK SELECT WITH ARROW SELECT OR NUMBER KEYS B Press [FG] to move the arrow to MANUAL CH SET INITIAL SET UP "CH", then press CH [TV] 46 the 'Number' keys ADD/SKIP SKIP RETURN or... MENU EXIT OK SELECT WITH ARROW SELECT OR NUMBER KEYS B Press [FG] to move the arrow to MANUAL CH SET INITIAL SET UP "CH", then press CH [TV] 45 the 'Number' keys ADD/SKIP ADD... to input a channel RETURN number you do not want to "ADD". VCR CABLE TV /DBS D A E B - FUNCTION SET UP TUNER SET UP INITIAL SET UP TUNER SET CABLE SET...
Instruction Manual
Page 20
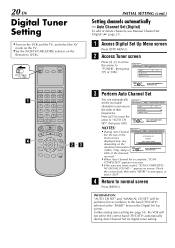
... in accordance to the band (TV/CATV) selected at the "BAND" item on the Remote to [VCR]. VCR CABLE TV /DBS A D B - Auto Channel Set (Digital) To add or delete channels, use Manual Channel Set (Digital) (A page 21). PRESS [MENU] TO END depending on the resolution information MENU (1080i, 720p, ...TV. •Set the [VCR/TV/CABLE/DBS] selector on the Digital Set Up screen. B Access Tuner screen Press [D E] to move the arrow to start again, or select "EXIT". DIGITAL SET UP DIGITAL PROGRAM TUNER CLOSED CAPTION PARENTAL BAND TV AUTO CH SET MANUAL CH SET MENU OK SELECT ...
... in accordance to the band (TV/CATV) selected at the "BAND" item on the Remote to [VCR]. VCR CABLE TV /DBS A D B - Auto Channel Set (Digital) To add or delete channels, use Manual Channel Set (Digital) (A page 21). PRESS [MENU] TO END depending on the resolution information MENU (1080i, 720p, ...TV. •Set the [VCR/TV/CABLE/DBS] selector on the Digital Set Up screen. B Access Tuner screen Press [D E] to move the arrow to start again, or select "EXIT". DIGITAL SET UP DIGITAL PROGRAM TUNER CLOSED CAPTION PARENTAL BAND TV AUTO CH SET MANUAL CH SET MENU OK SELECT ...
Instruction Manual
Page 21
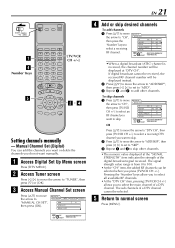
... sub channels of Tuner Setting. B Press [FG] to move the arrow to "DTV CH", then press [TV/VCR CH +/-] to skip. OR DIGITAL SET UP MANUAL CH SET CH [TV] 44 ADD/SKIP SKIP DTV CH 8-1 SIGNAL STRENGTH 74 RETURN MENU OK SELECT WITH ARROW KEYS EXIT... then press the 'Number' keys to "SKIP". INITIAL SETTING (cont.) EN 21 VCR CABLE TV /DBS A D 'Number' Keys E [TV/VCR CH +/ ] B - D Setting channels manually - DIGITAL SET UP DIGITAL PROGRAM TUNER CLOSED CAPTION PARENTAL BAND TV AUTO CH SET MANUAL CH SET MENU EXIT OK SELECT WITH ARROW KEYS SELECT THEN PRESS [OK] D...
... sub channels of Tuner Setting. B Press [FG] to move the arrow to "DTV CH", then press [TV/VCR CH +/-] to skip. OR DIGITAL SET UP MANUAL CH SET CH [TV] 44 ADD/SKIP SKIP DTV CH 8-1 SIGNAL STRENGTH 74 RETURN MENU OK SELECT WITH ARROW KEYS EXIT... then press the 'Number' keys to "SKIP". INITIAL SETTING (cont.) EN 21 VCR CABLE TV /DBS A D 'Number' Keys E [TV/VCR CH +/ ] B - D Setting channels manually - DIGITAL SET UP DIGITAL PROGRAM TUNER CLOSED CAPTION PARENTAL BAND TV AUTO CH SET MANUAL CH SET MENU EXIT OK SELECT WITH ARROW KEYS SELECT THEN PRESS [OK] D...
Instruction Manual
Page 22
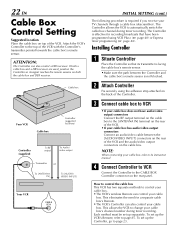
... This allows the VCR to its instruction manual. 22 EN Cable Box Control Setting Suggested location Place the cable box on top of the VCR with the Controller's transmitter pointed towards the cable box's remote sensor. This eliminates the need for recording broadcasts that its signal... and a DBS receiver are used, position the Controller so its transmitter is not blocked. The Controller allows the VCR to page 23. Attach the VCR's Controller to the CABLE BOX Controller connector on the rear of the VCR. • If your cable box's channel number during timer recording.
... This allows the VCR to its instruction manual. 22 EN Cable Box Control Setting Suggested location Place the cable box on top of the VCR with the Controller's transmitter pointed towards the cable box's remote sensor. This eliminates the need for recording broadcasts that its signal... and a DBS receiver are used, position the Controller so its transmitter is not blocked. The Controller allows the VCR to page 23. Attach the VCR's Controller to the CABLE BOX Controller connector on the rear of the VCR. • If your cable box's channel number during timer recording.

Instruction Manual
Page 24
... VCR's memory backup expires because of a power failure, set the cable box input channel and brand again. • For customers in step D appears. B Press [OK]. If you are not set the Controller, contact JVC ...Press [D E] to INPUT CH OFF BRDAIDNDYOUR CABLE BOX CHANGE1 TO TEST MODE CHANNEL 09? Perform Manual Clock Set on and tuned to the right. End of cable box, then try all the ... brand code from the list shown to the proper channel before the scheduled start time of timer recording. If the VCR's clock has not been set (with "AUTO CLOCK" set , the Cable Box Input Channel...
... VCR's memory backup expires because of a power failure, set the cable box input channel and brand again. • For customers in step D appears. B Press [OK]. If you are not set the Controller, contact JVC ...Press [D E] to INPUT CH OFF BRDAIDNDYOUR CABLE BOX CHANGE1 TO TEST MODE CHANNEL 09? Perform Manual Clock Set on and tuned to the right. End of cable box, then try all the ... brand code from the list shown to the proper channel before the scheduled start time of timer recording. If the VCR's clock has not been set (with "AUTO CLOCK" set , the Cable Box Input Channel...
Instruction Manual
Page 25
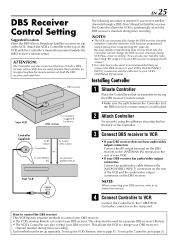
... receiver and a cable box are used , it is recommended that its instruction manual. This allows the VCR to the top of the VCR. Attach the VCR's Controller to change the DBS receiver channels during timer recording. How to control the DBS receiver This VCR has two separate methods to page 85. Each method must be set...
... receiver and a cable box are used , it is recommended that its instruction manual. This allows the VCR to the top of the VCR. Attach the VCR's Controller to change the DBS receiver channels during timer recording. How to control the DBS receiver This VCR has two separate methods to page 85. Each method must be set...

Instruction Manual
Page 30
... Adjustments Automatic tracking adjustment This VCR automatically adjusts the tracking condition. Manual tracking adjustment If automatic tracking ... as follows: S-VHS/VHS L R L R MIX NORMAL "UL RV" : Normally select this setting. The automatic tracking becomes active again. Audio Monitor You can also use the manual tracking during playback, use the manual tracking following the procedures...While playing back a tape on the front panel at the same time during playback. Hi-Fi sound is recorded, press [A. "MIX" : Both sounds on the Hi-Fi track and normal track are achieved. •...
... Adjustments Automatic tracking adjustment This VCR automatically adjusts the tracking condition. Manual tracking adjustment If automatic tracking ... as follows: S-VHS/VHS L R L R MIX NORMAL "UL RV" : Normally select this setting. The automatic tracking becomes active again. Audio Monitor You can also use the manual tracking during playback, use the manual tracking following the procedures...While playing back a tape on the front panel at the same time during playback. Hi-Fi sound is recorded, press [A. "MIX" : Both sounds on the Hi-Fi track and normal track are achieved. •...

Instruction Manual
Page 34
... playback, simply press [CHANNEL +] or [-] on the VCR (or [TV/VCR CH +] or [-] on the front display panel lights up. To resume normal playback, press [PLAY (I )]. NOTES: • Manual tracking is freezed and a still picture appears. 2 Advance...VCR (or [TV/VCR CH +] or [-] on the Remote) to start reverse) slow motion playback. When you press [PAUSE (W)] again, still picture resumes. Then adjust tracking by frame - PLAYBACK (cont.) C Viewing still picture frame by pressing [CHANNEL +] or [-]. D Viewing slow motion picture - Frame-by-Frame Playback (S-VHS/VHS...
... playback, simply press [CHANNEL +] or [-] on the VCR (or [TV/VCR CH +] or [-] on the front display panel lights up. To resume normal playback, press [PLAY (I )]. NOTES: • Manual tracking is freezed and a still picture appears. 2 Advance...VCR (or [TV/VCR CH +] or [-] on the Remote) to start reverse) slow motion playback. When you press [PAUSE (W)] again, still picture resumes. Then adjust tracking by frame - PLAYBACK (cont.) C Viewing still picture frame by pressing [CHANNEL +] or [-]. D Viewing slow motion picture - Frame-by-Frame Playback (S-VHS/VHS...

Instruction Manual
Page 47
...manual supplied with those DBS receivers.) C Set recording speed Press [REC SPEED] to set to "ON" (A page 68). • If you turn off when the DBS receiver stops outputting a signal. • This VCR will enter into Satellite Auto Recording standby mode after Satellite Auto Recording is finished, the VCR will start recording... receiver outputs a signal, the VCR starts recording and [V] blinks, the [j] and record [X] indicator light up . The VCR stops recording and powers off this VCR while Satellite Auto Recording is in progress, recording stops. • Video Calibration ...
...manual supplied with those DBS receivers.) C Set recording speed Press [REC SPEED] to set to "ON" (A page 68). • If you turn off when the DBS receiver stops outputting a signal. • This VCR will enter into Satellite Auto Recording standby mode after Satellite Auto Recording is finished, the VCR will start recording... receiver outputs a signal, the VCR starts recording and [V] blinks, the [j] and record [X] indicator light up . The VCR stops recording and powers off this VCR while Satellite Auto Recording is in progress, recording stops. • Video Calibration ...
Instruction Manual
Page 49
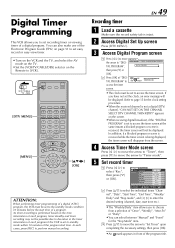
...DIGI- EN 49 Recording timer A Load a cassette Make sure the record safety tab is set recording timer or viewing timer of a digital program. C Access Digital Program screen A Press [D E] to move the arrow to "Timer mode". E Set record timer A Press [D E] to "DIGI- You can select between "Manual" and "Event...desired setting (channel, date, start time etc.). • The "Weekly/Daily" item allows you to choose from the screen. Digital Timer Programming This VCR allows you to set to standby mode within 10 minutes of the program start time. C Press [FG] to move the ...
...DIGI- EN 49 Recording timer A Load a cassette Make sure the record safety tab is set recording timer or viewing timer of a digital program. C Access Digital Program screen A Press [D E] to move the arrow to "Timer mode". E Set record timer A Press [D E] to "DIGI- You can select between "Manual" and "Event...desired setting (channel, date, start time etc.). • The "Weekly/Daily" item allows you to choose from the screen. Digital Timer Programming This VCR allows you to set to standby mode within 10 minutes of the program start time. C Press [FG] to move the ...

Instruction Manual
Page 51
... the program will be displayed. Refer to page 15 for a program whose start time of the program title. 4 Return to perform manual recording. A-2,3 B-2,3 C-2,3 D-2,3 ATTENTION: When setting recording timer of a digital (ATSC) program, the VCR must be possible due to the standby mode condition 10 minutes before the start time has passed, a message "Check Start Time...
... the program will be displayed. Refer to page 15 for a program whose start time of the program title. 4 Return to perform manual recording. A-2,3 B-2,3 C-2,3 D-2,3 ATTENTION: When setting recording timer of a digital (ATSC) program, the VCR must be possible due to the standby mode condition 10 minutes before the start time has passed, a message "Check Start Time...


