
Instruction Manual
Page 2
... OPEN COVERS AND DO NOT REPAIR YOURSELF. Reverse engineering or disassembly is manufactured under licence from Gemstar Development Corporation. ● This product incorporates copyright protection technology that it is recommended that you are registered trademarks of copyright in the sound or video recording, broadcast or cable programme and in any signal lead or aerial. REFER SERVICING TO QUALIFIED PERSONNEL. recorded tapes, DVDs...
... OPEN COVERS AND DO NOT REPAIR YOURSELF. Reverse engineering or disassembly is manufactured under licence from Gemstar Development Corporation. ● This product incorporates copyright protection technology that it is recommended that you are registered trademarks of copyright in the sound or video recording, broadcast or cable programme and in any signal lead or aerial. REFER SERVICING TO QUALIFIED PERSONNEL. recorded tapes, DVDs...

Instruction Manual
Page 3
... 79 lists frequently-used or explained in doubt - The STANDBY/ON A button does not completely shut off mains power from the unit, but switches operating current on the surface of the unit may be liable for any loss relating to the unit's failure to properly record, store or playback any content (video, audio or otherwise) for any reason whatsoever. IMPORTANT Connection to the mains supply...
... 79 lists frequently-used or explained in doubt - The STANDBY/ON A button does not completely shut off mains power from the unit, but switches operating current on the surface of the unit may be liable for any loss relating to the unit's failure to properly record, store or playback any content (video, audio or otherwise) for any reason whatsoever. IMPORTANT Connection to the mains supply...

Instruction Manual
Page 5
... 5 EDITING 54 DV Dubbing 54 Digital Audio Dubbing 55 Edit From A Camcorder 56 Edit To Or From Another Recorder 57 Output/Input Set 58 SYSTEM CONNECTIONS 60 Connecting To A Satellite Receiver 60 Connecting To A Dolby Digital Decoder Or An Amplifier With Built-in DTS 60 SUBSIDIARY SETTINGS 61 Mode Set 61 Remote Control Functions 63 Scan Mode Set 64 Tray Lock 64 Child Lock 64 VIDEO Plus+ System Setup 65 Tuner Set 66 Clock Set 69 Format A Disc 70 Finalise A Disc 71 TROUBLESHOOTING 72 APPENDIX 75 SPECIFICATIONS...
... 5 EDITING 54 DV Dubbing 54 Digital Audio Dubbing 55 Edit From A Camcorder 56 Edit To Or From Another Recorder 57 Output/Input Set 58 SYSTEM CONNECTIONS 60 Connecting To A Satellite Receiver 60 Connecting To A Dolby Digital Decoder Or An Amplifier With Built-in DTS 60 SUBSIDIARY SETTINGS 61 Mode Set 61 Remote Control Functions 63 Scan Mode Set 64 Tray Lock 64 Child Lock 64 VIDEO Plus+ System Setup 65 Tuner Set 66 Clock Set 69 Format A Disc 70 Finalise A Disc 71 TROUBLESHOOTING 72 APPENDIX 75 SPECIFICATIONS...

Instruction Manual
Page 13
... stopped: Disc marks all light. C VPS/PDC Indicator A pg. 39 Lights when checking if the station being set. E Recording Mode Indicator (XP/SP/LP/EP/FR) A pg. 35 Blinks when recording mode is no programme setting. G Channel Indicator Indicates the channel received. ACHAPB: Chapter number being played back are displayed on the Multi Display. J Repeat Mode Indicator (x/1/A-B) A pg. 31, 32 Select Repeat Playback mode on the on the disc tray: Disc marks all light out. K DISC Timer...
... stopped: Disc marks all light. C VPS/PDC Indicator A pg. 39 Lights when checking if the station being set. E Recording Mode Indicator (XP/SP/LP/EP/FR) A pg. 35 Blinks when recording mode is no programme setting. G Channel Indicator Indicates the channel received. ACHAPB: Chapter number being played back are displayed on the Multi Display. J Repeat Mode Indicator (x/1/A-B) A pg. 31, 32 Select Repeat Playback mode on the on the disc tray: Disc marks all light out. K DISC Timer...

Instruction Manual
Page 16
... recording/playback D Recording mode E Current playback time/Elapsed recording time F Audio mode G Recording channel number DV Dubbing When capturing images from the external DV equipment A B DVD-RW/VR SP TITLE12 CHAPTER-- EACH 0:00:00 C D E A Disc type B Current time C Current recording point D Current status (recording) E Elapsed recording time F Sound mode G Recording channel (DV input) --:-L R DV FG DV DUBBING DV DV AUDIO 1 12 A B C A Displays when remote control is pressed, various operational indicators appear on the TV screen. B Auto capture button C Sound monitor...
... recording/playback D Recording mode E Current playback time/Elapsed recording time F Audio mode G Recording channel number DV Dubbing When capturing images from the external DV equipment A B DVD-RW/VR SP TITLE12 CHAPTER-- EACH 0:00:00 C D E A Disc type B Current time C Current recording point D Current status (recording) E Elapsed recording time F Sound mode G Recording channel (DV input) --:-L R DV FG DV DUBBING DV DV AUDIO 1 12 A B C A Displays when remote control is pressed, various operational indicators appear on the TV screen. B Auto capture button C Sound monitor...

Instruction Manual
Page 18
... be connected to a mains outlet. ● Turn on the TV and select an input mode such as EXT1. 1 Press A on the unit or DVD A on the remote control to turn on the unit, the Auto Set Up function sets the tuner channels, clock and Guide Programme numbers automatically. 1 DVD A Selection Keys (FGDE) ENTER ATTENTION: AAUTOB blinks on the front display panel; 18 EN INITIAL SETTINGS Auto Set Up Auto Channel Set/Auto Clock Set/Auto Guide Programme Number Set After the A button on the unit (or DVD A on the remote control...
... be connected to a mains outlet. ● Turn on the TV and select an input mode such as EXT1. 1 Press A on the unit or DVD A on the remote control to turn on the unit, the Auto Set Up function sets the tuner channels, clock and Guide Programme numbers automatically. 1 DVD A Selection Keys (FGDE) ENTER ATTENTION: AAUTOB blinks on the front display panel; 18 EN INITIAL SETTINGS Auto Set Up Auto Channel Set/Auto Clock Set/Auto Guide Programme Number Set After the A button on the unit (or DVD A on the remote control...

Instruction Manual
Page 20
... Auto Channel Set and Auto Clock Set have been stored in the unit's memory by using the PR +/- B Perform AClock SetB (A pg. 69). When programming the timer using the PR +/- You can easily start playback. For details, refer to your TV. * Compatible with the above procedures call the JVC Customer Service Hot Line on and be stored correctly, and Auto Guide Programme Number Set may differ by reading data from a PDC signal. If Auto Channel Set...
... Auto Channel Set and Auto Clock Set have been stored in the unit's memory by using the PR +/- B Perform AClock SetB (A pg. 69). When programming the timer using the PR +/- You can easily start playback. For details, refer to your TV. * Compatible with the above procedures call the JVC Customer Service Hot Line on and be stored correctly, and Auto Guide Programme Number Set may differ by reading data from a PDC signal. If Auto Channel Set...

Instruction Manual
Page 22
... aspect ratio of the output signal correctly when playing back a picture whose aspect ratio is selected. The image fills the screen. ● The picture will be shown on the top and the bottom of the screen. 4:3PS (Pan&Scan): Select this ratio will not be shown in 16:9 aspect ratio. 22 EN INITIAL SETTINGS Monitor Set You can select the monitor type depending on the TV used when you play back DVD VIDEO discs recorded for a wide-screen...
... aspect ratio of the output signal correctly when playing back a picture whose aspect ratio is selected. The image fills the screen. ● The picture will be shown on the top and the bottom of the screen. 4:3PS (Pan&Scan): Select this ratio will not be shown in 16:9 aspect ratio. 22 EN INITIAL SETTINGS Monitor Set You can select the monitor type depending on the TV used when you play back DVD VIDEO discs recorded for a wide-screen...

Instruction Manual
Page 26
... desired subtitle language. In addition, the angle selection display disappears automatically if no operation is possible to set recording time in stop mode ● It is possible to check disc remaining time according to recording modes also by pressing MENU. During recording/playback or in stop mode Current track elapsed time N Current track remaining time N Total elapsed time N Total remaining time N (back to select your desired angle. ● Each time you press ANGLE or the selection keys, the angle changes...
... desired subtitle language. In addition, the angle selection display disappears automatically if no operation is possible to set recording time in stop mode ● It is possible to check disc remaining time according to recording modes also by pressing MENU. During recording/playback or in stop mode Current track elapsed time N Current track remaining time N Total elapsed time N Total remaining time N (back to select your desired angle. ● Each time you press ANGLE or the selection keys, the angle changes...

Instruction Manual
Page 32
... elapsed playing time of the point B appears. ● The selected part of the disc being used . 4 Press the number keys to access the on -screen bar disappears from step 1. ● The point B must be selected for Video CD/SVCD and Audio CD. NOTES: ● A-B Repeat Playback may not work properly depending on the type of the point A appears. DVD-VIDEO CINEMA AUTO 1 TITLE 1 5 ENTER Example: A To select track 5, press the number key...
... elapsed playing time of the point B appears. ● The selected part of the disc being used . 4 Press the number keys to access the on -screen bar disappears from step 1. ● The point B must be selected for Video CD/SVCD and Audio CD. NOTES: ● A-B Repeat Playback may not work properly depending on the type of the point A appears. DVD-VIDEO CINEMA AUTO 1 TITLE 1 5 ENTER Example: A To select track 5, press the number key...
Instruction Manual
Page 33
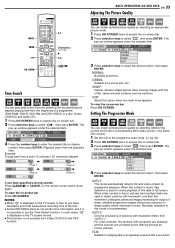
... AUTO 2 AUTO 1 AUTO 2 FILM VIDEO 4 Press selection keys to enter the desired title or chapter number, then press ENTER. AUTO 1: This mode automatically detects film and video content for playing back a progressive scanned film source disc. AUTO 2: Only the processing of flat, same-coloured surfaces such as well. ● This function is not possible for output of the disc. ● Some DVD VIDEO discs do not contain time information, and it is used...
... AUTO 2 AUTO 1 AUTO 2 FILM VIDEO 4 Press selection keys to enter the desired title or chapter number, then press ENTER. AUTO 1: This mode automatically detects film and video content for playing back a progressive scanned film source disc. AUTO 2: Only the processing of flat, same-coloured surfaces such as well. ● This function is not possible for output of the disc. ● Some DVD VIDEO discs do not contain time information, and it is used...

Instruction Manual
Page 37
... to check the disc remaining time in video mode, select the desired audio channel (ANICAM1/MAINB, ANICAM2/SUBB or AMONOB) to see if the remaining time is changed, the type of stereo and bilingual broadcasts possible. long daily programme five times just on a 120 minutes disc, the disc remaining time would be set Weekly/ Daily Rec Function to AMON-FRIB in step 8 to fit the total recording time to timer-record...
... to check the disc remaining time in video mode, select the desired audio channel (ANICAM1/MAINB, ANICAM2/SUBB or AMONOB) to see if the remaining time is changed, the type of stereo and bilingual broadcasts possible. long daily programme five times just on a 120 minutes disc, the disc remaining time would be set Weekly/ Daily Rec Function to AMON-FRIB in step 8 to fit the total recording time to timer-record...

Instruction Manual
Page 39
.../PDC REC MODE set the desired start PROG CONFIRM SET TIMER PROGRAMMING WITH [CURSORS] SELECT THEN PRESS [ENTER] time (ASTARTB), then press E. ● Each press of F G increases/decreases the start time in 1 minute interval. ● To increase/decrease the start time in due course. With this system, special code signals are recorded with the audio/video signals. PDC is changed from what has been advertised. Ch.3 operates a PDC service in advance. All channels...
.../PDC REC MODE set the desired start PROG CONFIRM SET TIMER PROGRAMMING WITH [CURSORS] SELECT THEN PRESS [ENTER] time (ASTARTB), then press E. ● Each press of F G increases/decreases the start time in 1 minute interval. ● To increase/decrease the start time in due course. With this system, special code signals are recorded with the audio/video signals. PDC is changed from what has been advertised. Ch.3 operates a PDC service in advance. All channels...

Instruction Manual
Page 43
...; If you engage the Automatic Satellite Programme Recording mode when the satellite receiver's power is on, the unit will start recording when the satellite receiver's power is turned on. ● If you have a timer. ● Pressing the unit's A button while Automatic Satellite Programme Recording is in progress. ● For timer programming of the satellite receiver, refer to the instruction manual of the satellite receiver. ● Automatic Satellite...
...; If you engage the Automatic Satellite Programme Recording mode when the satellite receiver's power is on, the unit will start recording when the satellite receiver's power is turned on. ● If you have a timer. ● Pressing the unit's A button while Automatic Satellite Programme Recording is in progress. ● For timer programming of the satellite receiver, refer to the instruction manual of the satellite receiver. ● Automatic Satellite...

Instruction Manual
Page 54
... not support the -1x speed, the rewinding time may be longer.) C Sound monitor switch For selecting the desired sound format for dubbing. 1 Connect a camcorder or DV equipment to the [DV IN] connector on -screen display for DV dubbing appears. 3 Press REC MODE repeatedly to set to start dubbing, then stop dubbing. 54 EN EDITING DV Dubbing You can be activated. Each press of the normal speed), press W to pause playback, then press O or N. ● To play...
... not support the -1x speed, the rewinding time may be longer.) C Sound monitor switch For selecting the desired sound format for dubbing. 1 Connect a camcorder or DV equipment to the [DV IN] connector on -screen display for DV dubbing appears. 3 Press REC MODE repeatedly to set to start dubbing, then stop dubbing. 54 EN EDITING DV Dubbing You can be activated. Each press of the normal speed), press W to pause playback, then press O or N. ● To play...

Instruction Manual
Page 56
... REC MODE repeatedly to set the recording mode. 4 Start playback on the camcorder slightly before the actual point from your unit. The dubbing starts. 6 Upon completing dubbing, stop playback on the source player (camcorder). 56 EN EDITING Edit From A Camcorder You can be obtained from where you wish to start recording. B If the camcorder has an S-VIDEO output connector: ^ connect the camcorder's AUDIO OUT and S-VIDEO OUT connectors to the [AUDIO(L(MONO))] input connector on the remote control...
... REC MODE repeatedly to set the recording mode. 4 Start playback on the camcorder slightly before the actual point from your unit. The dubbing starts. 6 Upon completing dubbing, stop playback on the source player (camcorder). 56 EN EDITING Edit From A Camcorder You can be obtained from where you wish to start recording. B If the camcorder has an S-VIDEO output connector: ^ connect the camcorder's AUDIO OUT and S-VIDEO OUT connectors to the [AUDIO(L(MONO))] input connector on the remote control...
Instruction Manual
Page 64
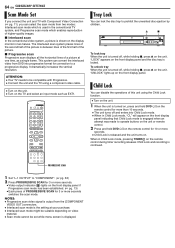
... using the Child Lock function. ● Turn on the unit. 1 When the unit is turned on, press and hold DVD A on the remote control for connection to a progressive display. This system can convert the interlaced video from the [COMPONENT VIDEO OUT] connectors. ● Interlaced scan mode is the setting at one time, as EXT1. M o RAM/RW To lock tray When the unit is output from DVD into Child Lock mode. ● When in two halves. NOTES: ● Progressive scan video signal...
... using the Child Lock function. ● Turn on the unit. 1 When the unit is turned on, press and hold DVD A on the remote control for connection to a progressive display. This system can convert the interlaced video from the [COMPONENT VIDEO OUT] connectors. ● Interlaced scan mode is the setting at one time, as EXT1. M o RAM/RW To lock tray When the unit is output from DVD into Child Lock mode. ● When in two halves. NOTES: ● Progressive scan video signal...

Instruction Manual
Page 72
... interlace scanned programme is played back, progressive scan mode is selected. ] Press and hold M until the disc tray opens. (Approximately 30 seconds.) ● Remove the disc and press M to close the disc tray. ● The disc tray was locked. ] Unlock the tray. (A pg. 64) Playback Images do not appear on finalised discs. 72 EN TROUBLESHOOTING Before requesting service for a problem, use this chart and see if you dub the programme to an external recording equipment. ] Set ASUPERIMPOSEB to...
... interlace scanned programme is played back, progressive scan mode is selected. ] Press and hold M until the disc tray opens. (Approximately 30 seconds.) ● Remove the disc and press M to close the disc tray. ● The disc tray was locked. ] Unlock the tray. (A pg. 64) Playback Images do not appear on finalised discs. 72 EN TROUBLESHOOTING Before requesting service for a problem, use this chart and see if you dub the programme to an external recording equipment. ] Set ASUPERIMPOSEB to...

Instruction Manual
Page 74
... compatible. PLAYBACK WILL STOP THEN TIMER RECORDING WILL START ● Timer recording finished during Live Memory playback. GUIDE PROGRAMME IS NOT SET SELECT CHANNEL YOU WANT TO RECORD ● To set the timer programme using the VIDEO Plus+ system, the Guide Programme Number must be set in advance. (A pg. 69) PROGRAMME FULL DELETE UNWANTED TIMER PROGRAMME ● You can programme this unit since the disc may be dirty or damaged. COPY PROHIBITED CAN NOT PLAY ● The unit...
... compatible. PLAYBACK WILL STOP THEN TIMER RECORDING WILL START ● Timer recording finished during Live Memory playback. GUIDE PROGRAMME IS NOT SET SELECT CHANNEL YOU WANT TO RECORD ● To set the timer programme using the VIDEO Plus+ system, the Guide Programme Number must be set in advance. (A pg. 69) PROGRAMME FULL DELETE UNWANTED TIMER PROGRAMME ● You can programme this unit since the disc may be dirty or damaged. COPY PROHIBITED CAN NOT PLAY ● The unit...

Instruction Manual
Page 79
... Repeat Playback 32 Adjusting The Picture Quality 33 Angle Selection 26 Audio Channel Selection 27 Audio Language/Sound Selection 27 Auto Channel Set 66 Automatic Satellite Programme Recording 43 B Basic Playback 23 Basic Recording 35 C Check, Cancel And Change Programmes 42 Child Lock 64 D Disc menu 24 Disc Remaining Time 36 Discs For Playback Only 7 DV Dubbing 54 DVD menu 24 E Elapsed Recording Time Indication 36 F File Structure Of Discs 8 Finalise 71 Format disc 70 Frame-By-Frame Playback 24 Free Rate Function 37 G Guide Programme Number 65 I Instant Timer Recording...
... Repeat Playback 32 Adjusting The Picture Quality 33 Angle Selection 26 Audio Channel Selection 27 Audio Language/Sound Selection 27 Auto Channel Set 66 Automatic Satellite Programme Recording 43 B Basic Playback 23 Basic Recording 35 C Check, Cancel And Change Programmes 42 Child Lock 64 D Disc menu 24 Disc Remaining Time 36 Discs For Playback Only 7 DV Dubbing 54 DVD menu 24 E Elapsed Recording Time Indication 36 F File Structure Of Discs 8 Finalise 71 Format disc 70 Frame-By-Frame Playback 24 Free Rate Function 37 G Guide Programme Number 65 I Instant Timer Recording...


