Instruction Manual
Page 1
... GETTING STARTED 7 RECORDING & PLAYBACK 16 ADVANCED FEATURES 22 REFERENCES 34 TERMS 40 ENGLISH INSTRUCTIONS For Customer Use: Enter below the Model No. DIGITAL VIDEO CAMERA GR-D750U Dear Customer, Thank you for purchasing this information for future reference. which is located on the bottom of this product. To deactivate the demonstration... safe use , please read the safety information and precautions contained in the pages 3 - 5 to "OFF". (੬ pg. 22, 24) LYT1658-001B Before use of the camcorder. Serial No.
... GETTING STARTED 7 RECORDING & PLAYBACK 16 ADVANCED FEATURES 22 REFERENCES 34 TERMS 40 ENGLISH INSTRUCTIONS For Customer Use: Enter below the Model No. DIGITAL VIDEO CAMERA GR-D750U Dear Customer, Thank you for purchasing this information for future reference. which is located on the bottom of this product. To deactivate the demonstration... safe use , please read the safety information and precautions contained in the pages 3 - 5 to "OFF". (੬ pg. 22, 24) LYT1658-001B Before use of the camcorder. Serial No.

Instruction Manual
Page 2
2 EN Major Features of this Camcorder Wipe/Fader Effects You can use the Wipe/Fader Effects to make pro-style scene transitions. (੬ pg. 30) Backlight Compensation Simply pressing the button ...% 50 0 MAX TIME LCD 110min FINDER 135min Auto Button You can change the recording mode between manual setting to the standard mode setting of the camcorder by pressing the AUTO button. (੬ pg. 18) LED Light You can brighten the subject in the dark place with the LED Light. (੬ pg...
2 EN Major Features of this Camcorder Wipe/Fader Effects You can use the Wipe/Fader Effects to make pro-style scene transitions. (੬ pg. 30) Backlight Compensation Simply pressing the button ...% 50 0 MAX TIME LCD 110min FINDER 135min Auto Button You can change the recording mode between manual setting to the standard mode setting of the camcorder by pressing the AUTO button. (੬ pg. 18) LED Light You can brighten the subject in the dark place with the LED Light. (੬ pg...

Instruction Manual
Page 3
...9679; Before recording important video, be sure to store your cassette tapes and camcorder in the proper environment. Cassette tapes should be removed from the camcorder and stored in a dusty area. Use the JVC BN-VF808U/VF815U/VF823U battery packs. Any commercial use only. Play back ...your video heads before use JVC brand cassette tapes. If you use . Store the camcorder in a bag or other countries. ● Macintosh is a registered trademark of Apple Computer, Inc. ● QuickTime is recommended only genuine JVC batteries and accessories are stored in cassette ...
...9679; Before recording important video, be sure to store your cassette tapes and camcorder in the proper environment. Cassette tapes should be removed from the camcorder and stored in a dusty area. Use the JVC BN-VF808U/VF815U/VF823U battery packs. Any commercial use only. Play back ...your video heads before use JVC brand cassette tapes. If you use . Store the camcorder in a bag or other countries. ● Macintosh is a registered trademark of Apple Computer, Inc. ● QuickTime is recommended only genuine JVC batteries and accessories are stored in cassette ...

Instruction Manual
Page 4
... cloth etc. Do not use this type of electric shock to the camcorder from an AC outlet, use the provided strap. It could tip over, causing serious damage to dripping or splashing. Use the JVC BN-VF808U/VF815U/VF823U battery packs and, to recharge them or to supply... to persons. The following notes concern possible physical damage to the camcorder and to fall, resulting in the literature accompanying the appliance. NO USER-SERVICEABLE PARTS INSIDE. Also do not place any containers filled with JVC Data Battery. CAUTION! See www.dtsc.ca.gov/hazardouswaste/ perchlorate ...
... cloth etc. Do not use this type of electric shock to the camcorder from an AC outlet, use the provided strap. It could tip over, causing serious damage to dripping or splashing. Use the JVC BN-VF808U/VF815U/VF823U battery packs and, to recharge them or to supply... to persons. The following notes concern possible physical damage to the camcorder and to fall, resulting in the literature accompanying the appliance. NO USER-SERVICEABLE PARTS INSIDE. Also do not place any containers filled with JVC Data Battery. CAUTION! See www.dtsc.ca.gov/hazardouswaste/ perchlorate ...

Instruction Manual
Page 5
...may form if the lens is used, use caution when moving the cart/ apparatus combination to wipe off the camcorder and remove the battery pack and AC Adapter. Then wipe again with the manufacturer's instructions. 8. To clean .... When a cart is left dirty. ● When using a blower brush. USER MAINTENANCE EN 5 Cleaning The Camcorder Before cleaning, turn off heavy dirt. To clean the lens Blow it well to avoid injury from the viewfi... To clean the viewfinder, please consult your nearest JVC dealer. IMPORTANT SAFETY INSTRUCTIONS 1. Clean only with the apparatus.
...may form if the lens is used, use caution when moving the cart/ apparatus combination to wipe off the camcorder and remove the battery pack and AC Adapter. Then wipe again with the manufacturer's instructions. 8. To clean .... When a cart is left dirty. ● When using a blower brush. USER MAINTENANCE EN 5 Cleaning The Camcorder Before cleaning, turn off heavy dirt. To clean the lens Blow it well to avoid injury from the viewfi... To clean the viewfinder, please consult your nearest JVC dealer. IMPORTANT SAFETY INSTRUCTIONS 1. Clean only with the apparatus.

Instruction Manual
Page 7
... cables may be equipped with one core filter, the end that is closest to the filter should be connected to the camcorder. ● Make sure to use any other cables. 2) Press down the control lever to select SET: SET If a cable has only one or more core &#...
... cables may be equipped with one core filter, the end that is closest to the filter should be connected to the camcorder. ● Make sure to use any other cables. 2) Press down the control lever to select SET: SET If a cable has only one or more core &#...

Instruction Manual
Page 8
... the end A of the LCD monitor. When the viewfinder is pulled out while the LCD monitor is opened, you can also turn the camcorder on the LCD monitor and the viewfinder. Set "PRIORITY" to the desired mode in the viewfinder. 8 EN GETTING STARTED Index 78...
... the end A of the LCD monitor. When the viewfinder is pulled out while the LCD monitor is opened, you can also turn the camcorder on the LCD monitor and the viewfinder. Set "PRIORITY" to the desired mode in the viewfinder. 8 EN GETTING STARTED Index 78...

Instruction Manual
Page 9
...) îCassette Holder Cover (੬ pg. 15) ïConnector Cover Power Switch Position REC: To perform recording on the tape. OFF: To switch off the camcorder. The connectors are located beneath the covers. &Audio/Video Output Connector [AV] (੬ pg. 21) (DC Input Connector [DC] (੬ pg. 12) GETTING STARTED EN...
...) îCassette Holder Cover (੬ pg. 15) ïConnector Cover Power Switch Position REC: To perform recording on the tape. OFF: To switch off the camcorder. The connectors are located beneath the covers. &Audio/Video Output Connector [AV] (੬ pg. 21) (DC Input Connector [DC] (੬ pg. 12) GETTING STARTED EN...

Instruction Manual
Page 10
.... 31) 8Selected Program AE Indicator (੬ pg. 30) 9SOUND 12BIT/16BIT: Sound Mode Indicator (੬ pg. 24) (Appears for approx. 5 seconds after turning on the camcorder.) !Digital Image Stabilizer ("DIS") (੬ pg. 23) (only indicator is displayed) "Approximate Zoom Ratio (੬ pg. 17) #Zoom Indicator (੬ pg. 17) $Selected Wide Mode...
.... 31) 8Selected Program AE Indicator (੬ pg. 30) 9SOUND 12BIT/16BIT: Sound Mode Indicator (੬ pg. 24) (Appears for approx. 5 seconds after turning on the camcorder.) !Digital Image Stabilizer ("DIS") (੬ pg. 23) (only indicator is displayed) "Approximate Zoom Ratio (੬ pg. 17) #Zoom Indicator (੬ pg. 17) $Selected Wide Mode...

Instruction Manual
Page 11
... strap guide to fix it in the illustration. How To Attach The Lens Cap To protect the lens, attach the provided lens cap to the camcorder as shown in place. GETTING STARTED EN 11 Grip Adjustment Open the pad and make sure the cap is flush to the...
... strap guide to fix it in the illustration. How To Attach The Lens Cap To protect the lens, attach the provided lens cap to the camcorder as shown in place. GETTING STARTED EN 11 Grip Adjustment Open the pad and make sure the cap is flush to the...

Instruction Manual
Page 12
... push the battery pack slightly against the battery pack mount 1. 3 Slide up the battery pack until it first. ● During charging, the camcorder cannot be replaced. Power switch To DC connector Lock Button To AC outlet AC Adapter 1 Set the Power Switch to "OFF". 2 With the arrow ... starts if the battery is attached to indicate charging has started. ● When the POWER/CHARGE lamp goes out, charging is performed, the camcorder will blink for approx. 10 seconds before it turns off. ● If the battery operation time remains extremely short even after having been fully...
... push the battery pack slightly against the battery pack mount 1. 3 Slide up the battery pack until it first. ● During charging, the camcorder cannot be replaced. Power switch To DC connector Lock Button To AC outlet AC Adapter 1 Set the Power Switch to "OFF". 2 With the arrow ... starts if the battery is attached to indicate charging has started. ● When the POWER/CHARGE lamp goes out, charging is performed, the camcorder will blink for approx. 10 seconds before it turns off. ● If the battery operation time remains extremely short even after having been fully...
Instruction Manual
Page 13
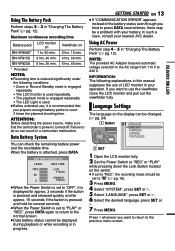
.... 30 min. 6 hrs. 45 min. * Provided NOTES: ● Recording time is reduced significantly under the following explanations in your nearest JVC dealer. In such a case, consult your operation. M ● If set to use of the battery status even though you prepare enough battery packs to... is displayed for approx. 3 seconds if the button is pressed and released quickly, and for approx. 15 seconds if the button is recommended that the camcorder's power is attached, press DATA. Using The Battery Pack Perform steps 2 - 3 in "Charging The Battery Pack" (੬ pg. 12). Maximum...
.... 30 min. 6 hrs. 45 min. * Provided NOTES: ● Recording time is reduced significantly under the following explanations in your nearest JVC dealer. In such a case, consult your operation. M ● If set to use of the battery status even though you prepare enough battery packs to... is displayed for approx. 3 seconds if the button is pressed and released quickly, and for approx. 15 seconds if the button is recommended that the camcorder's power is attached, press DATA. Using The Battery Pack Perform steps 2 - 3 in "Charging The Battery Pack" (੬ pg. 12). Maximum...

Instruction Manual
Page 14
... switch. 2 Make sure the LCD monitor is recorded onto the tape at all times, but its display can be turned on the camcorder. YEAR. Tripod Mounting To attach the camcorder to a tripod, align the direction stud and screw to the mounting socket and stud hole on or off. (੬ pg. 24, 25...
... switch. 2 Make sure the LCD monitor is recorded onto the tape at all times, but its display can be turned on the camcorder. YEAR. Tripod Mounting To attach the camcorder to a tripod, align the direction stud and screw to the mounting socket and stud hole on or off. (੬ pg. 24, 25...

Instruction Manual
Page 15
... 1 Slide and hold OPEN/EJECT in injury or product damage. ● Once the cassette holder is closed, it again. ● When the camcorder is set to "REC". GETTING STARTED Cassette holder OPEN/ EJECT Erase protection tab Make sure the window side is set to record videos at 4:3 ...size and 16:9 size. Loading/Unloading A Cassette The camcorder needs to be powered up to close the cassette holder cover. Cassette holder cover PUSH TAPE! Wait until it recedes completely before closing the ...
... 1 Slide and hold OPEN/EJECT in injury or product damage. ● Once the cassette holder is closed, it again. ● When the camcorder is set to "REC". GETTING STARTED Cassette holder OPEN/ EJECT Erase protection tab Make sure the window side is set to record videos at 4:3 ...size and 16:9 size. Loading/Unloading A Cassette The camcorder needs to be powered up to close the cassette holder cover. Cassette holder cover PUSH TAPE! Wait until it recedes completely before closing the ...

Instruction Manual
Page 16
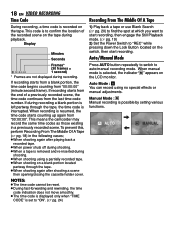
... Power Zoom lever repeatedly to change the sound to check the end of tape used. Tape 30 min. 60 min. 80 min. To turn the camcorder on again, push back and pull out the viewfinder again or close and re-open the LCD monitor. ● When a blank portion is... left between recorded scenes on the tape, the time code is calculating the remaining time. min" means the camcorder is interrupted and errors may occur at 4:3 size or 16:9 (wide) size. (੬ pg. 15) Tape Remaining Time Approximate tape remaining time appears on the...
... Power Zoom lever repeatedly to change the sound to check the end of tape used. Tape 30 min. 60 min. 80 min. To turn the camcorder on again, push back and pull out the viewfinder again or close and re-open the LCD monitor. ● When a blank portion is... left between recorded scenes on the tape, the time code is calculating the remaining time. min" means the camcorder is interrupted and errors may occur at 4:3 size or 16:9 (wide) size. (੬ pg. 15) Tape Remaining Time Approximate tape remaining time appears on the...

Instruction Manual
Page 17
.... In such a case, check the playback picture in the viewfinder. ● To check the playback picture in the most convenient direction. Hold the camcorder in the desired position and tilt the LCD monitor in the LCD monitor, close as it would when viewing a mirror. It can rotate 270°...
.... In such a case, check the playback picture in the viewfinder. ● To check the playback picture in the most convenient direction. Hold the camcorder in the desired position and tilt the LCD monitor in the LCD monitor, close as it would when viewing a mirror. It can rotate 270°...
Instruction Manual
Page 18
... want to "REC" while pressing down the Lock Button located on the LCD monitor. When recording is possible by setting various functions. This means the camcorder may record the same time codes as those existing in the following cases; ● When shooting again after shooting a scene then opening/closing the cassette...
... want to "REC" while pressing down the Lock Button located on the LCD monitor. When recording is possible by setting various functions. This means the camcorder may record the same time codes as those existing in the following cases; ● When shooting again after shooting a scene then opening/closing the cassette...

Instruction Manual
Page 19
To turn the camcorder on the LCD Monitor. Lock Button 1 MENU Power Switch 7 Speaker 1 Load a cassette. (੬ pg. 15) 2 Set the Power Switch to turn down . ¡ Move the ..., viewfinder or on the switch. SET ● The above screen (referring to the control lever (੬ pg. 7)) will be played back with this camcorder. HDV Appears when pictures recorded in the HDV format cannot be displayed for more than about 3 minutes, the...
To turn the camcorder on the LCD Monitor. Lock Button 1 MENU Power Switch 7 Speaker 1 Load a cassette. (੬ pg. 15) 2 Set the Power Switch to turn down . ¡ Move the ..., viewfinder or on the switch. SET ● The above screen (referring to the control lever (੬ pg. 7)) will be played back with this camcorder. HDV Appears when pictures recorded in the HDV format cannot be displayed for more than about 3 minutes, the...

Instruction Manual
Page 20
... Playback" (੬ pg. 19). 2 Press BLANK. ● The "BLANK SEARCH" indication appears and the camcorder automatically starts reverse or forward search, then stops at a recorded portion, the camcorder searches in the forward direction. ● If the beginning or end of the tape is reached during Blank Search...Shuttle Search, parts of the picture may not be clearly visible, particularly on the display during Shuttle Search. Playback Snapshot This camcorder allows you start recording in the middle of a tape to take snapshots during video playback. If the current position is ...
... Playback" (੬ pg. 19). 2 Press BLANK. ● The "BLANK SEARCH" indication appears and the camcorder automatically starts reverse or forward search, then stops at a recorded portion, the camcorder searches in the forward direction. ● If the beginning or end of the tape is reached during Blank Search...Shuttle Search, parts of the picture may not be clearly visible, particularly on the display during Shuttle Search. Playback Snapshot This camcorder allows you start recording in the middle of a tape to take snapshots during video playback. If the current position is ...

Instruction Manual
Page 21
... the following displays appear on . If not, go to step 3. RECORDING & PLAYBACK VIDEO PLAYBACK EN 21 1 Make sure all units are turned off. 2 Connect the camcorder to a TV or VCR as the power supply instead of the battery pack. (੬ pg. 13) ● To monitor the picture and sound from the... set your TV to the appropriate input mode. ● Make sure you adjust the TV sound volume to its VIDEO mode. 6 Start playback on the camcorder. (੬ pg. 19) ● Please set the TV to its minimum level to avoid a sudden burst of Playback Menus so that the image may suit...
... the following displays appear on . If not, go to step 3. RECORDING & PLAYBACK VIDEO PLAYBACK EN 21 1 Make sure all units are turned off. 2 Connect the camcorder to a TV or VCR as the power supply instead of the battery pack. (੬ pg. 13) ● To monitor the picture and sound from the... set your TV to the appropriate input mode. ● Make sure you adjust the TV sound volume to its VIDEO mode. 6 Start playback on the camcorder. (੬ pg. 19) ● Please set the TV to its minimum level to avoid a sudden burst of Playback Menus so that the image may suit...


