Instructions
Page 10
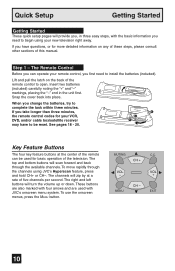
...remote control to complete the task within three minutes. If you need to begin using JVC's Hyperscan feature, press and hold CH+ or CH-. If you have to be used... are also marked with four arrows and are used for more detailed information on the back of this manual. To use the onscreen menus, press the MENU button. �� � ��&#...; The top and bottom buttons will scan forward and back through the channels using your new television right away. Quick Setup Getting Started Getting Started These quick setup pages will provide you, in...
...remote control to complete the task within three minutes. If you need to begin using JVC's Hyperscan feature, press and hold CH+ or CH-. If you have to be used... are also marked with four arrows and are used for more detailed information on the back of this manual. To use the onscreen menus, press the MENU button. �� � ��&#...; The top and bottom buttons will scan forward and back through the channels using your new television right away. Quick Setup Getting Started Getting Started These quick setup pages will provide you, in...
Instructions
Page 13
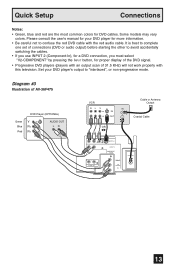
...; ���� � � 13 Diagram #3 Illustration of 31.5 KHz) will not work properly with the red audio cable. Please consult the user's manual for your DVD player's output to "interlaced", or non-progressive mode. Quick Setup Connections Notes: • Green, blue and red are the most common colors...
...; ���� � � 13 Diagram #3 Illustration of 31.5 KHz) will not work properly with the red audio cable. Please consult the user's manual for your DVD player's output to "interlaced", or non-progressive mode. Quick Setup Connections Notes: • Green, blue and red are the most common colors...

Instructions
Page 14
... input jacks, using the front input jacks (Input 3) located under the front panel door. Notes: • Refer to your television by using the same instructions. Illustration of AV-36F475 ���� 1) Connect a yellow composite cable from the camcorder VIDEO OUT...INPUT on the front of the TV to open it. Note: • If your camcorder is a mono sound model it to your amplifier's manual for your home theater system. 14 Connect it will have only one AUDIO OUT. Quick Setup Connections Connecting to a Camcorder You may connect a camcorder...
... input jacks, using the front input jacks (Input 3) located under the front panel door. Notes: • Refer to your television by using the same instructions. Illustration of AV-36F475 ���� 1) Connect a yellow composite cable from the camcorder VIDEO OUT...INPUT on the front of the TV to open it. Note: • If your camcorder is a mono sound model it to your amplifier's manual for your home theater system. 14 Connect it will have only one AUDIO OUT. Quick Setup Connections Connecting to a Camcorder You may connect a camcorder...
Instructions
Page 15
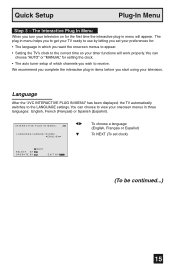
... you wish to get your television. The Interactive Plug In Menu When you turn your preferences for setting the clock. • The auto tuner setup of which you set clock) ���� (To be continued...) 15 Language After the "JVC INTERACTIVE PLUG IN MENU" has... been displayed, the TV automatically switches to use by letting you want the onscreen menus to appear. • Setting the TV's clock to the correct time so your timer functions will appear. You can choose "AUTO" or "MANUAL" for : &#...
... you wish to get your television. The Interactive Plug In Menu When you turn your preferences for setting the clock. • The auto tuner setup of which you set clock) ���� (To be continued...) 15 Language After the "JVC INTERACTIVE PLUG IN MENU" has... been displayed, the TV automatically switches to use by letting you want the onscreen menus to appear. • Setting the TV's clock to the correct time so your timer functions will appear. You can choose "AUTO" or "MANUAL" for : &#...

Instructions
Page 16
... Menu Auto Clock Set Before you use any of your TV's timer functions, you must set the clock before operating any timer functions. See manual clock set the clock before operating any timer functions. (To be used only for US and Canada when it is set to AUTO, the ... SET CLOCK menu. • Only when the MODE set the clock. If you choose AUTO, see auto clock set above. √® † To choose MANUAL To TIME √® † To set the hour To minute √® † To set the clock using the XDS signal: √® ...
... Menu Auto Clock Set Before you use any of your TV's timer functions, you must set the clock before operating any timer functions. See manual clock set the clock before operating any timer functions. (To be used only for US and Canada when it is set to AUTO, the ... SET CLOCK menu. • Only when the MODE set the clock. If you choose AUTO, see auto clock set above. √® † To choose MANUAL To TIME √® † To set the hour To minute √® † To set the clock using the XDS signal: √® ...

Instructions
Page 38
... to minutes To set the minutes To START CLOCK To operate Notes: • D.S.T. You must set clock function is set to set the clock manually, choose MANUAL by pressing the √ or ® arrows. π† √® π† √® † √® ...Daylight Savings. ON or OFF To FINISH To save settings Press the EXIT button when finished When you set the clock automatically, or manually. The clock will move forward one hour at 2:00 am on the last Sunday in October. • You will move back ...
... to minutes To set the minutes To START CLOCK To operate Notes: • D.S.T. You must set clock function is set to set the clock manually, choose MANUAL by pressing the √ or ® arrows. π† √® π† √® † √® ...Daylight Savings. ON or OFF To FINISH To save settings Press the EXIT button when finished When you set the clock automatically, or manually. The clock will move forward one hour at 2:00 am on the last Sunday in October. • You will move back ...
Instructions
Page 48
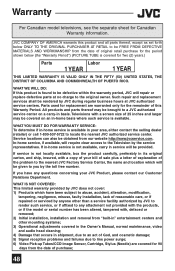
... Initial installation, installation and removal from "built-in" entertainment centers and other mounting systems; 3) Operational adjustments covered in the Owner's Manual, normal maintenance, video and audio head cleaning; 4) Damage that occurs in shipment, due to an act of God, and cosmetic damage...; 5) Signal reception problems and failures due to a JVC authorized service center on a carry-in -home service is available. JVC COMPANY OF AMERICA warrants this Warranty Period. Televisions with a copy of your area, either contact the selling dealer (retailer)...
... Initial installation, installation and removal from "built-in" entertainment centers and other mounting systems; 3) Operational adjustments covered in the Owner's Manual, normal maintenance, video and audio head cleaning; 4) Damage that occurs in shipment, due to an act of God, and cosmetic damage...; 5) Signal reception problems and failures due to a JVC authorized service center on a carry-in -home service is available. JVC COMPANY OF AMERICA warrants this Warranty Period. Televisions with a copy of your area, either contact the selling dealer (retailer)...


