Owners Manual
Page 3
...Removing/Installing the Seat Assembly 42 Replacing the Seat Positioning Strap ...43 Part No 1125085 3 Pronto® M51™and M61™with SureStep® TABLE OF CONTENTS TABLE OF CONTENTS REFERENCE DOCUMENTS 2 REGISTER YOUR PRODUCT 4 SPECIAL NOTES 5 LABEL ...LOCATION 7 TYPICAL PRODUCT PARAMETERS 8 SECTION 1-GENERAL GUIDELINES 10 Controller Settings/Repair or Service 10 Accessories ...10 Operation Information ...10 Batteries...12 Grounding Instructions ...13 Rain Test...13 Weight Training ...13 Weight Limitation...13 SECTION 2-EMI INFORMATION 14 SECTION 3-SAFETY/HANDLING...
...Removing/Installing the Seat Assembly 42 Replacing the Seat Positioning Strap ...43 Part No 1125085 3 Pronto® M51™and M61™with SureStep® TABLE OF CONTENTS TABLE OF CONTENTS REFERENCE DOCUMENTS 2 REGISTER YOUR PRODUCT 4 SPECIAL NOTES 5 LABEL ...LOCATION 7 TYPICAL PRODUCT PARAMETERS 8 SECTION 1-GENERAL GUIDELINES 10 Controller Settings/Repair or Service 10 Accessories ...10 Operation Information ...10 Batteries...12 Grounding Instructions ...13 Rain Test...13 Weight Training ...13 Weight Limitation...13 SECTION 2-EMI INFORMATION 14 SECTION 3-SAFETY/HANDLING...
Owners Manual
Page 4
.... 2. Any registration information you submit will only be used by Invacare Corporation and protected as required by applicable laws and regulations. Pronto® M51™and M61™with product information, maintenance tips and industry news. Ensuring long...Assemblies 58 Adjusting Forks ...59 SECTION 11-BATTERIES 60 Warnings For Handling and Replacing Batteries 60 Using the Proper Batteries...61 Removing/Installing Batteries from/into Battery Tray 61 Connecting/Disconnecting Battery Cables 63 Charging Batteries ...66 Battery Charger Operation...67 SECTION 12-ELECTRONICS 71...
.... 2. Any registration information you submit will only be used by Invacare Corporation and protected as required by applicable laws and regulations. Pronto® M51™and M61™with product information, maintenance tips and industry news. Ensuring long...Assemblies 58 Adjusting Forks ...59 SECTION 11-BATTERIES 60 Warnings For Handling and Replacing Batteries 60 Using the Proper Batteries...61 Removing/Installing Batteries from/into Battery Tray 61 Connecting/Disconnecting Battery Cables 63 Charging Batteries ...66 Battery Charger Operation...67 SECTION 12-ELECTRONICS 71...
Owners Manual
Page 8
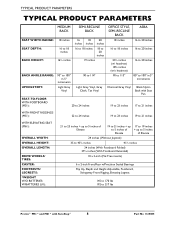
... WITH FRONT RIGGINGS (M51): 22 to 24 inches 19 to 23 inches 19 to 21 inches WITH ELEVATING SEAT (M61): OVERALL WIDTH: OVERALL HEIGHT: OVERALL LENGTH: DRIVE WHEELS/ TIRES: CASTER: FOOTRESTS/ LEGRESTS: *WEIGHT W/O BATTERIES: W/BATTERIES (U1): 21 to 23 inches + up to 5 inches of Elevate 19 to 21 inches + up 17 to 19... Flip Up, Depth and Height Adjustable, Footboard, Swingaway Front Rigging, Elevating Legrest 145 to 170 lbs 192 to 217 lbs Pronto® M51™and M61™with SureStep® 8 Part No 1125085
... WITH FRONT RIGGINGS (M51): 22 to 24 inches 19 to 23 inches 19 to 21 inches WITH ELEVATING SEAT (M61): OVERALL WIDTH: OVERALL HEIGHT: OVERALL LENGTH: DRIVE WHEELS/ TIRES: CASTER: FOOTRESTS/ LEGRESTS: *WEIGHT W/O BATTERIES: W/BATTERIES (U1): 21 to 23 inches + up to 5 inches of Elevate 19 to 21 inches + up 17 to 19... Flip Up, Depth and Height Adjustable, Footboard, Swingaway Front Rigging, Elevating Legrest 145 to 170 lbs 192 to 217 lbs Pronto® M51™and M61™with SureStep® 8 Part No 1125085
Owners Manual
Page 9
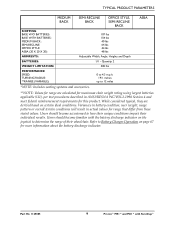
...range of their individual results. Users should become familiar with SureStep® Part No 1125085 9 Pronto® M51™and M61™with the battery discharge indicator on the joystick to how their unique conditions impact their wheelchair. Quantity 2 300 lbs PERFORMANCE SPEED: TURNING RADIUS:...PARAMETERS MEDIUM BACK SEMI-RECLINE BACK OFFICE STYLE, SEMI-RECLINE BACK ASBA SHIPPING BASE W/O BATTERIES: BASE WITH BATTERIES: MEDIUM BACK: SEMI-RECLINE: OFFICE STYLE: ASBA (20 X 20 X 20): ARMRESTS: BATTERIES: WEIGHT LIMITATION: 107 lbs 154 lbs 40 lbs 64 lbs 44 lbs 48 lbs ...
...range of their individual results. Users should become familiar with SureStep® Part No 1125085 9 Pronto® M51™and M61™with the battery discharge indicator on the joystick to how their unique conditions impact their wheelchair. Quantity 2 300 lbs PERFORMANCE SPEED: TURNING RADIUS:...PARAMETERS MEDIUM BACK SEMI-RECLINE BACK OFFICE STYLE, SEMI-RECLINE BACK ASBA SHIPPING BASE W/O BATTERIES: BASE WITH BATTERIES: MEDIUM BACK: SEMI-RECLINE: OFFICE STYLE: ASBA (20 X 20 X 20): ARMRESTS: BATTERIES: WEIGHT LIMITATION: 107 lbs 154 lbs 40 lbs 64 lbs 44 lbs 48 lbs ...
Owners Manual
Page 12
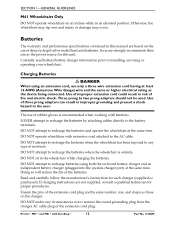
Invacare strongly recommends their use only a three wire extension cord having at least 16 AWG (American Wire Gauge) wire and the same or higher electrical rating as the device being connected. NEVER attempt to recharge the batteries by attaching cables directly to the AC cable. DO NOT sit in ... should not be used. The use of moisture. DO NOT under any type of deep cycle gel cell or sealed lead acid batteries. SECTION 1-GENERAL GUIDELINES M61 Wheelchairs Only DO NOT operate wheelchair on an incline while in improper grounding and present a shock hazard to the user. Three prong...
Invacare strongly recommends their use only a three wire extension cord having at least 16 AWG (American Wire Gauge) wire and the same or higher electrical rating as the device being connected. NEVER attempt to recharge the batteries by attaching cables directly to the AC cable. DO NOT sit in ... should not be used. The use of moisture. DO NOT under any type of deep cycle gel cell or sealed lead acid batteries. SECTION 1-GENERAL GUIDELINES M61 Wheelchairs Only DO NOT operate wheelchair on an incline while in improper grounding and present a shock hazard to the user. Three prong...
Owners Manual
Page 13
.... DO NOT use of its power wheelchairs in a damp area for bodily injury and the warranty is torn or cracked. Weight Limitation The M51 and M61 wheelchairs with ISO 7176 "Rain Test." Where a two‐ prong wall receptacle is encountered, it is not torn or cracked where water can enter ...and that the RED and GREY battery terminal caps are secure at all times. In addition, Invacare has placed RED/ORANGE warning tags on some equipment. Direct exposure to excessive rain or dampness may cause the chair to...
.... DO NOT use of its power wheelchairs in a damp area for bodily injury and the warranty is torn or cracked. Weight Limitation The M51 and M61 wheelchairs with ISO 7176 "Rain Test." Where a two‐ prong wall receptacle is encountered, it is not torn or cracked where water can enter ...and that the RED and GREY battery terminal caps are secure at all times. In addition, Invacare has placed RED/ORANGE warning tags on some equipment. Direct exposure to excessive rain or dampness may cause the chair to...
Owners Manual
Page 19
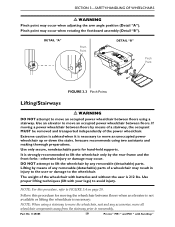
... "B"). Use an elevator to move all wheelchair components away from the stairway prior to reassembly. Invacare recommends using a stairway to move an unoccupied power wheelchair up or down the stairs. Lifting ... wheelchair by the rear frame and the front forks - The weight of the wheelchair with batteries and without the user is necessary to avoid injury. It is necessary: NOTE: When using... two assistants and making thorough preparations. Part No 1125085 19 Pronto® M51™and M61™with your legs) to move the wheelchair, seat and any removable (detachable) parts ...
... "B"). Use an elevator to move all wheelchair components away from the stairway prior to reassembly. Invacare recommends using a stairway to move an unoccupied power wheelchair up or down the stairs. Lifting ... wheelchair by the rear frame and the front forks - The weight of the wheelchair with batteries and without the user is necessary to avoid injury. It is necessary: NOTE: When using... two assistants and making thorough preparations. Part No 1125085 19 Pronto® M51™and M61™with your legs) to move the wheelchair, seat and any removable (detachable) parts ...
Owners Manual
Page 25
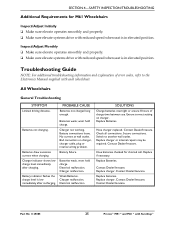
... charger cable, plug or internal wiring problem. Contact Dealer/Invacare. Replace charger. Part No 1125085 25 Pronto® M51™and M61™with each wheelchair. Batteries weak, wont hold charge. Charger malfunction. Switch to the.... Contact Dealer/Invacare. Contact Dealer/Invacare. Troubleshooting Guide NOTE: For additional troubleshooting information and explanation of charge time between use. Replace Batteries. Contact Dealer/Invacare. PROBABLE CAUSE Batteries not charged long enough. Have batteries checked for M61 Wheelchairs Inspect/Adjust...
... charger cable, plug or internal wiring problem. Contact Dealer/Invacare. Replace charger. Part No 1125085 25 Pronto® M51™and M61™with each wheelchair. Batteries weak, wont hold charge. Charger malfunction. Switch to the.... Contact Dealer/Invacare. Contact Dealer/Invacare. Troubleshooting Guide NOTE: For additional troubleshooting information and explanation of charge time between use. Replace Batteries. Contact Dealer/Invacare. PROBABLE CAUSE Batteries not charged long enough. Have batteries checked for M61 Wheelchairs Inspect/Adjust...
Owners Manual
Page 26
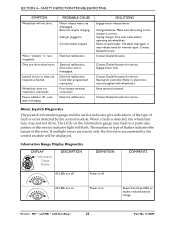
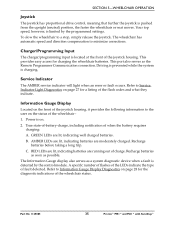
... Display Diagnostics DISPLAY Information Gauge Display DESCRIPTION DEFINITION COMMENTS All LEDs are on implies reduced battery charge. All LEDs are off - Pronto® M51™and M61™with wheelchair). Power indicator off . Electrical malfunction. Contact Dealer/Invacare for service. When a fault is correct. Fewer than three LEDs on . Only one drive wheel...
... Display Diagnostics DISPLAY Information Gauge Display DESCRIPTION DEFINITION COMMENTS All LEDs are on implies reduced battery charge. All LEDs are off - Pronto® M51™and M61™with wheelchair). Power indicator off . Electrical malfunction. Contact Dealer/Invacare for service. When a fault is correct. Fewer than three LEDs on . Only one drive wheel...
Owners Manual
Page 27
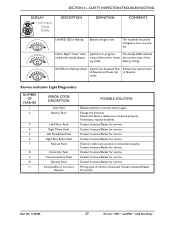
... is connected properly. ming, inhibit and/or charg- Joystick has detected Out- Charge the batteries. Contact Invacare/Dealer for service. Contact Invacare/Dealer for service. Contact Invacare/Dealer for service. Part No 1125085 27 Pronto® M51™and M61™with steady display. the current state of -Neutral-at-Power-Up to make sure...
... is connected properly. ming, inhibit and/or charg- Joystick has detected Out- Charge the batteries. Contact Invacare/Dealer for service. Contact Invacare/Dealer for service. Contact Invacare/Dealer for service. Part No 1125085 27 Pronto® M51™and M61™with steady display. the current state of -Neutral-at-Power-Up to make sure...
Owners Manual
Page 28
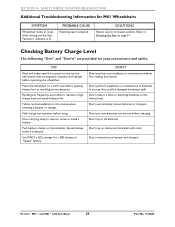
... to maintain a high charge level and extend battery life. Follow recommendations in an area that accompanies a battery and charger before charging. Use a carrying strap to its lowest position. Pronto® M51™and M61™with tools. SECTION 4-SAFETY INSPECTION/TROUBLESHOOTING Additional Troubleshooting Information for M61 Wheelchairs SYMPTOM Wheelchair slows or stops while driving...
... to maintain a high charge level and extend battery life. Follow recommendations in an area that accompanies a battery and charger before charging. Use a carrying strap to its lowest position. Pronto® M51™and M61™with tools. SECTION 4-SAFETY INSPECTION/TROUBLESHOOTING Additional Troubleshooting Information for M61 Wheelchairs SYMPTOM Wheelchair slows or stops while driving...
Owners Manual
Page 35
... front of the wheelchair ‐ 1. Part No 1125085 35 Pronto® M51™and M61™with SureStep® Recharge batteries before taking a long trip. Recharge batteries as soon as the Remote Programmer Communication connection. The wheelchair has automatic speed and direction compensation to... housing, it provides the following information to minimize corrections. This port also serves as possible. RED LEDs are lit, indicating batteries are running out of the joystick housing. To slow the wheelchair to a stop, simply release the joystick. The Information Gauge...
... front of the wheelchair ‐ 1. Part No 1125085 35 Pronto® M51™and M61™with SureStep® Recharge batteries before taking a long trip. Recharge batteries as soon as the Remote Programmer Communication connection. The wheelchair has automatic speed and direction compensation to... housing, it provides the following information to minimize corrections. This port also serves as possible. RED LEDs are lit, indicating batteries are running out of the joystick housing. To slow the wheelchair to a stop, simply release the joystick. The Information Gauge...
Owners Manual
Page 57
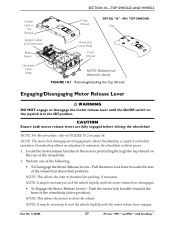
... the Motor Release Levers ‐ Push the motor lock handles towards the rear of the wheelchair. 2. Part No 1125085 57 Pronto® M51™and M61™with SureStep® NOTE: It may be necessary to rock the wheels slightly until the On/Off switch on the joystick is in Top... one of the following: • To Disengage the Motor Release Levers ‐ Pull the motor lock lever towards the front of the wheelchair (drive position). M61 TOP SHROUD Clip Hook and Loop Strap Front Shroud NOTE: Batteries not shown for pushing, if necessary.
... the Motor Release Levers ‐ Push the motor lock handles towards the rear of the wheelchair. 2. Part No 1125085 57 Pronto® M51™and M61™with SureStep® NOTE: It may be necessary to rock the wheels slightly until the On/Off switch on the joystick is in Top... one of the following: • To Disengage the Motor Release Levers ‐ Pull the motor lock lever towards the front of the wheelchair (drive position). M61 TOP SHROUD Clip Hook and Loop Strap Front Shroud NOTE: Batteries not shown for pushing, if necessary.
Owners Manual
Page 60
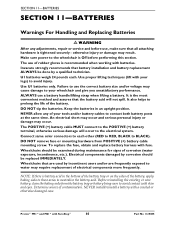
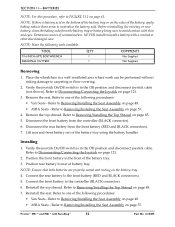
...Invacare strongly recommends that battery installation and battery replacement ALWAYS be done by incontinent users and/or are used by a qualified technician. Use proper lifting techniques (lift with batteries. It is tightened securely - Keep the batteries in the bottom of the battery tray or on the sides of the battery...Pronto® M51™and M61™with fuse. Connect same color connectors to each . DO NOT remove fuse or mounting hardware from the battery tray or battery being sure to prolong the life of the battery. NOTE: If there is battery acid in an upright position....
...Invacare strongly recommends that battery installation and battery replacement ALWAYS be done by incontinent users and/or are used by a qualified technician. Use proper lifting techniques (lift with batteries. It is tightened securely - Keep the batteries in the bottom of the battery tray or on the sides of the battery...Pronto® M51™and M61™with fuse. Connect same color connectors to each . DO NOT remove fuse or mounting hardware from the battery tray or battery being sure to prolong the life of the battery. NOTE: If there is battery acid in an upright position....

Owners Manual
Page 61
... (+) Battery Terminal NEGATIVE (-) Battery Terminal U1 Battery POSITIVE (+) Battery Terminal FIGURE 11.1 Using the Proper Batteries U1 Battery Removing/Installing Batteries from/into Battery Tray ƽ WARNING ALWAYS use the battery handle when lifting the battery. It is the most convenient method and assures that the battery acid will not spill. Part No 1125085 61 Pronto® M51™and M61™...
... (+) Battery Terminal NEGATIVE (-) Battery Terminal U1 Battery POSITIVE (+) Battery Terminal FIGURE 11.1 Using the Proper Batteries U1 Battery Removing/Installing Batteries from/into Battery Tray ƽ WARNING ALWAYS use the battery handle when lifting the battery. It is the most convenient method and assures that the battery acid will not spill. Part No 1125085 61 Pronto® M51™and M61™...
Owners Manual
Page 62
.../Installing the Top Shroud on page 121. 2. Position the front battery in rear of battery tray. Pronto® M51™and M61™with a cracked or otherwise damaged case. Before reinstalling the existing or new battery, clean the baking soda from the controller (BLACK connector). 6....8226; ASBA Seats ‐ Refer to Disconnecting/Connecting the Joystick on the battery tray. 4. Disconnect the front battery from the battery tray or battery being sure to avoid contact with skin and eyes. SECTION 11-BATTERIES NOTE: For this procedure, refer to FIGURE 11.2 on the sides ...
.../Installing the Top Shroud on page 121. 2. Position the front battery in rear of battery tray. Pronto® M51™and M61™with a cracked or otherwise damaged case. Before reinstalling the existing or new battery, clean the baking soda from the controller (BLACK connector). 6....8226; ASBA Seats ‐ Refer to Disconnecting/Connecting the Joystick on the battery tray. 4. Disconnect the front battery from the battery tray or battery being sure to avoid contact with skin and eyes. SECTION 11-BATTERIES NOTE: For this procedure, refer to FIGURE 11.2 on the sides ...
Owners Manual
Page 63
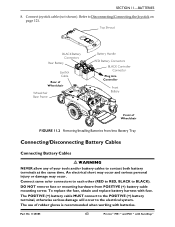
... occur. DO NOT remove fuse or mounting hardware from /into Controller Front Battery Front of your tools and/or battery cables to the electrical system. Part No 1125085 63 Pronto® M51™and M61™with SureStep® Connect joystick cable (not shown). Connect same color... connectors to each other (RED to RED, BLACK to Disconnecting/Connecting the Joystick on page 121. The POSITIVE (+) battery cable MUST connect to the POSITIVE (+) battery terminal, otherwise serious damage...
... occur. DO NOT remove fuse or mounting hardware from /into Controller Front Battery Front of your tools and/or battery cables to the electrical system. Part No 1125085 63 Pronto® M51™and M61™with SureStep® Connect joystick cable (not shown). Connect same color... connectors to each other (RED to RED, BLACK to Disconnecting/Connecting the Joystick on page 121. The POSITIVE (+) battery cable MUST connect to the POSITIVE (+) battery terminal, otherwise serious damage...
Owners Manual
Page 64
...of FIGURE 11.3 (depending on page 66. Batteries that have the terminal configuration reversed MUST NOT be reduced. 6. Secure the POSITIVE (+) battery cable to Detail "A" of the batteries will be used . Pronto® M51™and M61™with SureStep® 64 Part No 1125085... If necessary, charge the battery. NOTE: New batteries MUST be connected to the battery terminals as described below. CAUTION When connecting the battery cables to the battery, the battery cables MUST be fully charged ...
...of FIGURE 11.3 (depending on page 66. Batteries that have the terminal configuration reversed MUST NOT be reduced. 6. Secure the POSITIVE (+) battery cable to Detail "A" of the batteries will be used . Pronto® M51™and M61™with SureStep® 64 Part No 1125085... If necessary, charge the battery. NOTE: New batteries MUST be connected to the battery terminals as described below. CAUTION When connecting the battery cables to the battery, the battery cables MUST be fully charged ...

Owners Manual
Page 65
... batteries removed for clarity. SECTION 11-BATTERIES POSITIVE (+) Battery Terminal Cap NEGATIVE (-) Battery Terminal Cap BLACK Connectors POSITIVE (+) Battery Cable DETAIL "A" RED Connectors NOTE: Battery terminal caps not shown on batteries removed for clarity. U1 Batteries FIGURE 11.3 Connecting/Disconnecting Battery Cables Plug into controller Part No 1125085 65 Pronto® M51™and M61™with Mounting Screw POSITIVE (+) Battery...
... batteries removed for clarity. SECTION 11-BATTERIES POSITIVE (+) Battery Terminal Cap NEGATIVE (-) Battery Terminal Cap BLACK Connectors POSITIVE (+) Battery Cable DETAIL "A" RED Connectors NOTE: Battery terminal caps not shown on batteries removed for clarity. U1 Batteries FIGURE 11.3 Connecting/Disconnecting Battery Cables Plug into controller Part No 1125085 65 Pronto® M51™and M61™with Mounting Screw POSITIVE (+) Battery...
Owners Manual
Page 66
... so will reduce the life of the batteries. Pronto® M51™and M61™with batteries. DO NOT attempt to the battery terminals. Cut the tie‐wrap that secures the battery terminal cap in the wheelchair while recharging the batteries. Charging Batteries ƽ WARNING NEVER attempt to recharge the batteries by attaching cables directly to recharge...
... so will reduce the life of the batteries. Pronto® M51™and M61™with batteries. DO NOT attempt to the battery terminals. Cut the tie‐wrap that secures the battery terminal cap in the wheelchair while recharging the batteries. Charging Batteries ƽ WARNING NEVER attempt to recharge the batteries by attaching cables directly to recharge...


