
User Guide
Page 5
... by their edges. Take care to grip with, but not the board wrapper. ESD and handling boards: Always handle boards carefully. Installing or removing jumpers: A jumper is unplugged before opening it. Intel® Server Board S5000PAL User's Guide v Otherwise, personal injury or equipment damage can damage disk drives, boards, and other parts. Use a conductive foam pad if available but not...
... by their edges. Take care to grip with, but not the board wrapper. ESD and handling boards: Always handle boards carefully. Installing or removing jumpers: A jumper is unplugged before opening it. Intel® Server Board S5000PAL User's Guide v Otherwise, personal injury or equipment damage can damage disk drives, boards, and other parts. Use a conductive foam pad if available but not...

User Guide
Page 11
... ...vii Product Accessories ...viii Additional Information and Software viii Chapter 2: Server Board Features 1 Connector and Component Locations 3 Configuration Jumpers ...5 Intel® Light Guided Diagnostics 7 Back Panel Connectors ...8 RAID Support ...Server Utilities 15 Using the BIOS Setup Utility 15 Starting Setup ...15 If You Cannot Access Setup 15 Setup Menus ...15 Upgrading the BIOS ...17 Preparing for the Upgrade 17 Upgrading the BIOS ...18 Clearing the Password ...18 Clearing the CMOS ...19 Chapter 4: Hardware Installations and Upgrades 21 Intel® Server Board S5000PAL...
... ...vii Product Accessories ...viii Additional Information and Software viii Chapter 2: Server Board Features 1 Connector and Component Locations 3 Configuration Jumpers ...5 Intel® Light Guided Diagnostics 7 Back Panel Connectors ...8 RAID Support ...Server Utilities 15 Using the BIOS Setup Utility 15 Starting Setup ...15 If You Cannot Access Setup 15 Setup Menus ...15 Upgrading the BIOS ...17 Preparing for the Upgrade 17 Upgrading the BIOS ...18 Clearing the Password ...18 Clearing the CMOS ...19 Chapter 4: Hardware Installations and Upgrades 21 Intel® Server Board S5000PAL...

User Guide
Page 17
... Placement Diagram 54 Intel® Server Board S5000PAL User's Guide xvii ILifting the Processor Socket Handle 24 Figure 13. Intel® Server Board S5000PAL 1 Figure 2. Light Guided Diagnostic LEDs 7 Figure 6. Four DIMM Configuration Example 12 Figure 9. Installing the Processor 24 Figure 14. Back Panel Connectors 8 Figure 7. Recovery Jumpers ...6 Figure 5. Installing the Heat Sink 26 Figure 16. Server Board Connector and Component...
... Placement Diagram 54 Intel® Server Board S5000PAL User's Guide xvii ILifting the Processor Socket Handle 24 Figure 13. Intel® Server Board S5000PAL 1 Figure 2. Light Guided Diagnostic LEDs 7 Figure 6. Four DIMM Configuration Example 12 Figure 9. Installing the Processor 24 Figure 14. Back Panel Connectors 8 Figure 7. Recovery Jumpers ...6 Figure 5. Installing the Heat Sink 26 Figure 16. Server Board Connector and Component...

User Guide
Page 23
These pins should be selected on 2-3 for normal operation. Configuration Jumpers BIOS Select J3H1 3 3 1-2: Force Lower Bank 2-3: Normal Operation (Default) Jumper Name BIOS Select TP02087 Jumper Purpose If pins 1-2 are jumpered, the BIOS in the lower bank will be jumpered on the next reset. Figure 3. BIOS Select Jumper Intel® Server Board S5000PAL User's Guide 5
These pins should be selected on 2-3 for normal operation. Configuration Jumpers BIOS Select J3H1 3 3 1-2: Force Lower Bank 2-3: Normal Operation (Default) Jumper Name BIOS Select TP02087 Jumper Purpose If pins 1-2 are jumpered, the BIOS in the lower bank will be jumpered on the next reset. Figure 3. BIOS Select Jumper Intel® Server Board S5000PAL User's Guide 5

User Guide
Page 24
... Update Mode is enabled. These pins should be jumpered on 1-2 for normal operation. Recovery Jumpers 6 Intel® Server Board S5000PAL User's Guide Figure 4. These pins should be jumpered on the next reset. If pins 2-3 are jumpered, administrator and user passwords will be cleared on 1-2 for normal operation. These pins should be jumpered on the next reset. BMC Force Update...
... Update Mode is enabled. These pins should be jumpered on 1-2 for normal operation. Recovery Jumpers 6 Intel® Server Board S5000PAL User's Guide Figure 4. These pins should be jumpered on the next reset. If pins 2-3 are jumpered, administrator and user passwords will be cleared on 1-2 for normal operation. These pins should be jumpered on the next reset. BMC Force Update...

User Guide
Page 33
...You can enter and start BIOS Setup under several conditions: • When you turn on the server, after POST completes the memory test. • When you have moved the CMOS jumper on clearing the CMOS, see other prompts but not the prompt: Warning: CMOS checksum invalid ...If a value cannot be changed for a link to change server configuration defaults. 3 Server Utilities Using the BIOS Setup Utility This section describes the BIOS Setup Utility options, which is used to the Intel® 5000 Series Chipsets Server Board Family Datasheet where you will find details about specific BIOS setup...
...You can enter and start BIOS Setup under several conditions: • When you turn on the server, after POST completes the memory test. • When you have moved the CMOS jumper on clearing the CMOS, see other prompts but not the prompt: Warning: CMOS checksum invalid ...If a value cannot be changed for a link to change server configuration defaults. 3 Server Utilities Using the BIOS Setup Utility This section describes the BIOS Setup Utility options, which is used to the Intel® 5000 Series Chipsets Server Board Family Datasheet where you will find details about specific BIOS setup...
User Guide
Page 36
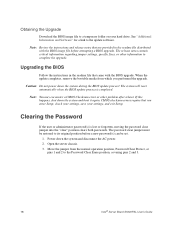
...instructions and release notes that you performed the upgrade. Open the server chassis. 3. The system will reset automatically when the BIOS update process is lost or forgotten, moving the password clear jumper into the "clear" position clears both passwords. When the update ...completes, remove the bootable media from the normal operation position, Password Clear Protect, at pins 1 and 2 to the Password Clear Erase position, covering pins 2 and 3. 18 Intel® Server Board S5000PAL User's...
...instructions and release notes that you performed the upgrade. Open the server chassis. 3. The system will reset automatically when the BIOS update process is lost or forgotten, moving the password clear jumper into the "clear" position clears both passwords. When the update ...completes, remove the bootable media from the normal operation position, Password Clear Protect, at pins 1 and 2 to the Password Clear Erase position, covering pins 2 and 3. 18 Intel® Server Board S5000PAL User's...

User Guide
Page 37
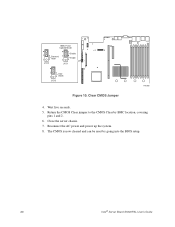
...Intel® Server Board S5000PAL User's Guide 19 Close the server chassis. 7. Move the jumper from the normal operation position, CMOS Clear by going into BIOS setup. Reconnect the AC power and power up the server. 8. Clearing the CMOS If you are not able to access the BIOS setup screens, the CMOS Clear jumper...used to the Password Clear Protect position, covering pins 1 and 2. 6. Clear Password Jumper TP02080 4. Power down the system and disconnect the AC power. 2. Wait five seconds. 5. Open the server. 3. BMC Force Update Mode 2 3 J1D2 Password Reset Disable 2 Enable 3 ...
...Intel® Server Board S5000PAL User's Guide 19 Close the server chassis. 7. Move the jumper from the normal operation position, CMOS Clear by going into BIOS setup. Reconnect the AC power and power up the server. 8. Clearing the CMOS If you are not able to access the BIOS setup screens, the CMOS Clear jumper...used to the Password Clear Protect position, covering pins 1 and 2. 6. Clear Password Jumper TP02080 4. Power down the system and disconnect the AC power. 2. Wait five seconds. 5. Open the server. 3. BMC Force Update Mode 2 3 J1D2 Password Reset Disable 2 Enable 3 ...
User Guide
Page 38
The CMOS is now cleared and can be reset by BMC location, covering pins 1 and 2. 6. Wait five seconds. 5. Reconnect the AC power and power up the system. 8. Return the CMOS Clear jumper to the CMOS Clear by going into the BIOS setup. 20 Intel® Server Board S5000PAL User's Guide Close the server chassis. 7. BMC Force Update Mode 2 3 J1D2 Password Reset Disable 2 Enable 3 J1D1 2 Clear 3 CMOS J1D3 Figure 10. Clear CMOS Jumper TP02080 4.
The CMOS is now cleared and can be reset by BMC location, covering pins 1 and 2. 6. Wait five seconds. 5. Reconnect the AC power and power up the system. 8. Return the CMOS Clear jumper to the CMOS Clear by going into the BIOS setup. 20 Intel® Server Board S5000PAL User's Guide Close the server chassis. 7. BMC Force Update Mode 2 3 J1D2 Password Reset Disable 2 Enable 3 J1D1 2 Clear 3 CMOS J1D3 Figure 10. Clear CMOS Jumper TP02080 4.

User Guide
Page 60
...a potential short? • Are all add-in PCI boards fully seated in their slots on the server board? • Are all jumper settings on the server board correct? • Are all jumper and switch settings on add-in ? See the operating ...system documentation. • Did you are usually caused by an incorrect installation or configuration. To check these settings, refer to the tested component lists. 42 Intel® Server Board S5000PAL...
...a potential short? • Are all add-in PCI boards fully seated in their slots on the server board? • Are all jumper settings on the server board correct? • Are all jumper and switch settings on add-in ? See the operating ...system documentation. • Did you are usually caused by an incorrect installation or configuration. To check these settings, refer to the tested component lists. 42 Intel® Server Board S5000PAL...

User Guide
Page 64
...cables properly connected to the server board? • Are there any of the fan motors stopped? Drive Activity Light Does Not Light Check the following: • Are the drive's power and signal cables properly installed? • Are all relevant switches and jumpers on the drive set correctly?...? • Are all relevant switches and jumpers on light lit? CD-ROM Drive or DVD-ROM Drive Activity Light Does Not Light Check the following : • Is the power-on the drive set correctly? • Is the drive properly configured? 46 Intel® Server Board S5000PAL User's Guide
...cables properly connected to the server board? • Are there any of the fan motors stopped? Drive Activity Light Does Not Light Check the following: • Are the drive's power and signal cables properly installed? • Are all relevant switches and jumpers on the drive set correctly?...? • Are all relevant switches and jumpers on light lit? CD-ROM Drive or DVD-ROM Drive Activity Light Does Not Light Check the following : • Is the power-on the drive set correctly? • Is the drive properly configured? 46 Intel® Server Board S5000PAL User's Guide


