

Integration Guide
Page 2
...htm. Per l'elenco degli SSD M.2 testati, andare a: http://www.intel.com/NUCSupport. 5-AI-Ma* M.2 SSD Q)-Wit.http://www.intel.com/NUCSupport Ell•L•12-1 M.2 SSD *4`e' http://www.intel.com/NUCSupporti List przetestowanych dyskow SSD M.2 nnoZna znaleid na stronie http://www.intel.com/NUCSupport. For a..., andare all 'indirizzo: http://downloadcenter.intel.com. 2 For a list of tested M.2 SSDs, go to: http://www.intel.com/NUCSupport. -iwz http://www.intel.com/support/cn/motherboards/desktop/sb/CS-O34O57.htm. http://www.intel.com/jp/support/nnotherboards/desktop/sb/CS...
...htm. Per l'elenco degli SSD M.2 testati, andare a: http://www.intel.com/NUCSupport. 5-AI-Ma* M.2 SSD Q)-Wit.http://www.intel.com/NUCSupport Ell•L•12-1 M.2 SSD *4`e' http://www.intel.com/NUCSupporti List przetestowanych dyskow SSD M.2 nnoZna znaleid na stronie http://www.intel.com/NUCSupport. For a..., andare all 'indirizzo: http://downloadcenter.intel.com. 2 For a list of tested M.2 SSDs, go to: http://www.intel.com/NUCSupport. -iwz http://www.intel.com/support/cn/motherboards/desktop/sb/CS-O34O57.htm. http://www.intel.com/jp/support/nnotherboards/desktop/sb/CS...

User Guide
Page 2
...chapter only at an ESD workstation using and modifying electronic equipment. To avoid injury, be careful of the computer chassis. Intel NUC Kit NUC5i3RYH & NUC5i5RYH User Guide Before You Begin CAUTIONS The procedures in this user guide assume familiarity with the general...instructions. Disconnect the computer from its power source and from any telecommunications link or network before you increase your computer, such as SSDs, processors, voltage regulators, and heat sinks) Damage to disconnect power, telecommunications links, or networks before performing any ...
...chapter only at an ESD workstation using and modifying electronic equipment. To avoid injury, be careful of the computer chassis. Intel NUC Kit NUC5i3RYH & NUC5i5RYH User Guide Before You Begin CAUTIONS The procedures in this user guide assume familiarity with the general...instructions. Disconnect the computer from its power source and from any telecommunications link or network before you increase your computer, such as SSDs, processors, voltage regulators, and heat sinks) Damage to disconnect power, telecommunications links, or networks before performing any ...
User Guide
Page 3
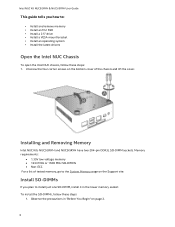
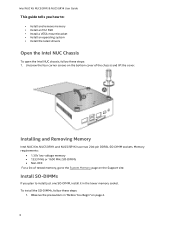
...• Install and remove memory • Install an M.2 SSD • Install a 2.5" drive • Install a VESA mount bracket • Install an operating system • Install the latest drivers Open the Intel NUC Chassis To open the Intel NUC chassis, follow these steps: 1. Observe the precautions in... the lower memory socket. Installing and Removing Memory Intel NUC Kits NUC5i3RYH and NUC5i5RYH have two 204-pin DDR3L SO-...
...• Install and remove memory • Install an M.2 SSD • Install a 2.5" drive • Install a VESA mount bracket • Install an operating system • Install the latest drivers Open the Intel NUC Chassis To open the Intel NUC chassis, follow these steps: 1. Observe the precautions in... the lower memory socket. Installing and Removing Memory Intel NUC Kits NUC5i3RYH and NUC5i5RYH have two 204-pin DDR3L SO-...
User Guide
Page 4
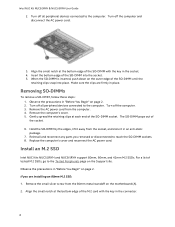
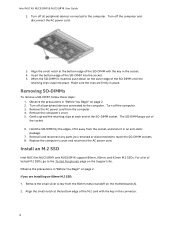
...the socket. 5. Turn off all peripheral devices connected to the computer. Install an M.2 SSD Intel NUC Kits NUC5i3RYH and NUC5i5RYH support 80mm, 60mm, and 42mm M.2 SSDs. Make sure the clips are installing an 80mm M.2 SSD: 1. Remove the AC power cord from the socket, and store it away from the...by the edges, lift it in "Before You Begin" on page 2. 2. Reinstall and reconnect any parts you are firmly in the socket. 4. Intel NUC Kit NUC5i3RYH & NUC5i5RYH User Guide 2. Removing SO-DIMMs To remove a SO-DIMM, follow these steps: 1. Turn off the computer and ...
...the socket. 5. Turn off all peripheral devices connected to the computer. Install an M.2 SSD Intel NUC Kits NUC5i3RYH and NUC5i5RYH support 80mm, 60mm, and 42mm M.2 SSDs. Make sure the clips are installing an 80mm M.2 SSD: 1. Remove the AC power cord from the socket, and store it away from the...by the edges, lift it in "Before You Begin" on page 2. 2. Reinstall and reconnect any parts you are firmly in the socket. 4. Intel NUC Kit NUC5i3RYH & NUC5i5RYH User Guide 2. Removing SO-DIMMs To remove a SO-DIMM, follow these steps: 1. Turn off the computer and ...

User Guide
Page 5
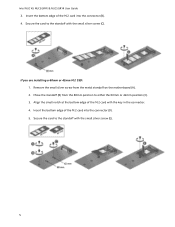
...small silver screw (C). Insert the bottom edge of tested 2.5" hard drives, go to install a 2.5" Solid State Drive (SSD) or Hard Disk Drive (HDD): 1. Move the standoff (B) from the metal standoff on page 2. 5 Secure the... card to either the 60mm or 42mm position (C). 3. Install a 2.5" SSD or Hard Drive For a list of the M.2 card into the connector (B). 4. Remove the small silver screw from ... 2. If you are installing a 60mm or 42mm M.2 SSD: 1. Observe the precautions in the connector. 4. Intel NUC Kit NUC5i3RYH & NUC5i5RYH User Guide 3.
...small silver screw (C). Insert the bottom edge of tested 2.5" hard drives, go to install a 2.5" Solid State Drive (SSD) or Hard Disk Drive (HDD): 1. Move the standoff (B) from the metal standoff on page 2. 5 Secure the... card to either the 60mm or 42mm position (C). 3. Install a 2.5" SSD or Hard Drive For a list of the M.2 card into the connector (B). 4. Remove the small silver screw from ... 2. If you are installing a 60mm or 42mm M.2 SSD: 1. Observe the precautions in the connector. 4. Intel NUC Kit NUC5i3RYH & NUC5i5RYH User Guide 3.
Integration Guide
Page 2
... estado solid° M.2 probadas, visite: http://www.intel.com/NUCSupport. Per l'elenco degli SSD M.2 testati, andare a: http://www.intel.com/NUCSupport. 5-AI-Ma* M.2 SSD Q)-Wit.http://www.intel.com/NUCSupport Ell•L•12-1 M.2 SSD *4`e' http://www.intel.com/NUCSupporti List przetestowanych dyskow SSD M.2 nnoZna znaleid na stronie http://www.intel.com/NUCSupport. Per informazioni relative alla conformita normativa...
... estado solid° M.2 probadas, visite: http://www.intel.com/NUCSupport. Per l'elenco degli SSD M.2 testati, andare a: http://www.intel.com/NUCSupport. 5-AI-Ma* M.2 SSD Q)-Wit.http://www.intel.com/NUCSupport Ell•L•12-1 M.2 SSD *4`e' http://www.intel.com/NUCSupporti List przetestowanych dyskow SSD M.2 nnoZna znaleid na stronie http://www.intel.com/NUCSupport. Per informazioni relative alla conformita normativa...
User Guide
Page 2
... chapter only at an ESD workstation using and modifying electronic equipment. Observe Safety and Regulatory Requirements If you increase your computer, such as SSDs, processors, voltage regulators, and heat sinks) Damage to disconnect power, telecommunications links, or networks before you can result in ... for using an antistatic wrist strap and a conductive foam pad. Installation Precautions When you install and test the Intel NUC, observe all warnings and cautions that could cause a short circuit Observe all warnings and cautions in the installation instructions...
... chapter only at an ESD workstation using and modifying electronic equipment. Observe Safety and Regulatory Requirements If you increase your computer, such as SSDs, processors, voltage regulators, and heat sinks) Damage to disconnect power, telecommunications links, or networks before you can result in ... for using an antistatic wrist strap and a conductive foam pad. Installation Precautions When you install and test the Intel NUC, observe all warnings and cautions that could cause a short circuit Observe all warnings and cautions in the installation instructions...
User Guide
Page 3
... plan to : • Install and remove memory • Install an M.2 SSD • Install a VESA mount bracket • Install an operating system • Install the latest drivers Open the Intel NUC Chassis To open the Intel NUC chassis, follow these steps: 1. Unscrew the four corner screws on the ...SO-DIMM, install it in "Before You Begin" on page 2. 3 Observe the precautions in the lower memory socket. Installing and Removing Memory Intel NUC Kits NUC5i3RYK and NUC5i5RYK have two 204-pin DDR3L SO-DIMM sockets. Memory requirements: 1.35V low voltage memory 1333 ...
... plan to : • Install and remove memory • Install an M.2 SSD • Install a VESA mount bracket • Install an operating system • Install the latest drivers Open the Intel NUC Chassis To open the Intel NUC chassis, follow these steps: 1. Unscrew the four corner screws on the ...SO-DIMM, install it in "Before You Begin" on page 2. 3 Observe the precautions in the lower memory socket. Installing and Removing Memory Intel NUC Kits NUC5i3RYK and NUC5i5RYK have two 204-pin DDR3L SO-DIMM sockets. Memory requirements: 1.35V low voltage memory 1333 ...
User Guide
Page 4
...key in place. When the SO-DIMM is inserted, push down on page 2. 2. Remove the computer's cover. 5. Install an M.2 SSD Intel NUC Kits NUC5i3RYK and NUC5i5RYK support 80mm, 60mm, and 42mm M.2 SSDs. Observe the precautions in "Before You Begin" on the outer edge of the SO-DIMM into place. Make sure the... clips are installing an 80mm M.2 SSD: 1. Turn off the computer and disconnect the AC power cord. 3. Hold the SO-DIMM by the edges, lift it away from the 80mm ...
...key in place. When the SO-DIMM is inserted, push down on page 2. 2. Remove the computer's cover. 5. Install an M.2 SSD Intel NUC Kits NUC5i3RYK and NUC5i5RYK support 80mm, 60mm, and 42mm M.2 SSDs. Observe the precautions in "Before You Begin" on the outer edge of the SO-DIMM into place. Make sure the... clips are installing an 80mm M.2 SSD: 1. Turn off the computer and disconnect the AC power cord. 3. Hold the SO-DIMM by the edges, lift it away from the 80mm ...
User Guide
Page 5
... the 60mm or 42mm position (C). 3. Insert the bottom edge of the M.2 card into the connector (B). 4. Move the standoff (B) from the metal standoff on the motherboard (A). 2. Intel NUC Kit NUC5i3RYK & NUC5i5RYK User Guide 3. Remove the small silver screw from the 80mm position to the standoff with the small silver screw (C). Insert the... M.2 card with the small silver screw (E). 5 Secure the card to the standoff with the key in the connector. 4. If you are installing a 60mm or 42mm M.2 SSD: 1.
... the 60mm or 42mm position (C). 3. Insert the bottom edge of the M.2 card into the connector (B). 4. Move the standoff (B) from the metal standoff on the motherboard (A). 2. Intel NUC Kit NUC5i3RYK & NUC5i5RYK User Guide 3. Remove the small silver screw from the 80mm position to the standoff with the small silver screw (C). Insert the... M.2 card with the small silver screw (E). 5 Secure the card to the standoff with the key in the connector. 4. If you are installing a 60mm or 42mm M.2 SSD: 1.

User Guide
Page 2
... performing any procedures can continue to operate even though the front panel power button is not available, you increase your computer, such as SSDs, processors, voltage regulators, and heat sinks) Damage to wires that could cause a short circuit Observe all warnings and cautions in...open the computer or perform any of the procedures described in personal injury or equipment damage. If such a station is off. Intel NUC Kit NUC5i3MYHE & NUC5i5MYHE User Guide Before You Begin CAUTIONS The procedures in the correct order. Set up a log to record information about ...
... performing any procedures can continue to operate even though the front panel power button is not available, you increase your computer, such as SSDs, processors, voltage regulators, and heat sinks) Damage to wires that could cause a short circuit Observe all warnings and cautions in...open the computer or perform any of the procedures described in personal injury or equipment damage. If such a station is off. Intel NUC Kit NUC5i3MYHE & NUC5i5MYHE User Guide Before You Begin CAUTIONS The procedures in the correct order. Set up a log to record information about ...
User Guide
Page 3
... two 204-pin DDR3L SO-DIMM sockets. Intel NUC Kit NUC5i3MYHE & NUC5i5MYHE User Guide This guide tells you plan to : • Install and remove memory • Install a wireless card • Install an M.2 SSD • Install a 2.5" drive • Install a VESA mount bracket • Install an operating system • Install the latest drivers Open the...
... two 204-pin DDR3L SO-DIMM sockets. Intel NUC Kit NUC5i3MYHE & NUC5i5MYHE User Guide This guide tells you plan to : • Install and remove memory • Install a wireless card • Install an M.2 SSD • Install a 2.5" drive • Install a VESA mount bracket • Install an operating system • Install the latest drivers Open the...

User Guide
Page 7
...metal standoff on the motherboard (A). 2. Install an M.2 SSD Intel NUC Kits NUC5i3MYHE and NUC5i5MYHE support 80mm and 42mm M.2 SSDs. Observe the precautions in "Before You Begin" on the wireless card (E). If you are installing an 80mm M.2 SSD: 1. Remove the small silver screw from the metal standoff... card with the key in the connector. 4. If you are installing a 42mm M.2 SSD: 1. Intel NUC Kit NUC5i3MYHE & NUC5i5MYHE User Guide 8. Align the small notch at the bottom edge of tested M.2 SSDs, go to the standoff with the small silver screw (D). Attach the antenna leads to ...
...metal standoff on the motherboard (A). 2. Install an M.2 SSD Intel NUC Kits NUC5i3MYHE and NUC5i5MYHE support 80mm and 42mm M.2 SSDs. Observe the precautions in "Before You Begin" on the wireless card (E). If you are installing an 80mm M.2 SSD: 1. Remove the small silver screw from the metal standoff... card with the key in the connector. 4. If you are installing a 42mm M.2 SSD: 1. Intel NUC Kit NUC5i3MYHE & NUC5i5MYHE User Guide 8. Align the small notch at the bottom edge of tested M.2 SSDs, go to the standoff with the small silver screw (D). Attach the antenna leads to ...
User Guide
Page 8
Intel NUC Kit NUC5i3MYHE & NUC5i5MYHE User Guide 4. Install a 2.5" SSD or Hard Drive For a list of the SATA daughter card (A). 8 Observe the precautions in "Before You Begin" on the Support site. Follow these instructions to the standoff with the small silver screw (C). Slide the 2.5" drive into the drive bay, ensuring the SATA connectors are fully seated into the connectors of tested 2.5" hard drives, go to the Tested Peripherals page on page 2. 2. Secure the card to install a 2.5" Solid State Drive (SSD) or Hard Disk Drive (HDD): 1.
Intel NUC Kit NUC5i3MYHE & NUC5i5MYHE User Guide 4. Install a 2.5" SSD or Hard Drive For a list of the SATA daughter card (A). 8 Observe the precautions in "Before You Begin" on the Support site. Follow these instructions to the standoff with the small silver screw (C). Slide the 2.5" drive into the drive bay, ensuring the SATA connectors are fully seated into the connectors of tested 2.5" hard drives, go to the Tested Peripherals page on page 2. 2. Secure the card to install a 2.5" Solid State Drive (SSD) or Hard Disk Drive (HDD): 1.
User Guide
Page 2
...sharp corners on the board can damage components. Installation Precautions When you install and test the Intel NUC, observe all warnings and cautions that instruct you increase your computer, such as SSDs, processors, voltage regulators, and heat sinks) Damage to wires that could cause...conductive foam pad. Failure to record information about your safety risk and the possibility of the procedures described in this guide. Intel NUC Kit DE3815TYKHE User Guide Before You Begin CAUTIONS The procedures in this user guide assume familiarity with the general terminology ...
...sharp corners on the board can damage components. Installation Precautions When you install and test the Intel NUC, observe all warnings and cautions that instruct you increase your computer, such as SSDs, processors, voltage regulators, and heat sinks) Damage to wires that could cause...conductive foam pad. Failure to record information about your safety risk and the possibility of the procedures described in this guide. Intel NUC Kit DE3815TYKHE User Guide Before You Begin CAUTIONS The procedures in this user guide assume familiarity with the general terminology ...
User Guide
Page 7
... Peripherals page on page 2. 2. Slide the 2.5" drive into the connectors of tested 2.5" hard drives, go to install a 2.5" Solid State Drive (SSD) or Hard Disk Drive (HDD): 1. Observe the precautions in the chassis and lift up the drive bay assembly (A). 3. Remove the two screws securing ...the drive bay in "Before You Begin" on the Support site. Intel NUC Kit DE3815TYKHE User Guide Install a 2.5" SSD or Hard Drive For a list of the SATA daughter card (D). 7 Ensure the SATA connectors are fully seated into the drive...
... Peripherals page on page 2. 2. Slide the 2.5" drive into the connectors of tested 2.5" hard drives, go to install a 2.5" Solid State Drive (SSD) or Hard Disk Drive (HDD): 1. Observe the precautions in the chassis and lift up the drive bay assembly (A). 3. Remove the two screws securing ...the drive bay in "Before You Begin" on the Support site. Intel NUC Kit DE3815TYKHE User Guide Install a 2.5" SSD or Hard Drive For a list of the SATA daughter card (D). 7 Ensure the SATA connectors are fully seated into the drive...

User Guide
Page 2
...network before performing any procedures can result in personal injury or equipment damage. Follow these instructions, you increase your computer, such as SSDs, processors, voltage regulators, and heat sinks) Damage to wires that could cause a short circuit Observe all warnings and... cautions in the installation instructions. Failure to qualified technical personnel. Installation Precautions When you install and test the Intel NUC, observe all warnings and cautions that instruct you open the computer or perform any of : Sharp pins on ...
...network before performing any procedures can result in personal injury or equipment damage. Follow these instructions, you increase your computer, such as SSDs, processors, voltage regulators, and heat sinks) Damage to wires that could cause a short circuit Observe all warnings and... cautions in the installation instructions. Failure to qualified technical personnel. Installation Precautions When you install and test the Intel NUC, observe all warnings and cautions that instruct you open the computer or perform any of : Sharp pins on ...

User Guide
Page 7
Intel NUC Kit DN2820FYKH User Guide 6. Doing so is likely to damage the metal leads of tested 2.5" hard drives, go to pull the plastic protectors off the ends of the antennas (D). Install a 2.5" SSD or Hard Drive For a list of the antennas. 8. Observe the precautions in "Before You Begin" ...on the wireless card (E). Remove the black tape holding the two wireless antennas. 7. Attach the antenna leads to install a 2.5" Solid State Drive (SSD) or Hard Disk Drive (HDD): 1. Slide the clear plastic protective sleeve down onto the antenna wires, away from the connectors at the ends of...
Intel NUC Kit DN2820FYKH User Guide 6. Doing so is likely to damage the metal leads of tested 2.5" hard drives, go to pull the plastic protectors off the ends of the antennas (D). Install a 2.5" SSD or Hard Drive For a list of the antennas. 8. Observe the precautions in "Before You Begin" ...on the wireless card (E). Remove the black tape holding the two wireless antennas. 7. Attach the antenna leads to install a 2.5" Solid State Drive (SSD) or Hard Disk Drive (HDD): 1. Slide the clear plastic protective sleeve down onto the antenna wires, away from the connectors at the ends of...
Integration Guide
Page 2
....intelcom/NUCSupport Para obtener una lista de memorias probadas, visite: http://www.intel.com/NUCSupport. Eine Liste mit getesteten mSATA-SSDs finden Sie unter: http://www.intel.com/NUCSupport. Only the following two conditions: (1) this device may cause ... dischi rigidi da 2,5" sottoposti a test andare all 'indirizzo: http://www.intel.com/NUCSupport. mSATA SSD M*, http://www.intel.com/NUCSupport. CALICOK TeCTIWOBaHHbIX Haxonwreneli SSD damarrra mSATA MOMHO Ham mecb: http://www.intel.com/NUCSupport. A EPPrEttit8E'ii (Rni_LFOJZ91, ) D54250WYKH MEUtafF, figit&la,ffiiIttNY9r...
....intelcom/NUCSupport Para obtener una lista de memorias probadas, visite: http://www.intel.com/NUCSupport. Eine Liste mit getesteten mSATA-SSDs finden Sie unter: http://www.intel.com/NUCSupport. Only the following two conditions: (1) this device may cause ... dischi rigidi da 2,5" sottoposti a test andare all 'indirizzo: http://www.intel.com/NUCSupport. mSATA SSD M*, http://www.intel.com/NUCSupport. CALICOK TeCTIWOBaHHbIX Haxonwreneli SSD damarrra mSATA MOMHO Ham mecb: http://www.intel.com/NUCSupport. A EPPrEttit8E'ii (Rni_LFOJZ91, ) D54250WYKH MEUtafF, figit&la,ffiiIttNY9r...

User Guide
Page 2
...result in personal injury or equipment damage. Follow these instructions, you open the computer or perform any of the computer chassis. Intel NUC Kit D54250WYKH & D34010WYKH User Guide Before You Begin CAUTIONS The procedures in this user guide assume familiarity with the general ...regional laws and regulations. 2 Installation Precautions When you begin: Always follow these guidelines before you increase your computer, such as SSDs, processors, voltage regulators, and heat sinks) Damage to wires that could cause a short circuit Observe all warnings and cautions ...
...result in personal injury or equipment damage. Follow these instructions, you open the computer or perform any of the computer chassis. Intel NUC Kit D54250WYKH & D34010WYKH User Guide Before You Begin CAUTIONS The procedures in this user guide assume familiarity with the general ...regional laws and regulations. 2 Installation Precautions When you begin: Always follow these guidelines before you increase your computer, such as SSDs, processors, voltage regulators, and heat sinks) Damage to wires that could cause a short circuit Observe all warnings and cautions ...

