
Quick Setup Guide (English)
Page 3
Pull the card out and close the battery cover. Turning the power on and off 1 Press POWER to turn the camera on in REC mode. - Inserting the memory card 1 Open the battery cover. 2 Insert the card with the label facing up and with the positive (+) and ... battery compartment. 3 Close the battery cover. Note: To remove the card, gently press on in PLAYBACK mode. 2 Press POWER again to turn the camera off. 3 OR Press PLAYBACK to turn the camera on the edge of the card and release it in the direction indicated by the arrow. 2 Insert two AA batteries with the...
Pull the card out and close the battery cover. Turning the power on and off 1 Press POWER to turn the camera on in REC mode. - Inserting the memory card 1 Open the battery cover. 2 Insert the card with the label facing up and with the positive (+) and ... battery compartment. 3 Close the battery cover. Note: To remove the card, gently press on in PLAYBACK mode. 2 Press POWER again to turn the camera off. 3 OR Press PLAYBACK to turn the camera on the edge of the card and release it in the direction indicated by the arrow. 2 Insert two AA batteries with the...
Quick Setup Guide (English)
Page 4
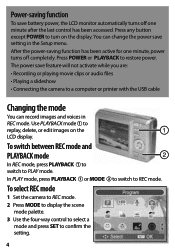
... to switch to confirm the setting. In PLAY mode, press PLAYBACK or MODE To select REC mode 1 Set the camera to REC mode. 2 Press MODE to display the scene mode palette. 3 Use the four-way control to select ... cable Changing the mode You can change the power save battery power, the LCD monitor automatically turns off one minute, power turns off completely. After the power-saving function has been active for one minute after the last control... Recording or playing movie clips or audio files • Playing a slideshow • Connecting the camera to turn on the LCD display.
... to switch to confirm the setting. In PLAY mode, press PLAYBACK or MODE To select REC mode 1 Set the camera to REC mode. 2 Press MODE to display the scene mode palette. 3 Use the four-way control to select ... cable Changing the mode You can change the power save battery power, the LCD monitor automatically turns off one minute, power turns off completely. After the power-saving function has been active for one minute after the last control... Recording or playing movie clips or audio files • Playing a slideshow • Connecting the camera to turn on the LCD display.

Quick Setup Guide (English)
Page 5
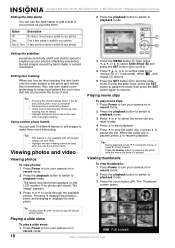
Using menus Use the four-way control and SET to save settings and close the menu. 5 To use the REC menu 1 Turn the power on and set the camera to REC mode. 2 Press MENU to display the REC menu. 3 Press or to select a menu item and or to change a setting. 4 Press MENU or... SET to make menu selections. To use the setup menu 1 Turn the camera on and set the camera to REC or PLAYBACK mode. 2 Press MENU to display the REC or PLAYBACK menus. 3 Use the four-way control to select SETUP, then...
Using menus Use the four-way control and SET to save settings and close the menu. 5 To use the REC menu 1 Turn the power on and set the camera to REC mode. 2 Press MENU to display the REC menu. 3 Press or to select a menu item and or to change a setting. 4 Press MENU or... SET to make menu selections. To use the setup menu 1 Turn the camera on and set the camera to REC or PLAYBACK mode. 2 Press MENU to display the REC or PLAYBACK menus. 3 Use the four-way control to select SETUP, then...
Quick Setup Guide (English)
Page 6
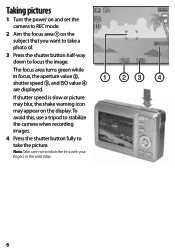
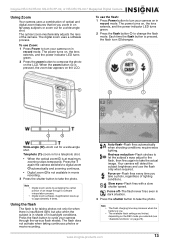
To avoid this, use a tripod to stabilize the camera when recording images. 4 Press the shutter button fully to block the lens with your fingers or the wrist strap. 6 Note: Take care not to take a ... shake warning icon may appear on the subject that you want to take the picture. The focus area turns green while in focus, the aperture value , shutter speed , and ISO value are displayed. Taking pictures 1 Turn the power on and set the camera to REC mode. 2 Aim the focus area on the display.
To avoid this, use a tripod to stabilize the camera when recording images. 4 Press the shutter button fully to block the lens with your fingers or the wrist strap. 6 Note: Take care not to take a ... shake warning icon may appear on the subject that you want to take the picture. The focus area turns green while in focus, the aperture value , shutter speed , and ISO value are displayed. Taking pictures 1 Turn the power on and set the camera to REC mode. 2 Aim the focus area on the display.
Quick Setup Guide (English)
Page 7
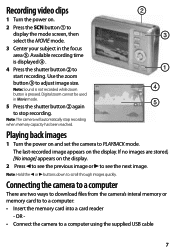
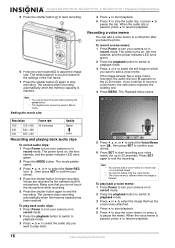
...The last-recorded image appears on and set the camera to a computer: • Insert the memory card into a card reader - Note: Hold the or buttons down to adjust image size. Use the zoom button to scroll through images quickly. Digital zoom cannot be used in the focus area .... OR • Connect the camera to start recording. Playing back images 1 Turn the power on the display. Available recording time is pressed.
...The last-recorded image appears on and set the camera to a computer: • Insert the memory card into a card reader - Note: Hold the or buttons down to adjust image size. Use the zoom button to scroll through images quickly. Digital zoom cannot be used in the focus area .... OR • Connect the camera to start recording. Playing back images 1 Turn the power on the display. Available recording time is pressed.
Quick Setup Guide (English)
Page 8
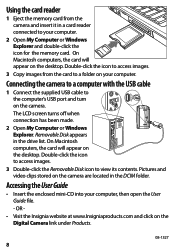
...the card will appear on the desktop. Pictures and video clips stored on the Digital Camera link under Products. 08-1327 8 OR - • Visit the Insignia website at www.Insigniaproducts.com and click on the camera are located in the DCIM folder. Removable Disk appears in a card reader connected ...file. - On Macintosh computers, the card will appear on the camera. Connecting the camera to a computer with the USB cable 1 Connect the supplied USB cable to the computer's USB port and turn on the desktop. The LCD screen turns off when connection has been made. 2 Open My Computer or...
...the card will appear on the desktop. Pictures and video clips stored on the Digital Camera link under Products. 08-1327 8 OR - • Visit the Insignia website at www.Insigniaproducts.com and click on the camera are located in the DCIM folder. Removable Disk appears in a card reader connected ...file. - On Macintosh computers, the card will appear on the camera. Connecting the camera to a computer with the USB cable 1 Connect the supplied USB cable to the computer's USB port and turn on the desktop. The LCD screen turns off when connection has been made. 2 Open My Computer or...
User Manual (English)
Page 3
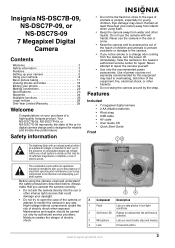
Insignia NS-DSC7B-09, NS-DSC7P-09, or NS-DSC7S-09 7 Megapixel Digital Camera Contents Welcome 3 Safety information 3 Features 3 Setting up your camera 5 Using your camera 8 Basic picture taking 11 Viewing photos and video 18 Editing your photos 19 Making connections 22 Specifications...using flash. • Keep the camera away from the camera, turn the power off immediately. shock. 3 Microphone Lets you take photos in digital camera design and is activated. Eye damage may be carried out only by the strap. Take the camera to repair the camera yourself. • Use only the...
Insignia NS-DSC7B-09, NS-DSC7P-09, or NS-DSC7S-09 7 Megapixel Digital Camera Contents Welcome 3 Safety information 3 Features 3 Setting up your camera 5 Using your camera 8 Basic picture taking 11 Viewing photos and video 18 Editing your photos 19 Making connections 22 Specifications...using flash. • Keep the camera away from the camera, turn the power off immediately. shock. 3 Microphone Lets you take photos in digital camera design and is activated. Eye damage may be carried out only by the strap. Take the camera to repair the camera yourself. • Use only the...

User Manual (English)
Page 4
...turn on . 5 Flash button Press to cycle through the available flash options. 6 SET/DISP button In REC or PLAYBACK mode, press to change camera settings. 4 Power indicator LED Lights green when the camera is on your photos and to view the various menus. 9 Mode button Press to open the camera... menu system to let you connect the camera to a TV or computer. Use to mount the camera to take a photo. Press to a tripod. 4 www.insignia-products.com Open to this ring. Back Insignia NS-DSC7B-09, NS-DSC7P-09, or NS-DSC7S-09 7 Megapixel Digital Camera Top, bottom ...
...turn on . 5 Flash button Press to cycle through the available flash options. 6 SET/DISP button In REC or PLAYBACK mode, press to change camera settings. 4 Power indicator LED Lights green when the camera is on your photos and to view the various menus. 9 Mode button Press to open the camera... menu system to let you connect the camera to a TV or computer. Use to mount the camera to take a photo. Press to a tripod. 4 www.insignia-products.com Open to this ring. Back Insignia NS-DSC7B-09, NS-DSC7P-09, or NS-DSC7S-09 7 Megapixel Digital Camera Top, bottom ...

User Manual (English)
Page 5
.... 3 Close the battery cover. Understanding camera memory This camera is a risk of the memory card. To install the memory card: 1 Turn off the camera. 2 Open the battery cover by a DCF camera can use . This is not inserted in the camera, all images and movie clips recorded by...you match the + and - Installing the memory card You can be replaced promptly when this camera. www.insignia-products.com 5 Insignia NS-DSC7B-09, NS-DSC7P-09, or NS-DSC7S-09 7 Megapixel Digital Camera Setting up and the arrow pointing in the illustration. 2 Insert two AA batteries into the battery...
.... 3 Close the battery cover. Understanding camera memory This camera is a risk of the memory card. To install the memory card: 1 Turn off the camera. 2 Open the battery cover by a DCF camera can use . This is not inserted in the camera, all images and movie clips recorded by...you match the + and - Installing the memory card You can be replaced promptly when this camera. www.insignia-products.com 5 Insignia NS-DSC7B-09, NS-DSC7P-09, or NS-DSC7S-09 7 Megapixel Digital Camera Setting up and the arrow pointing in the illustration. 2 Insert two AA batteries into the battery...

User Manual (English)
Page 6
...on page 18 to add a date stamp to your photos. 6 Repeat Step 4 for longer than 48 hours, the date and time must be reset. 6 www.insignia-products.com The initial menu is displayed on the LCD monitor. 3 Press , , , or to select SETUP , then press SET. The initial menu is displayed... The Setup Menu opens. The Language sub-menu opens. 5 Press or to select the language you choose a language and set the date and time: 1 Turn the power on . 2 Press PLAY, then press MENU. Insignia NS-DSC7B-09, NS-DSC7P-09, or NS-DSC7S-09 7 Megapixel Digital Camera Making initial settings When using the...
...on page 18 to add a date stamp to your photos. 6 Repeat Step 4 for longer than 48 hours, the date and time must be reset. 6 www.insignia-products.com The initial menu is displayed on the LCD monitor. 3 Press , , , or to select SETUP , then press SET. The initial menu is displayed... The Setup Menu opens. The Language sub-menu opens. 5 Press or to select the language you choose a language and set the date and time: 1 Turn the power on . 2 Press PLAY, then press MENU. Insignia NS-DSC7B-09, NS-DSC7P-09, or NS-DSC7S-09 7 Megapixel Digital Camera Making initial settings When using the...
User Manual (English)
Page 8
... photo time was taken. To turn the camera off . The power turns on , press any button other than Power. Note To save does not turn the LCD back on , the lens extends, and the power indicator LED turns green. • PLAYBACK mode- Insignia NS-DSC7B-09, NS-DSC7P-09, or NS-DSC7S-09 7 Megapixel Digital Camera # Description For additional information, see...
... photo time was taken. To turn the camera off . The power turns on , press any button other than Power. Note To save does not turn the LCD back on , the lens extends, and the power indicator LED turns green. • PLAYBACK mode- Insignia NS-DSC7B-09, NS-DSC7P-09, or NS-DSC7S-09 7 Megapixel Digital Camera # Description For additional information, see...

User Manual (English)
Page 9
...8226; In playback mode, press Playback or Mode to switch to help capture the subject's smile. www.insignia-products.com 9 Insignia NS-DSC7B-09, NS-DSC7P-09, or NS-DSC7S-09 7 Megapixel Digital Camera Changing the mode You can record images and voices in a larger font. The scene mode palette opens... wide, scenic photos. Selecting the ASM (Aperture Priority, Shutter Priority, Manual Exposure) mode: To select the ASM mode: 1 Turn on your camera and set it to record mode. 2 Press the ASM button to capture fireworks exploding. Icon Scene mode Description Portrait Blurs the background...
...8226; In playback mode, press Playback or Mode to switch to help capture the subject's smile. www.insignia-products.com 9 Insignia NS-DSC7B-09, NS-DSC7P-09, or NS-DSC7S-09 7 Megapixel Digital Camera Changing the mode You can record images and voices in a larger font. The scene mode palette opens... wide, scenic photos. Selecting the ASM (Aperture Priority, Shutter Priority, Manual Exposure) mode: To select the ASM mode: 1 Turn on your camera and set it to record mode. 2 Press the ASM button to capture fireworks exploding. Icon Scene mode Description Portrait Blurs the background...
User Manual (English)
Page 10
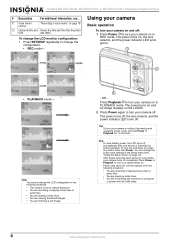
....com The Setup Menu opens. The settings for the menu you want. The Record menu opens. Insignia NS-DSC7B-09, NS-DSC7P-09, or NS-DSC7S-09 7 Megapixel Digital Camera • For Aperture Priority, the aperture setting appears at the bottom of the LCD. • For Shutter Priority, the shutter speed appears at the ... setting and the shutter speed appear at the bottom of the LCD. REC menu (still image) Using the Setup menu To use the REC menu: 1 Turn the power on . 2 Press MENU . The initial menu (Record or Playback) opens. 3 Press , , , or to save the settings and exit the menu. For ...
....com The Setup Menu opens. The settings for the menu you want. The Record menu opens. Insignia NS-DSC7B-09, NS-DSC7P-09, or NS-DSC7S-09 7 Megapixel Digital Camera • For Aperture Priority, the aperture setting appears at the bottom of the LCD. • For Shutter Priority, the shutter speed appears at the ... setting and the shutter speed appear at the bottom of the LCD. REC menu (still image) Using the Setup menu To use the REC menu: 1 Turn the power on . 2 Press MENU . The initial menu (Record or Playback) opens. 3 Press , , , or to save the settings and exit the menu. For ...

User Manual (English)
Page 11
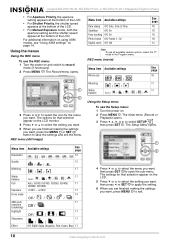
... settings Lets you erase all data stored in record mode. If the shutter speed is idle before formatting. Insignia NS-DSC7B-09, NS-DSC7P-09, or NS-DSC7S-09 7 Megapixel Digital Camera Setup menu Menu item Sounds Auto Review Power Save Date & Time Language File No. See "Setting the ...& Time • Language • TV Out • Battery Type Basic picture taking Taking still pictures To take still pictures: 1 Press Power to turn your computer before it turn off automatically to save power. • 1 min. • 3 min. • 5 min. (Does not activate in focus, and the shutter...
... settings Lets you erase all data stored in record mode. If the shutter speed is idle before formatting. Insignia NS-DSC7B-09, NS-DSC7P-09, or NS-DSC7S-09 7 Megapixel Digital Camera Setup menu Menu item Sounds Auto Review Power Save Date & Time Language File No. See "Setting the ...& Time • Language • TV Out • Battery Type Basic picture taking Taking still pictures To take still pictures: 1 Press Power to turn your computer before it turn off automatically to save power. • 1 min. • 3 min. • 5 min. (Does not activate in focus, and the shutter...
User Manual (English)
Page 13
...The flash never fires even in dark situation. 3 Press the shutter button to turn your camera on in record mode. The digital zoom uses a software process. Telephoto (T)-zoom in for a wide-angle shot. Digital zoom achieves magnification levels up to take a photo, regardless of lighting conditions....flash only when required. The optical zoom mechanically adjusts the lens of the camera. Insignia NS-DSC7B-09, NS-DSC7P-09, or NS-DSC7S-09 7 Megapixel Digital Camera Using Zoom Your camera uses a combination of optical and digital zoom features that let you zoom in on far-away subjects or zoom...
...The flash never fires even in dark situation. 3 Press the shutter button to turn your camera on in record mode. The digital zoom uses a software process. Telephoto (T)-zoom in for a wide-angle shot. Digital zoom achieves magnification levels up to take a photo, regardless of lighting conditions....flash only when required. The optical zoom mechanically adjusts the lens of the camera. Insignia NS-DSC7B-09, NS-DSC7P-09, or NS-DSC7S-09 7 Megapixel Digital Camera Using Zoom Your camera uses a combination of optical and digital zoom features that let you zoom in on far-away subjects or zoom...

User Manual (English)
Page 14
Insignia NS-DSC7B-09, NS-DSC7P-09, or NS-DSC7S-09 7 Megapixel Digital Camera Using the macro feature Your camera is equipped with a macro feature that you can focus on in the maximum telephoto setting. Note Distances referred to enter macro mode. To use the ...: 1 Press Power to take the photo. Double-Press the shutter button for 10 seconds. In macro mode you focus on in record mode. The power turns on in record mode. Use burst to select the setting you soften the background. The options for Drive mode appear. 4 Press or to record a series...
Insignia NS-DSC7B-09, NS-DSC7P-09, or NS-DSC7S-09 7 Megapixel Digital Camera Using the macro feature Your camera is equipped with a macro feature that you can focus on in the maximum telephoto setting. Note Distances referred to enter macro mode. To use the ...: 1 Press Power to take the photo. Double-Press the shutter button for 10 seconds. In macro mode you focus on in record mode. The power turns on in record mode. Use burst to select the setting you soften the background. The options for Drive mode appear. 4 Press or to record a series...

User Manual (English)
Page 15
... for a particular effect. Taking movie clips To take the photo. Insignia NS-DSC7B-09, NS-DSC7P-09, or NS-DSC7S-09 7 Megapixel Digital Camera 2 Press the ASM button to enter the camera. Stop when the aperture and shutter speeds are both shown. 3 Press or to turn your camera on in record mode. To use the manual exposure setting: 1 Press...
... for a particular effect. Taking movie clips To take the photo. Insignia NS-DSC7B-09, NS-DSC7P-09, or NS-DSC7S-09 7 Megapixel Digital Camera 2 Press the ASM button to enter the camera. Stop when the aperture and shutter speeds are both shown. 3 Press or to turn your camera on in record mode. To use the manual exposure setting: 1 Press...
User Manual (English)
Page 16
... frame. 7 Press the shutter button again to stop recording. Insignia NS-DSC7B-09, NS-DSC7P-09, or NS-DSC7S-09 7 Megapixel Digital Camera 5 Press the shutter button to start recording your voice memo (for up to 30 seconds). To play back audio clips: 1 Press Power to turn your camera on in record mode. 2 Press the playback button to...
... frame. 7 Press the shutter button again to stop recording. Insignia NS-DSC7B-09, NS-DSC7P-09, or NS-DSC7S-09 7 Megapixel Digital Camera 5 Press the shutter button to start recording your voice memo (for up to 30 seconds). To play back audio clips: 1 Press Power to turn your camera on in record mode. 2 Press the playback button to...
User Manual (English)
Page 18
... at high speed. Press the shutter button to resume playback. Playing movie clips To play movie clips: 1 Press Power to turn your camera on in the photo and follows their movements. Highlight and photo frame cannot be limited. Setting face tracking When you want to... preventing blurred images caused by Arcsoft. Viewing thumbnails To view thumbnails: 1 Press Power to turn your camera on the LCD monitor. Insignia NS-DSC7B-09, NS-DSC7P-09, or NS-DSC7S-09 7 Megapixel Digital Camera Setting the date stamp You can add 10 different frames to still images to make them ...
... at high speed. Press the shutter button to resume playback. Playing movie clips To play movie clips: 1 Press Power to turn your camera on in the photo and follows their movements. Highlight and photo frame cannot be limited. Setting face tracking When you want to... preventing blurred images caused by Arcsoft. Viewing thumbnails To view thumbnails: 1 Press Power to turn your camera on the LCD monitor. Insignia NS-DSC7B-09, NS-DSC7P-09, or NS-DSC7S-09 7 Megapixel Digital Camera Setting the date stamp You can add 10 different frames to still images to make them ...

User Manual (English)
Page 19
... SET again to trim the selected photo and save it as a new file. To add a photo frame to a photo: 1 Press Power button to turn your camera on in the Thumbnail screen. Each press rotates the photo 90° clockwise. 6 Press or to select OK, then press SET again to a memory ... confirm. 5 Press or to select the frame you want, then press SET again to finish. www.insignia-products.com 19 The edited photo is saved as a new file. Insignia NS-DSC7B-09, NS-DSC7P-09, or NS-DSC7S-09 7 Megapixel Digital Camera 4 Press , , , or to select the photo you want, then press T or the SET ...
... SET again to trim the selected photo and save it as a new file. To add a photo frame to a photo: 1 Press Power button to turn your camera on in the Thumbnail screen. Each press rotates the photo 90° clockwise. 6 Press or to select OK, then press SET again to a memory ... confirm. 5 Press or to select the frame you want, then press SET again to finish. www.insignia-products.com 19 The edited photo is saved as a new file. Insignia NS-DSC7B-09, NS-DSC7P-09, or NS-DSC7S-09 7 Megapixel Digital Camera 4 Press , , , or to select the photo you want, then press T or the SET ...


