Hardware Maintenance Manual
Page 5
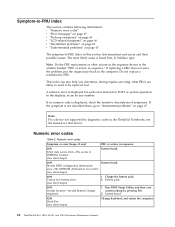
... 62 Numeric error codes 62 Error messages 65 © Copyright Lenovo 2009 No-beep symptoms 65 LCD-related symptoms 66 Intermittent problems 67 Undetermined problems 67 Status indicators 69 Fn key combinations 71 FRU replacement notices 75 Screw notices 75 Retaining serial numbers 76 Restoring the ...serial number of the system unit 76 Retaining the UUID 76 Reading or writing the ECA information . . . 77 Removing and replacing a FRU . . . . 79 1010 Battery pack 80 1020 ExpressCard blank bezel and Media Card blank bezel 81 1030 Optical drive or travel cover 83 1040 Thermal cover ...
... 62 Numeric error codes 62 Error messages 65 © Copyright Lenovo 2009 No-beep symptoms 65 LCD-related symptoms 66 Intermittent problems 67 Undetermined problems 67 Status indicators 69 Fn key combinations 71 FRU replacement notices 75 Screw notices 75 Retaining serial numbers 76 Restoring the ...serial number of the system unit 76 Retaining the UUID 76 Reading or writing the ECA information . . . 77 Removing and replacing a FRU . . . . 79 1010 Battery pack 80 1020 ExpressCard blank bezel and Media Card blank bezel 81 1030 Optical drive or travel cover 83 1040 Thermal cover ...

Hardware Maintenance Manual
Page 16
... to water. Use of an incorrect battery can result in ignition or explosion of the battery. Use only the battery in the appropriate parts listing when replacing the battery pack. Use of an incorrect battery can result in ignition or explosion of the battery as required by shaking the computer and... cause electrical shorts. Do not disassemble it, throw it into your eyes or on after washing. 8 ThinkPad SL410, L410, SL510, and L510 Hardware Maintenance Manual Use only the battery in place and are not left loose inside the LCD gets into fire or water, or short-circuit it...
... to water. Use of an incorrect battery can result in ignition or explosion of the battery. Use only the battery in the appropriate parts listing when replacing the battery pack. Use of an incorrect battery can result in ignition or explosion of the battery as required by shaking the computer and... cause electrical shorts. Do not disassemble it, throw it into your eyes or on after washing. 8 ThinkPad SL410, L410, SL510, and L510 Hardware Maintenance Manual Use only the battery in place and are not left loose inside the LCD gets into fire or water, or short-circuit it...

Hardware Maintenance Manual
Page 17
Safety information 9 DANGER Though the main batteries have low voltage, a shorted or grounded battery can produce enough current to burn personnel or combustible materials. DANGER Unless hot swap is allowed for the FRU being replaced, do not remove the plastic cover that protects the lower part of the inverter card. DANGER To avoid shock, do as follows before removing it: power off the computer, unplug all power cords from electrical outlets, remove the battery pack, and disconnect any interconnecting cables.
Safety information 9 DANGER Though the main batteries have low voltage, a shorted or grounded battery can produce enough current to burn personnel or combustible materials. DANGER Unless hot swap is allowed for the FRU being replaced, do not remove the plastic cover that protects the lower part of the inverter card. DANGER To avoid shock, do as follows before removing it: power off the computer, unplug all power cords from electrical outlets, remove the battery pack, and disconnect any interconnecting cables.

Hardware Maintenance Manual
Page 59
... does not turn on the computer. 5. Disconnect the ac adapter and install the charged battery pack. 7. Turn off the computer. 6. If the voltage is not correct, replace the AC adapter. 4. Remove the battery pack. 3. Note: Noise from the computer. 2. Power system checkout To verify a ...symptom, do the following: v Replace the system board. v If the problem persists, go to "FRU ...
... does not turn on the computer. 5. Disconnect the ac adapter and install the charged battery pack. 7. Turn off the computer. 6. If the voltage is not correct, replace the AC adapter. 4. Remove the battery pack. 3. Note: Noise from the computer. 2. Power system checkout To verify a ...symptom, do the following: v Replace the system board. v If the problem persists, go to "FRU ...

Hardware Maintenance Manual
Page 60
... , reinstall and recharge it . 2. If the battery status indicator or icon does not turn on , replace the battery pack. If the charge indicator or icon still does not turn on page 80). 52 ThinkPad SL410, L410, SL510, and L510 Hardware Maintenance Manual Then reinstall the battery pack. Checking the backup battery Do the following figure: Terminal Voltage...
... , reinstall and recharge it . 2. If the battery status indicator or icon does not turn on , replace the battery pack. If the charge indicator or icon still does not turn on page 80). 52 ThinkPad SL410, L410, SL510, and L510 Hardware Maintenance Manual Then reinstall the battery pack. Checking the backup battery Do the following figure: Terminal Voltage...

Hardware Maintenance Manual
Page 61
4. v If the voltage is correct, replace the system board. General checkout 53 See the following figure. v If the backup battery discharges quickly after replacement, replace the system board. Red (+) Black (-) Wire Red Black Voltage (V dc) +2.5 to +3.2 Ground v If the voltage is not correct, replace the backup battery. Measure the voltage of the backup battery. Remove the backup battery (see "1130 Backup battery" on page 102). 5.
4. v If the voltage is correct, replace the system board. General checkout 53 See the following figure. v If the backup battery discharges quickly after replacement, replace the system board. Red (+) Black (-) Wire Red Black Voltage (V dc) +2.5 to +3.2 Ground v If the voltage is not correct, replace the backup battery. Measure the voltage of the backup battery. Remove the backup battery (see "1130 Backup battery" on page 102). 5.
Hardware Maintenance Manual
Page 65
...battery" on page 102. 4. The Master + User mode requires two HDPs; The hard disk drive can be booted. Supervisor password A supervisor password (SVP) protects the system information stored in order to get access to the hard disk drive. Turn off the computer. 2. The password must be replaced...The system board must be entered before an operating system can be made available to the service technician, there is available, neither Lenovo nor Lenovo authorized service technicians provide any services to reset either the user or the master HDP, or to reset the password. Related ...
...battery" on page 102. 4. The Master + User mode requires two HDPs; The hard disk drive can be booted. Supervisor password A supervisor password (SVP) protects the system information stored in order to get access to the hard disk drive. Turn off the computer. 2. The password must be replaced...The system board must be entered before an operating system can be made available to the service technician, there is available, neither Lenovo nor Lenovo authorized service technicians provide any services to reset either the user or the master HDP, or to reset the password. Related ...
Hardware Maintenance Manual
Page 66
...HDP has been forgotten and cannot be replaced for a scheduled fee. Note: To check whether the ThinkPad Notebook you are servicing supports the ...SL510, and L510 Hardware Maintenance Manual For the other models, enter the master HDP. The hard disk drive can be made available to the service technician, neither Lenovo nor Lenovo authorized service technicians provide any services to reset the user HDPs or to Security --> Password. When the ThinkPad...the backup battery and the battery pack. (B) If an SVP has been set and is the letter of the hard disk drive. When the ThinkPad logo ...
...HDP has been forgotten and cannot be replaced for a scheduled fee. Note: To check whether the ThinkPad Notebook you are servicing supports the ...SL510, and L510 Hardware Maintenance Manual For the other models, enter the master HDP. The hard disk drive can be made available to the service technician, neither Lenovo nor Lenovo authorized service technicians provide any services to reset the user HDPs or to Security --> Password. When the ThinkPad...the backup battery and the battery pack. (B) If an SVP has been set and is the letter of the hard disk drive. When the ThinkPad logo ...
Hardware Maintenance Manual
Page 70
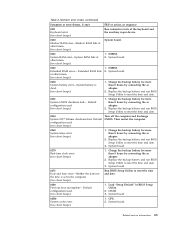
... the computer. This index can be replaced next. System board. 0210 Stuck Key (two short beeps) Change keyboard, and restart the computer. 62 ThinkPad SL410, L410, SL510, and L510 Hardware Maintenance Manual Numeric error codes Table 2. Charge the battery pack. 2. The most likely cause ...is failed. (two short beeps) System board. 0189 System board. Do not replace a nondefective FRU. Run BIOS Setup...
... the computer. This index can be replaced next. System board. 0210 Stuck Key (two short beeps) Change keyboard, and restart the computer. 62 ThinkPad SL410, L410, SL510, and L510 Hardware Maintenance Manual Numeric error codes Table 2. Charge the battery pack. 2. The most likely cause ...is failed. (two short beeps) System board. 0189 System board. Do not replace a nondefective FRU. Run BIOS Setup...
Hardware Maintenance Manual
Page 71
... board. 0231 System RAM error-System RAM fails at offset nnnn. (two short beeps) 1. Replace the backup battery and run BIOS Setup Utility to reset the time and date. 3. Replace the backup battery and run BIOS Setup Utility to reset the time and date. 3. System board. 02D0 System cache...date nor the time is dead. (two short beeps) 1. Charge the backup battery for more than 8 hours by connecting the ac adapter. 2. CPU. 2. Default configuration used . (two short beeps) 1. Replace the backup battery and run BIOS Setup Utility to reset the time and date. 0254 System NV7...
... board. 0231 System RAM error-System RAM fails at offset nnnn. (two short beeps) 1. Replace the backup battery and run BIOS Setup Utility to reset the time and date. 3. Replace the backup battery and run BIOS Setup Utility to reset the time and date. 3. System board. 02D0 System cache...date nor the time is dead. (two short beeps) 1. Charge the backup battery for more than 8 hours by connecting the ac adapter. 2. CPU. 2. Default configuration used . (two short beeps) 1. Replace the backup battery and run BIOS Setup Utility to reset the time and date. 0254 System NV7...
Hardware Maintenance Manual
Page 75
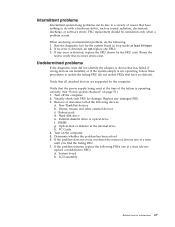
....) 1. System board b. If no error is detected, replace the FRU shown by the computer. If any error is...service information 67 Verify that have nothing to do not replace a nondefective FRU): a. Remove or disconnect all attached ... drive e. When analyzing an intermittent problem, do not replace any damaged FRU. 3. Battery pack d. Optical disk or diskette in loop mode at... find the failing FRU. 7. Replace any FRUs. 3. DIMM g. If the problem remains, replace the following FRUs one at the...variety of the following : 1. FRU replacement should be due to isolate the ...
....) 1. System board b. If no error is detected, replace the FRU shown by the computer. If any error is...service information 67 Verify that have nothing to do not replace a nondefective FRU): a. Remove or disconnect all attached ... drive e. When analyzing an intermittent problem, do not replace any damaged FRU. 3. Battery pack d. Optical disk or diskette in loop mode at... find the failing FRU. 7. Replace any FRUs. 3. DIMM g. If the problem remains, replace the following FRUs one at the...variety of the following : 1. FRU replacement should be due to isolate the ...

Hardware Maintenance Manual
Page 87
... removing the FRU, move it in the direction as given by using an electrostatic discharge (ESD) strap (P/N 6405959). © Copyright Lenovo 2009 79 Attention: After replacing a FRU, do not turn on page 139. 8. Before touching it in the direction as given in the drawings by the arrow in... correct screw as shown in the procedures. Do not try to replacement. Verify this by removing any FRUs that all power cords from electrical outlets, remove the battery pack, and then disconnect any computer unless you have to replace a FRU, turn off the computer, unplug all screws, springs,...
... removing the FRU, move it in the direction as given by using an electrostatic discharge (ESD) strap (P/N 6405959). © Copyright Lenovo 2009 79 Attention: After replacing a FRU, do not turn on page 139. 8. Before touching it in the direction as given in the drawings by the arrow in... correct screw as shown in the procedures. Do not try to replacement. Verify this by removing any FRUs that all power cords from electrical outlets, remove the battery pack, and then disconnect any computer unless you have to replace a FRU, turn off the computer, unplug all screws, springs,...

Hardware Maintenance Manual
Page 91
Removal steps of optical drive or travel cover For access, remove this FRU: v "1010 Battery pack" on page 80 Table 11. 1030 Optical drive or travel cover 1 Step 1 Screw (quantity) M2 × 8 mm, wafer-head, nylon-coated (1) Color Black Torque 0.167 Nm (1.7 kgfcm) 2 3 Removing and replacing a FRU 83
Removal steps of optical drive or travel cover For access, remove this FRU: v "1010 Battery pack" on page 80 Table 11. 1030 Optical drive or travel cover 1 Step 1 Screw (quantity) M2 × 8 mm, wafer-head, nylon-coated (1) Color Black Torque 0.167 Nm (1.7 kgfcm) 2 3 Removing and replacing a FRU 83

Hardware Maintenance Manual
Page 93
... shock. v Never remove the drive while the computer is operating or is in order: v "1010 Battery pack" on page 80 v "1040 Thermal cover" on it . The drive is attached firmly. Removal steps of data. Removing and replacing a FRU 85 Improper handling can cause damage and permanent loss of HDD assembly 1 When installing...
... shock. v Never remove the drive while the computer is operating or is in order: v "1010 Battery pack" on page 80 v "1040 Thermal cover" on it . The drive is attached firmly. Removal steps of data. Removing and replacing a FRU 85 Improper handling can cause damage and permanent loss of HDD assembly 1 When installing...

Hardware Maintenance Manual
Page 95
Removal steps of the DIMM into the place. Press the DIMM firmly, and pivot it until it is used on the computer you are servicing, the card must be installed in SLOT-0 ( a : lower slot), but not in order: v "1010 Battery pack" on page 80 v "1040 Thermal cover" on page 84 Table 14. b a When installing: Insert the notched end of DIMM 1 2 1 Note: If only one DIMM is firmly fixed in the slot and does not move easily. Make sure that it snaps into the socket. 1060 DIMM For access, remove these FRUs in SLOT-1 ( b : upper slot). Removing and replacing a FRU 87
Removal steps of the DIMM into the place. Press the DIMM firmly, and pivot it until it is used on the computer you are servicing, the card must be installed in SLOT-0 ( a : lower slot), but not in order: v "1010 Battery pack" on page 80 v "1040 Thermal cover" on page 84 Table 14. b a When installing: Insert the notched end of DIMM 1 2 1 Note: If only one DIMM is firmly fixed in the slot and does not move easily. Make sure that it snaps into the socket. 1060 DIMM For access, remove these FRUs in SLOT-1 ( b : upper slot). Removing and replacing a FRU 87

Hardware Maintenance Manual
Page 101
Removal steps of SIM slot cover Note: Loosen the screw 1 , but do not remove it. 1 2 Removing and replacing a FRU 93 1090 SIM slot cover For access, remove this FRU: v "1010 Battery pack" on page 80 Table 17.
Removal steps of SIM slot cover Note: Loosen the screw 1 , but do not remove it. 1 2 Removing and replacing a FRU 93 1090 SIM slot cover For access, remove this FRU: v "1010 Battery pack" on page 80 Table 17.

Hardware Maintenance Manual
Page 103
Removal steps of wireless WAN slot cover and PCI Express Mini Card for wireless WAN For access, remove this FRU: v "1010 Battery pack" on page 80 Table 18. 1100 Wireless WAN slot cover and PCI Express Mini Card for wireless WAN Note: Loosen the screw 1 , but do not remove it. 1 2 Removing and replacing a FRU 95
Removal steps of wireless WAN slot cover and PCI Express Mini Card for wireless WAN For access, remove this FRU: v "1010 Battery pack" on page 80 Table 18. 1100 Wireless WAN slot cover and PCI Express Mini Card for wireless WAN Note: Loosen the screw 1 , but do not remove it. 1 2 Removing and replacing a FRU 95

Hardware Maintenance Manual
Page 105
If the fingerprint reader has any defects, you can replace it by the procedures given in order: v "1010 Battery pack" on page 80 v "1030 Optical drive or travel cover" on page 83 Note: In models with the fingerprint reader, the sensor is attached to ... × 8 mm, wafer-head, nylon-coated (1) Color Black 2 M2 × 5 mm, wafer-head, nylon-coated (6) Black Torque 0.167 Nm (1.7 kgfcm) 0.167 Nm (1.7 kgfcm) Removing and replacing a FRU 97 Table 19.
If the fingerprint reader has any defects, you can replace it by the procedures given in order: v "1010 Battery pack" on page 80 v "1030 Optical drive or travel cover" on page 83 Note: In models with the fingerprint reader, the sensor is attached to ... × 8 mm, wafer-head, nylon-coated (1) Color Black 2 M2 × 5 mm, wafer-head, nylon-coated (6) Black Torque 0.167 Nm (1.7 kgfcm) 0.167 Nm (1.7 kgfcm) Removing and replacing a FRU 97 Table 19.

Hardware Maintenance Manual
Page 111
Removal steps of the card is attached firmly to the system board. Removing and replacing a FRU 103 1140 Bluetooth daughter card (BDC-2) For access, remove these FRUs in order: v "1010 Battery pack" on page 80 v "1030 Optical drive or travel cover" on page 83 v "1110 Palm rest assembly with cables" on bottom side of BDC-2 1 2 Step 1 Screw (quantity) M2 × 3 mm, wafer-head, nylon-coated (1) Color Black Torque 0.167 Nm (1.7 kgfcm) When installing: Make sure that the connector on page 97 Table 23.
Removal steps of the card is attached firmly to the system board. Removing and replacing a FRU 103 1140 Bluetooth daughter card (BDC-2) For access, remove these FRUs in order: v "1010 Battery pack" on page 80 v "1030 Optical drive or travel cover" on page 83 v "1110 Palm rest assembly with cables" on bottom side of BDC-2 1 2 Step 1 Screw (quantity) M2 × 3 mm, wafer-head, nylon-coated (1) Color Black Torque 0.167 Nm (1.7 kgfcm) When installing: Make sure that the connector on page 97 Table 23.

Hardware Maintenance Manual
Page 117
For ThinkPad SL410 and L410, skip steps 2a and 3a . 3 3 1 2 2 2a 2a 2 1 3a 3 Step 1 2 Screw (quantity) M2.5 × 6.5 mm, wafer-head, nylon-coated (2) M2 ...) 0.167 Nm (1.7 kgfcm) 0.167 Nm (1.7 kgfcm) 0.167 Nm (1.7 kgfcm) 0.167 Nm (1.7 kgfcm) Removing and replacing a FRU 109 1170 Keyboard bezel For access, remove these FRUs in order: v "1010 Battery pack" on page 80 v "1030 Optical drive or travel cover" on page 83 v "1070 Fan assembly" on page 88... 3a are only for wireless LAN" on page 100 v "1160 Keyboard" on page 97 v "1120 PCI Express Mini Card for ThinkPad SL510 and L510.
For ThinkPad SL410 and L410, skip steps 2a and 3a . 3 3 1 2 2 2a 2a 2 1 3a 3 Step 1 2 Screw (quantity) M2.5 × 6.5 mm, wafer-head, nylon-coated (2) M2 ...) 0.167 Nm (1.7 kgfcm) 0.167 Nm (1.7 kgfcm) 0.167 Nm (1.7 kgfcm) 0.167 Nm (1.7 kgfcm) Removing and replacing a FRU 109 1170 Keyboard bezel For access, remove these FRUs in order: v "1010 Battery pack" on page 80 v "1030 Optical drive or travel cover" on page 83 v "1070 Fan assembly" on page 88... 3a are only for wireless LAN" on page 100 v "1160 Keyboard" on page 97 v "1120 PCI Express Mini Card for ThinkPad SL510 and L510.
