Hardware Maintenance Manual
Page 5
... and GAV products 41 General checkout 43 What to do first 44 Checkout guide 45 Diagnostics using PC-Doctor for DOS . . . . 45 Lenovo ThinkVantage Toolbox (Lenovo System Toolbox 48 PC-Doctor for Rescue and Recovery . . . . . 48 FRU tests 49 Power system checkout 51 Checking the AC adapter 51... Bluetooth daughter card (BDC-2) . . . . . 103 1150 Media Card Reader slot board and Media Card Reader cable assembly 104 1160 Keyboard 106 1170 Keyboard bezel 109 1180 LCD unit 111 1190 Top shielding assembly 116 1200 System board assembly 118 1210 USB connector board and USB cable assembly...
... and GAV products 41 General checkout 43 What to do first 44 Checkout guide 45 Diagnostics using PC-Doctor for DOS . . . . 45 Lenovo ThinkVantage Toolbox (Lenovo System Toolbox 48 PC-Doctor for Rescue and Recovery . . . . . 48 FRU tests 49 Power system checkout 51 Checking the AC adapter 51... Bluetooth daughter card (BDC-2) . . . . . 103 1150 Media Card Reader slot board and Media Card Reader cable assembly 104 1160 Keyboard 106 1170 Keyboard bezel 109 1180 LCD unit 111 1190 Top shielding assembly 116 1200 System board assembly 118 1210 USB connector board and USB cable assembly...
Hardware Maintenance Manual
Page 6
Parts list 141 Overall 142 LCD FRUs 158 Keyboard 164 Miscellaneous parts 165 AC adapters 166 Power cords 167 Recovery discs 168 Windows XP Professional (32 bit) DVDs . . . 168 Windows Vista Home Basic (32 ... (64 bit) DVDs . . 173 Windows 7 Professional (32 bit) DVDs . . . . 174 Windows 7 Professional (64 bit) DVDs . . . . 175 Common service tools 176 Notices 177 Trademarks 178 iv ThinkPad SL410, L410, SL510, and L510 Hardware Maintenance Manual
Parts list 141 Overall 142 LCD FRUs 158 Keyboard 164 Miscellaneous parts 165 AC adapters 166 Power cords 167 Recovery discs 168 Windows XP Professional (32 bit) DVDs . . . 168 Windows Vista Home Basic (32 ... (64 bit) DVDs . . 173 Windows 7 Professional (32 bit) DVDs . . . . 174 Windows 7 Professional (64 bit) DVDs . . . . 175 Common service tools 176 Notices 177 Trademarks 178 iv ThinkPad SL410, L410, SL510, and L510 Hardware Maintenance Manual

Hardware Maintenance Manual
Page 52
...the cosmetic parts v Plastic parts, latches, pins, or connectors that have been subjected to excessive force, or dropped. 44 ThinkPad SL410, L410, SL510, and L510 Hardware Maintenance Manual Before checking problems with multiple labels v Damaged or bent diskette eject button v Fuses blown ...by attachment of a nonsupported device v Forgotten computer password (making the computer unusable) v Sticky keys caused by spilling a liquid onto the keyboard ...
...the cosmetic parts v Plastic parts, latches, pins, or connectors that have been subjected to excessive force, or dropped. 44 ThinkPad SL410, L410, SL510, and L510 Hardware Maintenance Manual Before checking problems with multiple labels v Damaged or bent diskette eject button v Fuses blown ...by attachment of a nonsupported device v Forgotten computer password (making the computer unusable) v Sticky keys caused by spilling a liquid onto the keyboard ...

Hardware Maintenance Manual
Page 55
... on the test menu are incorrect. v Video Adapter test supports only the LCD display on the screen. Follow the instructions on the ThinkPad Notebook. Exit Diag. otherwise, it before running PC-Doctor, check the time and date on the system and reset them if they ... Ports v Fixed Disks v Diskette Drives v Other Devices v Wireless LAN v Advanced Memory Tests v Keyboard v Video v Internal Speaker v Mouse v Diskette v System Load v Optical Drive Test v Intel WLAN Radio Test Note: v In the Keyboard test in Interactive Tests, the Fn key should be set to the computer, detach it cannot be...
... on the test menu are incorrect. v Video Adapter test supports only the LCD display on the screen. Follow the instructions on the ThinkPad Notebook. Exit Diag. otherwise, it before running PC-Doctor, check the time and date on the system and reset them if they ... Ports v Fixed Disks v Diskette Drives v Other Devices v Wireless LAN v Advanced Memory Tests v Keyboard v Video v Internal Speaker v Mouse v Diskette v System Load v Optical Drive Test v Intel WLAN Radio Test Note: v In the Keyboard test in Interactive Tests, the Fn key should be set to the computer, detach it cannot be...

Hardware Maintenance Manual
Page 57
... for each FRU. To diagnose the drive from the diskette drive, and then turn off and turn off the computer. 2. Diagnostics --> ThinkPad Devices --> AC Adapter, Battery 1 (Battery2) 1. Diagnostics --> Other Devices--> Optical Drive 2. If the problem does not recur, return ... button," is running. FRU tests FRU System board Power LCD unit Audio Speaker Keyboard Hard disk drive Diskette drive Optical drive Memory Applicable test 1. Diagnostics --> Systemboard 3. Diagnostics --> Systemboard --> Keyboard 2. Turn on the computer. Press Enter to enter the BIOS Setup Utility. ...
... for each FRU. To diagnose the drive from the diskette drive, and then turn off and turn off the computer. 2. Diagnostics --> ThinkPad Devices --> AC Adapter, Battery 1 (Battery2) 1. Diagnostics --> Other Devices--> Optical Drive 2. If the problem does not recur, return ... button," is running. FRU tests FRU System board Power LCD unit Audio Speaker Keyboard Hard disk drive Diskette drive Optical drive Memory Applicable test 1. Diagnostics --> Systemboard 3. Diagnostics --> Systemboard --> Keyboard 2. Turn on the computer. Press Enter to enter the BIOS Setup Utility. ...

Hardware Maintenance Manual
Page 68
... computer to what occurs in Windows XP), and hibernation. To end screen blank mode and resume normal operation, press any operation with the keyboard, the TrackPoint, the hard disk, the parallel connector, or the diskette drive within that the battery power is a Windows 7 model, ...scheme) appears. 2. Note: You can also put the computer into screen blank mode, do not set on the power switch. 60 ThinkPad SL410, L410, SL510, and L510 Hardware Maintenance Manual Power management To reduce power consumption, the computer has three power management modes: screen blank, sleep (standby...
... computer to what occurs in Windows XP), and hibernation. To end screen blank mode and resume normal operation, press any operation with the keyboard, the TrackPoint, the hard disk, the parallel connector, or the diskette drive within that the battery power is a Windows 7 model, ...scheme) appears. 2. Note: You can also put the computer into screen blank mode, do not set on the power switch. 60 ThinkPad SL410, L410, SL510, and L510 Hardware Maintenance Manual Power management To reduce power consumption, the computer has three power management modes: screen blank, sleep (standby...

Hardware Maintenance Manual
Page 69
.... The hibernation file in either of the following actions as the event that causes the system to enter hibernation mode, do any operation with the keyboard, the TrackPoint, the hard disk drive, the parallel connector, or the diskette drive within that action. - Related service information 61 When the power is powered...
.... The hibernation file in either of the following actions as the event that causes the system to enter hibernation mode, do any operation with the keyboard, the TrackPoint, the hard disk drive, the parallel connector, or the diskette drive within that action. - Related service information 61 When the power is powered...
Hardware Maintenance Manual
Page 70
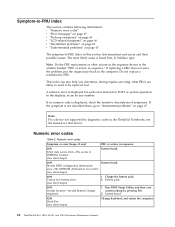
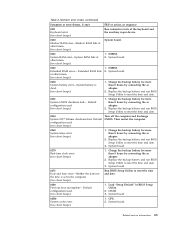
...-to-FRU index in POST or system operation. Run BIOS Setup Utility, and then save current setting by diagnostic codes in the ThinkPad Notebooks, see the manual for each error detected in this section lists symptoms and errors and their possible causes. A numeric error .... (two short beeps) System board. 0189 System board. System board. 0210 Stuck Key (two short beeps) Change keyboard, and restart the computer. 62 ThinkPad SL410, L410, SL510, and L510 Hardware Maintenance Manual The most likely cause is displayed for that device. Numeric error codes Table 2. Battery ...
...-to-FRU index in POST or system operation. Run BIOS Setup Utility, and then save current setting by diagnostic codes in the ThinkPad Notebooks, see the manual for each error detected in this section lists symptoms and errors and their possible causes. A numeric error .... (two short beeps) System board. 0189 System board. System board. 0210 Stuck Key (two short beeps) Change keyboard, and restart the computer. 62 ThinkPad SL410, L410, SL510, and L510 Hardware Maintenance Manual The most likely cause is displayed for that device. Numeric error codes Table 2. Battery ...
Hardware Maintenance Manual
Page 71
... error. (two short beeps) 1. Numeric error codes (continued) Symptom or error (beeps, if any) FRU or action, in sequence 0211 Keyboard error (two short beeps) Run interactive tests of the keyboard and the auxiliary input device. 0230 Shadow RAM error-Shadow RAM fails at offset nnnn. (two short beeps) System board. 0231...
... error. (two short beeps) 1. Numeric error codes (continued) Symptom or error (beeps, if any) FRU or action, in sequence 0211 Keyboard error (two short beeps) Run interactive tests of the keyboard and the auxiliary input device. 0230 Shadow RAM error-Shadow RAM fails at offset nnnn. (two short beeps) System board. 0231...

Hardware Maintenance Manual
Page 107
Installation of the keyboard bezel as shown in this figure. Then fasten the screws to the system board firmly. 2. Attach the palm rest so that the two small projections of the palm rest ( a ) firmly fit into place. 4. a a 3. Removing and replacing a FRU 99 Table 20. Attach the cables to secure the palm rest. Push the front side of the palm rest until it clicks into the guide holes of palm rest assembly with cables When installing: 1. Close the LCD cover and turn the computer over.
Installation of the keyboard bezel as shown in this figure. Then fasten the screws to the system board firmly. 2. Attach the palm rest so that the two small projections of the palm rest ( a ) firmly fit into place. 4. a a 3. Removing and replacing a FRU 99 Table 20. Attach the cables to secure the palm rest. Push the front side of the palm rest until it clicks into the guide holes of palm rest assembly with cables When installing: 1. Close the LCD cover and turn the computer over.

Hardware Maintenance Manual
Page 114
Removal steps of keyboard 1 Step 1 Screw (quantity) M2 × 5 mm, wafer-head, nylon-coated (1) Color Black Torque 0.167 Nm (1.7 kgfcm) 106 ThinkPad SL410, L410, SL510, and L510 Hardware Maintenance Manual 1160 Keyboard For access, remove these FRUs in order: v "1010 Battery pack" on page 80 v "1030 Optical drive or travel cover" on page 83 v "1110 Palm rest assembly with cables" on page 97 Table 25.
Removal steps of keyboard 1 Step 1 Screw (quantity) M2 × 5 mm, wafer-head, nylon-coated (1) Color Black Torque 0.167 Nm (1.7 kgfcm) 106 ThinkPad SL410, L410, SL510, and L510 Hardware Maintenance Manual 1160 Keyboard For access, remove these FRUs in order: v "1010 Battery pack" on page 80 v "1030 Optical drive or travel cover" on page 83 v "1110 Palm rest assembly with cables" on page 97 Table 25.

Hardware Maintenance Manual
Page 115
Removal steps of keyboard (continued) 6 7 2 4 2 3 5 Step 6 Screw (quantity) M2 × 3 mm, wafer-head, nylon-coated (1) Color Black 7 M2 × 2 mm, wafer-head, nylon-coated (1) Silver Torque 0.167 Nm (1.7 kgfcm) 0.167 Nm (1.7 kgfcm) 8 Removing and replacing a FRU 107 Table 25.
Removal steps of keyboard (continued) 6 7 2 4 2 3 5 Step 6 Screw (quantity) M2 × 3 mm, wafer-head, nylon-coated (1) Color Black 7 M2 × 2 mm, wafer-head, nylon-coated (1) Silver Torque 0.167 Nm (1.7 kgfcm) 0.167 Nm (1.7 kgfcm) 8 Removing and replacing a FRU 107 Table 25.

Hardware Maintenance Manual
Page 116
To make sure that the keyboard edges are under the frame as follows: Table 26. Attach the connectors. 2. Installation of the computer. 108 ThinkPad SL410, L410, SL510, and L510 Hardware Maintenance Manual Attach the keyboard so that the front side of the keyboard is housed firmly, gently press the keys with your thumbs and try to slide the keyboard toward you. 4. When installing the keyboard, do as shown in this figure. 3. Secure the keyboard by tightening the screws from the bottom side of the keyboard 1.
To make sure that the keyboard edges are under the frame as follows: Table 26. Attach the connectors. 2. Installation of the computer. 108 ThinkPad SL410, L410, SL510, and L510 Hardware Maintenance Manual Attach the keyboard so that the front side of the keyboard is housed firmly, gently press the keys with your thumbs and try to slide the keyboard toward you. 4. When installing the keyboard, do as shown in this figure. 3. Secure the keyboard by tightening the screws from the bottom side of the keyboard 1.

Hardware Maintenance Manual
Page 117
... (1) Black Torque 0.392 Nm (4 kgfcm) 0.167 Nm (1.7 kgfcm) 0.167 Nm (1.7 kgfcm) 0.167 Nm (1.7 kgfcm) 0.167 Nm (1.7 kgfcm) Removing and replacing a FRU 109 1170 Keyboard bezel For access, remove these FRUs in order: v "1010 Battery pack" on page 80 v "1030 Optical drive or travel cover" on page 83 v "1070 Fan... Mini Card for wireless WAN" on page 95 v "1110 Palm rest assembly with cables" on page 106 Table 27. Removal steps of keyboard bezel Note: Steps 2a and 3a are only for wireless LAN" on page 100 v "1160 Keyboard" on page 97 v "1120 PCI Express Mini Card for ThinkPad SL510 and L510.
... (1) Black Torque 0.392 Nm (4 kgfcm) 0.167 Nm (1.7 kgfcm) 0.167 Nm (1.7 kgfcm) 0.167 Nm (1.7 kgfcm) 0.167 Nm (1.7 kgfcm) Removing and replacing a FRU 109 1170 Keyboard bezel For access, remove these FRUs in order: v "1010 Battery pack" on page 80 v "1030 Optical drive or travel cover" on page 83 v "1070 Fan... Mini Card for wireless WAN" on page 95 v "1110 Palm rest assembly with cables" on page 106 Table 27. Removal steps of keyboard bezel Note: Steps 2a and 3a are only for wireless LAN" on page 100 v "1160 Keyboard" on page 97 v "1120 PCI Express Mini Card for ThinkPad SL510 and L510.

Hardware Maintenance Manual
Page 118
Removal steps of keyboard bezel (continued) 5 6 4 7 4 5 6 Step 4 Screw (quantity) M2 × 3 mm, wafer-head, nylon-coated (2) Color Black Torque 0.167 Nm (1.7 kgfcm) When installing: Make sure that the connectors are attached firmly to the system board. 8 8 110 ThinkPad SL410, L410, SL510, and L510 Hardware Maintenance Manual Table 27.
Removal steps of keyboard bezel (continued) 5 6 4 7 4 5 6 Step 4 Screw (quantity) M2 × 3 mm, wafer-head, nylon-coated (2) Color Black Torque 0.167 Nm (1.7 kgfcm) When installing: Make sure that the connectors are attached firmly to the system board. 8 8 110 ThinkPad SL410, L410, SL510, and L510 Hardware Maintenance Manual Table 27.

Hardware Maintenance Manual
Page 119
Removal steps of LCD unit 1 1 Step 1 Screw (quantity) M2.5 × 6.5 mm, wafter-head, nylon-coated (2) Color Black Torque 0.392 Nm (4 kgfcm) Removing and replacing a FRU 111 1180 LCD unit For access, remove these FRUs in order: v "1010 Battery pack" on page 80 v "1030 Optical drive or travel cover" on page 83 v "1100 Wireless WAN slot cover and PCI Express Mini Card for wireless WAN" on page 95 v "1110 Palm rest assembly with cables" on page 97 v "1120 PCI Express Mini Card for wireless LAN" on page 100 v "1160 Keyboard" on page 106 v "1170 Keyboard bezel" on page 109 Table 28.
Removal steps of LCD unit 1 1 Step 1 Screw (quantity) M2.5 × 6.5 mm, wafter-head, nylon-coated (2) Color Black Torque 0.392 Nm (4 kgfcm) Removing and replacing a FRU 111 1180 LCD unit For access, remove these FRUs in order: v "1010 Battery pack" on page 80 v "1030 Optical drive or travel cover" on page 83 v "1100 Wireless WAN slot cover and PCI Express Mini Card for wireless WAN" on page 95 v "1110 Palm rest assembly with cables" on page 97 v "1120 PCI Express Mini Card for wireless LAN" on page 100 v "1160 Keyboard" on page 106 v "1170 Keyboard bezel" on page 109 Table 28.

Hardware Maintenance Manual
Page 124
... × 3 mm, wafer-head, nylon-coated (3) Color Black 2 M2 × 5 mm, wafer-head, nylon-coated (4) Black Torque 0.167 Nm (1.7 kgfcm) 0.167 Nm (1.7 kgfcm) 116 ThinkPad SL410, L410, SL510, and L510 Hardware Maintenance Manual 1190 Top shielding assembly For access, remove these FRUs in order: v "1010 Battery pack" on page 80 v "1030 Optical... WAN" on page 95 v "1110 Palm rest assembly with cables" on page 97 v "1120 PCI Express Mini Card for wireless LAN" on page 100 v "1160 Keyboard" on page 106 v "1170 Keyboard bezel" on page 109 v "1180 LCD unit" on page 111 Table 29.
... × 3 mm, wafer-head, nylon-coated (3) Color Black 2 M2 × 5 mm, wafer-head, nylon-coated (4) Black Torque 0.167 Nm (1.7 kgfcm) 0.167 Nm (1.7 kgfcm) 116 ThinkPad SL410, L410, SL510, and L510 Hardware Maintenance Manual 1190 Top shielding assembly For access, remove these FRUs in order: v "1010 Battery pack" on page 80 v "1030 Optical... WAN" on page 95 v "1110 Palm rest assembly with cables" on page 97 v "1120 PCI Express Mini Card for wireless LAN" on page 100 v "1160 Keyboard" on page 106 v "1170 Keyboard bezel" on page 109 v "1180 LCD unit" on page 111 Table 29.

Hardware Maintenance Manual
Page 127
...daughter card (BDC-2)" on page 103 v "1150 Media Card Reader slot board and Media Card Reader cable assembly" on page 104 v "1160 Keyboard" on page 106 v "1170 Keyboard bezel" on page 109 v "1180 LCD unit" on page 111 v "1190 Top shielding assembly" on the top side of rough handling.... wireless WAN" on page 95 v "1110 Palm rest assembly with cables" on page 97 v "1120 PCI Express Mini Card for discrete models) For ThinkPad SL410 and L410 integrated models: a b c Removing and replacing a FRU 119 Location of major sensitive components on the system board Following components soldered on ...
...daughter card (BDC-2)" on page 103 v "1150 Media Card Reader slot board and Media Card Reader cable assembly" on page 104 v "1160 Keyboard" on page 106 v "1170 Keyboard bezel" on page 109 v "1180 LCD unit" on page 111 v "1190 Top shielding assembly" on the top side of rough handling.... wireless WAN" on page 95 v "1110 Palm rest assembly with cables" on page 97 v "1120 PCI Express Mini Card for discrete models) For ThinkPad SL410 and L410 integrated models: a b c Removing and replacing a FRU 119 Location of major sensitive components on the system board Following components soldered on ...

Hardware Maintenance Manual
Page 131
... Card for wireless LAN" on page 100 v "1150 Media Card Reader slot board and Media Card Reader cable assembly" on page 104 v "1160 Keyboard" on page 106 v "1170 Keyboard bezel" on page 109 v "1180 LCD unit" on page 111 v "1190 Top shielding assembly" on page 116 Table 32. Removal steps of USB...
... Card for wireless LAN" on page 100 v "1150 Media Card Reader slot board and Media Card Reader cable assembly" on page 104 v "1160 Keyboard" on page 106 v "1170 Keyboard bezel" on page 109 v "1180 LCD unit" on page 111 v "1190 Top shielding assembly" on page 116 Table 32. Removal steps of USB...

Hardware Maintenance Manual
Page 133
... page 106 v "1170 Keyboard bezel" on page 109 v "1180 LCD unit" on page 111 v "1190 Top shielding assembly" on page 116 v "1200 System board assembly" on page 118 Table 33. 1220 DC-in cable and base cover For access, remove these FRUs in cable and base cover For ThinkPad SL510 and L510: 1 3 2 1 Step...
... page 106 v "1170 Keyboard bezel" on page 109 v "1180 LCD unit" on page 111 v "1190 Top shielding assembly" on page 116 v "1200 System board assembly" on page 118 Table 33. 1220 DC-in cable and base cover For access, remove these FRUs in cable and base cover For ThinkPad SL510 and L510: 1 3 2 1 Step...

