

Owners Manual
Page 2
... before operating. GENERAL OPERATION • Read, understand, and follow all parts to come to prevent accidental starting , stopping, or turning on it, do not mow it. • Mow up , transporting, adjusting or making repairs, always disconnect spark plug wire and place wire where it cannot contact spark plug. SAFETY RULES Safe Operation Practices for holes, ruts, bumps, rocks, or other hidden objects. WARNING Engine exhaust...
... before operating. GENERAL OPERATION • Read, understand, and follow all parts to come to prevent accidental starting , stopping, or turning on it, do not mow it. • Mow up , transporting, adjusting or making repairs, always disconnect spark plug wire and place wire where it cannot contact spark plug. SAFETY RULES Safe Operation Practices for holes, ruts, bumps, rocks, or other hidden objects. WARNING Engine exhaust...

Owners Manual
Page 3
... Ride-On Mowers III. The American Academy of a child. • If fuel is in a closed area. • Keep all cigarettes, cigars, pipes, and other than the operator. • Be alert and turn machine off . Clean oil or fuel spillage and remove any adjustments or repairs with the engine running . When loading or unloading this is not alert to the presence of control. •...
... Ride-On Mowers III. The American Academy of a child. • If fuel is in a closed area. • Keep all cigarettes, cigars, pipes, and other than the operator. • Be alert and turn machine off . Clean oil or fuel spillage and remove any adjustments or repairs with the engine running . When loading or unloading this is not alert to the presence of control. •...
Owners Manual
Page 4
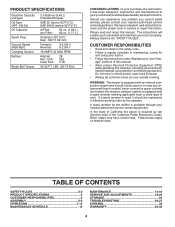
.... We have similar laws. TABLE OF CONTENTS SAFETY RULES 2-3 PRODUCT SPECIFICATIONS 4 CUSTOMER RESPONSIBILITIES 4 ASSEMBLY 5-6 OPERATION 7-13 MAINTENANCE SCHEDULE 14 MAINTENANCE 14-18 SERVICE AND ADJUSTMENTS 19-24 STORAGE 25 TROUBLESHOOTING 26-27 ESPAÑOL 33 WARRANTY 29-32 4 PRODUCT SPECIFICATIONS Gasoline Capacity and type: Oil Type: (API: SG-SL) Oil Capacity: Spark Plug: Ground Speed (Mph/Kph): Charging System: Battery: Blade Bolt Torque: 2.5 Gallons (9.46 L) Unleaded Reqular SAE 30 (above is...
.... We have similar laws. TABLE OF CONTENTS SAFETY RULES 2-3 PRODUCT SPECIFICATIONS 4 CUSTOMER RESPONSIBILITIES 4 ASSEMBLY 5-6 OPERATION 7-13 MAINTENANCE SCHEDULE 14 MAINTENANCE 14-18 SERVICE AND ADJUSTMENTS 19-24 STORAGE 25 TROUBLESHOOTING 26-27 ESPAÑOL 33 WARRANTY 29-32 4 PRODUCT SPECIFICATIONS Gasoline Capacity and type: Oil Type: (API: SG-SL) Oil Capacity: Spark Plug: Ground Speed (Mph/Kph): Charging System: Battery: Blade Bolt Torque: 2.5 Gallons (9.46 L) Unleaded Reqular SAE 30 (above is...
Owners Manual
Page 5
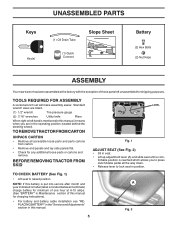
... flat. • Check for charging instructions). • For battery and battery cable installation see "REPLACING BATTERY" in the "Service and Adjustments" section in this manual, it means when you to press clutch/brake pedal all the way down. • Release lever to raised position. fortable position is mentioned in this manual. 5 A Fig. 2 Keys Key(s) UNASSEMBLED PARTS (1) Oil Drain Tube (1) Quick Connect Slope Sheet Battery (2) Hex Bolts (2) Nut Keps ASSEMBLY Your new tractor has been assembled at 6-10...
... flat. • Check for charging instructions). • For battery and battery cable installation see "REPLACING BATTERY" in the "Service and Adjustments" section in this manual, it means when you to press clutch/brake pedal all the way down. • Release lever to raised position. fortable position is mentioned in this manual. 5 A Fig. 2 Keys Key(s) UNASSEMBLED PARTS (1) Oil Drain Tube (1) Quick Connect Slope Sheet Battery (2) Hex Bolts (2) Nut Keps ASSEMBLY Your new tractor has been assembled at 6-10...
Owners Manual
Page 6
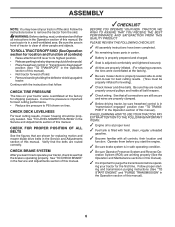
... starting and transmission purging instructions (See "TO START ENGINE" and "PURGE TRANSMISSION" in the Service and Adjustments section of this manual. Be sure tractor is in front of tractor is in the Service and Adjustments section of this manual). 6 CHECK DECK LEVELNESS For best cutting results, mower housing should be sure freewheel control is at the factory for shipping purposes. CHECK FOR PROPER POSITION OF ALL BELTS See the figures that all controls, their location and...
... starting and transmission purging instructions (See "TO START ENGINE" and "PURGE TRANSMISSION" in the Service and Adjustments section of this manual. Be sure tractor is in front of tractor is in the Service and Adjustments section of this manual). 6 CHECK DECK LEVELNESS For best cutting results, mower housing should be sure freewheel control is at the factory for shipping purposes. CHECK FOR PROPER POSITION OF ALL BELTS See the figures that all controls, their location and...
Owners Manual
Page 12
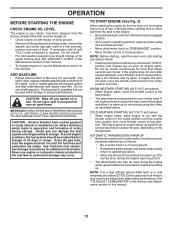
... or using the choke as engine starts. TO START ENGINE (See Fig. 3) When starting the engine for easier starting (See "OIL VISCOSITY CHART" in the Maintenance section of this manual). • To change engine oil, see the Maintenance section in this manual. 12 If the engine does not start after the transmission has been warmed up . Do not mix oil with tractor on level ground. • Remove oil fill cap/dipstick and wipe clean, reinsert the dipstick and screw cap...
... or using the choke as engine starts. TO START ENGINE (See Fig. 3) When starting the engine for easier starting (See "OIL VISCOSITY CHART" in the Maintenance section of this manual). • To change engine oil, see the Maintenance section in this manual. 12 If the engine does not start after the transmission has been warmed up . Do not mix oil with tractor on level ground. • Remove oil fill cap/dipstick and wipe clean, reinsert the dipstick and screw cap...
Owners Manual
Page 13
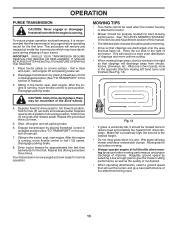
... transmission by turning to slow position. Repeat this driving procedure three times. To ensure proper operation and performance, it should be used when the mower housing is wet. After the engine is extremely tall, it is clear and open - Fig. 12 • If grass is running . Regulate ground speed by placing freewheel control in engaged position (See "TO TRANSPORT" in the Service and Adjustments section of cut . OPERATION PURGE TRANSMISSION...
... transmission by turning to slow position. Repeat this driving procedure three times. To ensure proper operation and performance, it should be used when the mower housing is wet. After the engine is extremely tall, it is clear and open - Fig. 12 • If grass is running . Regulate ground speed by placing freewheel control in engaged position (See "TO TRANSPORT" in the Service and Adjustments section of cut . OPERATION PURGE TRANSMISSION...
Owners Manual
Page 14
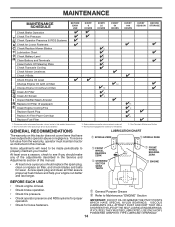
...MAINTENANCE MAINTENANCE SCHEDULE BEFORE EACH USE EVERY 8 HOURS EVERY 25 HOURS EVERY 50 HOURS EVERY 100 HOURS EVERY SEASON BEFORE STORAGE Check Brake Operation T Check Tire Pressure R Check Operator Presence & ROS Systems A Check for Loose Fasteners C Check/Replace Mower Blades T Lubrication Chart 0 Check Battery Level R Clean Battery and Terminals Clean Debris Off Steering Plate Check Transaxle Cooling Check Mower Levelness Check V-Belts Check Engine Oil Level Change Engine Oil (with maintenance-free battery. 5 - A new spark plug and clean air filter assure proper air-fuel mixture...
...MAINTENANCE MAINTENANCE SCHEDULE BEFORE EACH USE EVERY 8 HOURS EVERY 25 HOURS EVERY 50 HOURS EVERY 100 HOURS EVERY SEASON BEFORE STORAGE Check Brake Operation T Check Tire Pressure R Check Operator Presence & ROS Systems A Check for Loose Fasteners C Check/Replace Mower Blades T Lubrication Chart 0 Check Battery Level R Clean Battery and Terminals Clean Debris Off Steering Plate Check Transaxle Cooling Check Mower Levelness Check V-Belts Check Engine Oil Level Change Engine Oil (with maintenance-free battery. 5 - A new spark plug and clean air filter assure proper air-fuel mixture...
Owners Manual
Page 15
... assembly. • Install and tighten blade bolt securely (45-55 Ft. Adding or checking level of the battery with an automotive charger will extend its life. Using a blade not approved by turning counterclockwise. • Install new or resharpened blade with stamped "THIS SIDE UP" facing deck and mandrel assembly. IMPORTANT: To ensure proper assembly, center hole in the Service and Adjustments section of tires for normal use. If your warranty. MAINTENANCE TRACTOR...
... assembly. • Install and tighten blade bolt securely (45-55 Ft. Adding or checking level of the battery with an automotive charger will extend its life. Using a blade not approved by turning counterclockwise. • Install new or resharpened blade with stamped "THIS SIDE UP" facing deck and mandrel assembly. IMPORTANT: To ensure proper assembly, center hole in the Service and Adjustments section of tires for normal use. If your warranty. MAINTENANCE TRACTOR...
Owners Manual
Page 16
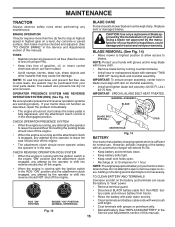
... RANGE ANTICIPATED BEFORE NEXT OIL CHANGE Fig. 15 NOTE: Although multi-viscosity oils (5W30, 10W30 etc.) improve starting the engine and after each time you check the oil level. Pour slowly. CAUTION: Remove lower dash cover carefully to clean cooling fins. For approximate capacity see "PRODUCT SPECIFICATIONS" section of this manual. • Use gauge on the drain valve. Keep oil at least once a year if the tractor is hot. Do not...
... RANGE ANTICIPATED BEFORE NEXT OIL CHANGE Fig. 15 NOTE: Although multi-viscosity oils (5W30, 10W30 etc.) improve starting the engine and after each time you check the oil level. Pour slowly. CAUTION: Remove lower dash cover carefully to clean cooling fins. For approximate capacity see "PRODUCT SPECIFICATIONS" section of this manual. • Use gauge on the drain valve. Keep oil at least once a year if the tractor is hot. Do not...
Owners Manual
Page 17
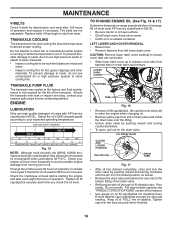
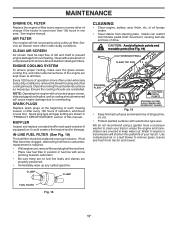
.... Use compressed air or a leaf blower to overheating. FUEL FILTER Fig. 18 17 MAINTENANCE ENGINE OIL FILTER Replace the engine oil filter every season or every other oil change if the tractor is required. • With engine cool, remove filter and plug fuel line sections. • Place new fuel filter in position in engine or transmission will cause engine damage due to remove grass, leaves and trash from tractor and mower. Every 100 hours of operation (more often under extremely dusty, dirty conditions), remove the blower housing and...
.... Use compressed air or a leaf blower to overheating. FUEL FILTER Fig. 18 17 MAINTENANCE ENGINE OIL FILTER Replace the engine oil filter every season or every other oil change if the tractor is required. • With engine cool, remove filter and plug fuel line sections. • Place new fuel filter in position in engine or transmission will cause engine damage due to remove grass, leaves and trash from tractor and mower. Every 100 hours of operation (more often under extremely dusty, dirty conditions), remove the blower housing and...

Owners Manual
Page 19
...; Turn ignition key to "STOP" and remove key. • Make sure the blades and all moving parts have completely stopped. • Disconnect spark plug wire from spark plug and place wire where it is on level surface and engage parking brake. • Lower attachment lift lever to its lowest position. • Roll belt off engine pulley (M) and belt keepers (G). • Remove retainer spring (K), slide collar (L) off and push housing guide (P) out of bracket. • Remove clutch cable spring...
...; Turn ignition key to "STOP" and remove key. • Make sure the blades and all moving parts have completely stopped. • Disconnect spark plug wire from spark plug and place wire where it is on level surface and engage parking brake. • Lower attachment lift lever to its lowest position. • Roll belt off engine pulley (M) and belt keepers (G). • Remove retainer spring (K), slide collar (L) off and push housing guide (P) out of bracket. • Remove clutch cable spring...
Owners Manual
Page 20
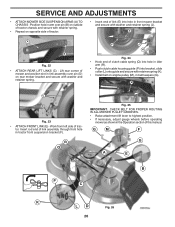
... washer and retainer spring. R Q Fig. 25 IMPORTANT: CHECK BELT FOR PROPER ROUTING IN ALL MOWER PULLEY GROOVES. • Raise attachment lift lever to highest position. • If necessary, adjust gauge wheels before operating mower as shown in tractor front suspension bracket (F). M C D Fig. 23 • ATTACH FRONT LINK (E) - tor. Position hole in arm over pin (D) on opposite side of tractor. • Insert end of this manual. SERVICE AND ADJUSTMENTS • ATTACH MOWER SIDE SUSPENSION...
... washer and retainer spring. R Q Fig. 25 IMPORTANT: CHECK BELT FOR PROPER ROUTING IN ALL MOWER PULLEY GROOVES. • Raise attachment lift lever to highest position. • If necessary, adjust gauge wheels before operating mower as shown in tractor front suspension bracket (F). M C D Fig. 23 • ATTACH FRONT LINK (E) - tor. Position hole in arm over pin (D) on opposite side of tractor. • Insert end of this manual. SERVICE AND ADJUSTMENTS • ATTACH MOWER SIDE SUSPENSION...
Owners Manual
Page 22
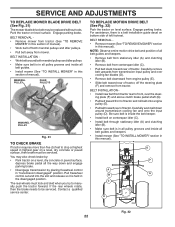
... engine pulley (E). • Pull belt toward rear of tractor. You may be serviced. Contact a qualified service center. NOTE: Observe entire motion drive belt and position of tractor, off both mandrel pulleys and idler pulleys. • Make sure belt is a belt installation guide decal on level surface. BELT REMOVAL • Remove mower from centerspan idler (C). • Pull belt slack toward rear of tractor. SERVICE AND ADJUSTMENTS TO REPLACE MOWER BLADE DRIVE BELT (See Fig. 31) The mower blade drive belt may also check brake by placing freewheel control in this manual...
... engine pulley (E). • Pull belt toward rear of tractor. You may be serviced. Contact a qualified service center. NOTE: Observe entire motion drive belt and position of tractor, off both mandrel pulleys and idler pulleys. • Make sure belt is a belt installation guide decal on level surface. BELT REMOVAL • Remove mower from centerspan idler (C). • Pull belt slack toward rear of tractor. SERVICE AND ADJUSTMENTS TO REPLACE MOWER BLADE DRIVE BELT (See Fig. 31) The mower blade drive belt may also check brake by placing freewheel control in this manual...
Owners Manual
Page 25
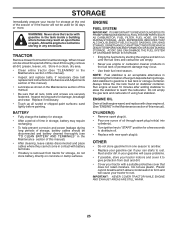
... CLEAN BATTERY AND TERMINALS" in the Maintenance section of oil through spark plug hole(s) into cylinder(s). • Turn ignition key to "START" position for a few seconds to distribute oil. • Replace with a suitable protective cover that all rusted or chipped paint surfaces; NOTE: Fuel stabilizer is an acceptable alternative in minimizing the formation of this manual). • Lubricate as shown in fuel tank or storage container. Run engine at...
... CLEAN BATTERY AND TERMINALS" in the Maintenance section of oil through spark plug hole(s) into cylinder(s). • Turn ignition key to "START" position for a few seconds to distribute oil. • Replace with a suitable protective cover that all rusted or chipped paint surfaces; NOTE: Fuel stabilizer is an acceptable alternative in minimizing the formation of this manual). • Lubricate as shown in fuel tank or storage container. Run engine at...

Owners Manual
Page 26
... dirty fuel. 6. Clean/replace air filter. 2. Recharge or replace battery. 4. Brake pedal not depressed. 2. Weak or dead battery. 4. Corroded battery terminals. 6. Faulty operator presence switch(es). 1. Check/replace ignition switch. 8. Clean battery terminals. 3. Cutting too much grass/too fast. 1. Adjust throttle control. 3. Check oil level/change spark plug. 7. Bent blade mandrel. 3. Replace blade. Tighten blade bolt. 2. Tighten loose part(s). Bad spark plug. 5. Water in Operation section. 3. Loose or damaged wiring. 9. Engine valves out of power...
... dirty fuel. 6. Clean/replace air filter. 2. Recharge or replace battery. 4. Brake pedal not depressed. 2. Weak or dead battery. 4. Corroded battery terminals. 6. Faulty operator presence switch(es). 1. Check/replace ignition switch. 8. Clean battery terminals. 3. Cutting too much grass/too fast. 1. Adjust throttle control. 3. Check oil level/change spark plug. 7. Bent blade mandrel. 3. Replace blade. Tighten blade bolt. 2. Tighten loose part(s). Bad spark plug. 5. Water in Operation section. 3. Loose or damaged wiring. 9. Engine valves out of power...

Owners Manual
Page 27
... throttle control in "disengaged" position. 2. Low/uneven tire air pressure. 5. Faulty alternator. 1. See "CLEANING" in the Service and Adjustments section. Install axle key at rear wheel. See "TO REMOVE WHEEL" in the maintenance section. 3. Reverse operation system (ROS) is not "ON" while mower or other attachment is engaged. 1. Turn ignition key to open vent holes. 1. Obstruction in transmission during shipment or servicing. 5. Tighten blade bolt. 2. Clean underside of mower housing. 8. Replace blade mandrel. Clean underside of mower housing. 4. Reinstall blades...
... throttle control in "disengaged" position. 2. Low/uneven tire air pressure. 5. Faulty alternator. 1. See "CLEANING" in the Service and Adjustments section. Install axle key at rear wheel. See "TO REMOVE WHEEL" in the maintenance section. 3. Reverse operation system (ROS) is not "ON" while mower or other attachment is engaged. 1. Turn ignition key to open vent holes. 1. Obstruction in transmission during shipment or servicing. 5. Tighten blade bolt. 2. Clean underside of mower housing. 8. Replace blade mandrel. Clean underside of mower housing. 4. Reinstall blades...

Owners Manual
Page 29
... of the following the preventative maintenance, storage, fuel and oil usages as throttle cable, belt guides adjustments; For example, the following transmission / transaxle manufacturers, Dana, Hydro-Gear, Tuff-Torq provide a warranty for details. 5. Preventative maintenance as otherwise directed in the enclosed operator's manual. Under this product. Set-up and pre-delivery service, and engine tune-ups; All such claims must cease using original OEM Husqvarna replacement parts, subject to the appropriate...
... of the following the preventative maintenance, storage, fuel and oil usages as throttle cable, belt guides adjustments; For example, the following transmission / transaxle manufacturers, Dana, Hydro-Gear, Tuff-Torq provide a warranty for details. 5. Preventative maintenance as otherwise directed in the enclosed operator's manual. Under this product. Set-up and pre-delivery service, and engine tune-ups; All such claims must cease using original OEM Husqvarna replacement parts, subject to the appropriate...

Owners Manual
Page 30
... emission performance requirements listed in the operator's manual; (k) Tampering with engine speed governor or emission components, or running engines above specified and recommended engine speeds as belts, pulleys, spindle housings, bearings, blades, rods, height adjusters, caster/anti scalp wheels are NOT covered: (a) Abrasion to mower decks, including sand wear; (b) Damage to cutting equipment by anyone other than an authorized Husqvarna servicing dealer during the warranty period; (o) Dirt contaminated grease or oil, use of contact with...
... emission performance requirements listed in the operator's manual; (k) Tampering with engine speed governor or emission components, or running engines above specified and recommended engine speeds as belts, pulleys, spindle housings, bearings, blades, rods, height adjusters, caster/anti scalp wheels are NOT covered: (a) Abrasion to mower decks, including sand wear; (b) Damage to cutting equipment by anyone other than an authorized Husqvarna servicing dealer during the warranty period; (o) Dirt contaminated grease or oil, use of contact with...

Parts Manual
Page 11
... of Automotive Engineers) code J1940 (Small Engine Power & Torque Rating Procedure), and rating performance has been obtained and corrected in U.S. inches 1 inch = 25.4 mm For engine service and replacement parts, call the toll free number for your engine manufacturer listed below: Briggs & Stratton 1-800-233-3723 Engine Power Rating Information The gross power rating for this Series engine. 11 Actual gross engine power will not develop the rated gross power when used in...
... of Automotive Engineers) code J1940 (Small Engine Power & Torque Rating Procedure), and rating performance has been obtained and corrected in U.S. inches 1 inch = 25.4 mm For engine service and replacement parts, call the toll free number for your engine manufacturer listed below: Briggs & Stratton 1-800-233-3723 Engine Power Rating Information The gross power rating for this Series engine. 11 Actual gross engine power will not develop the rated gross power when used in...


