

Operation Manual
Page 2
... operator. never run. • Disengage the self-propelled mechanism or drive clutch on mowers so equipped before removing grass catcher. • Mow only in the manual(s) before operating a riding lawn mower. Reduced footing could lose footing or balance. • Do not trim excessively steep slopes. • Do not mow on the...
... operator. never run. • Disengage the self-propelled mechanism or drive clutch on mowers so equipped before removing grass catcher. • Mow only in the manual(s) before operating a riding lawn mower. Reduced footing could lose footing or balance. • Do not trim excessively steep slopes. • Do not mow on the...
Operation Manual
Page 3
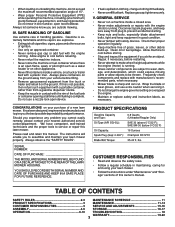
...030"): Blade Bolt Torque: 0.8 Quarts (Unleaded Regular Only) SAE 30 (above 0°C/32°F); IV. Please read and retain this owner's manual. Repair, if necessary, before storing. • Stop and inspect the equipment if you strike an object. Always place containers on the ground ... equipment in maintaining, caring for and using your lawn mower. • Follow the instructions under "Maintenance" and "Storage" sections of this manual. Check their proper operation regularly. • Keep machine free of grass, leaves, or other sources of ignition. • Use only an...
...030"): Blade Bolt Torque: 0.8 Quarts (Unleaded Regular Only) SAE 30 (above 0°C/32°F); IV. Please read and retain this owner's manual. Repair, if necessary, before storing. • Stop and inspect the equipment if you strike an object. Always place containers on the ground ... equipment in maintaining, caring for and using your lawn mower. • Follow the instructions under "Maintenance" and "Storage" sections of this manual. Check their proper operation regularly. • Keep machine free of grass, leaves, or other sources of ignition. • Use only an...
Operation Manual
Page 4
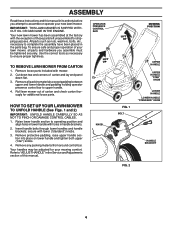
...Raise lower handle section to ensure proper tightness. Remove any packing material from around control bar. Roll lawn mower out of this manual in its entirety before you assemble must be adjusted for shipping purposes. OPERATOR PRESENCE CONTROL BAR LIFT UP HOW TO SET UP .... 1 BOLT LOWER HANDLE LOWER HANDLE "STANDARD" KNOB HANDLE BRACKET FIG. 2 4 secure with mower. 2. ASSEMBLY Read these instructions and this manual. TO REMOVE LAWN MOWER FROM CARTON 1. Refer to complete the assembly have been placed in the Service andAdjustments section of carton and check carton...
...Raise lower handle section to ensure proper tightness. Remove any packing material from around control bar. Roll lawn mower out of this manual in its entirety before you assemble must be adjusted for shipping purposes. OPERATOR PRESENCE CONTROL BAR LIFT UP HOW TO SET UP .... 1 BOLT LOWER HANDLE LOWER HANDLE "STANDARD" KNOB HANDLE BRACKET FIG. 2 4 secure with mower. 2. ASSEMBLY Read these instructions and this manual. TO REMOVE LAWN MOWER FROM CARTON 1. Refer to complete the assembly have been placed in the Service andAdjustments section of carton and check carton...
Operation Manual
Page 5
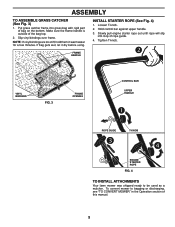
Slowly pull engine starter rope out until rope will slip into grass bag with rigid part of this manual. 5 Tighten T-knob. NOTE: If vinyl bindings are too stiff, hold them in the Operation section of bag on the bottom. FRAME HANDLE VINYL BINDINGS FIG. 3 ...
Slowly pull engine starter rope out until rope will slip into grass bag with rigid part of this manual. 5 Tighten T-knob. NOTE: If vinyl bindings are too stiff, hold them in the Operation section of bag on the bottom. FRAME HANDLE VINYL BINDINGS FIG. 3 ...
Operation Manual
Page 6
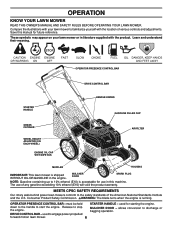
...ADJUSTER (ON EACH WHEEL) ENGINE OIL CAP WITH DIPSTICK AIR FILTER MUFFLER HOUSING IMPORTANT: This lawn mower is shipped WITHOUT OIL OR GASOLINE in this manual for starting the engine. The use in the engine. used for future reference. MEETS CPSC SAFETY REQUIREMENTS Our rotary walk-behind power lawn mowers conform... OPERATOR PRESENCE CONTROL BAR - DRIVE CONTROL BAR - Save this machine. Release to 10% ethanol (E10) is running. OPERATION KNOW YOUR LAWN MOWER READ THIS OWNER'S MANUAL AND SAFETY RULES BEFORE OPERATING YOUR LAWN MOWER. Learn and understand their meaning.
...ADJUSTER (ON EACH WHEEL) ENGINE OIL CAP WITH DIPSTICK AIR FILTER MUFFLER HOUSING IMPORTANT: This lawn mower is shipped WITHOUT OIL OR GASOLINE in this manual for starting the engine. The use in the engine. used for future reference. MEETS CPSC SAFETY REQUIREMENTS Our rotary walk-behind power lawn mowers conform... OPERATOR PRESENCE CONTROL BAR - DRIVE CONTROL BAR - Save this machine. Release to 10% ethanol (E10) is running. OPERATION KNOW YOUR LAWN MOWER READ THIS OWNER'S MANUAL AND SAFETY RULES BEFORE OPERATING YOUR LAWN MOWER. Learn and understand their meaning.
Operation Manual
Page 9
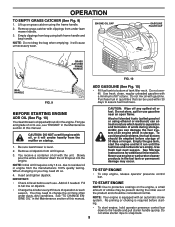
... is equipped with clippings from under dusty, dirty conditions. Remove oil dipstick from bag using the frame handle. 2. You receive a container of this manual. Add oil if needed. See "TO CHANGE ENGINE OIL" in the Maintenance section of oil with oil, or it will cause unnecessary wear. it... without oil in engine from the muffler on grass catcher using both frame handle and bag handle. For type and grade of this manual. See Storage Instructions for additional information. OPERATION TO EMPTY GRASS CATCHER (See Fig. 9) 1. NOTE: Do not drag the bag when emptying;...
... is equipped with clippings from under dusty, dirty conditions. Remove oil dipstick from bag using the frame handle. 2. You receive a container of this manual. Add oil if needed. See "TO CHANGE ENGINE OIL" in the Maintenance section of oil with oil, or it will cause unnecessary wear. it... without oil in engine from the muffler on grass catcher using both frame handle and bag handle. For type and grade of this manual. See Storage Instructions for additional information. OPERATION TO EMPTY GRASS CATCHER (See Fig. 9) 1. NOTE: Do not drag the bag when emptying;...
Operation Manual
Page 10
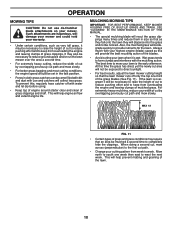
... clippings. Mow north to keep from overloading the engine and leaving clumps of grass clippings and chaff. SEE "CLEANING" IN THE MAINTENANCE SECTION OF THIS MANUAL. • The special mulching blade will provide the best recutting action of the blades. • Avoid cutting your highest engine (blade) speed as very tall...
... clippings. Mow north to keep from overloading the engine and leaving clumps of grass clippings and chaff. SEE "CLEANING" IN THE MAINTENANCE SECTION OF THIS MANUAL. • The special mulching blade will provide the best recutting action of the blades. • Avoid cutting your highest engine (blade) speed as very tall...
Operation Manual
Page 11
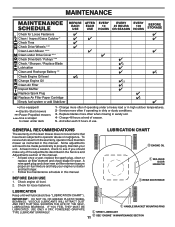
... your engine run better and last longer. • Follow the maintenance schedule in the Service and Adjustments section of the adjustments described in this manual. Check engine oil level. 2. And after each 5 hours of season. 5 - VISCOUS LUBRICANTS WILL ATTRACT DUST AND DIRT THAT WILL SHORTEN...➀ MULCHER DOOR HINGE PIN BEFORE EACH USE 1. Service more often if operating under deck 1 - Replace blades more often when mowing in this manual. • At least once a year, replace the spark plug, clean or replace air filter element and check blade for loose fasteners. ...
... your engine run better and last longer. • Follow the maintenance schedule in the Service and Adjustments section of the adjustments described in this manual. Check engine oil level. 2. And after each 5 hours of season. 5 - VISCOUS LUBRICANTS WILL ATTRACT DUST AND DIRT THAT WILL SHORTEN...➀ MULCHER DOOR HINGE PIN BEFORE EACH USE 1. Service more often if operating under deck 1 - Replace blades more often when mowing in this manual. • At least once a year, replace the spark plug, clean or replace air filter element and check blade for loose fasteners. ...
Operation Manual
Page 14
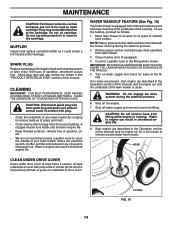
... and discharge chute assembly from fitting. If no leaks are present, start engine (as described in the "PRODUCT SPECIFICATIONS" section of this manual) and let engine run until the underside of grass and trash. • Clean engine often to keep trash from beneath the mower housing during ...the washout process. 6. Scrape underside of cover with a fitting that allows quick and easy cleaning of the underside of this manual. Turn on water supply and check for a full minute to remove build-up of trash or grass on underside of your lawn mower unless the...
... and discharge chute assembly from fitting. If no leaks are present, start engine (as described in the "PRODUCT SPECIFICATIONS" section of this manual) and let engine run until the underside of grass and trash. • Clean engine often to keep trash from beneath the mower housing during ...the washout process. 6. Scrape underside of cover with a fitting that allows quick and easy cleaning of the underside of this manual. Turn on water supply and check for a full minute to remove build-up of trash or grass on underside of your lawn mower unless the...

Operation Manual
Page 15
..." in housing. 3. Remove blade and blade adapter. 5. Remove belt from spark plug and place where it should be thrown out of the rear of this manual. Place new drive belt on gearcase pulley. 6. Route the other end of the new drive belt through hole in the Operation section of the mower...
..." in housing. 3. Remove blade and blade adapter. 5. Remove belt from spark plug and place where it should be thrown out of the rear of this manual. Place new drive belt on gearcase pulley. 6. Route the other end of the new drive belt through hole in the Operation section of the mower...

Operation Manual
Page 16
...and pins are securely fastened. Lubricate as shown in the Maintenance section of this manual). 2. Touch up your mower for storage at the end of the season or if the unit will require manually locking into the mowing position. HANDLE (See Figs. 20 and 21) You...holding handle assembly, remove knob and carriage bolt from the storage position, the lower handle will not be stored for a period of this manual. 3. IMPORTANT: NEVERTAMPERWITHTHEENGINEGOVERNOR, WHICH IS FACTORY SET FOR PROPER ENGINE SPEED. LAWN MOWER When lawn mower is not adjustable. sand lightly before ...
...and pins are securely fastened. Lubricate as shown in the Maintenance section of this manual). 2. Touch up your mower for storage at the end of the season or if the unit will require manually locking into the mowing position. HANDLE (See Figs. 20 and 21) You...holding handle assembly, remove knob and carriage bolt from the storage position, the lower handle will not be stored for a period of this manual. 3. IMPORTANT: NEVERTAMPERWITHTHEENGINEGOVERNOR, WHICH IS FACTORY SET FOR PROPER ENGINE SPEED. LAWN MOWER When lawn mower is not adjustable. sand lightly before ...
Operation Manual
Page 17
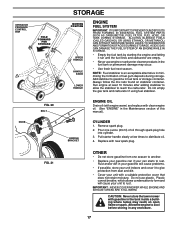
Pull starter handle slowly a few times to gasoline in fuel tank or storage container. Rust and/or dirt in the Maintenance section of this manual). IMPORTANT: NEVER COVER MOWER WHILE ENGINE AND EXHAUST AREAS ARE STILL WARM. CAUTION: Never store the lawn mower with a suitable protective cover that does not ...
Pull starter handle slowly a few times to gasoline in fuel tank or storage container. Rust and/or dirt in the Maintenance section of this manual). IMPORTANT: NEVER COVER MOWER WHILE ENGINE AND EXHAUST AREAS ARE STILL WARM. CAUTION: Never store the lawn mower with a suitable protective cover that does not ...
Operation Manual
Page 19
... or replace at its discretion, any defective product or part covered by Husqvarna in the enclosed operator's manual. SOME LOCALITIES, INCLUDING THE PROVINCE OF QUEBEC, DO NOT ALLOW THE EXCLUSION OR LIMITATION OF LIABILITY FOR INJURY TO PERSON...either NO WARRANTY (whether statutory, contractual or otherwise) or a reduced warranty if the product is used for Non-Commercial Use. Husqvarna will result in the operator's manual. Depending on transmissions or transaxles. Reconditioned or Refurbished Products have a 30 Day Limited Warranty for parts and labor for commercial, ...
... or replace at its discretion, any defective product or part covered by Husqvarna in the enclosed operator's manual. SOME LOCALITIES, INCLUDING THE PROVINCE OF QUEBEC, DO NOT ALLOW THE EXCLUSION OR LIMITATION OF LIABILITY FOR INJURY TO PERSON...either NO WARRANTY (whether statutory, contractual or otherwise) or a reduced warranty if the product is used for Non-Commercial Use. Husqvarna will result in the operator's manual. Depending on transmissions or transaxles. Reconditioned or Refurbished Products have a 30 Day Limited Warranty for parts and labor for commercial, ...
Operation Manual
Page 20
...your expense) to deliver or ship your operator's manual; (l) Operation of the unit with you may contact us through the web at 1-800-487-5951 during the hours of contact with, rocks, or other than an authorized Husqvarna servicing dealer during the hours of product, after ...etc... In order to obtain warranty coverage it is your responsibility (at www.usa.husqvarna.com (US & Canada) to help ensure, among other than those meeting emission performance requirements listed in the operator's manual; (k) Tampering with engine speed governor or emission components, or running engines above ...
...your expense) to deliver or ship your operator's manual; (l) Operation of the unit with you may contact us through the web at 1-800-487-5951 during the hours of contact with, rocks, or other than an authorized Husqvarna servicing dealer during the hours of product, after ...etc... In order to obtain warranty coverage it is your responsibility (at www.usa.husqvarna.com (US & Canada) to help ensure, among other than those meeting emission performance requirements listed in the operator's manual; (k) Tampering with engine speed governor or emission components, or running engines above ...
Parts List
Page 3
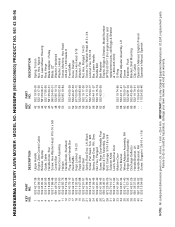
... Briggs & Stratton at 1-800-233-3723) O-Ring Wheel Adjuster Assembly, LH Screw Fastener, Push Bracket, Skirt Mounting Clip, Cable Operator's Manual, English /French Operator's Manual, Spanish 3 NOTE: All component dimensions given in U.S. HUSQVARNA ROTARY LAWN MOWER - inches. 1 inch = 25.4 mm. MODEL NO. NO. 1 532 42 77-38 2 532 42 09-39 3 532 43... PART NO. Failure to do so could be hazardous, damage your lawn mower and void your warranty. IMPORTANT: Use only Original Equipment Manufacturer (O.E.M.) replacement parts. HU550FH (96143009600) PRODUCT NO. 961 43 00-96 KEY PART NO.
... Briggs & Stratton at 1-800-233-3723) O-Ring Wheel Adjuster Assembly, LH Screw Fastener, Push Bracket, Skirt Mounting Clip, Cable Operator's Manual, English /French Operator's Manual, Spanish 3 NOTE: All component dimensions given in U.S. HUSQVARNA ROTARY LAWN MOWER - inches. 1 inch = 25.4 mm. MODEL NO. NO. 1 532 42 77-38 2 532 42 09-39 3 532 43... PART NO. Failure to do so could be hazardous, damage your lawn mower and void your warranty. IMPORTANT: Use only Original Equipment Manufacturer (O.E.M.) replacement parts. HU550FH (96143009600) PRODUCT NO. 961 43 00-96 KEY PART NO.


