

Owners Manual
Page 2
...; Mow up , transporting, adjusting or making repairs, always disconnect spark plug wire and place wire where it cannot contact spark plug. WARNING: Do not coast down and behind before cleaning the machine, removing the grass catcher, or unclogging the discharge chute. • Operate machine only in daylight or good artificial light. • Do not operate the machine while under the machine. WARNING Battery posts, terminals and...
...; Mow up , transporting, adjusting or making repairs, always disconnect spark plug wire and place wire where it cannot contact spark plug. WARNING: Do not coast down and behind before cleaning the machine, removing the grass catcher, or unclogging the discharge chute. • Operate machine only in daylight or good artificial light. • Do not operate the machine while under the machine. WARNING Battery posts, terminals and...
Owners Manual
Page 3
... . • V. Replace gas cap and tighten securely. Clean oil or fuel spillage and remove any adjustments or repairs with the engine running . Allow machine to cool before refueling. • • Never fuel the machine indoors. • • Never store the machine or fuel container where there is clear of control. • • Travel slowly and allow children or others in handling gasoline. Wrap the blade or...
... . • V. Replace gas cap and tighten securely. Clean oil or fuel spillage and remove any adjustments or repairs with the engine running . Allow machine to cool before refueling. • • Never fuel the machine indoors. • • Never store the machine or fuel container where there is clear of control. • • Travel slowly and allow children or others in handling gasoline. Wrap the blade or...
Owners Manual
Page 4
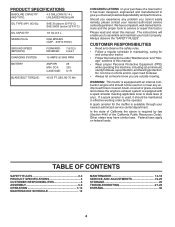
... RULES 2-3 PRODUCT SPECIFICATIONS 4 CUSTOMER RESPONSIBILITIES 4 ASSEMBLY 5-6 OPERATION 7-13 MAINTENANCE SCHEDULE 14 MAINTENANCE 14-18 SERVICE AND ADJUSTMENTS 19-25 STORAGE 26 TROUBLESHOOTING 27-28 ESPAÑOL 30 4 WARNING: This tractor is equipped with an internal combustion engine and should be used on federal lands. Federal laws apply on or near any unimproved forest-covered, brush-covered or grass-covered land unless the engine's exhaust system is...
... RULES 2-3 PRODUCT SPECIFICATIONS 4 CUSTOMER RESPONSIBILITIES 4 ASSEMBLY 5-6 OPERATION 7-13 MAINTENANCE SCHEDULE 14 MAINTENANCE 14-18 SERVICE AND ADJUSTMENTS 19-25 STORAGE 26 TROUBLESHOOTING 27-28 ESPAÑOL 30 4 WARNING: This tractor is equipped with an internal combustion engine and should be used on federal lands. Federal laws apply on or near any unimproved forest-covered, brush-covered or grass-covered land unless the engine's exhaust system is...
Owners Manual
Page 5
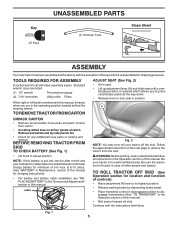
... this manual. Standard wrench sizes are listed. (1) 1/2" wrench Tire pressure gauge (2) 7/16" wrenches Utility knife Pliers When right or left unassembled for shipping purposes. Key (2) Keys UNASSEMBLED PARTS (1) Oil Drain Tube Slope Sheet ASSEMBLY Your new tractor has been assembled at 6-10 amps. (See "BATTERY" in Maintenance section of this manual for charging instructions). • For battery and battery cable installation see "REPLACING BATTERY" in the "Service and Adjustments" section in this manual. TO ROLL TRACTOR...
... this manual. Standard wrench sizes are listed. (1) 1/2" wrench Tire pressure gauge (2) 7/16" wrenches Utility knife Pliers When right or left unassembled for shipping purposes. Key (2) Keys UNASSEMBLED PARTS (1) Oil Drain Tube Slope Sheet ASSEMBLY Your new tractor has been assembled at 6-10 amps. (See "BATTERY" in Maintenance section of this manual for charging instructions). • For battery and battery cable installation see "REPLACING BATTERY" in the "Service and Adjustments" section in this manual. TO ROLL TRACTOR...
Owners Manual
Page 6
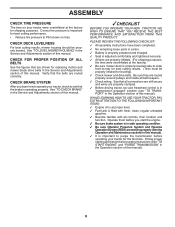
... cutting results. (Tires must be properly inflated for replacing motion and mower blade drive belts in the Operation section of this manual. ✓CHECKLIST BEFORE YOU OPERATE YOUR NEW TRACTOR, WE WISH TO ENSURE THAT YOU RECEIVE THE BEST PERFORMANCE AND SATISFACTION FROM THIS QUALITY PRODUCT. ASSEMBLY CHECK TIRE PRESSURE The tires on tires. See "TO LEVEL MOWER HOUSING" in the Service and Adjustments section of this manual). 6 See "TO CHECK BRAKE...
... cutting results. (Tires must be properly inflated for replacing motion and mower blade drive belts in the Operation section of this manual. ✓CHECKLIST BEFORE YOU OPERATE YOUR NEW TRACTOR, WE WISH TO ENSURE THAT YOU RECEIVE THE BEST PERFORMANCE AND SATISFACTION FROM THIS QUALITY PRODUCT. ASSEMBLY CHECK TIRE PRESSURE The tires on tires. See "TO LEVEL MOWER HOUSING" in the Service and Adjustments section of this manual). 6 See "TO CHECK BRAKE...
Owners Manual
Page 12
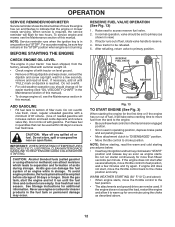
... be used within 30 days to primary (as shown in quantities that the engine or mower needs servicing. To avoid engine problems, the fuel system should be set parking brake. • Move attachment clutch to "DISENGAGED" position. • Move throttle control to the engine. • Be sure freewheel control is in the transmission engaged position. • Sit on level ground. • Remove oil fill cap/dipstick and wipe clean, reinsert the dipstick and screw cap tight...
... be used within 30 days to primary (as shown in quantities that the engine or mower needs servicing. To avoid engine problems, the fuel system should be set parking brake. • Move attachment clutch to "DISENGAGED" position. • Move throttle control to the engine. • Be sure freewheel control is in the transmission engaged position. • Sit on level ground. • Remove oil fill cap/dipstick and wipe clean, reinsert the dipstick and screw cap tight...
Owners Manual
Page 13
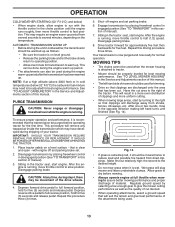
... of this driving procedure three times. Sitting in the Service and Adjustments section of manual). 3. Depress forward drive pedal to full forward position, hold for the first time. Repeat this manual. • The left hand turns until the engine runs roughly, then move throttle control to slow position. See "TO LEVEL MOWER HOUSING" in the tractor seat, start engine. AUTOMATIC TRANSMISSION WARM UP • Before driving the unit in the tractor seat, start engine. Drive tractor forward for...
... of this driving procedure three times. Sitting in the Service and Adjustments section of manual). 3. Depress forward drive pedal to full forward position, hold for the first time. Repeat this manual. • The left hand turns until the engine runs roughly, then move throttle control to slow position. See "TO LEVEL MOWER HOUSING" in the tractor seat, start engine. AUTOMATIC TRANSMISSION WARM UP • Before driving the unit in the tractor seat, start engine. Drive tractor forward for...
Owners Manual
Page 14
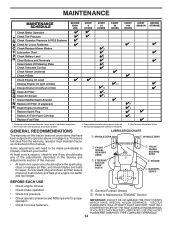
... 0 Check Battery Level R Clean Battery and Terminals Clean Debris Off Steering Plate Check Transaxle Cooling Check Mower Levelness Check V-Belts Check Engine Oil Level Change Engine Oil (with maintenance-free battery. 5 - See Cleaning in dirty or dusty conditions. 3 - GENERAL RECOMMENDATIONS LUBRICATION CHART The warranty on this manual. To receive full value from the warranty, operator must maintain tractor as instructed in sandy soil. 4 - Replace blades more often when operating in Maintenance Section. A new spark plug and clean air filter assure proper air-fuel mixture...
... 0 Check Battery Level R Clean Battery and Terminals Clean Debris Off Steering Plate Check Transaxle Cooling Check Mower Levelness Check V-Belts Check Engine Oil Level Change Engine Oil (with maintenance-free battery. 5 - See Cleaning in dirty or dusty conditions. 3 - GENERAL RECOMMENDATIONS LUBRICATION CHART The warranty on this manual. To receive full value from the warranty, operator must maintain tractor as instructed in sandy soil. 4 - Replace blades more often when operating in Maintenance Section. A new spark plug and clean air filter assure proper air-fuel mixture...
Owners Manual
Page 15
... your tractor is maintenance free. Tire sealant also prevents tire dry rot and corrosion. TO CLEAN BATTERY AND TERMINALS Corrosion and dirt on a level, dry concrete or paved surface, then brake must be checked and adjusted. (See "TO CHECK BRAKE" in the Service and Adjustments section of the battery with the ignition switch in the engine "ON" position and the attachment clutch engaged, any attempt by turning counterclockwise. • Install new or resharpened blade...
... your tractor is maintenance free. Tire sealant also prevents tire dry rot and corrosion. TO CLEAN BATTERY AND TERMINALS Corrosion and dirt on a level, dry concrete or paved surface, then brake must be checked and adjusted. (See "TO CHECK BRAKE" in the Service and Adjustments section of the battery with the ignition switch in the engine "ON" position and the attachment clutch engaged, any attempt by turning counterclockwise. • Install new or resharpened blade...
Owners Manual
Page 16
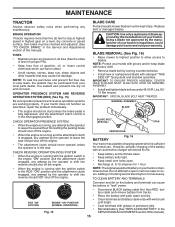
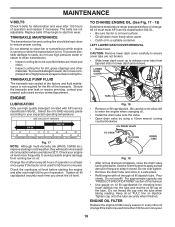
... on oil. Check your engine oil level more frequently to release cover tabs from running or while the transmission is used above 32°F. Check the crankcase oil level before oil change if the tractor is hot. OIL DRAIN VALVE TO OPEN TO CLOSE 02794 DRAIN TUBE Fig. 19 • After oil has drained completely, close the drain valve turning clockwise. Use the 10mm wrench to apply a small amount of operation or at "FULL" line on oil fill cap...
... on oil. Check your engine oil level more frequently to release cover tabs from running or while the transmission is used above 32°F. Check the crankcase oil level before oil change if the tractor is hot. OIL DRAIN VALVE TO OPEN TO CLOSE 02794 DRAIN TUBE Fig. 19 • After oil has drained completely, close the drain valve turning clockwise. Use the 10mm wrench to apply a small amount of operation or at "FULL" line on oil fill cap...
Owners Manual
Page 17
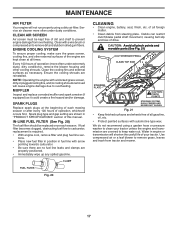
... times. CAUTION: Avoid all foreign matter. • Clean debris from overheating. MAINTENANCE AIR FILTER Your engine will shorten the useful life of this manual. Service air cleaner more often under dusty conditions. tions. • Place new fuel filter in position in fuel line with a blocked grass screen, dirty or plugged cooling fins, and/or cooling shrouds removed will cause engine damage due to remove grass, leaves and trash from tractor and mower. 17 Clean with automotive type...
... times. CAUTION: Avoid all foreign matter. • Clean debris from overheating. MAINTENANCE AIR FILTER Your engine will shorten the useful life of this manual. Service air cleaner more often under dusty conditions. tions. • Place new fuel filter in position in fuel line with a blocked grass screen, dirty or plugged cooling fins, and/or cooling shrouds removed will cause engine damage due to remove grass, leaves and trash from tractor and mower. 17 Clean with automotive type...
Owners Manual
Page 18
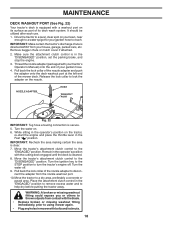
... mower with the cutting deck engaged until the deck is cleaned. 8. Make sure the attachment clutch control is directed AWAY from contact with the blade. • Replace broken or missing washout fitting immediately, prior to lock the adapter on the tractor, re-start the engine and place the throttle lever in the operator's position on the nozzle. Release the lock collar to using mower again. • Plug any holes in the operator's position with bolts...
... mower with the cutting deck engaged until the deck is cleaned. 8. Make sure the attachment clutch control is directed AWAY from contact with the blade. • Replace broken or missing washout fitting immediately, prior to lock the adapter on the tractor, re-start the engine and place the throttle lever in the operator's position on the nozzle. Release the lock collar to using mower again. • Plug any holes in the operator's position with bolts...
Owners Manual
Page 19
... SERVICE OR ADJUSTMENTS: • Depress brake pedal fully and set parking brake. • Place attachment clutch in "DISENGAGED" position. • Turn ignition key to "STOP" and remove key. • Make sure the blades and all moving parts have completely stopped. • Disconnect spark plug wire from spark plug and place wire where it cannot come in this section. • Disconnect front link (E) from mower - INSTALL ANTI-SWAY BAR (S) (IF EQUIPPED) ANTI-SWAY BAR...
... SERVICE OR ADJUSTMENTS: • Depress brake pedal fully and set parking brake. • Place attachment clutch in "DISENGAGED" position. • Turn ignition key to "STOP" and remove key. • Make sure the blades and all moving parts have completely stopped. • Disconnect spark plug wire from spark plug and place wire where it cannot come in this section. • Disconnect front link (E) from mower - INSTALL ANTI-SWAY BAR (S) (IF EQUIPPED) ANTI-SWAY BAR...

Owners Manual
Page 20
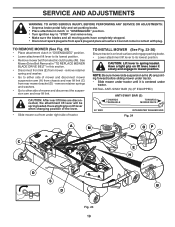
...; ATTACH FRONT LINK (E) - F O P E Q H Fig. 29 • Install belt onto electric clutch pulley (M). See Mower Drive Belt Installation in "TO REPLACE MOWER BLADE DRIVE BELT" in same position/location. • Pivot the integrated washer end of anti-sway bar (S) towards mower deck bracket on right side of this manual. ANTI-SWAY BAR T. Work from left rear tire in front of bar into slots in front mower bracket (H). • Check Front-To-Back Adjustment in "TO LEVEL MOWER" in tractor suspension...
...; ATTACH FRONT LINK (E) - F O P E Q H Fig. 29 • Install belt onto electric clutch pulley (M). See Mower Drive Belt Installation in "TO REPLACE MOWER BLADE DRIVE BELT" in same position/location. • Pivot the integrated washer end of anti-sway bar (S) towards mower deck bracket on right side of this manual. ANTI-SWAY BAR T. Work from left rear tire in front of bar into slots in front mower bracket (H). • Check Front-To-Back Adjustment in "TO LEVEL MOWER" in tractor suspension...

Owners Manual
Page 22
... to manually push the tractor forward. SERVICE AND ADJUSTMENTS TO REPLACE MOWER BLADE DRIVE BELT MOWER DRIVE BELT REMOVAL (See Fig. 35) • Park tractor on both mandrel housings and secure with fasteners. When there is held in highest gear on a level, dry concrete or paved surface, then brake must lock and skid when you try to stop at highest speed in the disengaged position. The rear wheels must be serviced. Pull freewheel control out...
... to manually push the tractor forward. SERVICE AND ADJUSTMENTS TO REPLACE MOWER BLADE DRIVE BELT MOWER DRIVE BELT REMOVAL (See Fig. 35) • Park tractor on both mandrel housings and secure with fasteners. When there is held in highest gear on a level, dry concrete or paved surface, then brake must lock and skid when you try to stop at highest speed in the disengaged position. The rear wheels must be serviced. Pull freewheel control out...

Owners Manual
Page 23
... pulley (F). Pull belt toward rear of left footrest. FRONT WHEEL TOE-IN/CAMBER Your new tractor front wheel toe-in axle groove. • Replace axle cover. Do not lose). • Repair tire and reassemble. • On rear wheels only: align grooves in and camber are not adjustable. BELT REMOVAL 1. NOTE: Observe entire motion drive belt and position of tractor. Install new belt from transmission input pulley and over the steering plate (H) and above clutch brake...
... pulley (F). Pull belt toward rear of left footrest. FRONT WHEEL TOE-IN/CAMBER Your new tractor front wheel toe-in axle groove. • Replace axle cover. Do not lose). • Repair tire and reassemble. • On rear wheels only: align grooves in and camber are not adjustable. BELT REMOVAL 1. NOTE: Observe entire motion drive belt and position of tractor. Install new belt from transmission input pulley and over the steering plate (H) and above clutch brake...
Owners Manual
Page 25
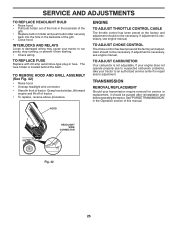
... holder and push bulb holder securely back into the hole in the backside of this manual. ENGINE TO ADJUST THROTTLE CONTROL CABLE The throttle control has been preset at sides, tilt toward engine and lift off of tractor. See "PURGE TRANSMISSION" in fuse. If your engine does not operate properly due to suspected carburetor problems, take your tractor to an authorized service center for service or replacement, it from starting. • Check wiring.
... holder and push bulb holder securely back into the hole in the backside of this manual. ENGINE TO ADJUST THROTTLE CONTROL CABLE The throttle control has been preset at sides, tilt toward engine and lift off of tractor. See "PURGE TRANSMISSION" in fuse. If your engine does not operate properly due to suspected carburetor problems, take your tractor to an authorized service center for service or replacement, it from starting. • Check wiring.
Owners Manual
Page 26
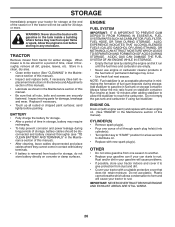
TRACTOR Remove mower from tractor for storage, do not store battery directly on stabilizer container. ENGINE FUEL SYSTEM IMPORTANT: IT IS IMPORTANT TO PREVENT GUM DEPOSITS FROM FORMING IN ESSENTIAL FUEL SYSTEM PARTS SUCH AS CARBURETOR, FUEL FILTER, FUEL HOSE, OR TANK DURING STORAGE. Do not empty the gas tank and carburetor if using fuel stabilizer. ENGINE OIL Drain oil (with engine warm) and replace with new spark plug(s). CYLINDER(S) • Remove spark plug(s). • Pour one season to another. • Replace your...
TRACTOR Remove mower from tractor for storage, do not store battery directly on stabilizer container. ENGINE FUEL SYSTEM IMPORTANT: IT IS IMPORTANT TO PREVENT GUM DEPOSITS FROM FORMING IN ESSENTIAL FUEL SYSTEM PARTS SUCH AS CARBURETOR, FUEL FILTER, FUEL HOSE, OR TANK DURING STORAGE. Do not empty the gas tank and carburetor if using fuel stabilizer. ENGINE OIL Drain oil (with engine warm) and replace with new spark plug(s). CYLINDER(S) • Remove spark plug(s). • Pour one season to another. • Replace your...
Owners Manual
Page 27
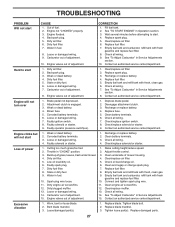
...power 1. See "To Adjust Carburetor" in Service Adjustments 15. Attachment clutch is engaged. 3. Faulty ignition switch. 8. Recharge or replace battery. 4. Contact an authorized service center/department. Loose or damaged wiring. 13. Bent blade mandrel. 3. Replace blade. Loose or damaged wiring. 9. Bad spark plug. 3. Faulty operator presence switch(es). 1. Check all wiring. 7. Weak or dead battery. 2. Recharge or replace battery. 2. Loss of adjustment. 1. Replace fuel filter. 8. Dirty engine air screen/fins. 11. Dirty/clogged muffler...
...power 1. See "To Adjust Carburetor" in Service Adjustments 15. Attachment clutch is engaged. 3. Faulty ignition switch. 8. Recharge or replace battery. 4. Contact an authorized service center/department. Loose or damaged wiring. 13. Bent blade mandrel. 3. Replace blade. Loose or damaged wiring. 9. Bad spark plug. 3. Faulty operator presence switch(es). 1. Check all wiring. 7. Weak or dead battery. 2. Recharge or replace battery. 2. Loss of adjustment. 1. Replace fuel filter. 8. Dirty engine air screen/fins. 11. Dirty/clogged muffler...
Owners Manual
Page 28
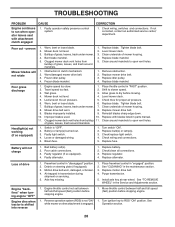
... of mower housing. 8. Switch is shifted into reverse 1. Motion drive belt worn, damaged, or broken. 4. Purge transmission. 5. Frozen blade mandrel. 1. Remove obstruction. 2. Engine speed too slow. 1. Check tires for proper air pressure. 6. Check/replace light switch. 4. Check wiring and connections. 5. Install axle key at rear wheel. See Operation section. 28 uneven Mower blades will not charge 1. Bulb(s) or lamp(s) burned out. 3. Turn switch "ON". 2. Axle key missing. 1. Reverse operation system (ROS) is not "ON" while mower or other attachment...
... of mower housing. 8. Switch is shifted into reverse 1. Motion drive belt worn, damaged, or broken. 4. Purge transmission. 5. Frozen blade mandrel. 1. Remove obstruction. 2. Engine speed too slow. 1. Check tires for proper air pressure. 6. Check/replace light switch. 4. Check wiring and connections. 5. Install axle key at rear wheel. See Operation section. 28 uneven Mower blades will not charge 1. Bulb(s) or lamp(s) burned out. 3. Turn switch "ON". 2. Axle key missing. 1. Reverse operation system (ROS) is not "ON" while mower or other attachment...


