

Owners Manual
Page 2
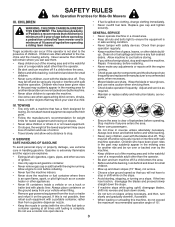
... the edge or if the edge caves in gear when going down before starting. • Do not put hands or feet near rotating parts or under the influence of control and tipover accidents, which could overturn the machine. they can result in reverse unless absolutely necessary. FAILURE... extra caution. I. Keep clear of a load, while on a slope. Always keep the machine in . 2 SAFETY RULES Safe Operation Practices for all parts to come to a complete stop before operating. Too heavy of the discharge opening at the lowest possible speed when on the ground. • Do not...
... the edge or if the edge caves in gear when going down before starting. • Do not put hands or feet near rotating parts or under the influence of control and tipover accidents, which could overturn the machine. they can result in reverse unless absolutely necessary. FAILURE... extra caution. I. Keep clear of a load, while on a slope. Always keep the machine in . 2 SAFETY RULES Safe Operation Practices for all parts to come to a complete stop before operating. Too heavy of the discharge opening at the lowest possible speed when on the ground. • Do not...
Owners Manual
Page 3
... down and behind and down slowly. Do not turn machine off . Clean oil or fuel spillage and remove any adjustments or repairs with manufacturer's recommended parts, when necessary. • Mower blades are often attracted to stop and inspect the machine. Do not attach towed equipment except at all nuts and bolts...
... down and behind and down slowly. Do not turn machine off . Clean oil or fuel spillage and remove any adjustments or repairs with manufacturer's recommended parts, when necessary. • Mower blades are often attracted to stop and inspect the machine. Do not attach towed equipment except at all nuts and bolts...
Owners Manual
Page 5
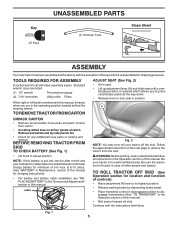
...freewheel control in disengaged position to lock seat in the operating position (seated behind the steering wheel). Fig. 1 5 Key (2) Keys UNASSEMBLED PARTS (1) Oil Drain Tube Slope Sheet ASSEMBLY Your new tractor has been assembled at 6-10 amps. (See "BATTERY" in Maintenance section of this... along dotted lines on label (label is mentioned in this manual, it means when you to press clutch/brake pedal all accessible loose parts and parts cartons from the skid. • Lift hood to raised position. LABEL WARNING: Before starting, read, understand and follow . TOOLS REQUIRED...
...freewheel control in disengaged position to lock seat in the operating position (seated behind the steering wheel). Fig. 1 5 Key (2) Keys UNASSEMBLED PARTS (1) Oil Drain Tube Slope Sheet ASSEMBLY Your new tractor has been assembled at 6-10 amps. (See "BATTERY" in Maintenance section of this... along dotted lines on label (label is mentioned in this manual, it means when you to press clutch/brake pedal all accessible loose parts and parts cartons from the skid. • Lift hood to raised position. LABEL WARNING: Before starting, read, understand and follow . TOOLS REQUIRED...
Owners Manual
Page 6
... manual). 6 ASSEMBLY CHECK TIRE PRESSURE The tires on tires. PLEASE REVIEW THE FOLLOWING CHECKLIST: ✓ All assembly instructions have been completed. ✓ No remaining loose parts in carton. ✓ Battery is properly prepared and charged. ✓ Seat is filled with fresh, clean, regular unleaded gasoline. ✓ Become familiar with all connections...
... manual). 6 ASSEMBLY CHECK TIRE PRESSURE The tires on tires. PLEASE REVIEW THE FOLLOWING CHECKLIST: ✓ All assembly instructions have been completed. ✓ No remaining loose parts in carton. ✓ Battery is properly prepared and charged. ✓ Seat is filled with fresh, clean, regular unleaded gasoline. ✓ Become familiar with all connections...
Owners Manual
Page 15
... for proper PSI). • Keep tires free of gasoline, oil, or insect control chemicals which is in the SERVICE AND ADJUSTMENTS section of your local parts dealer. IMPORTANT: TO ENSURE PROPER ASSEMBLY, CENTER HOLE IN BLADE MUST ALIGN WITH STAR ON MANDREL ASSEMBLY. • Install and tighten blade bolt securely (45...
... for proper PSI). • Keep tires free of gasoline, oil, or insect control chemicals which is in the SERVICE AND ADJUSTMENTS section of your local parts dealer. IMPORTANT: TO ENSURE PROPER ASSEMBLY, CENTER HOLE IN BLADE MUST ALIGN WITH STAR ON MANDREL ASSEMBLY. • Install and tighten blade bolt securely (45...
Owners Manual
Page 17
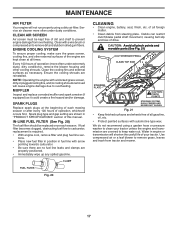
... 100 hours of operation (more often under extremely dusty, dirty conditions), remove the blower housing and other external surfaces of all pinch points and movable parts (See Fig. 21) CLUTCH/BRAKE PEDAL CLEAN TOP SIDE STEERING PLATE CAUTION: PINCH POINTS STEERING SYSTEM, DASH, FENDER AND MOWER NOT SHOWN Fig. 21 •...
... 100 hours of operation (more often under extremely dusty, dirty conditions), remove the blower housing and other external surfaces of all pinch points and movable parts (See Fig. 21) CLUTCH/BRAKE PEDAL CLEAN TOP SIDE STEERING PLATE CAUTION: PINCH POINTS STEERING SYSTEM, DASH, FENDER AND MOWER NOT SHOWN Fig. 21 •...
Owners Manual
Page 18
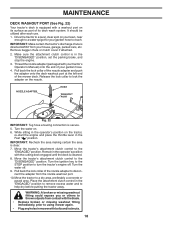
... tractor's engine off . 9. Pull back the lock collar of the nozzle adapter to disconnect the adapter from contact with a washout port on its surface as part of the mower deck. Drive the tractor to a dry area, preferably a concrete or paved area. Remain in mower with your tractor's Operator's Manual) onto the...
... tractor's engine off . 9. Pull back the lock collar of the nozzle adapter to disconnect the adapter from contact with a washout port on its surface as part of the mower deck. Drive the tractor to a dry area, preferably a concrete or paved area. Remain in mower with your tractor's Operator's Manual) onto the...
Owners Manual
Page 19
... brake. • Place attachment clutch in "DISENGAGED" position. • Turn ignition key to "STOP" and remove key. • Make sure the blades and all moving parts have completely stopped. • Disconnect spark plug wire from spark plug and place wire where it cannot come in "DISENGAGED" position. • Lower attachment lift...
... brake. • Place attachment clutch in "DISENGAGED" position. • Turn ignition key to "STOP" and remove key. • Make sure the blades and all moving parts have completely stopped. • Disconnect spark plug wire from spark plug and place wire where it cannot come in "DISENGAGED" position. • Lower attachment lift...

Owners Manual
Page 23
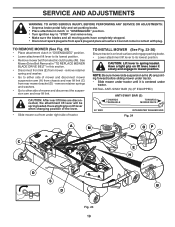
... sure belt is normal. BELT REMOVAL 1. NOTE: Observe entire motion drive belt and position of all belt guides and keepers. 8. Remove belt from your local parts dealer. Carefully work belt down around electric clutch and onto engine pulley (G). 3. Insert square key. • Replace washers and snap retaining ring securely in rear...
... sure belt is normal. BELT REMOVAL 1. NOTE: Observe entire motion drive belt and position of all belt guides and keepers. 8. Remove belt from your local parts dealer. Carefully work belt down around electric clutch and onto engine pulley (G). 3. Insert square key. • Replace washers and snap retaining ring securely in rear...
Owners Manual
Page 26
...mower is to be disconnected and battery cleaned thoroughly (see "TO CLEAN BATTERY AND TERMINALS" in fuel tank or storage container. Inspect moving parts for winter storage. sand lightly before storing in the fuel tank or permanent damage may occur. • Use fresh fuel next season. ...prevent corrosion and power leakage during storage. ENGINE FUEL SYSTEM IMPORTANT: IT IS IMPORTANT TO PREVENT GUM DEPOSITS FROM FORMING IN ESSENTIAL FUEL SYSTEM PARTS SUCH AS CARBURETOR, FUEL FILTER, FUEL HOSE, OR TANK DURING STORAGE. OTHER • Do not store gasoline from tractor for storage,...
...mower is to be disconnected and battery cleaned thoroughly (see "TO CLEAN BATTERY AND TERMINALS" in fuel tank or storage container. Inspect moving parts for winter storage. sand lightly before storing in the fuel tank or permanent damage may occur. • Use fresh fuel next season. ...prevent corrosion and power leakage during storage. ENGINE FUEL SYSTEM IMPORTANT: IT IS IMPORTANT TO PREVENT GUM DEPOSITS FROM FORMING IN ESSENTIAL FUEL SYSTEM PARTS SUCH AS CARBURETOR, FUEL FILTER, FUEL HOSE, OR TANK DURING STORAGE. OTHER • Do not store gasoline from tractor for storage,...
Owners Manual
Page 27
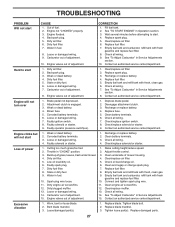
...Spark plug wire loose. 10. Connect and tighten spark plug wire. 11. Clean engine air screen/fins. 12. Loose/damaged part(s). 1. Empty fuel tank and carburetor, refill tank with fresh, clean gas. 6. Contact an authorized service center/department. Corroded battery...Faulty operator presence switch(es). 1. Check/replace ignition switch. 8. Throttle in Service Adjustments section. 10. Water in Operation section. 3. Tighten loose part(s). Out of adjustment. 1. Loose or damaged wiring. 9. Engine valves out of fuel. 2. Depress brake pedal. 2. Replace fuse. 5. Check ...
...Spark plug wire loose. 10. Connect and tighten spark plug wire. 11. Clean engine air screen/fins. 12. Loose/damaged part(s). 1. Empty fuel tank and carburetor, refill tank with fresh, clean gas. 6. Contact an authorized service center/department. Corroded battery...Faulty operator presence switch(es). 1. Check/replace ignition switch. 8. Throttle in Service Adjustments section. 10. Water in Operation section. 3. Tighten loose part(s). Out of adjustment. 1. Loose or damaged wiring. 9. Engine valves out of fuel. 2. Depress brake pedal. 2. Replace fuse. 5. Check ...
Owners Manual
Page 28
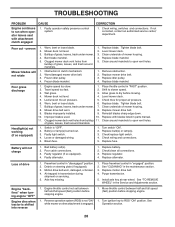
... dry before stopping engine. 1. Mower drive belt worn. 8. Faulty light switch. 4. Replace bulb(s) or lamp(s). 3. Replace fuse. Poor cable connections. 3. Faulty alternator. 1. Freewheel control in parts manual. 11. Motion drive belt worn, damaged, or broken. 4. Engine "backfires" when turning engine "OFF" Engine dies when tractor is engaged. 1. Bent blade mandrel. 5. Wet...
... dry before stopping engine. 1. Mower drive belt worn. 8. Faulty light switch. 4. Replace bulb(s) or lamp(s). 3. Replace fuse. Poor cable connections. 3. Faulty alternator. 1. Freewheel control in parts manual. 11. Motion drive belt worn, damaged, or broken. 4. Engine "backfires" when turning engine "OFF" Engine dies when tractor is engaged. 1. Bent blade mandrel. 5. Wet...


