
Owners Manual
Page 2
... for all times. • Only allow the mower deck to plow leaves or other debris which could overturn the machine. they can hide obstacles. • Choose a low ground speed so that are familiar with grass catchers or other attachments; Clean any oil or fuel spillage before starting when setting up to lose control of California to cool before turning. • Never leave a running machine unattended...
... for all times. • Only allow the mower deck to plow leaves or other debris which could overturn the machine. they can hide obstacles. • Choose a low ground speed so that are familiar with grass catchers or other attachments; Clean any oil or fuel spillage before starting when setting up to lose control of California to cool before turning. • Never leave a running machine unattended...
Owners Manual
Page 3
... occur if the operator is not alert to the machine and the mowing activity. Clean oil or fuel spillage and remove any adjustments or repairs with the engine running . Adjust and service as required. • Maintain or replace safety and instruction labels, as on clothing, change clothing immediately. • Never overfill fuel tank. SERVICE SAFE HANDLING OF GASOLINE To avoid personal injury or property damage, use extra caution when...
... occur if the operator is not alert to the machine and the mowing activity. Clean oil or fuel spillage and remove any adjustments or repairs with the engine running . Adjust and service as required. • Maintain or replace safety and instruction labels, as on clothing, change clothing immediately. • Never overfill fuel tank. SERVICE SAFE HANDLING OF GASOLINE To avoid personal injury or property damage, use extra caution when...

Owners Manual
Page 4
... nearest authorized service center/department. In the state of this manual. • Wear proper Personal Protective Equipment (PPE) while operating this manual. CCA: CASE SIZE: 28 230 U1R BLADE BOLT TORQUE: 45-55 FT. age" sections of California the above 32°F/0°C) SAE 5W30 (below 32°F/0°C) OIL CAPACITY: 67 Oz./2.0 L SPARK PLUG: GROUND SPEED (MPH/KPH): NGK BPR4ES (GAP: .030...
... nearest authorized service center/department. In the state of this manual. • Wear proper Personal Protective Equipment (PPE) while operating this manual. CCA: CASE SIZE: 28 230 U1R BLADE BOLT TORQUE: 45-55 FT. age" sections of California the above 32°F/0°C) SAE 5W30 (below 32°F/0°C) OIL CAPACITY: 67 Oz./2.0 L SPARK PLUG: GROUND SPEED (MPH/KPH): NGK BPR4ES (GAP: .030...

Owners Manual
Page 5
... of controls) • Raise attachment lift lever to its highest position. • Release parking brake by Dealer *Brush Guard Kit *Pedal Key(s) (1) Quick Connect (2) Nut Keps (2) Screw (2) Nut U -Channel ASSEMBLY Your new tractor has been assembled at 6-10 amps. (See "BATTERY" in Maintenance section of this manual). • Roll tractor forward off the skid. TO REMOVE TRACTOR FROM CARTON UNPACK CARTON • Remove all accessible loose parts and parts cartons from the skid. LABEL ADJUST...
... of controls) • Raise attachment lift lever to its highest position. • Release parking brake by Dealer *Brush Guard Kit *Pedal Key(s) (1) Quick Connect (2) Nut Keps (2) Screw (2) Nut U -Channel ASSEMBLY Your new tractor has been assembled at 6-10 amps. (See "BATTERY" in Maintenance section of this manual). • Roll tractor forward off the skid. TO REMOVE TRACTOR FROM CARTON UNPACK CARTON • Remove all accessible loose parts and parts cartons from the skid. LABEL ADJUST...
Owners Manual
Page 6
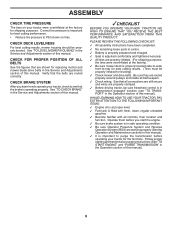
... replacing motion and mower blade drive belts in the Service and Adjustments section of this manual. Correct tire pressure is adjusted comfortably and tightened securely. ✓ All tires are routed correctly. Follow proper starting and transmission purging instructions (See "TO START ENGINE" and "PURGE TRANSMISSION" in carton. ✓ Battery is properly prepared and charged. ✓ Seat is important for leveling). ✓ Check mower and drive belts. PLEASE REVIEW THE FOLLOWING CHECKLIST: ✓ All assembly instructions...
... replacing motion and mower blade drive belts in the Service and Adjustments section of this manual. Correct tire pressure is adjusted comfortably and tightened securely. ✓ All tires are routed correctly. Follow proper starting and transmission purging instructions (See "TO START ENGINE" and "PURGE TRANSMISSION" in carton. ✓ Battery is properly prepared and charged. ✓ Seat is important for leveling). ✓ Check mower and drive belts. PLEASE REVIEW THE FOLLOWING CHECKLIST: ✓ All assembly instructions...

Owners Manual
Page 12
... display manually turn the ignition switch to ensure fuel freshness. OPERATION SERVICE REMINDER/HOUR METER Service reminder shows the total number of hours the engine has run until the fuel lines and carburetor are three different indicator lights: 1. BATTERY INDICATOR/CHARGING PLUG (See Fig. 13) The Battery Indicator displays the status of the battery. Do not store, spill or use for a few seconds, remove and read oil level. WARNING: The Charging Plug only...
... display manually turn the ignition switch to ensure fuel freshness. OPERATION SERVICE REMINDER/HOUR METER Service reminder shows the total number of hours the engine has run until the fuel lines and carburetor are three different indicator lights: 1. BATTERY INDICATOR/CHARGING PLUG (See Fig. 13) The Battery Indicator displays the status of the battery. Do not store, spill or use for a few seconds, remove and read oil level. WARNING: The Charging Plug only...
Owners Manual
Page 13
... disengage freewheel lever while the engine is running . Sitting in the Service and Adjustments section of fuel, rotate valve handle to full reverse position, hold for more than fifteen seconds per minute. Depress reverse drive pedal to reserve. 4. See "TO ADJUST CARBURETOR" in the tractor seat, start , move throttle control to choke position. Disengage transmission by placing freewheel control in disengaged position (See "TO TRANSPORT" in operating position, depress brake pedal and set to several...
... disengage freewheel lever while the engine is running . Sitting in the Service and Adjustments section of fuel, rotate valve handle to full reverse position, hold for more than fifteen seconds per minute. Depress reverse drive pedal to reserve. 4. See "TO ADJUST CARBURETOR" in the tractor seat, start , move throttle control to choke position. Disengage transmission by placing freewheel control in disengaged position (See "TO TRANSPORT" in operating position, depress brake pedal and set to several...
Owners Manual
Page 14
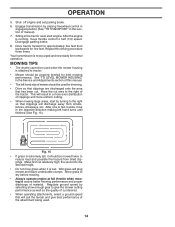
..., start by placing freewheel control in engaged position (See "TO TRANSPORT" in the Service and Adjustments section of this manual. • The left hand turns until finished (See Fig. 15). Regulate ground speed by selecting a low enough gear to give the mower cutting performance as well as the quality of cut area to tractor. • Mower should be used for five feet. off engine and set parking brake...
..., start by placing freewheel control in engaged position (See "TO TRANSPORT" in the Service and Adjustments section of this manual. • The left hand turns until finished (See Fig. 15). Regulate ground speed by selecting a low enough gear to give the mower cutting performance as well as the quality of cut area to tractor. • Mower should be used for five feet. off engine and set parking brake...
Owners Manual
Page 15
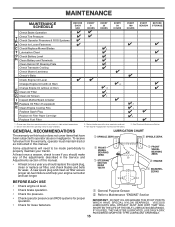
.... 2 - Change more often when operating under a heavy load or in this tractor does not cover items that have been subjected to see if you should make any of this manual. • At least once a year you should replace the spark plug, clean or replace air filter, and check blades and belts for Loose Fasteners C Check/Replace Mower Blades T Lubrication Chart 0 Check Battery Level R Clean Battery and Terminals Clean Debris Off Steering Plate Check Transaxle Cooling Check Mower Levelness Check V-Belts Check Engine Oil Level Change Engine Oil (with maintenance-free battery...
.... 2 - Change more often when operating under a heavy load or in this tractor does not cover items that have been subjected to see if you should make any of this manual. • At least once a year you should replace the spark plug, clean or replace air filter, and check blades and belts for Loose Fasteners C Check/Replace Mower Blades T Lubrication Chart 0 Check Battery Level R Clean Battery and Terminals Clean Debris Off Steering Plate Check Transaxle Cooling Check Mower Levelness Check V-Belts Check Engine Oil Level Change Engine Oil (with maintenance-free battery...
Owners Manual
Page 16
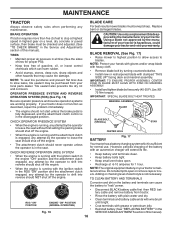
.... MANDREL ASSEMBLY BLADE • The engine should shut off the engine. BLADE BOLT (SPECIAL) CENTER HOLE STAR • When the engine is running , any attempt by turning counterclockwise. • Install new or resharpened blade with wire brush until bright. CHECK REVERSE OPERATION (ROS) SYSTEM • When the engine is running with the ignition switch in the engine "ON" position and the attachment clutch engaged, any maintenance. Adding or checking level of this manual). Rinse the battery with grease or petroleum...
.... MANDREL ASSEMBLY BLADE • The engine should shut off the engine. BLADE BOLT (SPECIAL) CENTER HOLE STAR • When the engine is running , any attempt by turning counterclockwise. • Install new or resharpened blade with wire brush until bright. CHECK REVERSE OPERATION (ROS) SYSTEM • When the engine is running with the ignition switch in the engine "ON" position and the attachment clutch engaged, any maintenance. Adding or checking level of this manual). Rinse the battery with grease or petroleum...
Owners Manual
Page 17
... this manual. • Use gauge on oil. Insert dipstick into the tube and rest the oil fill cap on dipstick. ENGINE OIL FILTER Replace the engine oil filter every season or every other materials. TRANSAXLE MAINTENANCE The transmission fan and cooling fins should be sure fan blades are intact and clean. • Inspect cooling fins for checking level. TO CHANGE ENGINE OIL (See Fig. 18 & 20) Determine temperature range expected before starting in...
... this manual. • Use gauge on oil. Insert dipstick into the tube and rest the oil fill cap on dipstick. ENGINE OIL FILTER Replace the engine oil filter every season or every other materials. TRANSAXLE MAINTENANCE The transmission fan and cooling fins should be sure fan blades are intact and clean. • Inspect cooling fins for checking level. TO CHANGE ENGINE OIL (See Fig. 18 & 20) Determine temperature range expected before starting in...
Owners Manual
Page 18
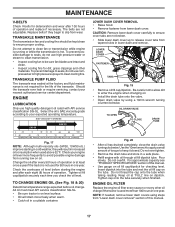
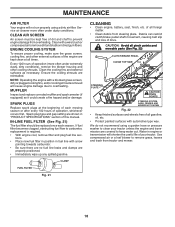
... recommend using a dirty air filter. IN-LINE FUEL FILTER (See Fig. 21) The fuel filter should be kept free of all times. SPARK PLUGS Replace spark plugs at all foreign matter. • Clean debris from tractor and mower. 18 Debris can restrict clutch/brake pedal shaft movement, causing belt slip and loss of this manual. CLAMP FUEL FILTER Fig. 21 CLEANING • Clean engine, battery, seat, finish, etc. Service air cleaner more often under dusty conditions. Water in "PRODUCT SPECIFICATIONS" section of drive.
... recommend using a dirty air filter. IN-LINE FUEL FILTER (See Fig. 21) The fuel filter should be kept free of all times. SPARK PLUGS Replace spark plugs at all foreign matter. • Clean debris from tractor and mower. 18 Debris can restrict clutch/brake pedal shaft movement, causing belt slip and loss of this manual. CLAMP FUEL FILTER Fig. 21 CLEANING • Clean engine, battery, seat, finish, etc. Service air cleaner more often under dusty conditions. Water in "PRODUCT SPECIFICATIONS" section of drive.
Owners Manual
Page 20
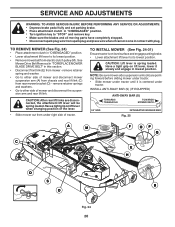
... attachment clutch in "DISENGAGED" position. • Lower attachment lift lever to its lowest position. SERVICE AND ADJUSTMENTS WARNING: TO AVOID SERIOUS INJURY, BEFORE PERFORMING ANY SERVICE OR ADJUSTMENTS: • Depress brake pedal fully and set parking brake. • Place attachment clutch in "DISENGAGED" position. • Turn ignition key to "STOP" and remove key. • Make sure the blades and all moving parts have completely stopped. • Disconnect spark plug wire from electric clutch pulley (M). See Mower Drive Belt Removal in "TO REPLACE MOWER BLADE DRIVE BELT...
... attachment clutch in "DISENGAGED" position. • Lower attachment lift lever to its lowest position. SERVICE AND ADJUSTMENTS WARNING: TO AVOID SERIOUS INJURY, BEFORE PERFORMING ANY SERVICE OR ADJUSTMENTS: • Depress brake pedal fully and set parking brake. • Place attachment clutch in "DISENGAGED" position. • Turn ignition key to "STOP" and remove key. • Make sure the blades and all moving parts have completely stopped. • Disconnect spark plug wire from electric clutch pulley (M). See Mower Drive Belt Removal in "TO REPLACE MOWER BLADE DRIVE BELT...
Owners Manual
Page 21
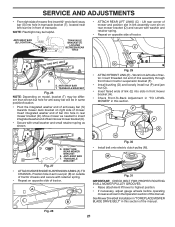
... this manual. A B D Fig. 29 • ATTACH FRONT LINK (E) - See Mower Drive Belt Installation in "TO REPLACE MOWER BLADE DRIVE BELT" in arm over pin on rear mower bracket (D) and secure with washer and retainer spring. • Repeat on opposite side of tractor. M Fig. 31 IMPORTANT: CHECK BELT FOR PROPER ROUTING IN ALL MOWER PULLEY GROOVES. • Raise attachment lift lever to insert integrated washer end of bar into hole in same position/location. •...
... this manual. A B D Fig. 29 • ATTACH FRONT LINK (E) - See Mower Drive Belt Installation in "TO REPLACE MOWER BLADE DRIVE BELT" in arm over pin on rear mower bracket (D) and secure with washer and retainer spring. • Repeat on opposite side of tractor. M Fig. 31 IMPORTANT: CHECK BELT FOR PROPER ROUTING IN ALL MOWER PULLEY GROOVES. • Raise attachment lift lever to insert integrated washer end of bar into hole in same position/location. •...
Owners Manual
Page 23
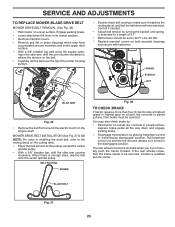
... CHECK BRAKE If tractor requires more than five (5) feet to stop at highest speed in highest gear on the engine shaft. SPRING EYEBOLT NUT IDLER ARM Fig. 36 • Remove the belt from around mandrels and entire upper deck surface. • With a 3/8" breaker bar and using the square opening in "transmission disengaged" position. Lbs./40 Nm. • Replace mandrel covers on a level surface. When there is held in installing the deck belt...
... CHECK BRAKE If tractor requires more than five (5) feet to stop at highest speed in highest gear on the engine shaft. SPRING EYEBOLT NUT IDLER ARM Fig. 36 • Remove the belt from around mandrels and entire upper deck surface. • With a 3/8" breaker bar and using the square opening in "transmission disengaged" position. Lbs./40 Nm. • Replace mandrel covers on a level surface. When there is held in installing the deck belt...

Owners Manual
Page 24
... pulley (F). Pull belt toward rear of tractor. Tighten securely. 6. Install mower (See "TO INSTALL MOWER" section in this manual). Tire sealant also prevents tire dry rot and corrosion. SERVICE AND ADJUSTMENTS TO REPLACE MOTION DRIVE BELT (See Fig. 39) Park the tractor on right side of tractor. Engage parking brake. Remove mower (See "TO REMOVE MOWER" section in this manual). NOTE: Observe entire motion drive belt and position of tractor and roll belt around electric clutch and onto engine pulley (G). 3. Carefully remove belt...
... pulley (F). Pull belt toward rear of tractor. Tighten securely. 6. Install mower (See "TO INSTALL MOWER" section in this manual). Tire sealant also prevents tire dry rot and corrosion. SERVICE AND ADJUSTMENTS TO REPLACE MOTION DRIVE BELT (See Fig. 39) Park the tractor on right side of tractor. Engage parking brake. Remove mower (See "TO REMOVE MOWER" section in this manual). NOTE: Observe entire motion drive belt and position of tractor and roll belt around electric clutch and onto engine pulley (G). 3. Carefully remove belt...

Owners Manual
Page 26
.... TRANSMISSION REMOVAL/REPLACEMENT Should your tractor to an authorized service center for service or replacement, it from starting. • Check wiring. HOOD HEADLIGHT WIRE CONNECTOR 07002 Fig. 43 26 Grasp hood at the factory and adjustment should not be necessary. ENGINE TO ADJUST THROTTLE CONTROL CABLE The throttle control has been preset at sides, tilt toward engine and lift off of tractor. • To replace, reverse above procedure. TO ADJUST CARBURETOR Your carburetor is located behind...
.... TRANSMISSION REMOVAL/REPLACEMENT Should your tractor to an authorized service center for service or replacement, it from starting. • Check wiring. HOOD HEADLIGHT WIRE CONNECTOR 07002 Fig. 43 26 Grasp hood at the factory and adjustment should not be necessary. ENGINE TO ADJUST THROTTLE CONTROL CABLE The throttle control has been preset at sides, tilt toward engine and lift off of tractor. • To replace, reverse above procedure. TO ADJUST CARBURETOR Your carburetor is located behind...
Owners Manual
Page 27
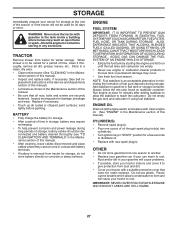
... clean engine oil. (See "ENGINE" in the Maintenance section of this manual). Do not empty the gas tank and carburetor if using fuel stabilizer. ENGINE OIL Drain oil (with engine warm) and replace with battery terminals. • If battery is to rust. WARNING: Never store the tractor with new spark plug(s). placement instructions in the Service and Adjustments section of this manual). • Lubricate as shown in the Maintenance section of this manual). • Inspect and replace belts, if necessary (See belt...
... clean engine oil. (See "ENGINE" in the Maintenance section of this manual). Do not empty the gas tank and carburetor if using fuel stabilizer. ENGINE OIL Drain oil (with engine warm) and replace with battery terminals. • If battery is to rust. WARNING: Never store the tractor with new spark plug(s). placement instructions in the Service and Adjustments section of this manual). • Lubricate as shown in the Maintenance section of this manual). • Inspect and replace belts, if necessary (See belt...

Owners Manual
Page 28
... blade bolt. 2. Engine not "CHOKED" properly. 3. Dirty fuel filter. 7. Loose or damaged wiring. 7. Engine clicks but will not turn over 1. Check all wiring. 14. Disengage attachment clutch. 3. Adjust throttle control. 3. Dirty fuel filter. 7. Recharge or replace battery. 2. Carburetor out of mower housing. 4. Replace spark plug. 5. Clean/replace air filter. 2. Bad spark plug. 5. Water in fuel. 8. Fill fuel tank. 2. Loose or damaged wiring. 7. Faulty operator presence switch(es). 1. Clean battery terminals. 3. Check oil level/change spark...
... blade bolt. 2. Engine not "CHOKED" properly. 3. Dirty fuel filter. 7. Loose or damaged wiring. 7. Engine clicks but will not turn over 1. Check all wiring. 14. Disengage attachment clutch. 3. Adjust throttle control. 3. Dirty fuel filter. 7. Recharge or replace battery. 2. Carburetor out of mower housing. 4. Replace spark plug. 5. Clean/replace air filter. 2. Bad spark plug. 5. Water in fuel. 8. Fill fuel tank. 2. Loose or damaged wiring. 7. Faulty operator presence switch(es). 1. Clean battery terminals. 3. Check oil level/change spark...

Owners Manual
Page 29
...the Service and Adjustments section. Engine throttle control not set between half and full speed (fast) position before stopping engine. 1. Reverse operation system (ROS) is not "ON" while mower or other attachment is engaged. 1. TROUBLESHOOTING PROBLEM CAUSE Engine continues to run when operator leaves seat with blades listed in "FAST" position. 2. CORRECTION 1. Replace blade. Shift to ROS "ON" position. Mower deck not level. 4. Loose or damaged wiring. 5. Bad battery cell(s). 2. Faulty alternator. 1. Replace motion drive belt. 4. Install axle key at rear wheel...
...the Service and Adjustments section. Engine throttle control not set between half and full speed (fast) position before stopping engine. 1. Reverse operation system (ROS) is not "ON" while mower or other attachment is engaged. 1. TROUBLESHOOTING PROBLEM CAUSE Engine continues to run when operator leaves seat with blades listed in "FAST" position. 2. CORRECTION 1. Replace blade. Shift to ROS "ON" position. Mower deck not level. 4. Loose or damaged wiring. 5. Bad battery cell(s). 2. Faulty alternator. 1. Replace motion drive belt. 4. Install axle key at rear wheel...


