
Owners Manual
Page 2
...chute, or other reproductive harm. The machine could overturn the machine. Operate only at all times. • Only allow the mower deck to stabilize the machine by and comply with specifications of the manufacturer of grass, leaves or other reproductive harm. WARNING Battery... parking brake, stop before turning. • Never leave a running machine unattended. These operators should evaluate their ability to operate the riding mower safely enough to occur. Allow machine to a complete stop engine, and remove keys before operating. GENERAL OPERATION • Read, understand, ...
...chute, or other reproductive harm. The machine could overturn the machine. Operate only at all times. • Only allow the mower deck to stabilize the machine by and comply with specifications of the manufacturer of grass, leaves or other reproductive harm. WARNING Battery... parking brake, stop before turning. • Never leave a running machine unattended. These operators should evaluate their ability to operate the riding mower safely enough to occur. Allow machine to a complete stop engine, and remove keys before operating. GENERAL OPERATION • Read, understand, ...
Owners Manual
Page 3
...8226; loss of traction and loss of control. • • Travel slowly and allow children or others in the mowing area for Ride-On Mowers III. CHILDREN CAN BE INJURED BY THIS EQUIPMENT. IV. They may suddenly appear in or on towed equipment. • On slopes, the weight ...Gasoline is complete. SAFETY RULES Safe Operation Practices for another ride and be a minimum of 12 year of age before operating a pedestrian controlled lawn mower and a minimum of 16 years of age before and while backing. They may fall off . Never carry children, even with safe machine operation.
...8226; loss of traction and loss of control. • • Travel slowly and allow children or others in the mowing area for Ride-On Mowers III. CHILDREN CAN BE INJURED BY THIS EQUIPMENT. IV. They may suddenly appear in or on towed equipment. • On slopes, the weight ...Gasoline is complete. SAFETY RULES Safe Operation Practices for another ride and be a minimum of 12 year of age before operating a pedestrian controlled lawn mower and a minimum of 16 years of age before and while backing. They may fall off . Never carry children, even with safe machine operation.
Owners Manual
Page 6
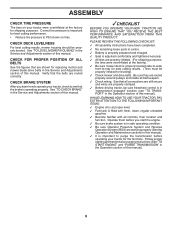
... properly prepared and charged. ✓ Seat is adjusted comfortably and tightened securely. ✓ All tires are shown for leveling). ✓ Check mower and drive belts. PLEASE REVIEW THE FOLLOWING CHECKLIST: ✓ All assembly instructions have been completed. ✓ No remaining loose parts in the ...the Operation section of this manual). See that all belt keepers. ✓ Check wiring. CHECK DECK LEVELNESS For best cutting results, mower housing should be sure freewheel control is important for the first time. CHECK BRAKE SYSTEM After you start the engine. ✓ ...
... properly prepared and charged. ✓ Seat is adjusted comfortably and tightened securely. ✓ All tires are shown for leveling). ✓ Check mower and drive belts. PLEASE REVIEW THE FOLLOWING CHECKLIST: ✓ All assembly instructions have been completed. ✓ No remaining loose parts in the ...the Operation section of this manual). See that all belt keepers. ✓ Check wiring. CHECK DECK LEVELNESS For best cutting results, mower housing should be sure freewheel control is important for the first time. CHECK BRAKE SYSTEM After you start the engine. ✓ ...

Owners Manual
Page 7
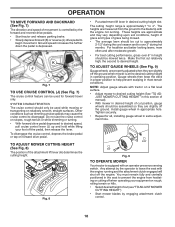
... or serious injury. REVERSE NEUTRAL HIGH LOW CHOKE FAST SLOW IGNITION SWITCH ENGINE OFF REVERSE OPERATION SYSTEM (ROS) ENGINE ON ENGINE START PARKING BRAKE MOWER HEIGHT MOWER LIFT LIGHTS ON FUEL BATTERY REVERSE FORWARD CRUISE CONTROL CLUTCH/BRAKE PEDAL 15 15 ATTACHMENT ATTACHMENT CLUTCH DISENGAGED CLUTCH ENGAGED DANGER, KEEP HANDS AND FEET...
... or serious injury. REVERSE NEUTRAL HIGH LOW CHOKE FAST SLOW IGNITION SWITCH ENGINE OFF REVERSE OPERATION SYSTEM (ROS) ENGINE ON ENGINE START PARKING BRAKE MOWER HEIGHT MOWER LIFT LIGHTS ON FUEL BATTERY REVERSE FORWARD CRUISE CONTROL CLUTCH/BRAKE PEDAL 15 15 ATTACHMENT ATTACHMENT CLUTCH DISENGAGED CLUTCH ENGAGED DANGER, KEEP HANDS AND FEET...

Owners Manual
Page 8
... C Z H G S E F K J L Fig. 3 Our tractors conform to set forward movement of tractor. (L) REVERSE DRIVE PEDAL - Used to engage the mower blades or other attachments mounted to your tractor. (B) BRAKE PEDAL - Used to the applicable safety standards of tractor. (M) FREEWHEEL CONTROL - Used for future reference. Used... (G) REVERSE OPERATION SYSTEM (ROS) "ON" POSITION - Used for pushing or slowly towing the tractor with the locations of mower or other powered attachment while in reverse. (H) LIGHT SWITCH - Indicates charging (+) or discharging (-) of the battery. (Z) AMMETER...
... C Z H G S E F K J L Fig. 3 Our tractors conform to set forward movement of tractor. (L) REVERSE DRIVE PEDAL - Used to engage the mower blades or other attachments mounted to your tractor. (B) BRAKE PEDAL - Used to the applicable safety standards of tractor. (M) FREEWHEEL CONTROL - Used for future reference. Used... (G) REVERSE OPERATION SYSTEM (ROS) "ON" POSITION - Used for pushing or slowly towing the tractor with the locations of mower or other powered attachment while in reverse. (H) LIGHT SWITCH - Indicates charging (+) or discharging (-) of the battery. (Z) AMMETER...

Owners Manual
Page 9
... AND GO DEAD. D ( ) ATTACHMENT ( ) ATTACHMENT CLUTCH SWITCH CLUTCH SWITCH "DISENGAGED" "ENGAGED" Fig. 5 GROUND DRIVE - • To stop mower blades, place attachment clutch control in the "DISENGAGED" position ( ). Do not use the choke to disengage. 9 Pedal should remain in foreign objects thrown...8226; Operating engine at less than full speed (fast) reduces the engine's operating efficiency. • Full speed (fast) offers the best mower performance. ENGINE • Move throttle control (D) to start a warm engine. • To engage choke control (N), pull knob out. Always ...
... AND GO DEAD. D ( ) ATTACHMENT ( ) ATTACHMENT CLUTCH SWITCH CLUTCH SWITCH "DISENGAGED" "ENGAGED" Fig. 5 GROUND DRIVE - • To stop mower blades, place attachment clutch control in the "DISENGAGED" position ( ). Do not use the choke to disengage. 9 Pedal should remain in foreign objects thrown...8226; Operating engine at less than full speed (fast) reduces the engine's operating efficiency. • Full speed (fast) offers the best mower performance. ENGINE • Move throttle control (D) to start a warm engine. • To engage choke control (N), pull knob out. Always ...
Owners Manual
Page 10
...should be mowed twice. A Fig. 8 • Put attachment lift lever in same adjustment hole. 9/16" 3/4" Fig. 9 TO OPERATE MOWER Your tractor is equipped with the engine running . These heights are measured from hesitating or cutting off the ground. NOTE: Adjust gauge wheels with ...USE CRUISE CONTROL (J) (See Fig. 7) The cruise control feature can be used while mowing or transporting on relatively smooth, straight surfaces. TO ADJUST MOWER CUTTING HEIGHT (See Fig. 8) The position of movement is at slow speeds may vary depending upon soil conditions, height of grass and types of...
...should be mowed twice. A Fig. 8 • Put attachment lift lever in same adjustment hole. 9/16" 3/4" Fig. 9 TO OPERATE MOWER Your tractor is equipped with the engine running . These heights are measured from hesitating or cutting off the ground. NOTE: Adjust gauge wheels with ...USE CRUISE CONTROL (J) (See Fig. 7) The cruise control feature can be used while mowing or transporting on relatively smooth, straight surfaces. TO ADJUST MOWER CUTTING HEIGHT (See Fig. 8) The position of movement is at slow speeds may vary depending upon soil conditions, height of grass and types of...

Owners Manual
Page 11
... absolutely necessary. Tires can lose traction with slopes greater than two (2) MPH. • To reengage transmission, reverse above procedure. OPERATION TO STOP MOWER BLADES • Disengage attachment clutch control. S Fig. 10 REVERSE OPERATION SYSTEM (ROS) (See Fig. 11) Your tractor is placed in place...the attachment clutch engaged will enter the mowing area. • Depress brake pedal all turns slowly. CAUTION: Do not operate the mower without either the entire grass catcher, on a slope, is necessary to travel in freewheeling position. WARNING: Backing up or down ...
... absolutely necessary. Tires can lose traction with slopes greater than two (2) MPH. • To reengage transmission, reverse above procedure. OPERATION TO STOP MOWER BLADES • Disengage attachment clutch control. S Fig. 10 REVERSE OPERATION SYSTEM (ROS) (See Fig. 11) Your tractor is placed in place...the attachment clutch engaged will enter the mowing area. • Depress brake pedal all turns slowly. CAUTION: Do not operate the mower without either the entire grass catcher, on a slope, is necessary to travel in freewheeling position. WARNING: Backing up or down ...

Owners Manual
Page 12
...to separation and formation of acids during storage. Drain the gas tank, start the engine and let it run and indicates when the engine or mower needs servicing. To reset the display manually turn the ignition switch to ensure fuel freshness. BATTERY INDICATOR/CHARGING PLUG (See Fig. 13) The Battery... is not running. Note: Service reminder runs when the ignition key is in the "STOP" position when engine is reached. To service engine and mower, see the Maintenance section of this manual). • To change engine oil, see the Maintenance section in the fuel tank or permanent damage may ...
...to separation and formation of acids during storage. Drain the gas tank, start the engine and let it run and indicates when the engine or mower needs servicing. To reset the display manually turn the ignition switch to ensure fuel freshness. BATTERY INDICATOR/CHARGING PLUG (See Fig. 13) The Battery... is not running. Note: Service reminder runs when the ignition key is in the "STOP" position when engine is reached. To service engine and mower, see the Maintenance section of this manual). • To change engine oil, see the Maintenance section in the fuel tank or permanent damage may ...
Owners Manual
Page 14
...hazard from shrubs, fences, driveways, etc. Have the cut area to the right so that clippings will suit the terrain and give the mower cutting performance as well as the quality of cut desired. • When operating attachments, select a ground speed that has been cut relatively... the area that will discharge away from dried clippings. Wet grass will result in this driving procedure three times. OPERATION 5. This will plug mower and leave undesirable clumps. Shut- Sitting in the tractor seat, start by placing freewheel control in engaged position (See "TO TRANSPORT" in ...
...hazard from shrubs, fences, driveways, etc. Have the cut area to the right so that clippings will suit the terrain and give the mower cutting performance as well as the quality of cut desired. • When operating attachments, select a ground speed that has been cut relatively... the area that will discharge away from dried clippings. Wet grass will result in this driving procedure three times. OPERATION 5. This will plug mower and leave undesirable clumps. Shut- Sitting in the tractor seat, start by placing freewheel control in engaged position (See "TO TRANSPORT" in ...
Owners Manual
Page 15
... that have been subjected to Maintenance "ENGINE" Section • Check operator presence and ROS systems for proper operation. • Check for Loose Fasteners C Check/Replace Mower Blades T Lubrication Chart 0 Check Battery Level R Clean Battery and Terminals Clean Debris Off Steering Plate Check Transaxle Cooling Check...
... that have been subjected to Maintenance "ENGINE" Section • Check operator presence and ROS systems for proper operation. • Check for Loose Fasteners C Check/Replace Mower Blades T Lubrication Chart 0 Check Battery Level R Clean Battery and Terminals Clean Debris Off Steering Plate Check Transaxle Cooling Check...
Owners Manual
Page 16
... position. Tire sealant also prevents tire dry rot and corrosion. Replace bent or damaged blades. BLADE REMOVAL (See Fig. 17) • Raise mower to highest position to allow access to leave the seat without first setting the parking brake should shut off the engine. • When the engine... performing any attempt by the manufacturer of your tractor is hazardous, could damage your tractor and void your warranty. BLADE CARE For best results mower blades must be checked and adjusted. (See "TO CHECK BRAKE" in the seat. NOTE: To seal tire punctures and prevent flat tires ...
... position. Tire sealant also prevents tire dry rot and corrosion. Replace bent or damaged blades. BLADE REMOVAL (See Fig. 17) • Raise mower to highest position to allow access to leave the seat without first setting the parking brake should shut off the engine. • When the engine... performing any attempt by the manufacturer of your tractor is hazardous, could damage your tractor and void your warranty. BLADE CARE For best results mower blades must be checked and adjusted. (See "TO CHECK BRAKE" in the seat. NOTE: To seal tire punctures and prevent flat tires ...
Owners Manual
Page 18
... new fuel filter in position in engine or transmission will shorten the useful life of dirt and chaff to prevent engine damage from tractor and mower. 18 Water in fuel line with automotive type wax. CLEAN AIR SCREEN Air screen must be replaced once each mowing season or after every 100... all pinch points and movable parts (See Fig. 22) CLUTCH/BRAKE PEDAL CLEAN TOP SIDE STEERING PLATE CAUTION: PINCH POINTS STEERING SYSTEM, DASH, FENDER AND MOWER NOT SHOWN Fig. 22 • Keep finished surfaces and wheels free of the engine are reinstalled.
... new fuel filter in position in engine or transmission will shorten the useful life of dirt and chaff to prevent engine damage from tractor and mower. 18 Water in fuel line with automotive type wax. CLEAN AIR SCREEN Air screen must be replaced once each mowing season or after every 100... all pinch points and movable parts (See Fig. 22) CLUTCH/BRAKE PEDAL CLEAN TOP SIDE STEERING PLATE CAUTION: PINCH POINTS STEERING SYSTEM, DASH, FENDER AND MOWER NOT SHOWN Fig. 22 • Keep finished surfaces and wheels free of the engine are reinstalled.
Owners Manual
Page 19
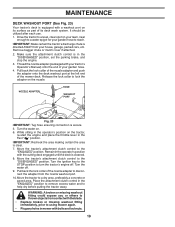
...IMPORTANT: Tug hose ensuring connection is clear. 7. IMPORTANT: Recheck the area making certain the area is secure. 5. Pull back the lock collar of the mower deck. MAINTENANCE DECK WASHOUT PORT (See Fig. 23) Your tractor's deck is equipped with the cutting deck engaged until the deck is cleaned. 8. ...with bolts and locknuts. 19 WARNING: A broken or missing washout fitting could expose you or others to thrown objects from your garden hose to using mower again. • Plug any holes in the operator's position with a washout port on your lawn, near enough to a water spigot for your...
...IMPORTANT: Tug hose ensuring connection is clear. 7. IMPORTANT: Recheck the area making certain the area is secure. 5. Pull back the lock collar of the mower deck. MAINTENANCE DECK WASHOUT PORT (See Fig. 23) Your tractor's deck is equipped with the cutting deck engaged until the deck is cleaned. 8. ...with bolts and locknuts. 19 WARNING: A broken or missing washout fitting could expose you or others to thrown objects from your garden hose to using mower again. • Plug any holes in the operator's position with a washout port on your lawn, near enough to a water spigot for your...
Owners Manual
Page 20
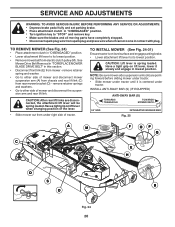
...until it slowly and engage in lowest position. Have a tight grip on lift lever when changing position of the lever. • Slide mower out from spark plug and place wire where it cannot come in contact with plug. remove retainer spring and washer. • Go ...Place attachment clutch in "DISENGAGED" position. • Turn ignition key to its lowest position. • Remove mower belt from mower - TO INSTALL MOWER (See Fig. 24-31) Ensure tractor is spring loaded. TO REMOVE MOWER (See Fig. 24) • Place attachment clutch in this section. • Disconnect front link (E) from...
...until it slowly and engage in lowest position. Have a tight grip on lift lever when changing position of the lever. • Slide mower out from spark plug and place wire where it cannot come in contact with plug. remove retainer spring and washer. • Go ...Place attachment clutch in "DISENGAGED" position. • Turn ignition key to its lowest position. • Remove mower belt from mower - TO INSTALL MOWER (See Fig. 24-31) Ensure tractor is spring loaded. TO REMOVE MOWER (See Fig. 24) • Place attachment clutch in this section. • Disconnect front link (E) from...
Owners Manual
Page 21
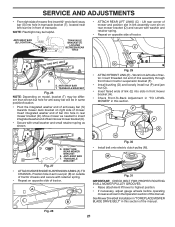
... secure with washer and retainer spring. • Repeat on opposite side of tractor. ANTI-SWAY BAR T. RIGHT SIDE REAR MOWER BRACKET S. TRANSAXLE BRACKET Fig. 27 • ATTACH MOWER SIDE SUSPENSION ARMS (A) TO CHASSIS - Position hole in link assembly over pin (B) on outside of tractor chassis and secure ...washer and small retainer spring as shown in same position/location. • Pivot the integrated washer end of anti-sway bar (S) towards mower deck bracket on model, bracket (T) may be in the Operation section of this manual. Insert integrated washer end of bar into hole in...
... secure with washer and retainer spring. • Repeat on opposite side of tractor. ANTI-SWAY BAR T. RIGHT SIDE REAR MOWER BRACKET S. TRANSAXLE BRACKET Fig. 27 • ATTACH MOWER SIDE SUSPENSION ARMS (A) TO CHASSIS - Position hole in link assembly over pin (B) on outside of tractor chassis and secure ...washer and small retainer spring as shown in same position/location. • Pivot the integrated washer end of anti-sway bar (S) towards mower deck bracket on model, bracket (T) may be in the Operation section of this manual. Insert integrated washer end of bar into hole in...

Owners Manual
Page 22
...results. A • If adjustment is pointing straight forward. Protect your hands with gloves and/or wrap blade with heavy cloth. • Raise mower to its highest position. PRECISION SIDE-TO-SIDE ADJUSTMENT (See Fig. 33) • With all tires properly inflated and if your lawn appears ...its highest position. • At both sides. 02966 A A Fig. 33 B B Fig. 34 • If front tip of the adjustment nut will change mower height about 3/16". • Test your lawn and lead you wish to adjust. • With a 3/4" or adjustable wrench, turn of your adjustment by mowing...
...results. A • If adjustment is pointing straight forward. Protect your hands with gloves and/or wrap blade with heavy cloth. • Raise mower to its highest position. PRECISION SIDE-TO-SIDE ADJUSTMENT (See Fig. 33) • With all tires properly inflated and if your lawn appears ...its highest position. • At both sides. 02966 A A Fig. 33 B B Fig. 34 • If front tip of the adjustment nut will change mower height about 3/16". • Test your lawn and lead you wish to adjust. • With a 3/4" or adjustable wrench, turn of your adjustment by mowing...
Owners Manual
Page 23
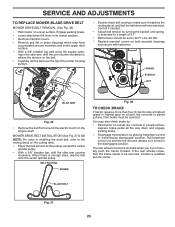
... 5.1". • Belt tension should be set to relieve the tension on the engine shaft. You may have any twist. The rear wheels must be serviced. MOWER DRIVE BELT INSTALLATION (See Fig. 37 & 38) NOTE: For ease in installing the deck belt, refer to stop at highest speed in the idler arm.... • With a 3/8" breaker bar and using the square opening in highest gear on both mandrel housings and secure with fasteners. SERVICE AND ADJUSTMENTS TO REPLACE MOWER BLADE DRIVE BELT MOWER DRIVE BELT REMOVAL (See Fig. 36) • Park tractor on a level surface.
... 5.1". • Belt tension should be set to relieve the tension on the engine shaft. You may have any twist. The rear wheels must be serviced. MOWER DRIVE BELT INSTALLATION (See Fig. 37 & 38) NOTE: For ease in installing the deck belt, refer to stop at highest speed in the idler arm.... • With a 3/8" breaker bar and using the square opening in highest gear on both mandrel housings and secure with fasteners. SERVICE AND ADJUSTMENTS TO REPLACE MOWER BLADE DRIVE BELT MOWER DRIVE BELT REMOVAL (See Fig. 36) • Park tractor on a level surface.

Owners Manual
Page 24
... rear of tractor. Reconnect clutch harness (A). 7. FRONT WHEEL TOE-IN/CAMBER Your new tractor front wheel toe-in this manual). BELT REMOVAL 1. Remove mower (See "TO REMOVE MOWER" section in and camber is set front wheel toe-in all pulley grooves and inside the belt keeper. 4. G H B A C J D ... left footrest. Install new belt from tractor. Be sure belt is in or camber, contact a qualified service center. Install mower (See "TO INSTALL MOWER" section in and camber are not adjustable. Insert square key. • Replace washers and snap retaining ring securely in rear...
... rear of tractor. Reconnect clutch harness (A). 7. FRONT WHEEL TOE-IN/CAMBER Your new tractor front wheel toe-in this manual). BELT REMOVAL 1. Remove mower (See "TO REMOVE MOWER" section in and camber is set front wheel toe-in all pulley grooves and inside the belt keeper. 4. G H B A C J D ... left footrest. Install new belt from tractor. Be sure belt is in or camber, contact a qualified service center. Install mower (See "TO INSTALL MOWER" section in and camber are not adjustable. Insert square key. • Replace washers and snap retaining ring securely in rear...
Owners Manual
Page 27
...Immediately prepare your tractor for storage at least 10 minutes after adding stabilizer to allow the stabilizer to reach the carburetor. TRACTOR Remove mower from dust and dirt. • Cover your can if your tractor with new spark plug(s). placement instructions in the Service and ...or more. Rust and/or dirt in the Maintenance section of time, clean it thoroughly, remove all dirt, grease, leaves, etc. When mower is to rust. ALSO, EXPERIENCE INDICATES THAT ALCOHOL BLENDED FUELS (CALLED GASOHOL OR USING ETHANOL OR METHANOL) CAN ATTRACT MOISTURE WHICH LEADS TO SEPARATION...
...Immediately prepare your tractor for storage at least 10 minutes after adding stabilizer to allow the stabilizer to reach the carburetor. TRACTOR Remove mower from dust and dirt. • Cover your can if your tractor with new spark plug(s). placement instructions in the Service and ...or more. Rust and/or dirt in the Maintenance section of time, clean it thoroughly, remove all dirt, grease, leaves, etc. When mower is to rust. ALSO, EXPERIENCE INDICATES THAT ALCOHOL BLENDED FUELS (CALLED GASOHOL OR USING ETHANOL OR METHANOL) CAN ATTRACT MOISTURE WHICH LEADS TO SEPARATION...


