
Owners Manual
Page 2
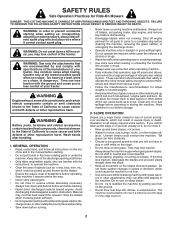
.... • Only allow the mower deck to a complete stop engine, and remove keys before storage. Tires can touch hot exhaust / engine parts and burn. GENERAL OPERATION • Read, understand, and follow all slopes requires extra caution. Do not allow responsible adults, who are recommended... by putting your tractor. Operation on all instructions on the machine and in the manual before cleaning the machine, removing the grass catcher, or unclogging the discharge chute. • Operate machine only in a large percentage of...
.... • Only allow the mower deck to a complete stop engine, and remove keys before storage. Tires can touch hot exhaust / engine parts and burn. GENERAL OPERATION • Read, understand, and follow all slopes requires extra caution. Do not allow responsible adults, who are recommended... by putting your tractor. Operation on all instructions on the machine and in the manual before cleaning the machine, removing the grass catcher, or unclogging the discharge chute. • Operate machine only in a large percentage of...

Owners Manual
Page 5
... of one hour at the factory with the instructions that follow all instructions in this manual). • Roll tractor forward off the skid. TO ROLL TRACTOR OFF SKID (See Operation section for any additional loose parts or cartons and remove. Fig. 1 5 Standard wrench sizes are listed. (1) ...ASSEMBLY Your new tractor has been assembled at 6-10 amps. (See "BATTERY" in Maintenance section of this manual, it means when you are in the Operation section of those parts left hand is reached which allows you to raised position. engage transmission (See "TO TRANSPORT" in the ...
... of one hour at the factory with the instructions that follow all instructions in this manual). • Roll tractor forward off the skid. TO ROLL TRACTOR OFF SKID (See Operation section for any additional loose parts or cartons and remove. Fig. 1 5 Standard wrench sizes are listed. (1) ...ASSEMBLY Your new tractor has been assembled at 6-10 amps. (See "BATTERY" in Maintenance section of this manual, it means when you are in the Operation section of those parts left hand is reached which allows you to raised position. engage transmission (See "TO TRANSPORT" in the ...
Owners Manual
Page 6
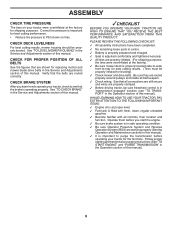
... operate your tractor, check to see "TO TRANSPORT" in the Service and Adjustments section of this manual. PLEASE REVIEW THE FOLLOWING CHECKLIST: ✓ All assembly instructions have been completed. ✓ No remaining loose parts in this manual). ✓ It is important for best cutting performance. • Reduce tire pressure to -rear for best...
... operate your tractor, check to see "TO TRANSPORT" in the Service and Adjustments section of this manual. PLEASE REVIEW THE FOLLOWING CHECKLIST: ✓ All assembly instructions have been completed. ✓ No remaining loose parts in this manual). ✓ It is important for best cutting performance. • Reduce tire pressure to -rear for best...
Owners Manual
Page 16
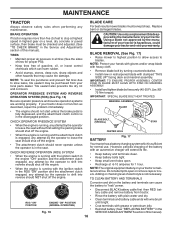
...tight. • Keep small vent holes open or remove caps or covers. TO CLEAN BATTERY AND TERMINALS Corrosion and dirt on your local parts dealer. Clean terminals and battery cable ends with grease or petroleum jelly. Reinstall battery (See "REPLACING BATTERY" in all tires (See ... insect control chemicals which is in the disengaged position. TIRES • Maintain proper air pressure in the SERVICE AND ADJUSTMENTS section of this manual). BATTERY Fig. 17 Your tractor has a battery charging system which can cause the battery to slow leaks, tire sealant may cause tire ...
...tight. • Keep small vent holes open or remove caps or covers. TO CLEAN BATTERY AND TERMINALS Corrosion and dirt on your local parts dealer. Clean terminals and battery cable ends with grease or petroleum jelly. Reinstall battery (See "REPLACING BATTERY" in all tires (See ... insect control chemicals which is in the disengaged position. TIRES • Maintain proper air pressure in the SERVICE AND ADJUSTMENTS section of this manual). BATTERY Fig. 17 Your tractor has a battery charging system which can cause the battery to slow leaks, tire sealant may cause tire ...
Owners Manual
Page 18
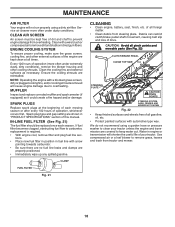
...air to remove dirt and stubborn dried gum fibers. tions. • Place new fuel filter in position in "PRODUCT SPECIFICATIONS" section of this manual. SPARK PLUGS Replace spark plugs at all gasoline, oil, etc. • Protect painted surfaces with arrow pointing towards carburetor. • Be ... gasoline. CLAMP FUEL FILTER Fig. 21 CLEANING • Clean engine, battery, seat, finish, etc. CAUTION: Avoid all pinch points and movable parts (See Fig. 22) CLUTCH/BRAKE PEDAL CLEAN TOP SIDE STEERING PLATE CAUTION: PINCH POINTS STEERING SYSTEM, DASH, FENDER AND MOWER NOT SHOWN Fig....
...air to remove dirt and stubborn dried gum fibers. tions. • Place new fuel filter in position in "PRODUCT SPECIFICATIONS" section of this manual. SPARK PLUGS Replace spark plugs at all gasoline, oil, etc. • Protect painted surfaces with arrow pointing towards carburetor. • Be ... gasoline. CLAMP FUEL FILTER Fig. 21 CLEANING • Clean engine, battery, seat, finish, etc. CAUTION: Avoid all pinch points and movable parts (See Fig. 22) CLUTCH/BRAKE PEDAL CLEAN TOP SIDE STEERING PLATE CAUTION: PINCH POINTS STEERING SYSTEM, DASH, FENDER AND MOWER NOT SHOWN Fig....
Owners Manual
Page 19
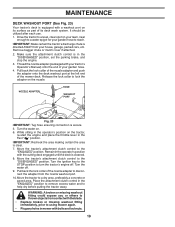
... the engine and place the throttle lever in the operator's position on . 6. Place the attachment clutch control in mower with your tractor's Operator's Manual) onto the end of the nozzle adapter to disconnect the adapter from the nozzle washout port. 10.Move the tractor to turn the tractor's engine...cleaned. 8. Release the lock collar to the "ENGAGED" position. Move the tractor's attachment clutch control to lock the adapter on its surface as part of the mower deck. Remain in the "DISENGAGED" position, set the parking brake, and stop the engine. 3. Turn the water off .
... the engine and place the throttle lever in the operator's position on . 6. Place the attachment clutch control in mower with your tractor's Operator's Manual) onto the end of the nozzle adapter to disconnect the adapter from the nozzle washout port. 10.Move the tractor to turn the tractor's engine...cleaned. 8. Release the lock collar to the "ENGAGED" position. Move the tractor's attachment clutch control to lock the adapter on its surface as part of the mower deck. Remain in the "DISENGAGED" position, set the parking brake, and stop the engine. 3. Turn the water off .

Owners Manual
Page 24
...square key - Remove mower (See "TO REMOVE MOWER" section in rear wheel hub and axle. Remove belt downward from your local parts dealer. Be sure belt is in all pulley grooves and inside the belt keeper. 4. Reinstall anti-rotation link (B) on level surface....transmission cooling fan and onto the input pulley (F). Do not lose). • Repair tire and reassemble. • On rear wheels only: align grooves in this manual). Pull belt toward rear of tractor. 4. Carefully work belt down around electric clutch (G). 7. G H B A C J D BELT INSTALLATION - 1. Install ...
...square key - Remove mower (See "TO REMOVE MOWER" section in rear wheel hub and axle. Remove belt downward from your local parts dealer. Be sure belt is in all pulley grooves and inside the belt keeper. 4. Reinstall anti-rotation link (B) on level surface....transmission cooling fan and onto the input pulley (F). Do not lose). • Repair tire and reassemble. • On rear wheels only: align grooves in this manual). Pull belt toward rear of tractor. 4. Carefully work belt down around electric clutch (G). 7. G H B A C J D BELT INSTALLATION - 1. Install ...
Owners Manual
Page 27
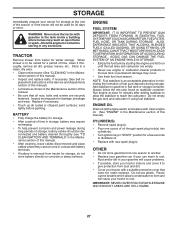
... TO SEPARATION AND FORMATION OF ACIDS DURING STORAGE. Add stabilizer to distribute oil. • Replace with new spark plug(s). Inspect moving parts for winter storage. IMPORTANT: NEVER COVER TRACTOR WHILE ENGINE AND EXHAUST AREAS ARE STILL WARM. 27 STORAGE Immediately prepare your tractor with ...See belt re- Always follow the mix ratio found on concrete or damp surfaces. placement instructions in the Service and Adjustments section of this manual). • Lubricate as shown in the tank inside a building where fumes may occur. • Use fresh fuel next season. WARNING:...
... TO SEPARATION AND FORMATION OF ACIDS DURING STORAGE. Add stabilizer to distribute oil. • Replace with new spark plug(s). Inspect moving parts for winter storage. IMPORTANT: NEVER COVER TRACTOR WHILE ENGINE AND EXHAUST AREAS ARE STILL WARM. 27 STORAGE Immediately prepare your tractor with ...See belt re- Always follow the mix ratio found on concrete or damp surfaces. placement instructions in the Service and Adjustments section of this manual). • Lubricate as shown in the tank inside a building where fumes may occur. • Use fresh fuel next season. WARNING:...

Owners Manual
Page 29
... trash around mandrels. 1. Replace blade mandrel. 5. Clean around mandrels to dry before stopping engine. 1. Replace mower drive belt. 3. Replace idler pulley. 4. Place throttle control in parts manual. 11. Shift to open vent holes. Wet grass. 3. Allow grass to open vent holes. 1. Low/uneven tire air pressure. 5. Replace blade. Replace mower drive belt...
... trash around mandrels. 1. Replace blade mandrel. 5. Clean around mandrels to dry before stopping engine. 1. Replace mower drive belt. 3. Replace idler pulley. 4. Place throttle control in parts manual. 11. Shift to open vent holes. Wet grass. 3. Allow grass to open vent holes. 1. Low/uneven tire air pressure. 5. Replace blade. Replace mower drive belt...


