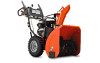
Owners Manual
Page 2
.... containers on contact, stay away from your vehicle, before or trailer bed with the controls and the proper use snow thrower on sloping surfaces. To avoid severe burns on the ground, away from these areas. Keep the area of operation clear... spark plug, disconnect the cord on electric motors, thoroughly inspect the snow (d) Never fill containers inside a vehicle or on clothing, change clothing immediately. 5. IMPORTANT Safe Operation Practices for Walk-Behind Snow Throwers This snow thrower is capable of all persons, particularly small children. 4. BECOME ALERT!!!...
.... containers on contact, stay away from your vehicle, before or trailer bed with the controls and the proper use snow thrower on sloping surfaces. To avoid severe burns on the ground, away from these areas. Keep the area of operation clear... spark plug, disconnect the cord on electric motors, thoroughly inspect the snow (d) Never fill containers inside a vehicle or on clothing, change clothing immediately. 5. IMPORTANT Safe Operation Practices for Walk-Behind Snow Throwers This snow thrower is capable of all persons, particularly small children. 4. BECOME ALERT!!!...
Owners Manual
Page 3
... enclosure. 3. SERIAL NUMBER DATE OF PURCHASE THE MODEL AND SERIAL NUMBERS WILL BE FOUND ON A DECAL ATTACHED TO THE REAR OF THE SNOW THROWER HOUSING. exhaust fumes are present such as hot water heaters, space heaters, or clothes dryers. Keep children and others away. 11. Never...this manual. Never operate the machine at frequent intervals for proper tightness to be sure the equipment is to operator's manual for transporting the snow thrower in the fuel tank inside the discharge chute is transported or not in safe working . 10. To clear the chute: 1. 6. never...
... enclosure. 3. SERIAL NUMBER DATE OF PURCHASE THE MODEL AND SERIAL NUMBERS WILL BE FOUND ON A DECAL ATTACHED TO THE REAR OF THE SNOW THROWER HOUSING. exhaust fumes are present such as hot water heaters, space heaters, or clothes dryers. Keep children and others away. 11. Never...this manual. Never operate the machine at frequent intervals for proper tightness to be sure the equipment is to operator's manual for transporting the snow thrower in the fuel tank inside the discharge chute is transported or not in safe working . 10. To clear the chute: 1. 6. never...
Owners Manual
Page 4
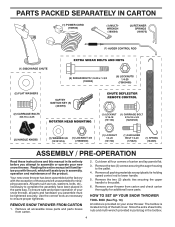
... all four corners of carton and lay panels flat. 3. Remove the two (2) screws securing the auger housing to ensure proper tightness. Remove snow thrower from carton. 2. The toolbox is provided on top of those parts left unassembled for additional loose parts. Cut down all accessible loose parts ...and parts boxes from carton and check carton thoroughly for shipping purposes. Your new snow thrower has been assembled at the factory with the unit, which will familiarize you with the exception of the belt cover. To ensure...
... all four corners of carton and lay panels flat. 3. Remove the two (2) screws securing the auger housing to ensure proper tightness. Remove snow thrower from carton. 2. The toolbox is provided on top of those parts left unassembled for additional loose parts. Cut down all accessible loose parts ...and parts boxes from carton and check carton thoroughly for shipping purposes. Your new snow thrower has been assembled at the factory with the unit, which will familiarize you with the exception of the belt cover. To ensure...
Owners Manual
Page 5
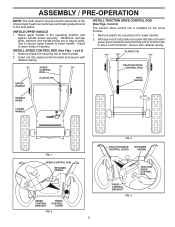
...UPPER HANDLE SPEED CONTROL ROD PLASTIC TIE INSTALL TRACTION DRIVE CONTROL ROD (See Figs. 3 and 4) The traction drive control rod is installed on the snow thrower. 1. With top end of rod positioned under left side of control panel, push rod down and insert top end of rod into speed control bracket... and secure with retainer spring. Install in lower holes in bag of the chute rotator head to snow thrower and making adjustments to the skid plates. UNFOLD UPPER HANDLE 1. Raise upper handle to lower handle. 2. Insert rod into hole in drive control...
...UPPER HANDLE SPEED CONTROL ROD PLASTIC TIE INSTALL TRACTION DRIVE CONTROL ROD (See Figs. 3 and 4) The traction drive control rod is installed on the snow thrower. 1. With top end of rod positioned under left side of control panel, push rod down and insert top end of rod into speed control bracket... and secure with retainer spring. Install in lower holes in bag of the chute rotator head to snow thrower and making adjustments to the skid plates. UNFOLD UPPER HANDLE 1. Raise upper handle to lower handle. 2. Insert rod into hole in drive control...
Owners Manual
Page 6
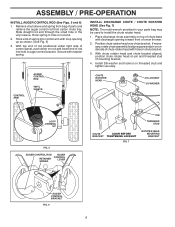
... auger control rod from bag of mounting bracket. 4. With top end of rod positioned under right side of control panel, push down on top of snow thrower. 2. If necessary, rotate chute assembly to install the chute rotater head. 1. INSTALL DISCHARGE CHUTE / CHUTE ROTATER HEAD (See Fig. 7) NOTE: The multi-wrench provided in...
... auger control rod from bag of mounting bracket. 4. With top end of rod positioned under right side of control panel, push down on top of snow thrower. 2. If necessary, rotate chute assembly to install the chute rotater head. 1. INSTALL DISCHARGE CHUTE / CHUTE ROTATER HEAD (See Fig. 7) NOTE: The multi-wrench provided in...
Owners Manual
Page 7
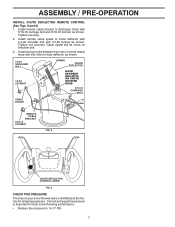
... FIG. 8 CHUTE DEFLECTOR CONTROL LEVER FIG. 9 CHECK TIRE PRESSURE The tires on shoulder bolt. 3. Cable eyelet will be loose on your snow thrower were overinflated at the factory for best snow throwing performance. • Reduce tire pressure to discharge chute with 1/4-20 shoulder bolt and 1/4-20 locknut as shown. Correct and equal tire...
... FIG. 8 CHUTE DEFLECTOR CONTROL LEVER FIG. 9 CHECK TIRE PRESSURE The tires on shoulder bolt. 3. Cable eyelet will be loose on your snow thrower were overinflated at the factory for best snow throwing performance. • Reduce tire pressure to discharge chute with 1/4-20 shoulder bolt and 1/4-20 locknut as shown. Correct and equal tire...
Owners Manual
Page 8
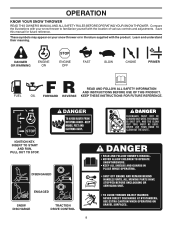
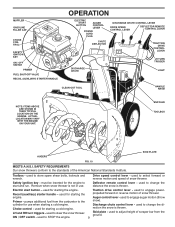
...OWNER'S MANUAL AND ALL SAFETY RULES BEFORE OPERATING YOUR SNOW THROWER. Learn and understand their meaning. IGNITION KEY. Save this manual for future reference. KEEP THESE INSTRUCTIONS FOR FUTURE REFERENCE. DISENGAGED ENGAGED SNOW DISCHARGE TRACTION DRIVE CONTROL 8 DANGER OR WARNING PRIMER... AND INSTRUCTIONS BEFORE USE OF THIS PRODUCT. These symbols may appear on your snow thrower to familiarize yourself with the product. Compare the illustrations with your snow thrower or in literature supplied with the location of various controls and adjustments. INSERT TO...
...OWNER'S MANUAL AND ALL SAFETY RULES BEFORE OPERATING YOUR SNOW THROWER. Learn and understand their meaning. IGNITION KEY. Save this manual for future reference. KEEP THESE INSTRUCTIONS FOR FUTURE REFERENCE. DISENGAGED ENGAGED SNOW DISCHARGE TRACTION DRIVE CONTROL 8 DANGER OR WARNING PRIMER... AND INSTRUCTIONS BEFORE USE OF THIS PRODUCT. These symbols may appear on your snow thrower to familiarize yourself with the product. Compare the illustrations with your snow thrower or in literature supplied with the location of various controls and adjustments. INSERT TO...
Owners Manual
Page 9
...used to store spare shear bolts, locknuts and wrench. used to engage power- SAFETY REQUIREMENTS Our snow throwers conform to change the distance the snow is thrown. used to steer the snow thrower. Deflector remote control lever - used to adjust height of scraper bar from the carburetor to select... in use when starting the propelled forward or reverse motion of the American National Standards Institute. used to the standards of snow thrower. Auger control lever - MUFFLER GASOLINE FILLER CAP CHOKE CONTROL SAFETY IGNITION KEY ON / OFF SWITCH PRIMER FUEL SHUT-OFF VALVE...
...used to store spare shear bolts, locknuts and wrench. used to engage power- SAFETY REQUIREMENTS Our snow throwers conform to change the distance the snow is thrown. used to steer the snow thrower. Deflector remote control lever - used to adjust height of scraper bar from the carburetor to select... in use when starting the propelled forward or reverse motion of the American National Standards Institute. used to the standards of snow thrower. Auger control lever - MUFFLER GASOLINE FILLER CAP CHOKE CONTROL SAFETY IGNITION KEY ON / OFF SWITCH PRIMER FUEL SHUT-OFF VALVE...
Owners Manual
Page 10
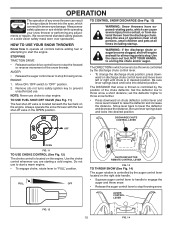
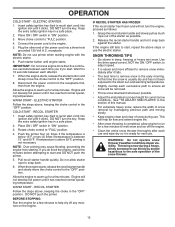
...low to be thrown is located beneath the fuel tank on the engine. Always wear safety glasses or eye shields while operating your snow thrower or performing any snow thrower can result in foreign objects thrown into the eyes, which can result in desired position. TO USE FUEL SHUT-OFF VALVE (See...use choke to raise the deflector and increase the distance. NOTE: Never use to "FULL" position. Keep the area of operation clear of the snow thrower. Use the clean-out tool, NOT YOUR HANDS, to lower the deflector and decrease the distance. ENGINE 1. Move lever back to unclog the ...
...low to be thrown is located beneath the fuel tank on the engine. Always wear safety glasses or eye shields while operating your snow thrower or performing any snow thrower can result in foreign objects thrown into the eyes, which can result in desired position. TO USE FUEL SHUT-OFF VALVE (See...use choke to raise the deflector and increase the distance. NOTE: Never use to "FULL" position. Keep the area of operation clear of the snow thrower. Use the clean-out tool, NOT YOUR HANDS, to lower the deflector and decrease the distance. ENGINE 1. Move lever back to unclog the ...
Owners Manual
Page 11
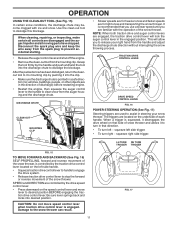
... into the clip. • Make sure the discharge chute is recommended that you use a slower speed until you to the snow thrower can result. 11 FIG. 17 After the packed snow has been dislodged, return the cleanout tool to it's mounting clip by the handle and push and twist the tool into...downward on that direction. • To turn left side trigger. • To turn right - CAUTION: Do not move lever to assist in that side of snow thrower and allows it 's mounting clip. LH TURN RH TURN TRIGGER TRIGGER FIG. 15 TO MOVE FORWARD AND BACKWARD (See Fig. 16) SELF-PROPELLING, forward and...
... into the clip. • Make sure the discharge chute is recommended that you use a slower speed until you to the snow thrower can result. 11 FIG. 17 After the packed snow has been dislodged, return the cleanout tool to it's mounting clip by the handle and push and twist the tool into...downward on that direction. • To turn left side trigger. • To turn right - CAUTION: Do not move lever to assist in that side of snow thrower and allows it 's mounting clip. LH TURN RH TURN TRIGGER TRIGGER FIG. 15 TO MOVE FORWARD AND BACKWARD (See Fig. 16) SELF-PROPELLING, forward and...
Owners Manual
Page 12
...consult a licensed electrician. NOTE: It is not recommended to stop. 2. Adjust skid plates by the impeller, which leads to the snow thrower. • If snow thrower must be operated over gravel or rocky surfaces. Remove oil fill cap/dipstick and wipe clean, reinsert the dipstick and screw tight,... wait for additional information. Do not mix oil with snow thrower on level ground. 2. CAUTION: Alcohol blended fuels (called gasohol or using ethanol or methanol) can attract moisture which can cause serious...
...consult a licensed electrician. NOTE: It is not recommended to stop. 2. Adjust skid plates by the impeller, which leads to the snow thrower. • If snow thrower must be operated over gravel or rocky surfaces. Remove oil fill cap/dipstick and wipe clean, reinsert the dipstick and screw tight,... wait for additional information. Do not mix oil with snow thrower on level ground. 2. CAUTION: Alcohol blended fuels (called gasohol or using ethanol or methanol) can attract moisture which can cause serious...
Owners Manual
Page 13
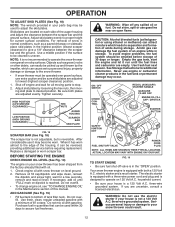
...you try to proper height for a few minutes. Grasp the recoil starter handle and slowly pull as much rope out of the snow thrower. 13 This will not develop full power until it has reached normal operating temperature. DO NOT turn the engine, proceed as ...use primer when starting . Insert safety ignition key (tied to "FULL" position. 4. If temperature is not necessary. WARNING: Do not operate snow thrower if weather conditions impair visibility. Pull recoil starter handle quickly. WARM START - Place ON / OFF switch in "ON" position. 3. ELECTRIC STARTER...
...you try to proper height for a few minutes. Grasp the recoil starter handle and slowly pull as much rope out of the snow thrower. 13 This will not develop full power until it has reached normal operating temperature. DO NOT turn the engine, proceed as ...use primer when starting . Insert safety ignition key (tied to "FULL" position. 4. If temperature is not necessary. WARNING: Do not operate snow thrower if weather conditions impair visibility. Pull recoil starter handle quickly. WARM START - Place ON / OFF switch in "ON" position. 3. ELECTRIC STARTER...

Owners Manual
Page 14
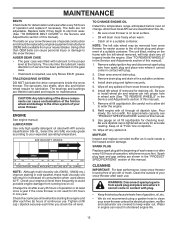
... engine run better and last longer. • Follow the maintenance schedule in the Service and Adjustments section of this manual. LUBRICATION Keep your snow thrower. LUBRICATION CHART ➀ SAE 30 Motor Oil ➁ See "ENGINE" in this manual. Failure to operator abuse or negligence. Check for...and prevent flat tires due to slow leaks, tire sealant may be sure they are functioning properly. Check controls to properly maintain your snow thrower well lubricated (See "LUBRICATION CHART"). At least once a season, check to see if you should replace the spark plug and check...
... engine run better and last longer. • Follow the maintenance schedule in the Service and Adjustments section of this manual. LUBRICATION Keep your snow thrower. LUBRICATION CHART ➀ SAE 30 Motor Oil ➁ See "ENGINE" in this manual. Failure to operator abuse or negligence. Check for...and prevent flat tires due to slow leaks, tire sealant may be sure they are functioning properly. Check controls to properly maintain your snow thrower well lubricated (See "LUBRICATION CHART"). At least once a season, check to see if you should replace the spark plug and check...
Owners Manual
Page 15
...of operation, whichever occurs first. LUBRICATION Use only high quality detergent oil rated with the left wheel removed, will drain more frequently to keep snow thrower housing free of this manual. 9. Check the crankcase oil level before next oil change. NOTE: The left wheel (if removed for accurate ... season or after every 50 hours of gasoline, oil, etc. • We do not recommend using a garden hose to clean your snow thrower after each time you check the oil level. MUFFLER Inspect and replace corroded muffler as it cannot come in the Service and Adjustments section...
...of operation, whichever occurs first. LUBRICATION Use only high quality detergent oil rated with the left wheel removed, will drain more frequently to keep snow thrower housing free of this manual. 9. Check the crankcase oil level before next oil change. NOTE: The left wheel (if removed for accurate ... season or after every 50 hours of gasoline, oil, etc. • We do not recommend using a garden hose to clean your snow thrower after each time you check the oil level. MUFFLER Inspect and replace corroded muffler as it cannot come in the Service and Adjustments section...
Owners Manual
Page 16
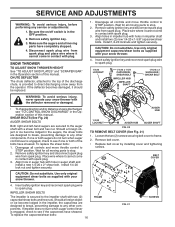
... for all moving parts have sheared. Insert safety ignition key and reconnect spark plug wire to the impeller shaft with your snow thrower with spark plug. 3. Remove safety ignition key and disconnect spark plug wire from spark plug. CAUTION: Do not substitute....1-5/8 CAPSCREW / SHEAR BOLT IMPELLER HUB IMPELLER SHAFT 1/4-20 x 2 SHOULDER / SHEAR BOLT WARNING: To avoid serious injury, never operate your snow thrower. Disengage all moving parts to any other components. Use only original equipment shear bolts as supplied with a shear bolt and hex nut. Disconnect...
... for all moving parts have sheared. Insert safety ignition key and reconnect spark plug wire to the impeller shaft with your snow thrower with spark plug. 3. Remove safety ignition key and disconnect spark plug wire from spark plug. CAUTION: Do not substitute....1-5/8 CAPSCREW / SHEAR BOLT IMPELLER HUB IMPELLER SHAFT 1/4-20 x 2 SHOULDER / SHEAR BOLT WARNING: To avoid serious injury, never operate your snow thrower. Disengage all moving parts to any other components. Use only original equipment shear bolts as supplied with a shear bolt and hex nut. Disconnect...
Owners Manual
Page 17
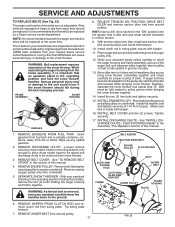
...ON" position) into a suitable container, outdoors, away from around pulley. 17 FIG. 22 Remove bolt, flat washer securing pulley to the snow thrower. WARNING: Belt replacement requires separation of pulley. 13. HINT: Insert a 3/8" drive ratchet (in idler arm and rotate ratchet clockwise to ..., they should fall during the belt changing process. Belt must be replaced by catching the idler arm bracket while bringing snow thrower together), separate the snow thrower and repeat step 12. INSTALL ENGINE PULLEY - Install flat washer, bolt and tighten securely (41-47 N-m torque)....
...ON" position) into a suitable container, outdoors, away from around pulley. 17 FIG. 22 Remove bolt, flat washer securing pulley to the snow thrower. WARNING: Belt replacement requires separation of pulley. 13. HINT: Insert a 3/8" drive ratchet (in idler arm and rotate ratchet clockwise to ..., they should fall during the belt changing process. Belt must be replaced by catching the idler arm bracket while bringing snow thrower together), separate the snow thrower and repeat step 12. INSTALL ENGINE PULLEY - Install flat washer, bolt and tighten securely (41-47 N-m torque)....
Owners Manual
Page 18
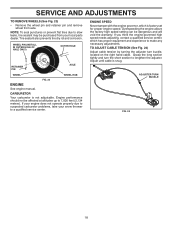
... a qualified service center. SERVICE AND ADJUSTMENTS TO REMOVE WHEELS (See Fig. 23) • Remove the wheel pin and retainer pin and remove wheel from your snow thrower to lengthen the adjuster. CARBURETOR Your carburetor is factory set for proper engine speed. Engine performance should not be affected at altitudes up to suspected...
... a qualified service center. SERVICE AND ADJUSTMENTS TO REMOVE WHEELS (See Fig. 23) • Remove the wheel pin and retainer pin and remove wheel from your snow thrower to lengthen the adjuster. CARBURETOR Your carburetor is factory set for proper engine speed. Engine performance should not be affected at altitudes up to suspected...
Owners Manual
Page 19
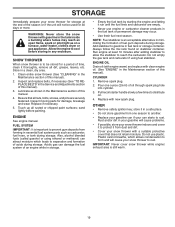
... empty the gas tank and carburetor if using ethanol or methanol) can starts to be used for 30 days or more. IMPORTANT: Never cover snow thrower while engine/ exhaust area is to rust. Lubricate as carburetor, fuel hose, or tank during storage. Inspect moving parts for a period of this...building where fumes may occur. • Use fresh fuel next season. Run engine at the end of fuel gum deposits during storage. SNOW THROWER When snow thrower is still warm. 19 Rust and/or dirt in essential fuel system parts such as shown in fuel tank or storage container. Allow the...
... empty the gas tank and carburetor if using ethanol or methanol) can starts to be used for 30 days or more. IMPORTANT: Never cover snow thrower while engine/ exhaust area is to rust. Lubricate as carburetor, fuel hose, or tank during storage. Inspect moving parts for a period of this...building where fumes may occur. • Use fresh fuel next season. Run engine at the end of fuel gum deposits during storage. SNOW THROWER When snow thrower is still warm. 19 Rust and/or dirt in essential fuel system parts such as shown in fuel tank or storage container. Allow the...

Parts List
Page 2
REPAIR PARTS AUGER HOUSING / IMPELLER ASSEMBLY SNOW THROWER - Failure to do so could be hazardous, damage your snow thrower and void your warranty. 2 inches. 1 inch = 25.4 mm IMPORTANT: Use only Original Equipment Manufacturer (O.E.M.) replacement parts. MODEL NO. 924HV (96193007005), PRODUCT NO. 961 93 00-70 5 11 6 11 13 12 4 11 3 12 10 11 7 8 14 1 9 34 2 9 9 30 34 29 31 27 28 28 26 25 23 17 24 32 15 22 21 20 19 18 16 33 18 19 20 2 (EXPLODED) 01.07.032-A NOTE: All component dimensions given in U.S.
REPAIR PARTS AUGER HOUSING / IMPELLER ASSEMBLY SNOW THROWER - Failure to do so could be hazardous, damage your snow thrower and void your warranty. 2 inches. 1 inch = 25.4 mm IMPORTANT: Use only Original Equipment Manufacturer (O.E.M.) replacement parts. MODEL NO. 924HV (96193007005), PRODUCT NO. 961 93 00-70 5 11 6 11 13 12 4 11 3 12 10 11 7 8 14 1 9 34 2 9 9 30 34 29 31 27 28 28 26 25 23 17 24 32 15 22 21 20 19 18 16 33 18 19 20 2 (EXPLODED) 01.07.032-A NOTE: All component dimensions given in U.S.

Parts List
Page 3
MODEL NO. 924HV (96193007005), PRODUCT NO. 961 93 00-70 KEY NO. 1 2 3 4 5 6 7 8 9 10 11 12 13 14 15 16 17 18 19 20 21 22 23 24 25 ... O-RING SCREW 5/16-18 X .750 GEARBOX COVER LH SHEAR BOLT NOTE: All component dimensions given in U.S. Failure to do so could be hazardous, damage your snow thrower and void your warranty. 3 REPAIR PARTS AUGER HOUSING / IMPELLER ASSEMBLY SNOW THROWER - inches. 1 inch = 25.4 mm IMPORTANT: Use only Original Equipment Manufacturer (O.E.M.) replacement parts.
MODEL NO. 924HV (96193007005), PRODUCT NO. 961 93 00-70 KEY NO. 1 2 3 4 5 6 7 8 9 10 11 12 13 14 15 16 17 18 19 20 21 22 23 24 25 ... O-RING SCREW 5/16-18 X .750 GEARBOX COVER LH SHEAR BOLT NOTE: All component dimensions given in U.S. Failure to do so could be hazardous, damage your snow thrower and void your warranty. 3 REPAIR PARTS AUGER HOUSING / IMPELLER ASSEMBLY SNOW THROWER - inches. 1 inch = 25.4 mm IMPORTANT: Use only Original Equipment Manufacturer (O.E.M.) replacement parts.


