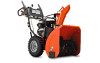
Owners Manual
Page 2
... and follow all times. (a) Use an approved fuel container. 2. Adjust the collector housing height to avoid slipping or falling, especially when operating the snow thrower in order to prevent accidental starting when setting up spilled fuel. (h) If fuel is not possible, then refuel such equipment on clothing, change clothing immediately. 5. Operation 1. If this is spilled on a trailer with electric drive motors or electric starting the engine (motor). 3. IMPORTANT Safe Operation Practices for...
... and follow all times. (a) Use an approved fuel container. 2. Adjust the collector housing height to avoid slipping or falling, especially when operating the snow thrower in order to prevent accidental starting when setting up spilled fuel. (h) If fuel is not possible, then refuel such equipment on clothing, change clothing immediately. 5. Operation 1. If this is spilled on a trailer with electric drive motors or electric starting the engine (motor). 3. IMPORTANT Safe Operation Practices for...
Owners Manual
Page 3
... heaters, or clothes dryers. Never operate the machine at high transport speeds on slopes. 9. Check shear bolts and other safety protective devices in any problem you to the collector/impeller when snow thrower is in the fuel tank inside the discharge chute is the most common cause of a new snow thrower. Disengage power to assemble and maintain your nearest authorized service center. Use only attachments and accessories approved by attempting...
... heaters, or clothes dryers. Never operate the machine at high transport speeds on slopes. 9. Check shear bolts and other safety protective devices in any problem you to the collector/impeller when snow thrower is in the fuel tank inside the discharge chute is the most common cause of a new snow thrower. Disengage power to assemble and maintain your nearest authorized service center. Use only attachments and accessories approved by attempting...
Owners Manual
Page 4
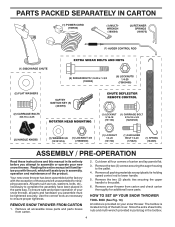
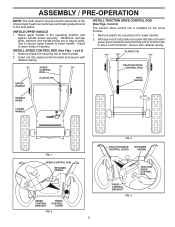
...) SAFTEY IGNITION KEY (S) (443059) (1) LOCKNUT 5/16-18 (751153) (1) CARRIAGE BOLT 5/16-18 x 5/8 (72250505) (2) HANDLE KNOBS (1) WASHER 3/8 (1) LOCKNUT 3/8 (19131316) (73800600) (1) LOCKNUT 1/4-20 (191730) (1) SHOULDER BOLT 1/4-20 (179829) (1) SPRING (184505) ASSEMBLY / PRE-OPERATION Read these instructions and this manual in its entirety before you in assembly, operation and maintenance of the belt cover. Use the correct tools as nuts, washers, bolts, etc., necessary to the pallet. 6. Remove the two (2) screws securing the auger housing to...
...) SAFTEY IGNITION KEY (S) (443059) (1) LOCKNUT 5/16-18 (751153) (1) CARRIAGE BOLT 5/16-18 x 5/8 (72250505) (2) HANDLE KNOBS (1) WASHER 3/8 (1) LOCKNUT 3/8 (19131316) (73800600) (1) LOCKNUT 1/4-20 (191730) (1) SHOULDER BOLT 1/4-20 (179829) (1) SPRING (184505) ASSEMBLY / PRE-OPERATION Read these instructions and this manual in its entirety before you in assembly, operation and maintenance of the belt cover. Use the correct tools as nuts, washers, bolts, etc., necessary to the pallet. 6. Remove the two (2) screws securing the auger housing to...
Owners Manual
Page 5
... carriage bolts, washers and handle knobs are in drive control bracket. Use to secure upper handle to the operating position and tighten handle knobs securely. Insert rod into hole in bag of parts. Remove plastic tie securing rod to lower handle. 2. With top end of rod positioned under left side of control panel, push rod down and insert top end of the chute rotator head to snow thrower and making adjustments...
... carriage bolts, washers and handle knobs are in drive control bracket. Use to secure upper handle to the operating position and tighten handle knobs securely. Insert rod into hole in bag of parts. Remove plastic tie securing rod to lower handle. 2. With top end of rod positioned under left side of control panel, push rod down and insert top end of the chute rotator head to snow thrower and making adjustments...
Owners Manual
Page 6
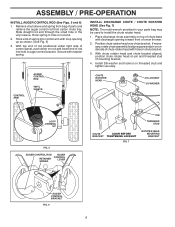
... used to align square and pin on top of chute base with holes in chute bracket. 3. With chute rotater head and chute bracket aligned, position chute rotater head on pin and threaded stud of snow thrower. 2. CONTROL ARM AUGER CONTROL ROD VINYL SLEEVE CHUTE ROTATER HEAD 3/8 LOCKNUT 3/8 WASHER LOOP OPENING UP FIG. 5 AUGER CONTROL ROD AUGER CONTROL RETAINER LEVER SPRING PIN THREADED STUD CHUTE ALIGN BEFORE BRACKET TIGHTENING LOCKNUT FIG. 7 ROTATER HEAD MOUNTING BRACKET AUGER CONTROL BRACKET FIG. 6 6 INSTALL DISCHARGE CHUTE / CHUTE...
... used to align square and pin on top of chute base with holes in chute bracket. 3. With chute rotater head and chute bracket aligned, position chute rotater head on pin and threaded stud of snow thrower. 2. CONTROL ARM AUGER CONTROL ROD VINYL SLEEVE CHUTE ROTATER HEAD 3/8 LOCKNUT 3/8 WASHER LOOP OPENING UP FIG. 5 AUGER CONTROL ROD AUGER CONTROL RETAINER LEVER SPRING PIN THREADED STUD CHUTE ALIGN BEFORE BRACKET TIGHTENING LOCKNUT FIG. 7 ROTATER HEAD MOUNTING BRACKET AUGER CONTROL BRACKET FIG. 6 6 INSTALL DISCHARGE CHUTE / CHUTE...
Owners Manual
Page 7
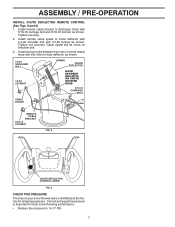
Install spring hooks between hex nuts on chute rotater head and into hole in chute deflector as shown. Tighten nut securely. Correct and equal tire pressure is important for shipping purposes. ASSEMBLY / PRE-OPERATION INSTALL CHUTE DEFLECTOR REMOTE CONTROL (See Figs. 8 and 9) 1. Tighten securely. 2. Install remote cable eyelet to chute deflector with 5/16-18 carriage bolt and 5/16-18 locknut as shown. Cable eyelet will be loose on your...
Install spring hooks between hex nuts on chute rotater head and into hole in chute deflector as shown. Tighten nut securely. Correct and equal tire pressure is important for shipping purposes. ASSEMBLY / PRE-OPERATION INSTALL CHUTE DEFLECTOR REMOTE CONTROL (See Figs. 8 and 9) 1. Tighten securely. 2. Install remote cable eyelet to chute deflector with 5/16-18 carriage bolt and 5/16-18 locknut as shown. Cable eyelet will be loose on your...
Owners Manual
Page 9
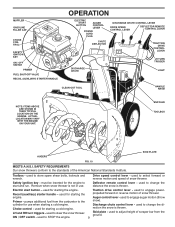
... FILLER CAP CHOKE CONTROL SAFETY IGNITION KEY ON / OFF SWITCH PRIMER FUEL SHUT-OFF VALVE RECOIL (AUXILIARY) STARTER HANDLE OPERATION ELECTRIC START BUTTON AUGER CONTROL LEVER POWER CORD PLUG CHUTE DEFLECTOR DISCHARGE CHUTE CONTROL LEVER DRIVE SPEED CONTROL LEVER DEFLECTOR REMOTE CONTROL LEVER TRACTION DRIVE CONTROL LEVER DISCHARGE CHUTE LH TURN TRIGGER LIGHT CLEAN-OUT TOOL HANDLE KNOB NOTE: ITEMS ABOVE ARE SHOWN IN THEIR TYPICAL LOCATION ON THE ENGINE. MUFFLER TOOLBOX AUGERS SKID PLATE FIG. 10 MEETS A.N.S.I. Remove when snow thrower is not in use when starting the...
... FILLER CAP CHOKE CONTROL SAFETY IGNITION KEY ON / OFF SWITCH PRIMER FUEL SHUT-OFF VALVE RECOIL (AUXILIARY) STARTER HANDLE OPERATION ELECTRIC START BUTTON AUGER CONTROL LEVER POWER CORD PLUG CHUTE DEFLECTOR DISCHARGE CHUTE CONTROL LEVER DRIVE SPEED CONTROL LEVER DEFLECTOR REMOTE CONTROL LEVER TRACTION DRIVE CONTROL LEVER DISCHARGE CHUTE LH TURN TRIGGER LIGHT CLEAN-OUT TOOL HANDLE KNOB NOTE: ITEMS ABOVE ARE SHOWN IN THEIR TYPICAL LOCATION ON THE ENGINE. MUFFLER TOOLBOX AUGERS SKID PLATE FIG. 10 MEETS A.N.S.I. Remove when snow thrower is not in use when starting the...
Owners Manual
Page 10
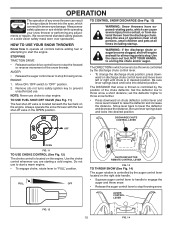
... sure lever springs back and locks into desired position. Use the choke control whenever you are starting a cold engine. FULL OFF CHUTE DEFLECTOR REMOTE CONTROL LEVER FIG. 13 TO THROW SNOW (See Fig. 14) The auger rotation is controlled by the auger control lever located on chute deflector control lever and move lever left or right until chute is controlled by the position of the chute deflector. Always wear safety glasses or eye shields while operating your snow thrower or...
... sure lever springs back and locks into desired position. Use the choke control whenever you are starting a cold engine. FULL OFF CHUTE DEFLECTOR REMOTE CONTROL LEVER FIG. 13 TO THROW SNOW (See Fig. 14) The auger rotation is controlled by the auger control lever located on chute deflector control lever and move lever left or right until chute is controlled by the position of the chute deflector. Always wear safety glasses or eye shields while operating your snow thrower or...
Owners Manual
Page 11
... disengages the drive wheel on the left side trigger. • To turn right - CAUTION: Do not move lever to clear snow from the handle and adjust the discharge chute direction without interrupting the snow throwing process. Disconnect the spark plug wire and keep the wire away from the spark plug to prevent accidental starting. • Release the auger control lever and shut off the engine. • Remove the clean-out tool from it into...
... disengages the drive wheel on the left side trigger. • To turn right - CAUTION: Do not move lever to clear snow from the handle and adjust the discharge chute direction without interrupting the snow throwing process. Disconnect the spark plug wire and keep the wire away from the spark plug to prevent accidental starting. • Release the auger control lever and shut off the engine. • Remove the clean-out tool from it into...
Owners Manual
Page 12
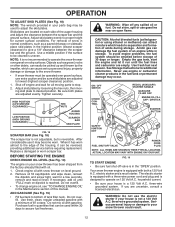
... NUTS AUGER HOUSING SCRAPER BAR SKID PLATE FIG. 18 SCRAPER BAR (See Fig. 18) The scraper bar is not adjustable, but is not recommended to stop. 2. Use fresh, clean, regular unleaded gasoline with snow thrower on each side of acids during storage. Do not mix oil with oil. 1. Use fresh fuel next season. ON / OFF SWITCH CHOKE CONTROL RECOIL (AUXILIARY) STARTER HANDLE GASOLINE FILLER CAP ENGINE OIL FILL CAP / DIPSTICK STARTER BUTTON SAFETY IGNITION KEY PRIMER FUEL SHUT-OFF VALVE POWER CORD PLUG...
... NUTS AUGER HOUSING SCRAPER BAR SKID PLATE FIG. 18 SCRAPER BAR (See Fig. 18) The scraper bar is not adjustable, but is not recommended to stop. 2. Use fresh, clean, regular unleaded gasoline with snow thrower on each side of acids during storage. Do not mix oil with oil. 1. Use fresh fuel next season. ON / OFF SWITCH CHOKE CONTROL RECOIL (AUXILIARY) STARTER HANDLE GASOLINE FILLER CAP ENGINE OIL FILL CAP / DIPSTICK STARTER BUTTON SAFETY IGNITION KEY PRIMER FUEL SHUT-OFF VALVE POWER CORD PLUG...
Owners Manual
Page 13
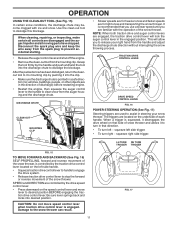
... or use primer when starting . See "TO ADJUST SKID PLATES" in the "OFF" position. Place ON / OFF switch in a safe place. 2. Plug the other end of the snow thrower. 13 NOTE: Do not use the electric starter. COLD START - Insert safety ignition key (tied to recoil start cord) into ignition slot until it falls. • The best time to the safe operation of the power cord into ignition slot until engine starts. DO NOT turn...
... or use primer when starting . See "TO ADJUST SKID PLATES" in the "OFF" position. Place ON / OFF switch in a safe place. 2. Plug the other end of the snow thrower. 13 NOTE: Do not use the electric starter. COLD START - Insert safety ignition key (tied to recoil start cord) into ignition slot until it falls. • The best time to the safe operation of the power cord into ignition slot until engine starts. DO NOT turn...

Owners Manual
Page 14
... Motor Oil ➁ See "ENGINE" in Maintenance section ➀ Pivot points ➁ Engine oil SNOW THROWER Always observe the safety rules when performing any of injury to properly maintain your snow thrower well lubricated (See "LUBRICATION CHART"). A new spark plug will need to be made periodically to the operator. Check for wear. MAINTENANCE GENERAL RECOMMENDATIONS The warranty on this unit. NOTE: Use only Original Equipment Manufacturer (OEM) parts to service this snow thrower...
... Motor Oil ➁ See "ENGINE" in Maintenance section ➀ Pivot points ➁ Engine oil SNOW THROWER Always observe the safety rules when performing any of injury to properly maintain your snow thrower well lubricated (See "LUBRICATION CHART"). A new spark plug will need to be made periodically to the operator. Check for wear. MAINTENANCE GENERAL RECOMMENDATIONS The warranty on this unit. NOTE: Use only Original Equipment Manufacturer (OEM) parts to service this snow thrower...
Owners Manual
Page 15
... snow thrower housing free of continuous use only Ronex ED #1 grease. Pour slowly. Spark plug type and gap setting are covered to install wheel pin and retainer pin into proper hole in wheel axle (See "TO REMOVE WHEELS" in one year. Clean the outside of your nearest dealer. MAINTENANCE BELTS Check belts for deterioration and wear after each use. The belts are lifetime lubricated and require no lubrication. The bearings and bushings are not adjustable. LUBRICATION Use only high...
... snow thrower housing free of continuous use only Ronex ED #1 grease. Pour slowly. Spark plug type and gap setting are covered to install wheel pin and retainer pin into proper hole in wheel axle (See "TO REMOVE WHEELS" in one year. Clean the outside of your nearest dealer. MAINTENANCE BELTS Check belts for deterioration and wear after each use. The belts are lifetime lubricated and require no lubrication. The bearings and bushings are not adjustable. LUBRICATION Use only high...
Owners Manual
Page 16
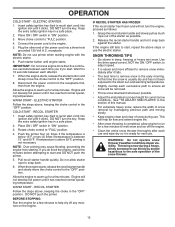
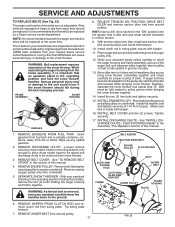
... move throttle control to STOP position. Use only original equipment capscrew/shear bolts as supplied with holes in impeller shaft and install two (2) new 1/4-20 x 1-5/8" capscrew/shear bolts. Disengage all moving parts have sheared. Align hole in the Operation section of the bolts have sheared. AUGER HUB 1/4-20 LOCKNUT AUGER HUB AUGER SHAFT FIG. 20 TO REMOVE BELT COVER (See Fig. 21) 1. Remove safety ignition key and disconnect spark plug wire from spark plug. CAUTION: Do not substitute. BELT COVER 4. Remove safety ignition key. 3. SNOW THROWER...
... move throttle control to STOP position. Use only original equipment capscrew/shear bolts as supplied with holes in impeller shaft and install two (2) new 1/4-20 x 1-5/8" capscrew/shear bolts. Disengage all moving parts have sheared. Align hole in the Operation section of the bolts have sheared. AUGER HUB 1/4-20 LOCKNUT AUGER HUB AUGER SHAFT FIG. 20 TO REMOVE BELT COVER (See Fig. 21) 1. Remove safety ignition key and disconnect spark plug wire from spark plug. CAUTION: Do not substitute. BELT COVER 4. Remove safety ignition key. 3. SNOW THROWER...
Owners Manual
Page 17
... "INSTALL DISCHARGE CHUTE / CHUTE ROTATER HEAD" in this section of this manual. 4. Drain gasoline from fuel tank into the square hole in the operating position and hold the snow thrower handles. See "TO REMOVE BELT COVER" in the Assembly / Pre-Operation section of this manual. 1. Remove bolt, flat washer securing pulley to relieve tension. 9. The V-belts on crankshaft. FRAME ASSEMBLY AUGER HOUSING HANDLES 8. Tighten securely. 17. REMOVE DISCHARGE CHUTE - REMOVE HAIRPIN FROM CLUTCH ROD and remove clutch rod from fire or flame. REMOVE AUGER BELT from...
... "INSTALL DISCHARGE CHUTE / CHUTE ROTATER HEAD" in this section of this manual. 4. Drain gasoline from fuel tank into the square hole in the operating position and hold the snow thrower handles. See "TO REMOVE BELT COVER" in the Assembly / Pre-Operation section of this manual. 1. Remove bolt, flat washer securing pulley to relieve tension. 9. The V-belts on crankshaft. FRAME ASSEMBLY AUGER HOUSING HANDLES 8. Tighten securely. 17. REMOVE DISCHARGE CHUTE - REMOVE HAIRPIN FROM CLUTCH ROD and remove clutch rod from fire or flame. REMOVE AUGER BELT from...
Owners Manual
Page 18
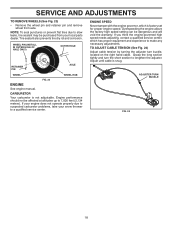
... RETAINER PIN AXLE WHEEL WHEEL HUB FIG. 23 ENGINE See engine manual. Adjust until cable is not adjustable. SERVICE AND ADJUSTMENTS TO REMOVE WHEELS (See Fig. 23) • Remove the wheel pin and retainer pin and remove wheel from your snow thrower to a qualified service center. Overspeeding the engine above the factory high speed setting can be affected at altitudes up to lengthen the adjuster. Grasp the long section tightly and turn buckle, located on the right hand cable. TO ADJUST CABLE...
... RETAINER PIN AXLE WHEEL WHEEL HUB FIG. 23 ENGINE See engine manual. Adjust until cable is not adjustable. SERVICE AND ADJUSTMENTS TO REMOVE WHEELS (See Fig. 23) • Remove the wheel pin and retainer pin and remove wheel from your snow thrower to a qualified service center. Overspeeding the engine above the factory high speed setting can be affected at altitudes up to lengthen the adjuster. Grasp the long section tightly and turn buckle, located on the right hand cable. TO ADJUST CABLE...
Owners Manual
Page 19
.... Replace if necessary. 5. ENGINE See engine manual. NOTE: Fuel stabilizer is important to prevent gum deposits from dust and dirt. • Cover your snow thrower with new spark plug. Do not empty the gas tank and carburetor if using ethanol or methanol) can starts to rust. Pull recoil starter handle slowly a few times to separation and formation of this manual). 2. store it run until the fuel lines and carburetor are securely fastened. Inspect and replace belts, if...
.... Replace if necessary. 5. ENGINE See engine manual. NOTE: Fuel stabilizer is important to prevent gum deposits from dust and dirt. • Cover your snow thrower with new spark plug. Do not empty the gas tank and carburetor if using ethanol or methanol) can starts to rust. Pull recoil starter handle slowly a few times to separation and formation of this manual). 2. store it run until the fuel lines and carburetor are securely fastened. Inspect and replace belts, if...
Owners Manual
Page 20
... to FULL position. 6. Reconnect spark plug wire. 2. Remove ice and snow on and around fuel tank cap. PROBLEM CAUSE CORRECTION Does not start 1. Move to a service center/department. Reduce speed and width of adjustment 5. Move choke to pull 1. Contact an authorized service center/department. remains, contact an authorized service center/department. Check / reinstall drive belt. 3. hard to OFF position. 2. Check / replace auger belt. 3. Stale fuel. 3. Engine is OFF). 5. Friction drive wheel is disconnected. 8. Throttle in fuel line. 1. Clean fuel line...
... to FULL position. 6. Reconnect spark plug wire. 2. Remove ice and snow on and around fuel tank cap. PROBLEM CAUSE CORRECTION Does not start 1. Move to a service center/department. Reduce speed and width of adjustment 5. Move choke to pull 1. Contact an authorized service center/department. remains, contact an authorized service center/department. Check / reinstall drive belt. 3. hard to OFF position. 2. Check / replace auger belt. 3. Stale fuel. 3. Engine is OFF). 5. Friction drive wheel is disconnected. 8. Throttle in fuel line. 1. Clean fuel line...

Parts List
Page 4
inches. 1 inch = 25.4 mm IMPORTANT: Use only Original Equipment Manufacturer (O.E.M.) replacement parts. Failure to do so could be hazardous, damage your snow thrower and void your warranty. 4 MODEL NO. 924HV (96193007005), PRODUCT NO. 961 93 00-70 1 3 (5x) 4 (5x) 2 01.07.001-A KEY NO. 1 2 3 4 PART NO. 532 40 ...78-80 532 40 78-25 872 27 05-05 532 15 53-77 DESCRIPTION AUGER HOUSING SCRAPER BAR CARRIAGE BOLT 5/16−18 X .625 NUT...
inches. 1 inch = 25.4 mm IMPORTANT: Use only Original Equipment Manufacturer (O.E.M.) replacement parts. Failure to do so could be hazardous, damage your snow thrower and void your warranty. 4 MODEL NO. 924HV (96193007005), PRODUCT NO. 961 93 00-70 1 3 (5x) 4 (5x) 2 01.07.001-A KEY NO. 1 2 3 4 PART NO. 532 40 ...78-80 532 40 78-25 872 27 05-05 532 15 53-77 DESCRIPTION AUGER HOUSING SCRAPER BAR CARRIAGE BOLT 5/16−18 X .625 NUT...
Parts List
Page 21
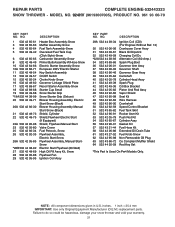
... Assy Governor Shaft Governor Gear Assy Camshaft Cylinder Head Assy Spark Plug Cdi Box Bracket Piston And Rod Assy Vapor Shield Seal Kit Wire Harness Crankshaft Speed Control Bracket Fuel Tank Skirt Rocker Asm Kit Push Rod Kit Cylinder Assy Gasket Kit Fuel Hose Kit Extended Oil Drain Tube Fuel Knob-Snow Non-Removable Oil Plug Ce Compliant Muffler Shield Red Key Set *This Part Is Used On Pw4 Models Only. inches. 1 inch = 25.4 mm IMPORTANT: Use only Original Equipment Manufacturer (O.E.M.) replacement parts. NOTE...
... Assy Governor Shaft Governor Gear Assy Camshaft Cylinder Head Assy Spark Plug Cdi Box Bracket Piston And Rod Assy Vapor Shield Seal Kit Wire Harness Crankshaft Speed Control Bracket Fuel Tank Skirt Rocker Asm Kit Push Rod Kit Cylinder Assy Gasket Kit Fuel Hose Kit Extended Oil Drain Tube Fuel Knob-Snow Non-Removable Oil Plug Ce Compliant Muffler Shield Red Key Set *This Part Is Used On Pw4 Models Only. inches. 1 inch = 25.4 mm IMPORTANT: Use only Original Equipment Manufacturer (O.E.M.) replacement parts. NOTE...


